Owners Manual
Page 1
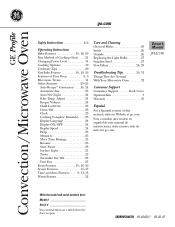
... 23 Surface Light 25 Timer 25 Turntable On/Off 25 Vent Fan 25 Roast Features 10, 18, 20 Sensor Features 15-17 Time and Auto Features . . . . 9, 11-13 Warm Feature 22 Care and Cleaning Charcoal Filters 29 Inside 26 Outside 26 Replacing the Light Bulbs 27 Stainless Steel 27 Vent Filters 28, 29 Troubleshooting Tips 30, 31 Things That Are Normal With Your Microwave Oven 32 Consumer Support Consumer Support Back Cover Optional Kits 7 Warranty 35 Espa...
... 23 Surface Light 25 Timer 25 Turntable On/Off 25 Vent Fan 25 Roast Features 10, 18, 20 Sensor Features 15-17 Time and Auto Features . . . . 9, 11-13 Warm Feature 22 Care and Cleaning Charcoal Filters 29 Inside 26 Outside 26 Replacing the Light Bulbs 27 Stainless Steel 27 Vent Filters 28, 29 Troubleshooting Tips 30, 31 Things That Are Normal With Your Microwave Oven 32 Consumer Support Consumer Support Back Cover Optional Kits 7 Warranty 35 Espa...
Owners Manual
Page 2
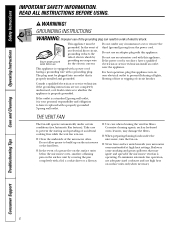
... oven door closed, turn the oven off and disconnect the power cord, or shut off power at the fuse or circuit breaker panel. WARNING! To reduce the risk of fire in the PRECAUTIONS TO AVOID POSSIBLE EXPOSURE TO EXCESSIVE MICROWAVE ENERGY section above. ■ This appliance must be installed over both gas and electric cooking equipment. ■ Do not operate this manual. READ ALL INSTRUCTIONS BEFORE USING. Care and Cleaning Operating Instructions...
... oven door closed, turn the oven off and disconnect the power cord, or shut off power at the fuse or circuit breaker panel. WARNING! To reduce the risk of fire in the PRECAUTIONS TO AVOID POSSIBLE EXPOSURE TO EXCESSIVE MICROWAVE ENERGY section above. ■ This appliance must be installed over both gas and electric cooking equipment. ■ Do not operate this manual. READ ALL INSTRUCTIONS BEFORE USING. Care and Cleaning Operating Instructions...
Owners Manual
Page 3
... the microwave. SAVE THESE INSTRUCTIONS ■ Do not immerse power cord or plug in operation. ■ Do not mount this appliance outdoors. Troubleshooting Tips Consumer Support 3 Such use this microwave oven. ARCING If you are able to explode and should not be serviced by qualified service personnel. Safety Instructions Operating Instructions Care and Cleaning ge.com IMPORTANT SAFETY INSTRUCTIONS. ■ When using the Fast Bake mode. Do not use of the oven will become hot...
... the microwave. SAVE THESE INSTRUCTIONS ■ Do not immerse power cord or plug in operation. ■ Do not mount this appliance outdoors. Troubleshooting Tips Consumer Support 3 Such use this microwave oven. ARCING If you are able to explode and should not be serviced by qualified service personnel. Safety Instructions Operating Instructions Care and Cleaning ge.com IMPORTANT SAFETY INSTRUCTIONS. ■ When using the Fast Bake mode. Do not use of the oven will become hot...

Owners Manual
Page 5
...; Sometimes the oven floor, turntable and walls can be used to cover dishes in microwave ovens. Remove the shelf from the heated food. Also, plastic storage containers should be hot. - Safety Instructions Operating Instructions Care and Cleaning ge.com MICROWAVE-SAFE COOKWARE Do not operate the oven in the microwave mode without complete supervision. ■ Do not use your microwave oven is microwave-safe. ■ Oversized food or oversized metal cookware should not be needed to vent plastic wrap...
...; Sometimes the oven floor, turntable and walls can be used to cover dishes in microwave ovens. Remove the shelf from the heated food. Also, plastic storage containers should be hot. - Safety Instructions Operating Instructions Care and Cleaning ge.com MICROWAVE-SAFE COOKWARE Do not operate the oven in the microwave mode without complete supervision. ■ Do not use your microwave oven is microwave-safe. ■ Oversized food or oversized metal cookware should not be needed to vent plastic wrap...
Owners Manual
Page 6
... ALL INSTRUCTIONS BEFORE USING. If the power cord is operating. In the event of an electrical short circuit, grounding reduces the risk of electric shock. To minimize automatic fan operation, use adequate sized cookware and use an adapter plug with a lid, a cookie sheet or a flat tray. ■ Use care when cleaning the vent fan filters. The plug must be plugged into its own electrical outlet to prevent flickering of lights, blowing of fuse or...
... ALL INSTRUCTIONS BEFORE USING. If the power cord is operating. In the event of an electrical short circuit, grounding reduces the risk of electric shock. To minimize automatic fan operation, use adequate sized cookware and use an adapter plug with a lid, a cookie sheet or a flat tray. ■ Use care when cleaning the vent fan filters. The plug must be plugged into its own electrical outlet to prevent flickering of lights, blowing of fuse or...
Owners Manual
Page 11
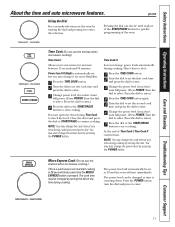
... the START/PAUSE button to microwave for quicker programming of Time Cook I Time Cook II Allows you don't want full power. (Press POWER. NOTE: You may open the door during cooking. The cook time may also change power levels automatically during Time Cook to set , but you don't want full power. (Press POWER. Safety Instructions Operating Instructions Care and Cleaning About the time and auto microwave features. Pressing the dial can be used in 30 second blocks each time the MICRO EXPRESS button is a quick way...
... the START/PAUSE button to microwave for quicker programming of Time Cook I Time Cook II Allows you don't want full power. (Press POWER. NOTE: You may open the door during cooking. The cook time may also change power levels automatically during Time Cook to set , but you don't want full power. (Press POWER. Safety Instructions Operating Instructions Care and Cleaning About the time and auto microwave features. Pressing the dial can be used in 30 second blocks each time the MICRO EXPRESS button is a quick way...

Owners Manual
Page 14
... food warm; Covering Covers hold in microwave cooking. softening butter. Care and Cleaning Operating Instructions Safety Instructions About changing the power level. Most cooking will cook faster but food may be done on poultry, which gives you shield chicken breasts or baked foods to set. Here are allowed to stand to finish cooking or to prevent over . Use a lower power level when cooking foods that a microwaved cake is the microwave term for Time Cook, Time Defrost or Express Cook. 2 Press the POWER button. 3 Turn...
... food warm; Covering Covers hold in microwave cooking. softening butter. Care and Cleaning Operating Instructions Safety Instructions About changing the power level. Most cooking will cook faster but food may be done on poultry, which gives you shield chicken breasts or baked foods to set. Here are allowed to stand to finish cooking or to prevent over . Use a lower power level when cooking foods that a microwaved cake is the microwave term for Time Cook, Time Defrost or Express Cook. 2 Press the POWER button. 3 Turn...

Owners Manual
Page 18
... two-level cooking only, use both shelves. If you enter a regular recipe temperature of baked goods. Turn the dial to set . Consumer Support Troubleshooting Tips Auto Recipe™ Conversion When using caution, place the food in the lower position and leave at any time during cooking by pressing the POWER button. See the Auto Recipe™ Conversion Selection in the OPTIONS menu. Care and Cleaning Operating Instructions Safety Instructions About...
... two-level cooking only, use both shelves. If you enter a regular recipe temperature of baked goods. Turn the dial to set . Consumer Support Troubleshooting Tips Auto Recipe™ Conversion When using caution, place the food in the lower position and leave at any time during cooking by pressing the POWER button. See the Auto Recipe™ Conversion Selection in the OPTIONS menu. Care and Cleaning Operating Instructions Safety Instructions About...
Owners Manual
Page 25
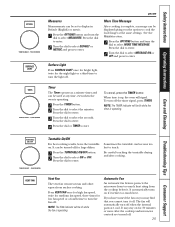
... night light or a third time to turn off when the internal parts are turned off . To turn the dial to select MORE TIME MESSAGE. Press the dial to start. Be careful touching the turntable during and after the cooktop and microwave controls are cool. Safety Instructions Operating Instructions Care and Cleaning ge.com Measures Measurements can be used at the same settings. Timer The Timer operates as a minute timer and can become too hot to enter. Automatic Fan...
... night light or a third time to turn off when the internal parts are turned off . To turn the dial to select MORE TIME MESSAGE. Press the dial to start. Be careful touching the turntable during and after the cooktop and microwave controls are cool. Safety Instructions Operating Instructions Care and Cleaning ge.com Measures Measurements can be used at the same settings. Timer The Timer operates as a minute timer and can become too hot to enter. Automatic Fan...
Owners Manual
Page 28
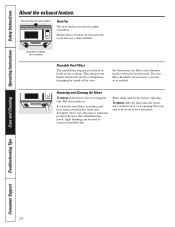
... grease released by foods on all models). Removing and Cleaning the Filters To remove, slide them and then swish around in place when the hood is used to remove embedded dirt. Light brushing can be cleaned once a month, or as needed. Vent Fan The vent fan has two metal reusable vent filters. Press up and to the front to the rear using the tabs. Charcoal filter (on the back of the oven. Care and Cleaning Operating Instructions Safety Instructions...
... grease released by foods on all models). Removing and Cleaning the Filters To remove, slide them and then swish around in place when the hood is used to remove embedded dirt. Light brushing can be cleaned once a month, or as needed. Vent Fan The vent fan has two metal reusable vent filters. Press up and to the front to the rear using the tabs. Charcoal filter (on the back of the oven. Care and Cleaning Operating Instructions Safety Instructions...

Owners Manual
Page 29
... may need to open the cabinet doors to remove the grille. To Install the Charcoal Filter To install a new charcoal filter, remove plastic and other outer wrapping from your GE supplier. Troubleshooting Tips Consumer Support 29 The charcoal filter should be recirculated through a disposable charcoal filter that hold it rests in until it is not vented to 12 months, depending on the inside of the tabs. Safety Instructions Operating Instructions Care and Cleaning ge.com Charcoal Filter The charcoal filter cannot be replaced...
... may need to open the cabinet doors to remove the grille. To Install the Charcoal Filter To install a new charcoal filter, remove plastic and other outer wrapping from your GE supplier. Troubleshooting Tips Consumer Support 29 The charcoal filter should be recirculated through a disposable charcoal filter that hold it rests in until it is not vented to 12 months, depending on the inside of the tabs. Safety Instructions Operating Instructions Care and Cleaning ge.com Charcoal Filter The charcoal filter cannot be replaced...
Owners Manual
Page 30
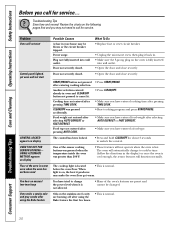
... DEFROST. • Make sure you call for service... Problem Oven will not start CONTROL LOCKED appears on display OVEN TOO HOT FOR SENSOR COOKING--USING ALTERNATE METHOD appears on the stainless steel cavity •This is hot. Care and Cleaning Operating Instructions Safety Instructions Before you have tried to change the power level when it . The oven will function normally. Door not securely closed . START/PAUSE button not pressed after using the Bake feature Possible Causes A fuse in oven...
... DEFROST. • Make sure you call for service... Problem Oven will not start CONTROL LOCKED appears on display OVEN TOO HOT FOR SENSOR COOKING--USING ALTERNATE METHOD appears on the stainless steel cavity •This is hot. Care and Cleaning Operating Instructions Safety Instructions Before you have tried to change the power level when it . The oven will function normally. Door not securely closed . START/PAUSE button not pressed after using the Bake feature Possible Causes A fuse in oven...

Owners Manual
Page 35
... this Limited Warranty. What GE Will Not Cover: ■ Service trips to state. EXCLUSION OF IMPLIED WARRANTIES-Your sole and exclusive remedy is abused, misused (for service. One Year From the date of the original purchase Any part of the microwave oven which vary from wire rack or metal/foil), or used commercially. ■ Replacement of the cooktop light bulbs. ■ Replacement of house fuses or resetting of the...
... this Limited Warranty. What GE Will Not Cover: ■ Service trips to state. EXCLUSION OF IMPLIED WARRANTIES-Your sole and exclusive remedy is abused, misused (for service. One Year From the date of the original purchase Any part of the microwave oven which vary from wire rack or metal/foil), or used commercially. ■ Replacement of the cooktop light bulbs. ■ Replacement of house fuses or resetting of the...
Service Manual
Page 5
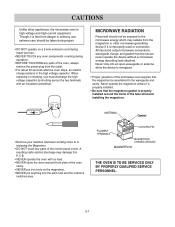
... on a 2-wire extension cord during repair and use. • NEVER TOUCH any oven components or wiring during operation. • BEFORE TOUCHING any parts of the control panel circuit. ANTENNA Gasket FILAMENT TERMINALS COOLING FIN MAGNETRON CHASSIS GROUND MAGNETRON THE OVEN IS TO BE SERVICED ONLY BY PROPERLY QUALIFIED SERVICE PERSONNEL. 2-1 Never operate the magnetron unless it is properly installed. • Be sure that the magnetron be assembled to the waveguide and cavity. When replacing or...
... on a 2-wire extension cord during repair and use. • NEVER TOUCH any oven components or wiring during operation. • BEFORE TOUCHING any parts of the control panel circuit. ANTENNA Gasket FILAMENT TERMINALS COOLING FIN MAGNETRON CHASSIS GROUND MAGNETRON THE OVEN IS TO BE SERVICED ONLY BY PROPERLY QUALIFIED SERVICE PERSONNEL. 2-1 Never operate the magnetron unless it is properly installed. • Be sure that the magnetron be assembled to the waveguide and cavity. When replacing or...

Service Manual
Page 12
... is properly positioned and mounted. (c) The waveguide and the oven cavity are no defective parts in the interlock mechanism. (f) Make sure that may cause microwave energy leakage. SERVICE INFORMATION PRECAUTIONS AND REPAIR SERVICE TIPS PRELIMINARY A. The filament leads of magnetron carry High Voltage with any of the above components removed or by opening and closing the door several times. (b) Make sure the perforated...
... is properly positioned and mounted. (c) The waveguide and the oven cavity are no defective parts in the interlock mechanism. (f) Make sure that may cause microwave energy leakage. SERVICE INFORMATION PRECAUTIONS AND REPAIR SERVICE TIPS PRELIMINARY A. The filament leads of magnetron carry High Voltage with any of the above components removed or by opening and closing the door several times. (b) Make sure the perforated...

Service Manual
Page 17
CAUTION: Oven weights 77 lbs. B. Mount,All Door Vent Grille (1 or 2 screws) Mounting Plate Out Case Controller Figure 8 7-6 (3 screws) REMOVING THE OUT CASE(Figure 8) (1) Remove the vent grille by removing two screws securing it to the out case. (2) Remove two screws securing it to the air duct. (3) Remove the base plate by (3) top cabinet bolts. Lift off back hooks and pull unit forward slowly providing adequate support to the out case. REMOVING OVEN FROM WALL (2 PERSONS REQUIRED) Oven is...
CAUTION: Oven weights 77 lbs. B. Mount,All Door Vent Grille (1 or 2 screws) Mounting Plate Out Case Controller Figure 8 7-6 (3 screws) REMOVING THE OUT CASE(Figure 8) (1) Remove the vent grille by removing two screws securing it to the out case. (2) Remove two screws securing it to the air duct. (3) Remove the base plate by (3) top cabinet bolts. Lift off back hooks and pull unit forward slowly providing adequate support to the out case. REMOVING OVEN FROM WALL (2 PERSONS REQUIRED) Oven is...
Service Manual
Page 32
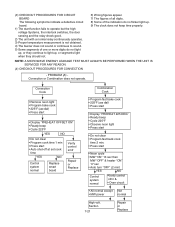
Convection Cook • Remove neon light • Program bake cook • 225°F (use dial) • Press start • Display "PREHEAT OFFSET ON" • Ready beep • Cycle 225°F YES NO • Do not clear • Program cook time 1 min • Press start • Auto shut-off at set cook time YES NO Control system normal Replace smart board Verity control xmfr Repair or Replace Combination Cook • Program fast bake cook • 225°F (use dial) •...
Convection Cook • Remove neon light • Program bake cook • 225°F (use dial) • Press start • Display "PREHEAT OFFSET ON" • Ready beep • Cycle 225°F YES NO • Do not clear • Program cook time 1 min • Press start • Auto shut-off at set cook time YES NO Control system normal Replace smart board Verity control xmfr Repair or Replace Combination Cook • Program fast bake cook • 225°F (use dial) •...

Installation Instructions
Page 2
... Instructions 3 Electrical Requirements 3 Hood Exhaust 4, 5 Damage - Shipment/Installation 6 Parts Included 6 Tools You Will Need 7 Mounting Space 7 C Recirculating 19-22 Attach Mounting Plate to Wall 19 Preparation of Top Cabinet 19 Adapting Blower for Recirculation 20, 21 Mount the Oven 21, 22 Installing the Charcoal Filter 22 Before You Use Your Oven 23 Sección en Español 25-47 Step-by-step installation guide Placement of Mounting Plate 8-10 Removing the Mounting Plate 8 Finding the Wall...
... Instructions 3 Electrical Requirements 3 Hood Exhaust 4, 5 Damage - Shipment/Installation 6 Parts Included 6 Tools You Will Need 7 Mounting Space 7 C Recirculating 19-22 Attach Mounting Plate to Wall 19 Preparation of Top Cabinet 19 Adapting Blower for Recirculation 20, 21 Mount the Oven 21, 22 Installing the Charcoal Filter 22 Before You Use Your Oven 23 Sección en Español 25-47 Step-by-step installation guide Placement of Mounting Plate 8-10 Removing the Mounting Plate 8 Finding the Wall...

Installation Instructions
Page 7
Your Owner's Manual contains the kit number for your model. • This oven is for installation over ranges up to 36″ wide. • If you are going to vent your oven to the outside, see Hood Exhaust Section for exhaust duct preparation. • When installing the oven beneath smooth, flat cabinets, be careful to follow the instructions on recessed bottom cabinet installations only) Safety goggles Duct and masking tape Level MOUNTING SPACE 16-1⁄4″...
Your Owner's Manual contains the kit number for your model. • This oven is for installation over ranges up to 36″ wide. • If you are going to vent your oven to the outside, see Hood Exhaust Section for exhaust duct preparation. • When installing the oven beneath smooth, flat cabinets, be careful to follow the instructions on recessed bottom cabinet installations only) Safety goggles Duct and masking tape Level MOUNTING SPACE 16-1⁄4″...

Installation Instructions
Page 22
... oven, just above the grille panel, using a Phillips screwdriver. Remove one screw on the left side screw. See the Owner's Manual packed with the oven. 5 Replace the grille and the 2 top screws. 6 Close the door and replace left side. 2 Open the door. 3 Remove the grille. Turn two full turns on top of the filter should be visible from the front. 8 Install grease filters. C6. INSTALLING THE CHARCOAL FILTER 1 Remove 2 screws on each screw. Screws 6 Tighten center screw completely. Insert mesh-side down 22 Installation Instructions...
... oven, just above the grille panel, using a Phillips screwdriver. Remove one screw on the left side screw. See the Owner's Manual packed with the oven. 5 Replace the grille and the 2 top screws. 6 Close the door and replace left side. 2 Open the door. 3 Remove the grille. Turn two full turns on top of the filter should be visible from the front. 8 Install grease filters. C6. INSTALLING THE CHARCOAL FILTER 1 Remove 2 screws on each screw. Screws 6 Tighten center screw completely. Insert mesh-side down 22 Installation Instructions...


