
Use and Care Manual
Page 1
Models: JVM1750 HVM1750 EVM1750 Spacemaker Microwave Oven Owner's Manual Important Safety Instructions 2 Precautions to Avoid Possible Exposure to Excessive Microwave Energy 2 Special Notes About Microwaving 5 Operating ... Information 35 Microwave Terms 35 Care and Cleaning 36 If Something Goes Wrong 41 Before You Call For Service 41 GE Service Numbers 46 Warranty Back Cover Write the model and serial numbers here: Model Serial Find these numbers on a label inside the oven. GEAppliances.com DE68-03699A 49-40612 07-09 JR
Models: JVM1750 HVM1750 EVM1750 Spacemaker Microwave Oven Owner's Manual Important Safety Instructions 2 Precautions to Avoid Possible Exposure to Excessive Microwave Energy 2 Special Notes About Microwaving 5 Operating ... Information 35 Microwave Terms 35 Care and Cleaning 36 If Something Goes Wrong 41 Before You Call For Service 41 GE Service Numbers 46 Warranty Back Cover Write the model and serial numbers here: Model Serial Find these numbers on a label inside the oven. GEAppliances.com DE68-03699A 49-40612 07-09 JR
Use and Care Manual
Page 10
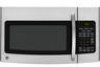
The turntable may vary from your model.) Features 3 4 2 1 7 896 5 7 1 Door Handle. Lets you microwave several foods at once. You must be in the oven. 4 Shelf. Operating Instructions Features of the microwave oven. ...
The turntable may vary from your model.) Features 3 4 2 1 7 896 5 7 1 Door Handle. Lets you microwave several foods at once. You must be in the oven. 4 Shelf. Operating Instructions Features of the microwave oven. ...

Use and Care Manual
Page 11
Starts immediately! Starts immediately! Enter Food weight 11 Quick Start The Controls on Your Microwave Oven (Throughout this manual, features and appearance may vary from your model.) You can microwave by time, temperature, preset time and power level or with the convenience features. 1 Time Features Time Cooking Press TIME COOK I & II (Press once or twice) DEFROST AUTO/TIME (Press twice) EXPRESS COOK POWER LEVEL ADD 30 SEC Defrosting by Weight Press DEFROST AUTO/TIME (Press once) 1 Enter Amount of defrosting time. Power level 1-10. Amount of cooking time.
Starts immediately! Starts immediately! Enter Food weight 11 Quick Start The Controls on Your Microwave Oven (Throughout this manual, features and appearance may vary from your model.) You can microwave by time, temperature, preset time and power level or with the convenience features. 1 Time Features Time Cooking Press TIME COOK I & II (Press once or twice) DEFROST AUTO/TIME (Press twice) EXPRESS COOK POWER LEVEL ADD 30 SEC Defrosting by Weight Press DEFROST AUTO/TIME (Press once) 1 Enter Amount of defrosting time. Power level 1-10. Amount of cooking time.

Use and Care Manual
Page 12
...Press 5 for Frozen Vegetables Press 6 for usage instructions and tips. GUIDE ON MICROWAVE Before you begin, check the guide located on some models) Press once (fresh vegetables) Press twice (frozen vegetables) Press three times (canned vegetables) Enter Starts immediately! Quick Start The Controls on ...Your Microwave Oven (Throughout this manual, features and appearance may vary from your model.) HELP Press this pad and any feature pad for Canned Vegetables 12 Food type 1-6 Starts immediately! Starts immediately! COOK (on ...
...Press 5 for Frozen Vegetables Press 6 for usage instructions and tips. GUIDE ON MICROWAVE Before you begin, check the guide located on some models) Press once (fresh vegetables) Press twice (frozen vegetables) Press three times (canned vegetables) Enter Starts immediately! Quick Start The Controls on ...Your Microwave Oven (Throughout this manual, features and appearance may vary from your model.) HELP Press this pad and any feature pad for Canned Vegetables 12 Food type 1-6 Starts immediately! Starts immediately! COOK (on ...
Use and Care Manual
Page 20
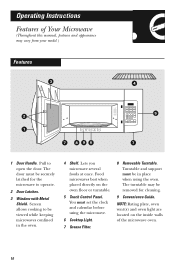
Operating Instructions Convenience Features Snacks (on some models) The Snacks feature automatically sets the microwaving times and power levels to display the snack type and remaining microwaving time. Hint: You can press and ...
Operating Instructions Convenience Features Snacks (on some models) The Snacks feature automatically sets the microwaving times and power levels to display the snack type and remaining microwaving time. Hint: You can press and ...
Use and Care Manual
Page 25
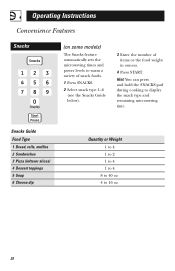
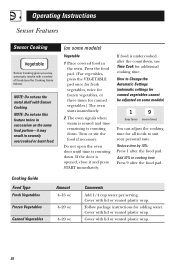
... plastic wrap. Turn or stir the food if necessary. How to Change the Automatic Settings (automatic settings for canned vegetables cannot be adjusted on some models) (less time) (more time) You can adjust the cooking time for adding water. Chicken 2. Canned Vegetables Amount 2-8 pieces 4-16 oz. 1/2 - 2 lbs. 4-16 oz. 4-20 oz... foods to cooking time: Press 9 after the food pad. If food is opened, close it may result in severely overcooked or burnt food. (on some models) Sensor Cooking gives you easy, automatic results with Sensor Cooking.
... plastic wrap. Turn or stir the food if necessary. How to Change the Automatic Settings (automatic settings for canned vegetables cannot be adjusted on some models) (less time) (more time) You can adjust the cooking time for adding water. Chicken 2. Canned Vegetables Amount 2-8 pieces 4-16 oz. 1/2 - 2 lbs. 4-16 oz. 4-20 oz... foods to cooking time: Press 9 after the food pad. If food is opened, close it may result in severely overcooked or burnt food. (on some models) Sensor Cooking gives you easy, automatic results with Sensor Cooking.
Use and Care Manual
Page 26
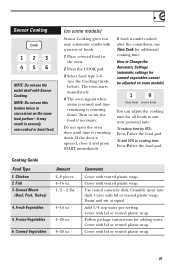
NOTE: Do not use this feature twice in succession on some models) Vegetable 1 Place covered food in the oven. Do not open the oven door until time is counting down . Cover with lid or vented plastic wrap. ... times for all foods to suit your personal taste. If food is opened, close it may result in severely overcooked or burnt food. (on some models) (less time) (more time) You can adjust the cooking time for canned vegetables.) The oven starts immediately. 2 The oven signals when steam is sensed and...
NOTE: Do not use this feature twice in succession on some models) Vegetable 1 Place covered food in the oven. Do not open the oven door until time is counting down . Cover with lid or vented plastic wrap. ... times for all foods to suit your personal taste. If food is opened, close it may result in severely overcooked or burnt food. (on some models) (less time) (more time) You can adjust the cooking time for canned vegetables.) The oven starts immediately. 2 The oven signals when steam is sensed and...

Use and Care Manual
Page 27
... place potato in the oven. 2 Press POTATO. Do not open the oven door until time is opened, close it may result in succession on some models) 1 Pierce potato skin with Sensor Cooking. If the door is counting down . Turn or stir the food if necessary. The oven starts immediately. 3 The oven...
... place potato in the oven. 2 Press POTATO. Do not open the oven door until time is opened, close it may result in succession on some models) 1 Pierce potato skin with Sensor Cooking. If the door is counting down . Turn or stir the food if necessary. The oven starts immediately. 3 The oven...
Use and Care Manual
Page 28
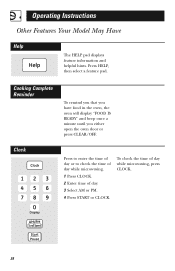
Operating Instructions Other Features Your Model May Have Help The HELP pad displays feature information and helpful hints. To check the time of day. 3 Select AM or PM. 4 Press START or CLOCK. Press HELP, then select a feature pad. Clock Press to enter the time of day or to check the time of day while microwaving. 1 Press CLOCK. 2 Enter time of day while microwaving, press CLOCK. 28 Cooking Complete Reminder To remind you that you have food in the oven, the oven will display "FOOD IS READY" and beep once a minute until you either open the oven door or press CLEAR/OFF.
Operating Instructions Other Features Your Model May Have Help The HELP pad displays feature information and helpful hints. To check the time of day. 3 Select AM or PM. 4 Press START or CLOCK. Press HELP, then select a feature pad. Clock Press to enter the time of day or to check the time of day while microwaving. 1 Press CLOCK. 2 Enter time of day while microwaving, press CLOCK. 28 Cooking Complete Reminder To remind you that you have food in the oven, the oven will display "FOOD IS READY" and beep once a minute until you either open the oven door or press CLEAR/OFF.
Use and Care Manual
Page 30
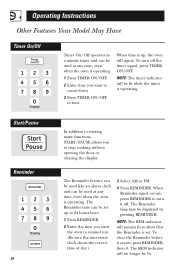
... oven is set up , the oven will no longer be displayed by pressing REMINDER. The Reminder time can be set . Operating Instructions Other Features Your Model May Have Timer On/Off Timer On/Off operates as a minute timer and can be used at any time, even when the oven is operating...
... oven is set up , the oven will no longer be displayed by pressing REMINDER. The Reminder time can be set . Operating Instructions Other Features Your Model May Have Timer On/Off Timer On/Off operates as a minute timer and can be used at any time, even when the oven is operating...

Use and Care Manual
Page 32
... Have Surface Light Press to turn the surface light on . On some models, there is set. You can set the night light to turn on and off automatically at any time you want. 1 Press AUTO NITE LIGHT. 2 Enter ...
... Have Surface Light Press to turn the surface light on . On some models, there is set. You can set the night light to turn on and off automatically at any time you want. 1 Press AUTO NITE LIGHT. 2 Enter ...
Use and Care Manual
Page 34
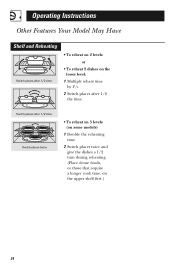
Operating Instructions Other Features Your Model May Have Shelf and Reheating Switch places after 1/2 time. • To reheat on 2 levels or • To reheat 2 dishes on the upper shelf first.) 34 Switch places twice • To reheat on 3 levels (on some models) 1 Double the reheating time. 2 Switch places twice and give the dishes a 1/2 turn during reheating. (Place dense foods, or those that require a longer cook time, on the lower level: 1 Multiply reheat time by 11/2. 2 Switch places after 1/2 time. Switch places after 1/2 the time.
Operating Instructions Other Features Your Model May Have Shelf and Reheating Switch places after 1/2 time. • To reheat on 2 levels or • To reheat 2 dishes on the upper shelf first.) 34 Switch places twice • To reheat on 3 levels (on some models) 1 Double the reheating time. 2 Switch places twice and give the dishes a 1/2 turn during reheating. (Place dense foods, or those that require a longer cook time, on the lower level: 1 Multiply reheat time by 11/2. 2 Switch places after 1/2 time. Switch places after 1/2 the time.

Use and Care Manual
Page 37
... detergents applied with a damp cloth. Use a solution of panel you choose to a clean cloth, then wipe the soiled area. Case Clean the outside of the model number. Do not use a common household cleaner, first apply the cleaner directly to use appliance wax, polish, bleach or products containing any chemical agent on...
... detergents applied with a damp cloth. Use a solution of panel you choose to a clean cloth, then wipe the soiled area. Case Clean the outside of the model number. Do not use a common household cleaner, first apply the cleaner directly to use appliance wax, polish, bleach or products containing any chemical agent on...
Use and Care Manual
Page 39
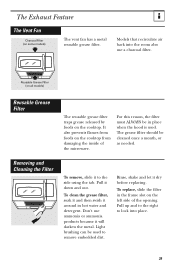
..., soak it and then swish it will darken the metal. Light brushing can be cleaned once a month, or as needed. Reusable Grease Filter (on all models) Reusable Grease Filter The reusable grease filter traps grease released by foods on some...
..., soak it and then swish it will darken the metal. Light brushing can be cleaned once a month, or as needed. Reusable Grease Filter (on all models) Reusable Grease Filter The reusable grease filter traps grease released by foods on some...

Use and Care Manual
Page 40
... grille and 3 screws. Remove the grille by opening of the locking tabs. To Install Charcoal Filter 40 If the model is noticeably dirty or discolored (usually after 6-12 months, depending on hood usage). The charcoal filter should be recirculated...the main fuse or circuit breaker panel or pull the plug. Helpful Information The Exhaust Feature Charcoal Filter (on some models) The charcoal filter cannot be replaced. It must be cleaned. Order Part No. WB06X10823 from the new filter. ... To install a new filter, remove plastic and other outer wrapping from your GE supplier.
... grille and 3 screws. Remove the grille by opening of the locking tabs. To Install Charcoal Filter 40 If the model is noticeably dirty or discolored (usually after 6-12 months, depending on hood usage). The charcoal filter should be recirculated...the main fuse or circuit breaker panel or pull the plug. Helpful Information The Exhaust Feature Charcoal Filter (on some models) The charcoal filter cannot be replaced. It must be cleaned. Order Part No. WB06X10823 from the new filter. ... To install a new filter, remove plastic and other outer wrapping from your GE supplier.

Use and Care Manual
Page 48
...If the product is not available, you may be responsible for a trip charge or you may not apply to you have serial and model numbers available when calling for providing adequate electrical, exhausting and other than the intended purpose or used for other connecting facilities. • Product...purchased for example, cavity arcing from date of incidental or consequential damages, so the above limitation or exclusion may be provided by our Factory GE will provide, free of God. • Incidental or consequential damage caused by accident, fire, floods or acts of charge, all labor...
...If the product is not available, you may be responsible for a trip charge or you may not apply to you have serial and model numbers available when calling for providing adequate electrical, exhausting and other than the intended purpose or used for other connecting facilities. • Product...purchased for example, cavity arcing from date of incidental or consequential damages, so the above limitation or exclusion may be provided by our Factory GE will provide, free of God. • Incidental or consequential damage caused by accident, fire, floods or acts of charge, all labor...
Installation Instructions
Page 7
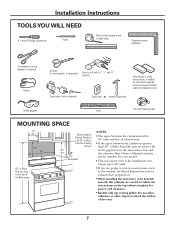
...When installing the microwave oven beneath smooth, flat cabinets, be careful to follow the instructions on the top cabinet template for power cord clearance. • Models with 3⁄16″, 1⁄2″ and 5⁄8″ drill bits Filler blocks or scrap wood pieces, if needed for top cabinet spacing (...straight edge Carpenter square (optional) Tin snips (for installation over ranges up to 36″ wide. • If you are going to vent your model. • This microwave oven is greater than 30″, a Filler Panel Kit may be 30″ or More from the Floor to the Top...
...When installing the microwave oven beneath smooth, flat cabinets, be careful to follow the instructions on the top cabinet template for power cord clearance. • Models with 3⁄16″, 1⁄2″ and 5⁄8″ drill bits Filler blocks or scrap wood pieces, if needed for top cabinet spacing (...straight edge Carpenter square (optional) Tin snips (for installation over ranges up to 36″ wide. • If you are going to vent your model. • This microwave oven is greater than 30″, a Filler Panel Kit may be 30″ or More from the Floor to the Top...
Installation Instructions
Page 11
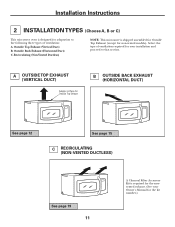
... (HORIZONTAL DUCT) See page 12 See page 15 C RECIRCULATING (NON-VENTED DUCTLESS) See page 19 11 A Charcoal Filter Accessory Kit is designed for non-vented models). Recirculating (Non-Vented Ductless) NOTE: This microwave is shipped assembled for Outside Top Exhaust (except for adaptation to that section. Outside Top Exhaust (Vertical Duct...
... (HORIZONTAL DUCT) See page 12 See page 15 C RECIRCULATING (NON-VENTED DUCTLESS) See page 19 11 A Charcoal Filter Accessory Kit is designed for non-vented models). Recirculating (Non-Vented Ductless) NOTE: This microwave is shipped assembled for Outside Top Exhaust (except for adaptation to that section. Outside Top Exhaust (Vertical Duct...


