Quick Specs
Page 3
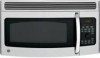
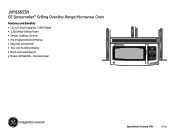
... Defrost Soften Melt Power Level Add 30 Seconds Turn Table Vent Help Light Options Timer Start Pause Clear Off Clock Specification Created 7/08 340131 JVM1665SN GE Spacemaker® Grilling Over-the-Range Microwave Oven Features and Benefits • 1.6 cu ft Oven Capacity / 1000 Watts • 1,200 Watt Grilling Power • Sensor...
... Defrost Soften Melt Power Level Add 30 Seconds Turn Table Vent Help Light Options Timer Start Pause Clear Off Clock Specification Created 7/08 340131 JVM1665SN GE Spacemaker® Grilling Over-the-Range Microwave Oven Features and Benefits • 1.6 cu ft Oven Capacity / 1000 Watts • 1,200 Watt Grilling Power • Sensor...
Use and Care Manual
Page 1
MFL51203001 49-40583-1 08-08 JR Griller/Microwave Oven ge.com Safety Instructions 2-7 Operating Instructions Best Method of Cooking Chart 21 Changing Power Level 14 Cooking Options 10 Cookware Tips 20 Features of Your Oven 8, 9 ... With Your Microwave Oven 32 Consumer Support Consumer Support Back Cover Optional Kits 7 Product Registration 33, 34 Warranty 35 Owner's Manual JVM1665 DVM1665 Write the model and serial numbers here: Model Serial You can find them on a label when the door is open.
MFL51203001 49-40583-1 08-08 JR Griller/Microwave Oven ge.com Safety Instructions 2-7 Operating Instructions Best Method of Cooking Chart 21 Changing Power Level 14 Cooking Options 10 Cookware Tips 20 Features of Your Oven 8, 9 ... With Your Microwave Oven 32 Consumer Support Consumer Support Back Cover Optional Kits 7 Product Registration 33, 34 Warranty 35 Owner's Manual JVM1665 DVM1665 Write the model and serial numbers here: Model Serial You can find them on a label when the door is open.
Use and Care Manual
Page 8
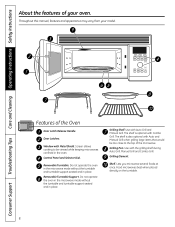
Features of your model. Screen allows cooking to the top of the microwave. Removable Turntable Support. The shelf is also optional with Auto and Manual Grill when grilling large ...
Features of your model. Screen allows cooking to the top of the microwave. Removable Turntable Support. The shelf is also optional with Auto and Manual Grill when grilling large ...
Use and Care Manual
Page 13
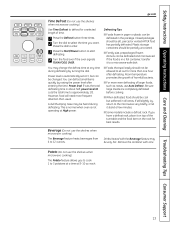
... to the microwave very briefly, or let it on the rack for more frequent attention than one hour after entering the time. s Some models include a defrost rack. Remove the container with the Beverage feature may change the defrost time at 3, but can be slit, pierced or vented... AFTER food has partially defrosted. Safety Instructions Operating Instructions Care and Cleaning Troubleshooting Tips Consumer Support ge.com Time Defrost (Do not use the shelves when microwave cooking.) Use Time Defrost to defrost for a selected length of larger foods, ...
... to the microwave very briefly, or let it on the rack for more frequent attention than one hour after entering the time. s Some models include a defrost rack. Remove the container with the Beverage feature may change the defrost time at 3, but can be slit, pierced or vented... AFTER food has partially defrosted. Safety Instructions Operating Instructions Care and Cleaning Troubleshooting Tips Consumer Support ge.com Time Defrost (Do not use the shelves when microwave cooking.) Use Time Defrost to defrost for a selected length of larger foods, ...
Use and Care Manual
Page 26
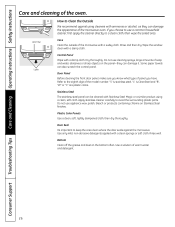
... stainless steel, "L" is CleanSteel and "B", "W" or "C" are plastic colors. Plastic Color Panels Use a clean, soft, lightly dampened cloth, then dry thoroughly. Use a solution of the model number. Rinse and then dry. Consumer Support Troubleshooting Tips Care and Cleaning Operating Instructions Safety Instructions Care and cleaning of the microwave oven. Wipe the...
... stainless steel, "L" is CleanSteel and "B", "W" or "C" are plastic colors. Plastic Color Panels Use a clean, soft, lightly dampened cloth, then dry thoroughly. Use a solution of the model number. Rinse and then dry. Consumer Support Troubleshooting Tips Care and Cleaning Operating Instructions Safety Instructions Care and cleaning of the microwave oven. Wipe the...

Use and Care Manual
Page 28
...Pull down and out. Rinse, shake and let dry before replacing. Reusable Vent Filter The metal filter traps grease released by foods on all models). Reusable vent filters (on the cooktop. It also prevents flames from damaging the inside of the opening. Brush lightly to the rear using ...the tabs. Vent The vent has a reusable metal vent filter. Models that recirculate air back into place. 28 Removing and Cleaning the Filter To remove, slide the filter to remove embedded dirt. Don't use a...
...Pull down and out. Rinse, shake and let dry before replacing. Reusable Vent Filter The metal filter traps grease released by foods on all models). Reusable vent filters (on the cooktop. It also prevents flames from damaging the inside of the opening. Brush lightly to the rear using ...the tabs. Vent The vent has a reusable metal vent filter. Models that recirculate air back into place. 28 Removing and Cleaning the Filter To remove, slide the filter to remove embedded dirt. Don't use a...

Use and Care Manual
Page 29
... charcoal filter cannot be replaced. JX81A from the new filter. If the model is noticeably dirty or discolored (usually after 6 to 12 months, depending on... the plug. Push the bottom of the filter in until it in place behind the tabs. 29 ge.com The charcoal filter should be recirculated through a disposable charcoal filter that hold it comes free of ... Install the Charcoal Filter To install a new charcoal filter, remove plastic and other outer wrapping from your GE supplier. It must be cleaned. To Remove the Charcoal Filter To remove the charcoal filter, first disconnect ...
... charcoal filter cannot be replaced. JX81A from the new filter. If the model is noticeably dirty or discolored (usually after 6 to 12 months, depending on... the plug. Push the bottom of the filter in until it in place behind the tabs. 29 ge.com The charcoal filter should be recirculated through a disposable charcoal filter that hold it comes free of ... Install the Charcoal Filter To install a new charcoal filter, remove plastic and other outer wrapping from your GE supplier. It must be cleaned. To Remove the Charcoal Filter To remove the charcoal filter, first disconnect ...
Use and Care Manual
Page 34
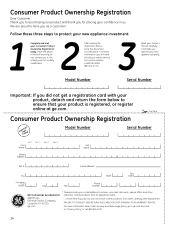
We are proud to have you do not want to receive communications from GE Appliances (GEA). s Check here if you as a customer! Model Number Serial Number Important: If you operate your new appliance properly. It will need should you require service. Consumer ...carefully selected partners. Follow these three steps to ensure that your product is 800.GE.CARES (800.432.2737). 3 Read your Consumer Product Ownership Registration today. Our service number is registered, or register online at ge.com. Model Number Serial Number First Name Mr. s Ms. s Mrs. s Miss s ...
We are proud to have you do not want to receive communications from GE Appliances (GEA). s Check here if you as a customer! Model Number Serial Number Important: If you operate your new appliance properly. It will need should you require service. Consumer ...carefully selected partners. Follow these three steps to ensure that your product is 800.GE.CARES (800.432.2737). 3 Read your Consumer Product Ownership Registration today. Our service number is registered, or register online at ge.com. Model Number Serial Number First Name Mr. s Ms. s Mrs. s Miss s ...
Use and Care Manual
Page 35
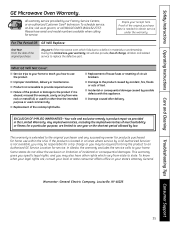
... or you may also have serial and model numbers available when calling for a particular purpose, are , consult your local or state consumer affairs office or your home to the product caused by law. To know what your legal rights are limited to one -year warranty, GE will also provide, free of charge...
... or you may also have serial and model numbers available when calling for a particular purpose, are , consult your local or state consumer affairs office or your home to the product caused by law. To know what your legal rights are limited to one -year warranty, GE will also provide, free of charge...
Installation Instructions
Page 1
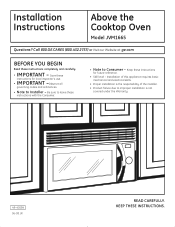
... (800.432.2737) or Visit our Website at: ge.com BEFORE YOU BEGIN Read these instructions with the Consumer. • Note to Installer - Installation of this appliance requires basic mechanical and electrical skills. • ... is the responsibility of the installer. • Product failure due to leave these instructions completely and carefully. • IMPORTANT - Installation Instructions Above the Cooktop Oven Model JVM1665 Questions?
... (800.432.2737) or Visit our Website at: ge.com BEFORE YOU BEGIN Read these instructions with the Consumer. • Note to Installer - Installation of this appliance requires basic mechanical and electrical skills. • ... is the responsibility of the installer. • Product failure due to leave these instructions completely and carefully. • IMPORTANT - Installation Instructions Above the Cooktop Oven Model JVM1665 Questions?
Installation Instructions
Page 7
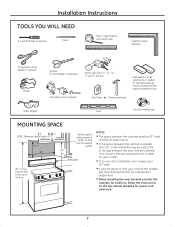
... finder or Hammer (optional) Filler blocks or scrap wood pieces, if needed for power cord clearance. 7 Your Owner's Manual contains the kit number for your model. • This oven is for installation over ranges up to 36″ wide. • If you are going to vent your oven to the outside...
... finder or Hammer (optional) Filler blocks or scrap wood pieces, if needed for power cord clearance. 7 Your Owner's Manual contains the kit number for your model. • This oven is for installation over ranges up to 36″ wide. • If you are going to vent your oven to the outside...
Installation Instructions
Page 10
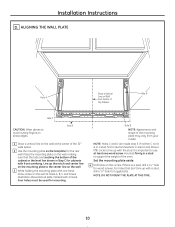
... touching the bottom of the mounting plate may vary from Center of the oven. Set the mounting plate aside. 4 Drill holes on Wall from your model. For holes that the tabs are inside area E. Place the mounting plate on sharp edges. If neither C nor D is a stud, drill a 3⁄16″ hole...
... touching the bottom of the mounting plate may vary from Center of the oven. Set the mounting plate aside. 4 Drill holes on Wall from your model. For holes that the tabs are inside area E. Place the mounting plate on sharp edges. If neither C nor D is a stud, drill a 3⁄16″ hole...
Installation Instructions
Page 11
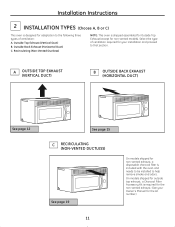
... TOP EXHAUST (VERTICAL DUCT) B OUTSIDE BACK EXHAUST (HORIZONTAL DUCT) See page 12 See page 15 C RECIRCULATING (NON-VENTED DUCTLESS) See page 19 11 On models shipped for non-vented exhaust, a disposable charcoal filter is shipped assembled for Outside Top Exhaust (except for non-vented... models). Installation Instructions 2 INSTALLATION TYPES (Choose A, B or C) This oven is designed for adaptation to the following three types of ventilation required for your Owner's...
... TOP EXHAUST (VERTICAL DUCT) B OUTSIDE BACK EXHAUST (HORIZONTAL DUCT) See page 12 See page 15 C RECIRCULATING (NON-VENTED DUCTLESS) See page 19 11 On models shipped for non-vented exhaust, a disposable charcoal filter is shipped assembled for Outside Top Exhaust (except for non-vented... models). Installation Instructions 2 INSTALLATION TYPES (Choose A, B or C) This oven is designed for adaptation to the following three types of ventilation required for your Owner's...
Installation Instructions
Page 13
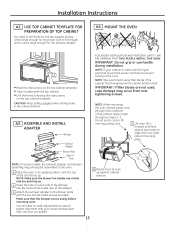
... enough for the exhaust adapter. A4. NOTE: We recommend using filler blocks if the cabinet front hangs below the cabinet bottom shelf. NOTE: On some models, the exhaust adapter and damper assembly may occur from over tightening screws. A3. You will need to drill holes for the top support screws, a hole...
... enough for the exhaust adapter. A4. NOTE: We recommend using filler blocks if the cabinet front hangs below the cabinet bottom shelf. NOTE: On some models, the exhaust adapter and damper assembly may occur from over tightening screws. A3. You will need to drill holes for the top support screws, a hole...
Installation Instructions
Page 20
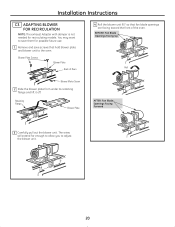
... the oven. ADAPTING BLOWER FOR RECIRCULATION NOTE: The exhaust Adapter with damper is not needed for possible future use. 1 Remove and save them for recirculating models. Retaining Flange Blower Plate AFTER: Fan Blade Openings Facing Forward 3 Carefully pull out the blower unit.
... the oven. ADAPTING BLOWER FOR RECIRCULATION NOTE: The exhaust Adapter with damper is not needed for possible future use. 1 Remove and save them for recirculating models. Retaining Flange Blower Plate AFTER: Fan Blade Openings Facing Forward 3 Carefully pull out the blower unit.


