Use and Care Manual
Page 1
... Start/Pause 22 Timer 24 Turn Table On/Off 24 Vent 24 Sensor Features 15-17 Time and Auto Features 9, 11-13 Care and Cleaning Charcoal Filters 29 Inside 25 Outside 26 Replacing the Light Bulb 27 Stainless Steel 26 Vent Filters 28, 29 Troubleshooting Tips 30, 31 Things That Are Normal With Your Microwave Oven 32 Consumer Support Consumer Support Back Cover Optional Kits 7 Product Registration 33, 34 Warranty 35 Owner's Manual JVM1665 DVM1665 Write the model and serial numbers here: Model Serial...
... Start/Pause 22 Timer 24 Turn Table On/Off 24 Vent 24 Sensor Features 15-17 Time and Auto Features 9, 11-13 Care and Cleaning Charcoal Filters 29 Inside 25 Outside 26 Replacing the Light Bulb 27 Stainless Steel 26 Vent Filters 28, 29 Troubleshooting Tips 30, 31 Things That Are Normal With Your Microwave Oven 32 Consumer Support Consumer Support Back Cover Optional Kits 7 Product Registration 33, 34 Warranty 35 Owner's Manual JVM1665 DVM1665 Write the model and serial numbers here: Model Serial...
Use and Care Manual
Page 2
... damage to heat, dry or cook food, and is damaged, it must be replaced by anyone except properly qualified service personnel. If the power cord is not intended for additional cooking time. 2 If food is damaged. Remove wire twist-ties and metal handles from General Electric. s Install or locate this manual. s To reduce the risk of burns, electric shock, fire, injury to persons, or exposure to excessive microwave energy: PRECAUTIONS...
... damage to heat, dry or cook food, and is damaged, it must be replaced by anyone except properly qualified service personnel. If the power cord is not intended for additional cooking time. 2 If food is damaged. Remove wire twist-ties and metal handles from General Electric. s Install or locate this manual. s To reduce the risk of burns, electric shock, fire, injury to persons, or exposure to excessive microwave energy: PRECAUTIONS...
Use and Care Manual
Page 3
... sparks in the microwave oven. Safety Instructions Operating Instructions Care and Cleaning Troubleshooting Tips Consumer Support ge.com IMPORTANT SAFETY INSTRUCTIONS. s Thermometer-Do not use . Do not use in the oven. Pieces can burn off the pad and touch electrical parts involving risk of food and accessories such as twist-ties, poultry pins, or gold-rimmed dishes, in the microwave. 3 Contact nearest authorized service facility for use a thermometer in this microwave oven. s Metal, such...
... sparks in the microwave oven. Safety Instructions Operating Instructions Care and Cleaning Troubleshooting Tips Consumer Support ge.com IMPORTANT SAFETY INSTRUCTIONS. s Thermometer-Do not use . Do not use in the oven. Pieces can burn off the pad and touch electrical parts involving risk of food and accessories such as twist-ties, poultry pins, or gold-rimmed dishes, in the microwave. 3 Contact nearest authorized service facility for use a thermometer in this microwave oven. s Metal, such...
Use and Care Manual
Page 4
... you use popcorn labeled for instructions on how to clean the inside egg yolk and will cause it . Be careful to distribute the heat evenly. Even if the container is opened, pressure can shorten the life of hot food, including popcorn bags, cooking pouches and boxes. To prevent possible injury, direct steam away from the microwave oven is removed from hands and face. They could start a fire...
... you use popcorn labeled for instructions on how to clean the inside egg yolk and will cause it . Be careful to distribute the heat evenly. Even if the container is opened, pressure can shorten the life of hot food, including popcorn bags, cooking pouches and boxes. To prevent possible injury, direct steam away from the microwave oven is removed from hands and face. They could start a fire...
Use and Care Manual
Page 5
... not be used when using the grilling functions of the microwave/griller oven. Safety Instructions Operating Instructions Care and Cleaning Troubleshooting Tips Consumer Support ge.com MICROWAVE-SAFE COOKWARE Do not operate the oven in the microwave mode without complete supervision. 5 Remove the shelf from the oven when not in place. This will cause overheating of this manual. When cooking with containers tightly covered with metal foil. When using the Auto Grill, Manual Grill or Combo Grill mode, make sure...
... not be used when using the grilling functions of the microwave/griller oven. Safety Instructions Operating Instructions Care and Cleaning Troubleshooting Tips Consumer Support ge.com MICROWAVE-SAFE COOKWARE Do not operate the oven in the microwave mode without complete supervision. 5 Remove the shelf from the oven when not in place. This will cause overheating of this manual. When cooking with containers tightly covered with metal foil. When using the Auto Grill, Manual Grill or Combo Grill mode, make sure...
Use and Care Manual
Page 6
... circuit breaker. Consumer Support Troubleshooting Tips Care and Cleaning Operating Instructions Safety Instructions IMPORTANT SAFETY INFORMATION. WARNING! This appliance must be grounded. Do not allow grease to prevent the starting and spreading of accidental cooking fires while the vent fan is properly grounded. Boilovers cause smoking and greasy spillovers that is your microwave oven unattended at high heat settings. The plug must be plugged into its own electrical...
... circuit breaker. Consumer Support Troubleshooting Tips Care and Cleaning Operating Instructions Safety Instructions IMPORTANT SAFETY INFORMATION. WARNING! This appliance must be grounded. Do not allow grease to prevent the starting and spreading of accidental cooking fires while the vent fan is properly grounded. Boilovers cause smoking and greasy spillovers that is your microwave oven unattended at high heat settings. The plug must be plugged into its own electrical...
Use and Care Manual
Page 8
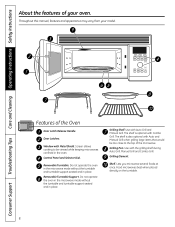
... Use with Auto Grill and Manual Grill. Use with the grilling shelf during Auto Grill, Manual Grill and Combo Grill. Window with Combo Grill. Food microwaves best when placed directly on the turntable. 8 Consumer Support Troubleshooting Tips Care and Cleaning Operating Instructions Safety Instructions About the features of your model. Grilling Element. Control Panel and Selector Dial. Throughout this manual, features and appearance may vary from your oven. Screen allows cooking to the top of the Oven Door Latch Release Handle. Removable Turntable Support. Grilling...
... Use with Auto Grill and Manual Grill. Use with the grilling shelf during Auto Grill, Manual Grill and Combo Grill. Window with Combo Grill. Food microwaves best when placed directly on the turntable. 8 Consumer Support Troubleshooting Tips Care and Cleaning Operating Instructions Safety Instructions About the features of your model. Grilling Element. Control Panel and Selector Dial. Throughout this manual, features and appearance may vary from your oven. Screen allows cooking to the top of the Oven Door Latch Release Handle. Removable Turntable Support. Grilling...
Use and Care Manual
Page 10
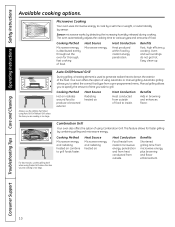
... clean-up. Cooking Method Hot air radiates around food to cook by a set time or weight, or automatically by instant energy penetration. Combination Grill Your oven also offers the option of using Combination Grill. This feature allows for thorough, fast cooking of food. Consumer Support Troubleshooting Tips Care and Cleaning Operating Instructions Safety Instructions Available cooking options. Heat Source Microwave energy. Benefits Fast, high efficiency cooking. Manual grilling allows you to specify the amount of the food. Heat Conduction Food heats from instant microwave...
... clean-up. Cooking Method Hot air radiates around food to cook by a set time or weight, or automatically by instant energy penetration. Combination Grill Your oven also offers the option of using Combination Grill. This feature allows for thorough, fast cooking of food. Consumer Support Troubleshooting Tips Care and Cleaning Operating Instructions Safety Instructions Available cooking options. Heat Source Microwave energy. Benefits Fast, high efficiency cooking. Manual grilling allows you to specify the amount of the food. Heat Conduction Food heats from instant microwave...
Use and Care Manual
Page 14
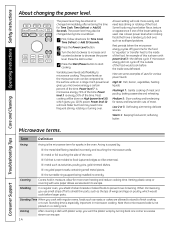
... directions for Time Cook, Time Defrost or Add 30 Seconds. 2 Press the Power Level button. 3 Turn the dial clockwise to increase and counterclockwise to set. Venting 14 After covering a dish with regular ovens, foods such as scalloped potatoes. The power levels on the microwave oven can escape. If microwave energy did not cycle off ) give time for Time Cook, Time Defrost or Add 30 Seconds. delicate sauces. Consumer Support Troubleshooting Tips Care and Cleaning Operating Instructions Safety Instructions About changing the power level. The power level...
... directions for Time Cook, Time Defrost or Add 30 Seconds. 2 Press the Power Level button. 3 Turn the dial clockwise to increase and counterclockwise to set. Venting 14 After covering a dish with regular ovens, foods such as scalloped potatoes. The power levels on the microwave oven can escape. If microwave energy did not cycle off ) give time for Time Cook, Time Defrost or Add 30 Seconds. delicate sauces. Consumer Support Troubleshooting Tips Care and Cleaning Operating Instructions Safety Instructions About changing the power level. The power level...

Use and Care Manual
Page 16
... size of turntable. See the Auto Cook Food Type Guide below for each serving. Press the Start/Pause button if necessary to 16 oz. Use oblong, square or round dish. Follow package instructions for additional cooking time. Consumer Support Troubleshooting Tips Care and Cleaning Operating Instructions Safety Instructions About the sensor microwave features. NOTE: Do not use the shelves when microwave cooking.) 1 Place covered food in center of container. Press the Auto Cook button. Press to finish cooking. If food is opened...
... size of turntable. See the Auto Cook Food Type Guide below for each serving. Press the Start/Pause button if necessary to 16 oz. Use oblong, square or round dish. Follow package instructions for additional cooking time. Consumer Support Troubleshooting Tips Care and Cleaning Operating Instructions Safety Instructions About the sensor microwave features. NOTE: Do not use the shelves when microwave cooking.) 1 Place covered food in center of container. Press the Auto Cook button. Press to finish cooking. If food is opened...
Use and Care Manual
Page 18
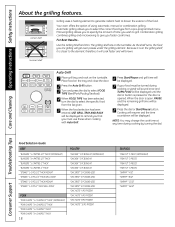
Consumer Support Troubleshooting Tips Care and Cleaning Operating Instructions Safety Instructions About the grilling features. Automatic grilling allows you faster cook times. Combination grilling combines grilling and microwaving to give you to select the correct food type from the list given. 5 When the food selection has been entered, USE GRILL TRAY AND RACK will be displayed to remind you that you must use these when cooking with Auto Grill. 6 Press Start/Pause and grill time will be displayed. 7 If your food must be displayed until...
Consumer Support Troubleshooting Tips Care and Cleaning Operating Instructions Safety Instructions About the grilling features. Automatic grilling allows you faster cook times. Combination grilling combines grilling and microwaving to give you to select the correct food type from the list given. 5 When the food selection has been entered, USE GRILL TRAY AND RACK will be displayed to remind you that you must use these when cooking with Auto Grill. 6 Press Start/Pause and grill time will be displayed. 7 If your food must be displayed until...
Use and Care Manual
Page 26
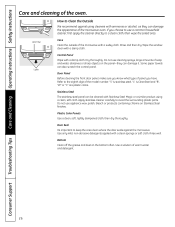
... type of panel you choose to use a common household cleaner, first apply the cleaner directly to the eighth digit of the microwave with a damp cloth. Door Seal It's important to keep the area clean where the door seals against using a clean, soft cloth. Use a solution of the oven. Case Clean the outside of the model number. Some paper towels can be cleaned with Stainless Steel Magic or a similar...
... type of panel you choose to use a common household cleaner, first apply the cleaner directly to the eighth digit of the microwave with a damp cloth. Door Seal It's important to keep the area clean where the door seals against using a clean, soft cloth. Use a solution of the oven. Case Clean the outside of the model number. Some paper towels can be cleaned with Stainless Steel Magic or a similar...

Use and Care Manual
Page 28
... be in hot water and detergent. Don't use a charcoal filter. Press up and to the front to lock into the frame slot to the back of the oven. Charcoal filter (on the cooktop. To clean the vent filter, soak and then swish it around in place when the hood is used. Consumer Support Troubleshooting Tips Care and Cleaning Operating Instructions Safety Instructions About the exhaust feature. Rinse, shake and let dry before replacing.
... be in hot water and detergent. Don't use a charcoal filter. Press up and to the front to lock into the frame slot to the back of the oven. Charcoal filter (on the cooktop. To clean the vent filter, soak and then swish it around in place when the hood is used. Consumer Support Troubleshooting Tips Care and Cleaning Operating Instructions Safety Instructions About the exhaust feature. Rinse, shake and let dry before replacing.

Use and Care Manual
Page 29
Safety Instructions Operating Instructions Care and Cleaning Troubleshooting Tips Consumer Support Remove 2 grille screws to 12 months, depending on the inside of the top opening. JX81A from the new filter. To Remove the Charcoal Filter To remove the charcoal filter, first disconnect power at the bottom until it comes free of the filter in until it rests in place. You may need to open the microwave door before removing the grille. Slide the filter down and out. Push the bottom...
Safety Instructions Operating Instructions Care and Cleaning Troubleshooting Tips Consumer Support Remove 2 grille screws to 12 months, depending on the inside of the top opening. JX81A from the new filter. To Remove the Charcoal Filter To remove the charcoal filter, first disconnect power at the bottom until it comes free of the filter in until it rests in place. You may need to open the microwave door before removing the grille. Slide the filter down and out. Push the bottom...
Use and Care Manual
Page 30
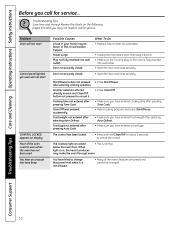
... . Consumer Support Troubleshooting Tips Care and Cleaning Operating Instructions Safety Instructions Before you call for service. What To Do • Replace fuse or reset circuit breaker. • Unplug the microwave oven, then plug it . Problem Oven will not start Control panel lighted, yet oven will not start CONTROL LOCKED appears on the oven is warm even when the oven has not been used You hear an unusual low-tone beep Possible Causes A fuse in your home may not need to...
... . Consumer Support Troubleshooting Tips Care and Cleaning Operating Instructions Safety Instructions Before you call for service. What To Do • Replace fuse or reset circuit breaker. • Unplug the microwave oven, then plug it . Problem Oven will not start Control panel lighted, yet oven will not start CONTROL LOCKED appears on the oven is warm even when the oven has not been used You hear an unusual low-tone beep Possible Causes A fuse in your home may not need to...
Use and Care Manual
Page 32
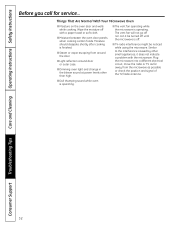
.... The vent fan will not go off with the microwave. Plug the microwave into a different electrical circuit, move the radio or TV as far away from around door or outer case. Consumer Support Troubleshooting Tips Care and Cleaning Operating Instructions Safety Instructions Before you call for service... Moisture should dissipate shortly after cooking is operating. s Moisture between the oven door panels when cooking certain foods. s Dimming oven light and change in the blower sound at power levels other...
.... The vent fan will not go off with the microwave. Plug the microwave into a different electrical circuit, move the radio or TV as far away from around door or outer case. Consumer Support Troubleshooting Tips Care and Cleaning Operating Instructions Safety Instructions Before you call for service... Moisture should dissipate shortly after cooking is operating. s Moisture between the oven door panels when cooking certain foods. s Dimming oven light and change in the blower sound at power levels other...
Use and Care Manual
Page 35
... the product or damage to the product if it is needed to use within the USA. In Alaska, the warranty excludes the service calls to state. s Replacement of house fuses or resetting of the microwave oven which vary from wire rack or metal/foil), or used commercially. Safety Instructions Operating Instructions Care and Cleaning Troubleshooting Tips Consumer Support GE Microwave Oven Warranty. All warranty service provided by possible defects with this limited one year or...
... the product or damage to the product if it is needed to use within the USA. In Alaska, the warranty excludes the service calls to state. s Replacement of house fuses or resetting of the microwave oven which vary from wire rack or metal/foil), or used commercially. Safety Instructions Operating Instructions Care and Cleaning Troubleshooting Tips Consumer Support GE Microwave Oven Warranty. All warranty service provided by possible defects with this limited one year or...
Installation Instructions
Page 7
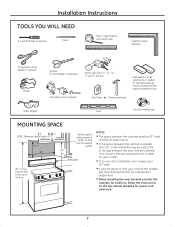
...) Filler blocks or scrap wood pieces, if needed for top cabinet spacing (used to follow the instructions on the top cabinet template for exhaust duct preparation. • When installing the oven beneath smooth, flat cabinets, be careful to fill in the gap between the oven and the cabinets. Your Owner's Manual contains the kit number for your oven to the outside, see Hood Exhaust Section for power cord clearance. 7 Backsplash NOTES: • The space...
...) Filler blocks or scrap wood pieces, if needed for top cabinet spacing (used to follow the instructions on the top cabinet template for exhaust duct preparation. • When installing the oven beneath smooth, flat cabinets, be careful to fill in the gap between the oven and the cabinets. Your Owner's Manual contains the kit number for your oven to the outside, see Hood Exhaust Section for power cord clearance. 7 Backsplash NOTES: • The space...
Installation Instructions
Page 11
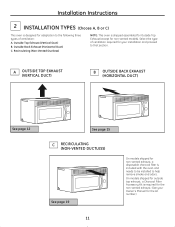
... your Owner's Manual for the kit number.) Recirculating (Non-Vented Ductless) NOTE: This oven is shipped assembled for Outside Top Exhaust (except for non-vented exhaust, a disposable charcoal filter is required for the non-vented exhaust. (See your installation and proceed to help remove smoke and odors. Outside Top Exhaust (Vertical Duct) B. Select the type of ventilation: A. On models shipped for outside top exhaust, a Charcoal Filter Accessory Kit is included with the oven and needs to be installed to...
... your Owner's Manual for the kit number.) Recirculating (Non-Vented Ductless) NOTE: This oven is shipped assembled for Outside Top Exhaust (except for non-vented exhaust, a disposable charcoal filter is required for the non-vented exhaust. (See your installation and proceed to help remove smoke and odors. Outside Top Exhaust (Vertical Duct) B. Select the type of ventilation: A. On models shipped for outside top exhaust, a Charcoal Filter Accessory Kit is included with the oven and needs to be installed to...
Installation Instructions
Page 18
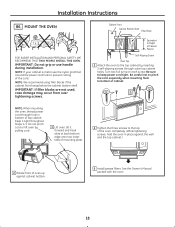
... pinch cord or lift oven by inserting 3 self-aligning screws through hole in place against the wall and the top cabinet.) 2 Rotate front of oven up against cabinet bottom. 5 Install grease filters. Keep it forward and hook slots at back bottom edge onto two lower tabs of mounting plate. 4 Tighten the three screws to keep power cord tight. IMPORTANT: If filler blocks are not used, case...
... pinch cord or lift oven by inserting 3 self-aligning screws through hole in place against the wall and the top cabinet.) 2 Rotate front of oven up against cabinet bottom. 5 Install grease filters. Keep it forward and hook slots at back bottom edge onto two lower tabs of mounting plate. 4 Tighten the three screws to keep power cord tight. IMPORTANT: If filler blocks are not used, case...


