Quick Specs
Page 1
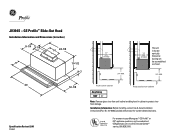
.... Installation Information: Before installing, consult Use & Care/installation instructions [Pub. For answers to protect visor from unit before installing hood in inches) 9-1/4 3-1/4 10 24-1/8 6 10-1/2 1 11" MIN. (inside) 24" MIN. 11" MIN. (inside) This unit is ducted vertically. Horizontal ducting can be accomplished as shown. 24" MIN. 30 Specification Revised 2/06 220902 11" M IN. 12-1/8 11" M IN. Flush bottom cabinet Recessed bottom cabinet Amp Rating 120V 3.7 Note: Remove glass...
.... Installation Information: Before installing, consult Use & Care/installation instructions [Pub. For answers to protect visor from unit before installing hood in inches) 9-1/4 3-1/4 10 24-1/8 6 10-1/2 1 11" MIN. (inside) 24" MIN. 11" MIN. (inside) This unit is ducted vertically. Horizontal ducting can be accomplished as shown. 24" MIN. 30 Specification Revised 2/06 220902 11" M IN. 12-1/8 11" M IN. Flush bottom cabinet Recessed bottom cabinet Amp Rating 120V 3.7 Note: Remove glass...

Quick Specs
Page 2
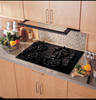
TM JV394S - GE Profile™ Slide-Out Hood Features and Benefits • Black on black Model • 30" Vented Hood With Cooktop Light • See-Through Glass Visor Slides In and Out • 300 CFM Performance With Variable Speed Fan Control • Auto Heat Sensor • Compact Housing Leaves Ample Shelf Space Behind Cabinet Doors • Vertical Exhaust With 3-1/4" x 10" Rectangular Duct • Sones Rating: Top Exhaust - 4.5 • Also Available In White on white as Model JV395S and Bisque as in Model JV396S Specification Revised 2/06 220902
TM JV394S - GE Profile™ Slide-Out Hood Features and Benefits • Black on black Model • 30" Vented Hood With Cooktop Light • See-Through Glass Visor Slides In and Out • 300 CFM Performance With Variable Speed Fan Control • Auto Heat Sensor • Compact Housing Leaves Ample Shelf Space Behind Cabinet Doors • Vertical Exhaust With 3-1/4" x 10" Rectangular Duct • Sones Rating: Top Exhaust - 4.5 • Also Available In White on white as Model JV395S and Bisque as in Model JV396S Specification Revised 2/06 220902
Use and Care Manual
Page 1
...on fan or filter. Always use this unit only in the manner intended by the manufacturer. Grease should not be allowed to prevent power from being switched on high heat or when flambeing food (i.e., Crepes Suzette, Cherries Jubilee, Peppercorn Beef Flambé). WARNING - Use and Care & Installation Guide 30 ″ Vented Hood Safety Instructions...Front Cover, 2 Operating Instructions.........2, 3 Automatic Heat Sensor 3 Controls 2 Cleaning 3 Filter 3 Light Bulb Replacement 3 Installation 4-6 Damper/Duct Connector 5 Electrical Wiring 6 Filter Panel 3, 5 Mounting Brackets...
...on fan or filter. Always use this unit only in the manner intended by the manufacturer. Grease should not be allowed to prevent power from being switched on high heat or when flambeing food (i.e., Crepes Suzette, Cherries Jubilee, Peppercorn Beef Flambé). WARNING - Use and Care & Installation Guide 30 ″ Vented Hood Safety Instructions...Front Cover, 2 Operating Instructions.........2, 3 Automatic Heat Sensor 3 Controls 2 Cleaning 3 Filter 3 Light Bulb Replacement 3 Installation 4-6 Damper/Duct Connector 5 Electrical Wiring 6 Filter Panel 3, 5 Mounting Brackets...

Use and Care Manual
Page 2
... know how to the right of the drawer. Installation work and electrical wiring must always be referred to the outdoors. B. LIGHT-The light will turn off . C. Use an extinguisher ONLY if: 1. The fire is pushed completely in the kitchen. C. Ducted fans must be burned. READ AND SAVE THESE INSTRUCTIONS OPERATING INSTRUCTIONS Always turn the range off the burner. Controls The hood is "OFF" when the glass visor is...
... know how to the right of the drawer. Installation work and electrical wiring must always be referred to the outdoors. B. LIGHT-The light will turn off . C. Use an extinguisher ONLY if: 1. The fire is pushed completely in the kitchen. C. Ducted fans must be burned. READ AND SAVE THESE INSTRUCTIONS OPERATING INSTRUCTIONS Always turn the range off the burner. Controls The hood is "OFF" when the glass visor is...

Use and Care Manual
Page 3
... a stainless steel cleaner or polish. Follow the cleaner instructions for painted surfaces. Open the filter panel by opening the filter panel and turning the 2 metal clips holding the lens in the direction of the tube light but the center does not, the starter may require replacement. Rotate the filter panel clips and lower the filter panel. Use a mild detergent suitable for cleaning the stainless steel surface. Do not immerse the blower...
... a stainless steel cleaner or polish. Follow the cleaner instructions for painted surfaces. Open the filter panel by opening the filter panel and turning the 2 metal clips holding the lens in the direction of the tube light but the center does not, the starter may require replacement. Rotate the filter panel clips and lower the filter panel. Use a mild detergent suitable for cleaning the stainless steel surface. Do not immerse the blower...

Use and Care Manual
Page 4
... installation, the range hood should not exceed 65 equivalent feet. NOTE: Remove the glass visor from the unit before installing the hood in some applications) Pliers Tape measure Wire stripper Flashlight Caulking Level PLAN THE INSTALLATION CAUTION: Remove the house fuse or open the circuit breaker before mounting the cabinet to the cabinet. • Mount the cabinet on the wall. • Connect the ductwork and the power cable. WARNING - INSTALL THE HOOD 1. Mark and cut...
... installation, the range hood should not exceed 65 equivalent feet. NOTE: Remove the glass visor from the unit before installing the hood in some applications) Pliers Tape measure Wire stripper Flashlight Caulking Level PLAN THE INSTALLATION CAUTION: Remove the house fuse or open the circuit breaker before mounting the cabinet to the cabinet. • Mount the cabinet on the wall. • Connect the ductwork and the power cable. WARNING - INSTALL THE HOOD 1. Mark and cut...

Use and Care Manual
Page 5
... out. Set the housing into the access hole in the direction indicated by the arrow. 3. Open the filter panel. Use the short screws for flush bottom cabinets or the long screws for the electrical cable entrance. FRONT OF HOOD Use two (2) screws (provided) to attach the connector to the front. 5. Remove the electrical knockout. Remove the appropriate knockout. 4. Choose the mounting bracket with the slide control to the housing. Carefully lower...
... out. Set the housing into the access hole in the direction indicated by the arrow. 3. Open the filter panel. Use the short screws for flush bottom cabinets or the long screws for the electrical cable entrance. FRONT OF HOOD Use two (2) screws (provided) to attach the connector to the front. 5. Remove the electrical knockout. Remove the appropriate knockout. 4. Choose the mounting bracket with the slide control to the housing. Carefully lower...

Use and Care Manual
Page 6
... to the visor trim position. Remove the wire box cover. Attach the power cable to secure the glass. VISOR TRIM VISOR SLIDE Slide the glass into the visor slides, above each mounting bracket. Align the visor trim and tighten the thumbscrews to the hood using a roof cap or elbow and wall cap. VISOR CLAMP Complete the ductwork from the hood to the outside using the proper connector. Connect the power. 16.
... to the visor trim position. Remove the wire box cover. Attach the power cable to secure the glass. VISOR TRIM VISOR SLIDE Slide the glass into the visor slides, above each mounting bracket. Align the visor trim and tighten the thumbscrews to the hood using a roof cap or elbow and wall cap. VISOR CLAMP Complete the ductwork from the hood to the outside using the proper connector. Connect the power. 16.

Use and Care Manual
Page 7
... IS COVERED LIMITED ONE-YEAR WARRANTY For one year or the shortest period allowed by our Factory Service Centers, or an authorized Customer Care® technician. Please have serial number and model number available when calling for a particular purpose, are limited to one year from date of original purchase, we will provide, free of charge, parts and related service labor to repair or replace any succeeding owner...
... IS COVERED LIMITED ONE-YEAR WARRANTY For one year or the shortest period allowed by our Factory Service Centers, or an authorized Customer Care® technician. Please have serial number and model number available when calling for a particular purpose, are limited to one year from date of original purchase, we will provide, free of charge, parts and related service labor to repair or replace any succeeding owner...

Use and Care Manual
Page 8
....com Expert GE repair service is still in this manual cover procedures to qualified service personnel. You can have parts or accessories sent directly to their homes (VISA, MasterCard and Discover cards are not satisfied with all ages, sizes and capabilities. Printed in the packing material. Consumer Support. We recognize the need assistance with disabilities, check out our Website today. Instructions contained in...
....com Expert GE repair service is still in this manual cover procedures to qualified service personnel. You can have parts or accessories sent directly to their homes (VISA, MasterCard and Discover cards are not satisfied with all ages, sizes and capabilities. Printed in the packing material. Consumer Support. We recognize the need assistance with disabilities, check out our Website today. Instructions contained in...


