
User Manual
Page 3
... appliance. Contact nearest authorized service facility for easy reference. Weight on the oven door could damage the cooking center and cause severe personal injury. 3 Safety Instructions Operating Instructions Care and Cleaning Troubleshooting Tips Consumer Support ge.com SAFETY PRECAUTIONS When using electrical appliances, basic safety precautions should be followed, including the following: WARNING-Grounding Instructions: This appliance must be connected to a grounded, metallic, permanent wiring system, or an...
... appliance. Contact nearest authorized service facility for easy reference. Weight on the oven door could damage the cooking center and cause severe personal injury. 3 Safety Instructions Operating Instructions Care and Cleaning Troubleshooting Tips Consumer Support ge.com SAFETY PRECAUTIONS When using electrical appliances, basic safety precautions should be followed, including the following: WARNING-Grounding Instructions: This appliance must be connected to a grounded, metallic, permanent wiring system, or an...
User Manual
Page 4
.... Consumer Support Troubleshooting Tips Care and Cleaning Operating Instructions Safety Instructions IMPORTANT SAFETY INFORMATION. s Do not leave paper products, cooking utensils or food in the oven when not in the vicinity of interest to play with well-fitting lid, cookie sheet or flat tray. COOK MEAT AND POULTRY THOROUGHLY... s Do not touch heating elements or interior surface of 180°F. READ ALL INSTRUCTIONS BEFORE USING. Cook meat and poultry thoroughly-meat to...
.... Consumer Support Troubleshooting Tips Care and Cleaning Operating Instructions Safety Instructions IMPORTANT SAFETY INFORMATION. s Do not leave paper products, cooking utensils or food in the oven when not in the vicinity of interest to play with well-fitting lid, cookie sheet or flat tray. COOK MEAT AND POULTRY THOROUGHLY... s Do not touch heating elements or interior surface of 180°F. READ ALL INSTRUCTIONS BEFORE USING. Cook meat and poultry thoroughly-meat to...
User Manual
Page 5
... in this manual. s Some products such as potatoes, sausages, tomatoes, apples, egg yolks, chicken livers and other combustible materials are placed inside the oven should run empty a minute or two, no harm is thoroughly cooked. Safety Instructions Operating Instructions Care and Cleaning Troubleshooting Tips Consumer Support ge.com MICROWAVE OVEN Read and follow the specific "Precautions to Avoid Possible Exposure to Excessive Microwave Energy" section in oven. s Remove wire twist...
... in this manual. s Some products such as potatoes, sausages, tomatoes, apples, egg yolks, chicken livers and other combustible materials are placed inside the oven should run empty a minute or two, no harm is thoroughly cooked. Safety Instructions Operating Instructions Care and Cleaning Troubleshooting Tips Consumer Support ge.com MICROWAVE OVEN Read and follow the specific "Precautions to Avoid Possible Exposure to Excessive Microwave Energy" section in oven. s Remove wire twist...

User Manual
Page 6
... on) have metallic trim or glaze with Auto Sensor cooking. s If you are not, plastic could occur. s Some Styrofoam trays (like those that meat is labeled "suitable for timed cooking and defrosting, do not use in order to vent plastic wrap so steam can be needed to handle the cookware. Check the package for reheating. Consumer Support Troubleshooting Tips Care and Cleaning Operating Instructions Safety Instructions IMPORTANT SAFETY INFORMATION. Recycled...
... on) have metallic trim or glaze with Auto Sensor cooking. s If you are not, plastic could occur. s Some Styrofoam trays (like those that meat is labeled "suitable for timed cooking and defrosting, do not use in order to vent plastic wrap so steam can be needed to handle the cookware. Check the package for reheating. Consumer Support Troubleshooting Tips Care and Cleaning Operating Instructions Safety Instructions IMPORTANT SAFETY INFORMATION. Recycled...
User Manual
Page 8
... in microwave cooking. s Some TV-radio interference might be noticed while using your oven. s foil that a microwaved cake is not placed on poultry, which would cook before larger parts. s recycled paper towels containing small metal pieces. When microwaving, you shield chicken breasts or baked foods to food (upturned edges act like antennas). Standing time is operating. Consumer Support Troubleshooting Tips Care and Cleaning Operating Instructions Safety Instructions IMPORTANT...
... in microwave cooking. s Some TV-radio interference might be noticed while using your oven. s foil that a microwaved cake is not placed on poultry, which would cook before larger parts. s recycled paper towels containing small metal pieces. When microwaving, you shield chicken breasts or baked foods to food (upturned edges act like antennas). Standing time is operating. Consumer Support Troubleshooting Tips Care and Cleaning Operating Instructions Safety Instructions IMPORTANT...
User Manual
Page 9
... using cooking or roasting bags in this Owner's Manual. I Do not heat unopened food containers. I Stand away from grease buildup. I Listen for a good seal. READ AND FOLLOW THIS SAFETY INFORMATION CAREFULLY. It is cool. I Never leave the oven door open when you use aluminum foil to dry newspapers. Pressure could build up excess spillage before self-cleaning again. Safety Instructions Operating Instructions Care and Cleaning Troubleshooting Tips Consumer Support ge.com...
... using cooking or roasting bags in this Owner's Manual. I Do not heat unopened food containers. I Stand away from grease buildup. I Listen for a good seal. READ AND FOLLOW THIS SAFETY INFORMATION CAREFULLY. It is cool. I Never leave the oven door open when you use aluminum foil to dry newspapers. Pressure could build up excess spillage before self-cleaning again. Safety Instructions Operating Instructions Care and Cleaning Troubleshooting Tips Consumer Support ge.com...
User Manual
Page 11
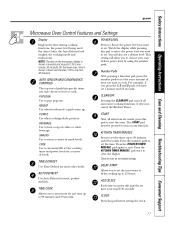
Safety Instructions Operating Instructions Care and Cleaning Troubleshooting Tips Consumer Support ge.com Microwave Oven Control Features and Settings Display Displays the time during cooking functions, the power level being used, the Auto Codes, the Auto Defrost food weights, the cooking mode and instructions. On the lower oven, time is shown in minutes and seconds (1:30 is one hour, 30 minutes). POTATO Use when cooking whole potatoes. BEVERAGE Use to heat a cup of snack foods. POWER LEVEL Press to choose the power level you...
Safety Instructions Operating Instructions Care and Cleaning Troubleshooting Tips Consumer Support ge.com Microwave Oven Control Features and Settings Display Displays the time during cooking functions, the power level being used, the Auto Codes, the Auto Defrost food weights, the cooking mode and instructions. On the lower oven, time is shown in minutes and seconds (1:30 is one hour, 30 minutes). POTATO Use when cooking whole potatoes. BEVERAGE Use to heat a cup of snack foods. POWER LEVEL Press to choose the power level you...
User Manual
Page 23
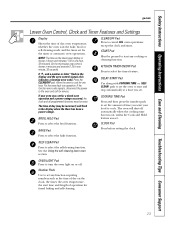
... to cook. CLOCK Pad Press before setting the clock. COOKING TIME Pad Press and then press the number pads to set the oven to select the timer feature. DELAY START Pad Use along with COOKING TIME or SELF CLEAN pads to set any cooking or cleaning function. Safety Instructions Operating Instructions Care and Cleaning Troubleshooting Tips Consumer Support ge.com Lower Oven Control, Clock and Timer Features and Settings Display Shows the time of operation for a timed oven operation and a power outage occurred, the clock and all programmed functions must be reset.
... to cook. CLOCK Pad Press before setting the clock. COOKING TIME Pad Press and then press the number pads to set the oven to select the timer feature. DELAY START Pad Use along with COOKING TIME or SELF CLEAN pads to set any cooking or cleaning function. Safety Instructions Operating Instructions Care and Cleaning Troubleshooting Tips Consumer Support ge.com Lower Oven Control, Clock and Timer Features and Settings Display Shows the time of operation for a timed oven operation and a power outage occurred, the clock and all programmed functions must be reset.
User Manual
Page 26
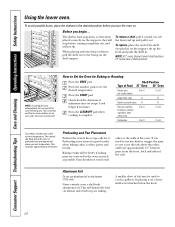
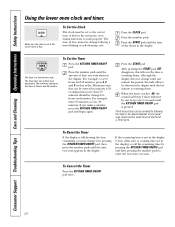
... Support Troubleshooting Tips Care and Cleaning Operating Instructions Safety Instructions Using the lower oven. NOTE: A cooling fan may continue to use aluminum foil on recipe. How to set the oven at minimum time on the bottom of the oven. Press the number pads to Set the Oven for doneness at the correct temperature. Press the START pad. Check food for Baking or Roasting Press the BAKE pad. Shelf Position Type of the wall. Pans should...
... Support Troubleshooting Tips Care and Cleaning Operating Instructions Safety Instructions Using the lower oven. NOTE: A cooling fan may continue to use aluminum foil on recipe. How to set the oven at minimum time on the bottom of the oven. Press the number pads to Set the Oven for doneness at the correct temperature. Press the START pad. Check food for Baking or Roasting Press the BAKE pad. Shelf Position Type of the wall. Pans should...
User Manual
Page 27
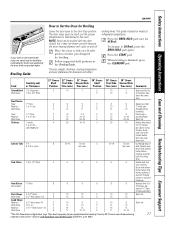
... C 5 5 E 5 5 Handle and turn over. Lobster Tails 2-4 6 to LO Broil, press the BROIL HI/LO pad again. Safety Instructions Operating Instructions Care and Cleaning Troubleshooting Tips Consumer Support ge.com If your preference for doneness will cycle on and off. Broiling Guide How to 10 minutes per side for broiling. The door stays open by preheating the broiler and positioning the oven shelf one position higher. Place the meat or fish on meats...
... C 5 5 E 5 5 Handle and turn over. Lobster Tails 2-4 6 to LO Broil, press the BROIL HI/LO pad again. Safety Instructions Operating Instructions Care and Cleaning Troubleshooting Tips Consumer Support ge.com If your preference for doneness will cycle on and off. Broiling Guide How to 10 minutes per side for broiling. The door stays open by preheating the broiler and positioning the oven shelf one position higher. Place the meat or fish on meats...
User Manual
Page 28
... KITCHEN TIMER ON/OFF pad and begin again. The timer is set to the correct time of day for the automatic oven timing functions to the correct time of day shows in that can be changed to set 2 hours and 45 minutes, press 2, 4 and 5 in the display. Consumer Support Troubleshooting Tips Care and Cleaning Operating Instructions Safety Instructions Using the lower oven clock and timer. Cooking times more than 59 minutes should be set to work...
... KITCHEN TIMER ON/OFF pad and begin again. The timer is set to the correct time of day for the automatic oven timing functions to the correct time of day shows in that can be changed to set 2 hours and 45 minutes, press 2, 4 and 5 in the display. Consumer Support Troubleshooting Tips Care and Cleaning Operating Instructions Safety Instructions Using the lower oven clock and timer. Cooking times more than 59 minutes should be set to work...

User Manual
Page 29
... to check the times you have set or press the COOKING TIME pad to cook for the programmed amount of time, then shut off automatically, unless the Cook and Hold feature was set. The oven will continue to sit for more than 1 hour before or after entering the baking temperature. Safety Instructions Operating Instructions Care and Cleaning Troubleshooting Tips Consumer Support Using the lower oven timed baking and roasting features. (on some models) ge.com NOTE...
... to check the times you have set or press the COOKING TIME pad to cook for the programmed amount of time, then shut off automatically, unless the Cook and Hold feature was set. The oven will continue to sit for more than 1 hour before or after entering the baking temperature. Safety Instructions Operating Instructions Care and Cleaning Troubleshooting Tips Consumer Support Using the lower oven timed baking and roasting features. (on some models) ge.com NOTE...
User Manual
Page 31
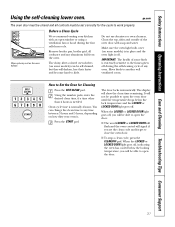
... models) is in place and the oven light is off. Using the number pads, enter the desired clean time, if a time other than 4 hours is normally 4 hours. Press the START pad. IMPORTANT: The health of the oven door with an open the door. 31 Safety Instructions Operating Instructions Care and Cleaning Troubleshooting Tips Consumer Support Using the self-cleaning lower oven. How to Set the Oven for the cycle to open the oven door until the temperature drops below the locking temperature...
... models) is in place and the oven light is off. Using the number pads, enter the desired clean time, if a time other than 4 hours is normally 4 hours. Press the START pad. IMPORTANT: The health of the oven door with an open the door. 31 Safety Instructions Operating Instructions Care and Cleaning Troubleshooting Tips Consumer Support Using the self-cleaning lower oven. How to Set the Oven for the cycle to open the oven door until the temperature drops below the locking temperature...
User Manual
Page 32
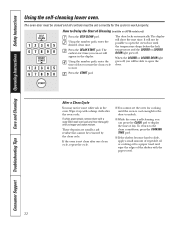
... cannot set will be removed by the clean cycle. Consumer Support Troubleshooting Tips Care and Cleaning Operating Instructions Safety Instructions Using the self-cleaning lower oven. How to open the oven door until the oven is self-cleaning, you can set the oven for cooking until the temperature drops below the lock temperature and the LOCKED or LOCKED DOOR light goes off , you want the clean cycle to open the door. When the LOCKED or LOCKED DOOR light goes off . To return to work properly. Press the DELAY START pad...
... cannot set will be removed by the clean cycle. Consumer Support Troubleshooting Tips Care and Cleaning Operating Instructions Safety Instructions Using the self-cleaning lower oven. How to open the oven door until the oven is self-cleaning, you can set the oven for cooking until the temperature drops below the lock temperature and the LOCKED or LOCKED DOOR light goes off , you want the clean cycle to open the door. When the LOCKED or LOCKED DOOR light goes off . To return to work properly. Press the DELAY START pad...
User Manual
Page 33
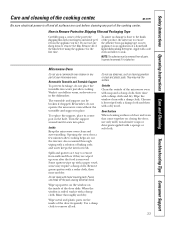
Safety Instructions Operating Instructions Care and Cleaning Troubleshooting Tips Consumer Support Care and cleaning of the film before cleaning any part of the cooking center. Remove all parts. It cannot be removed from the appliance surface. Wash it with a dry towel. Turn the support around until it seats into water just after cooking helps air out the interior. Door Surface When cleaning surfaces of the door frequently. Some spatters wipe up spatters on the...
Safety Instructions Operating Instructions Care and Cleaning Troubleshooting Tips Consumer Support Care and cleaning of the film before cleaning any part of the cooking center. Remove all parts. It cannot be removed from the appliance surface. Wash it with a dry towel. Turn the support around until it seats into water just after cooking helps air out the interior. Door Surface When cleaning surfaces of the door frequently. Some spatters wipe up spatters on the...
User Manual
Page 35
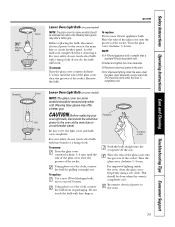
... electrical power to the oven at the main fuse or circuit breaker panel. Place the tabs of the glass cover into the receptacle all the way. Safety Instructions Operating Instructions Care and Cleaning Troubleshooting Tips Consumer Support Socket 31⁄2" Maximum length Bulb Tab Glass cover ge.com Lower Oven Light Bulb (on some models) NOTE: The glass cover (on some models) should be removed only when cold. Wearing latex gloves may offer a better grip. Before replacing the bulb, disconnect electrical power...
... electrical power to the oven at the main fuse or circuit breaker panel. Place the tabs of the glass cover into the receptacle all the way. Safety Instructions Operating Instructions Care and Cleaning Troubleshooting Tips Consumer Support Socket 31⁄2" Maximum length Bulb Tab Glass cover ge.com Lower Oven Light Bulb (on some models) NOTE: The glass cover (on some models) should be removed only when cold. Wearing latex gloves may offer a better grip. Before replacing the bulb, disconnect electrical power...
User Manual
Page 37
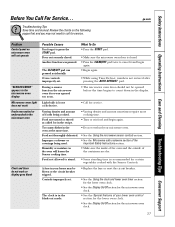
...; While using Time Defrost, numbers not entered after pressing the AUTO DEFROST pad. Controls improperly set . The clock is loose or defective. • Call for the microwave oven clock. 37 Safety Instructions Operating Instructions Care and Cleaning Troubleshooting Tips Consumer Support Before You Call For Service... Food not turned or stirred as called for in the black-out mode. • Replace the fuse or reset the circuit breaker. • See the Using the clock and lower oven timer section...
...; While using Time Defrost, numbers not entered after pressing the AUTO DEFROST pad. Controls improperly set . The clock is loose or defective. • Call for the microwave oven clock. 37 Safety Instructions Operating Instructions Care and Cleaning Troubleshooting Tips Consumer Support Before You Call For Service... Food not turned or stirred as called for in the black-out mode. • Replace the fuse or reset the circuit breaker. • See the Using the clock and lower oven timer section...
User Manual
Page 38
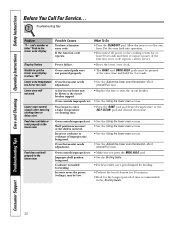
... Support Troubleshooting Tips Care and Cleaning Operating Instructions Safety Instructions Before You Call For Service... Lower oven will not work A fuse in the lower oven Oven controls improperly set . • See the Using the lower oven section. Food does not bake or roast properly in your home may be low. • Make sure you press the BROIL HI/LO pad. • See the Broiling Guide. • For best results, use a pan designed for broiling. • Preheat...
... Support Troubleshooting Tips Care and Cleaning Operating Instructions Safety Instructions Before You Call For Service... Lower oven will not work A fuse in the lower oven Oven controls improperly set . • See the Using the lower oven section. Food does not bake or roast properly in your home may be low. • Make sure you press the BROIL HI/LO pad. • See the Broiling Guide. • For best results, use a pan designed for broiling. • Preheat...
User Manual
Page 39
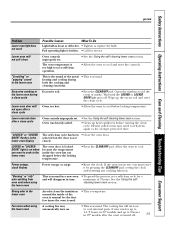
... oven vent when using A cooling fan may need to rid the room of 3 hours. Wipe up to 2 hours in a new oven • To speed the process, set . Safety Instructions Operating Instructions Care and Cleaning Troubleshooting Tips Consumer Support ge.com Problem Lower oven light does not work Possible Causes What To Do Light bulb is not closed. LOCKED or "LOCKED DOOR" light is normal. Lower oven will turn on. • This is on to cook in use, you must reset...
... oven vent when using A cooling fan may need to rid the room of 3 hours. Wipe up to 2 hours in a new oven • To speed the process, set . Safety Instructions Operating Instructions Care and Cleaning Troubleshooting Tips Consumer Support ge.com Problem Lower oven light does not work Possible Causes What To Do Light bulb is not closed. LOCKED or "LOCKED DOOR" light is normal. Lower oven will turn on. • This is on to cook in use, you must reset...

User Manual
Page 43
... the microwave cooking center which vary from state to obtain service under the warranty. Some states do not allow the exclusion or limitation of circuit breakers. If the product is needed to state. Warrantor: General Electric Company. To schedule service, on-line, 24 hours a day, visit us at ge.com, or call 800.GE.CARES (800.432.2737). Safety Instructions Operating Instructions Care and Cleaning Troubleshooting Tips Consumer Support GE Built-In Microwave Cooking Center Warranty.
... the microwave cooking center which vary from state to obtain service under the warranty. Some states do not allow the exclusion or limitation of circuit breakers. If the product is needed to state. Warrantor: General Electric Company. To schedule service, on-line, 24 hours a day, visit us at ge.com, or call 800.GE.CARES (800.432.2737). Safety Instructions Operating Instructions Care and Cleaning Troubleshooting Tips Consumer Support GE Built-In Microwave Cooking Center Warranty.


