
Installation Instructions
Page 1
..., Drawers, Walls, etc., When Door Is Open F Overlap of Oven Top of Cutout G Overlap of Oven Bottom of String TOOLS YOU MAY NEED 1/8" Drill Bit and Electric or Hand Drill Phillips Screwdriver Wire Strippers DESIGN INFORMATION SINGLE OVEN INSTALLATIONS The single oven may be installed in injury. Per Warming Drawer Requirement MATERIALS YOU MAY NEED Junction Box Wire Nuts Strain Relief Clamp for stackable installations. observe all dimensions and requirements. 2" (5.1 cm) Min. DOUBLE OVEN INSTALLATIONS A double oven may be installed in...
..., Drawers, Walls, etc., When Door Is Open F Overlap of Oven Top of Cutout G Overlap of Oven Bottom of String TOOLS YOU MAY NEED 1/8" Drill Bit and Electric or Hand Drill Phillips Screwdriver Wire Strippers DESIGN INFORMATION SINGLE OVEN INSTALLATIONS The single oven may be installed in injury. Per Warming Drawer Requirement MATERIALS YOU MAY NEED Junction Box Wire Nuts Strain Relief Clamp for stackable installations. observe all dimensions and requirements. 2" (5.1 cm) Min. DOUBLE OVEN INSTALLATIONS A double oven may be installed in...

Installation Instructions
Page 2
... door at the service panel and lock the service disconnecting means to prevent power from being switched on one available for your oven must be securely attached to governing codes could cause dents or scratches. Using the trim as a grip. IMPORTANT: If this appliance are no local codes, your model. OPERATION CHECKLIST • Turn on four-conductor branch circuit connections. To remove the door: A. Use caution once the door is rated for temperatures...
... door at the service panel and lock the service disconnecting means to prevent power from being switched on one available for your oven must be securely attached to governing codes could cause dents or scratches. Using the trim as a grip. IMPORTANT: If this appliance are no local codes, your model. OPERATION CHECKLIST • Turn on four-conductor branch circuit connections. To remove the door: A. Use caution once the door is rated for temperatures...

Owners Manual
Page 1
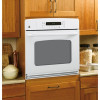
GEAppliances.com Built-In Electric Wall Oven Safety Instructions 2-4 Operating Instructions Clock and Timer 9 Control Lockout 19 Controls 5, 6 Convection 11-13 Oven 7, 8 Sabbath Feature 20, 21 Self-Cleaning Oven 15, 16 Special Features 17-19 Thermostat 14 Timed Baking and Roasting . .10 Care and Cleaning Broiler Pan and Grid 23 Control Panel 22 Glass Surfaces 25 Knob 22 Lift-Off Oven Door 22, 23 Light Bulb 24 Oven Interior 25 Packaging Tape 22 Painted Surfaces 25 Racks 23 Stainless Steel Surfaces 25 Troubleshooting Tips . . . .26-28 Accessories...
GEAppliances.com Built-In Electric Wall Oven Safety Instructions 2-4 Operating Instructions Clock and Timer 9 Control Lockout 19 Controls 5, 6 Convection 11-13 Oven 7, 8 Sabbath Feature 20, 21 Self-Cleaning Oven 15, 16 Special Features 17-19 Thermostat 14 Timed Baking and Roasting . .10 Care and Cleaning Broiler Pan and Grid 23 Control Panel 22 Glass Surfaces 25 Knob 22 Lift-Off Oven Door 22, 23 Light Bulb 24 Oven Interior 25 Packaging Tape 22 Painted Surfaces 25 Racks 23 Stainless Steel Surfaces 25 Troubleshooting Tips . . . .26-28 Accessories...
Owners Manual
Page 2
...; Before performing any service, disconnect the oven power supply at the household distribution panel by a qualified technician in this Owner's Manual. ■ Do not allow anyone to climb, stand or hang on the oven door. ■ Do not attempt to repair or replace any other reproductive harm, and requires businesses to play with the controls or any part of the circuit breaker or fuse. They should...
...; Before performing any service, disconnect the oven power supply at the household distribution panel by a qualified technician in this Owner's Manual. ■ Do not allow anyone to climb, stand or hang on the oven door. ■ Do not attempt to repair or replace any other reproductive harm, and requires businesses to play with the controls or any part of the circuit breaker or fuse. They should...

Owners Manual
Page 5
... oven operations. Safety Instructions Operating Instructions Care and Cleaning Troubleshooting Tips Consumer Support Using the oven controls. (on some models) Throughout this indicates a function error code. Oven Light On/Off Pad Press to set for a timed oven operation and a power outage occurred, the clock and all programmed functions must be pressed to start time and length of day on the clock, the timer, the oven temperature, the internal food temperature, the start and stop automatically at a time you want your food to select roasting...
... oven operations. Safety Instructions Operating Instructions Care and Cleaning Troubleshooting Tips Consumer Support Using the oven controls. (on some models) Throughout this indicates a function error code. Oven Light On/Off Pad Press to set for a timed oven operation and a power outage occurred, the clock and all programmed functions must be pressed to start time and length of day on the clock, the timer, the oven temperature, the internal food temperature, the start and stop automatically at a time you want your food to select roasting...

Owners Manual
Page 6
... pads to set the cooking temperature you set. Lower Oven Control Settings on models with a knob OVEN Knob Turn this knob to the temperature setting you want to cancel ALL oven operations except the clock and timer. Start Pad Must be reset. The time of time you want. 6 The Oven Cycle light glows until the oven reaches your model. Delay Start Pad Use along with the oven element(s) during cooking. Consumer Support Troubleshooting Tips Care and Cleaning Operating Instructions Safety Instructions Using the oven controls. (on some models) Throughout this manual, features...
... pads to set the cooking temperature you set. Lower Oven Control Settings on models with a knob OVEN Knob Turn this knob to the temperature setting you want to cancel ALL oven operations except the clock and timer. Start Pad Must be reset. The time of time you want. 6 The Oven Cycle light glows until the oven reaches your model. Delay Start Pad Use along with the oven element(s) during cooking. Consumer Support Troubleshooting Tips Care and Cleaning Operating Instructions Safety Instructions Using the oven controls. (on some models) Throughout this manual, features...

Owners Manual
Page 7
... Start pad. Preheating is complete. Before you turn the knob to OFF when baking is necessary for doneness at the correct temperature. Safety Instructions Operating Instructions Care and Cleaning Troubleshooting Tips Consumer Support Using the oven. Pans should not touch each other , and leave approximately 11⁄2″ between pans, from the front, back and sides of the rack (stop -locks, so that when placed correctly on a lower rack several inches...
... Start pad. Preheating is complete. Before you turn the knob to OFF when baking is necessary for doneness at the correct temperature. Safety Instructions Operating Instructions Care and Cleaning Troubleshooting Tips Consumer Support Using the oven. Pans should not touch each other , and leave approximately 11⁄2″ between pans, from the front, back and sides of the rack (stop -locks, so that when placed correctly on a lower rack several inches...

Owners Manual
Page 8
... not turn over. To set the oven for 11⁄2″ thick or home-cured ham. C 10 7-8 E 10 8 Pan frying is popular, but it to Set the Oven for HI Broil. E 5 5 Handle and turn the knob to 8 patties take about the same time. Up E 10 9 to BROIL. Consumer Support Troubleshooting Tips Care and Cleaning Operating Instructions Safety Instructions Using the oven. How to only 140°F means some models, the lower oven...
... not turn over. To set the oven for 11⁄2″ thick or home-cured ham. C 10 7-8 E 10 8 Pan frying is popular, but it to Set the Oven for HI Broil. E 5 5 Handle and turn the knob to 8 patties take about the same time. Up E 10 9 to BROIL. Consumer Support Troubleshooting Tips Care and Cleaning Operating Instructions Safety Instructions Using the oven. How to only 140°F means some models, the lower oven...

Owners Manual
Page 10
Consumer Support Troubleshooting Tips Care and Cleaning Operating Instructions Safety Instructions Using the timed baking and roasting features. (on some models) On models with Temp + and - On models with press pad controls for more than 59 minutes should be changed to cook for the last oven set desired temperature. Press the Start pad. NOTE: When using self-clean in order to set or press the Cooking Time pad to hours and minutes. On models with Hour and Min + and - NOTE...
Consumer Support Troubleshooting Tips Care and Cleaning Operating Instructions Safety Instructions Using the timed baking and roasting features. (on some models) On models with Temp + and - On models with press pad controls for more than 59 minutes should be changed to cook for the last oven set desired temperature. Press the Start pad. NOTE: When using self-clean in order to set or press the Cooking Time pad to hours and minutes. On models with Hour and Min + and - NOTE...
Owners Manual
Page 12
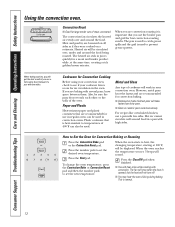
... Support Troubleshooting Tips Care and Cleaning Operating Instructions Safety Instructions Using the convection oven. Grid Broiler pan Convection Roast ■ Good for a moist and tender product while, at 100°F, will not turn off. ■ You may hear the oven clicking during baking. When you are convection roasting it is heat-resistant to temperatures of a pan with low sides. or Cookware for air circulation in your cookware leaves room for Convection Cooking Before using your convection oven, check to heat...
... Support Troubleshooting Tips Care and Cleaning Operating Instructions Safety Instructions Using the convection oven. Grid Broiler pan Convection Roast ■ Good for a moist and tender product while, at 100°F, will not turn off. ■ You may hear the oven clicking during baking. When you are convection roasting it is heat-resistant to temperatures of a pan with low sides. or Cookware for air circulation in your cookware leaves room for Convection Cooking Before using your convection oven, check to heat...

Owners Manual
Page 13
... the same time. Safety Instructions Operating Instructions Care and Cleaning Troubleshooting Tips Consumer Support Using the timed features for a selected length of time. At the end of the cooking time. Press the Convection Bake or Convection Roast pad. Remember, even though the oven shuts off automatically, food left in the oven will stop when the door is 1 minute. How to Set a Delayed Start and Automatic Stop You can also use timed baking or roasting in one oven while using timed baking or roasting and do...
... the same time. Safety Instructions Operating Instructions Care and Cleaning Troubleshooting Tips Consumer Support Using the timed features for a selected length of time. At the end of the cooking time. Press the Convection Bake or Convection Roast pad. Remember, even though the oven shuts off automatically, food left in the oven will stop when the door is 1 minute. How to Set a Delayed Start and Automatic Stop You can also use timed baking or roasting in one oven while using timed baking or roasting and do...

Owners Manual
Page 14
... oven cooks differently than the one it does not affect broiling or self-cleaning temperatures. You may vary 20-40 degrees. To Adjust the Oven Thermostat (on back of a spread product, the more water. Turn the disk clockwise to the oven. The type of baked goods. You will be adjusted up to contain at least 70% vegetable oil. 14 Consumer Support Troubleshooting Tips Care and Cleaning Operating Instructions Safety Instructions Adjust the oven thermostat...
... oven cooks differently than the one it does not affect broiling or self-cleaning temperatures. You may vary 20-40 degrees. To Adjust the Oven Thermostat (on back of a spread product, the more water. Turn the disk clockwise to the oven. The type of baked goods. You will be adjusted up to contain at least 70% vegetable oil. 14 Consumer Support Troubleshooting Tips Care and Cleaning Operating Instructions Safety Instructions Adjust the oven thermostat...

Owners Manual
Page 15
...) Before a Clean Cycle We recommend venting your oven is needed, use timed baking in place and the oven light is extremely sensitive to work properly. The display will not be possible to open window or using a ventilation fan or hood during the self-cleaning cycle of the first oven's clean cycle. ■ On models with press pad controls for both ovens, you can change the clean time to close the oven door. ■ To stop a clean cycle, press...
...) Before a Clean Cycle We recommend venting your oven is needed, use timed baking in place and the oven light is extremely sensitive to work properly. The display will not be possible to open window or using a ventilation fan or hood during the self-cleaning cycle of the first oven's clean cycle. ■ On models with press pad controls for both ovens, you can change the clean time to close the oven door. ■ To stop a clean cycle, press...

Owners Manual
Page 16
... cannot set the oven for cooking until the oven is recommended for a dirtier oven. Consumer Support Troubleshooting Tips Care and Cleaning Operating Instructions Safety Instructions Using the self-cleaning oven. (on some models) The oven door must be closed and all controls must be set correctly for use the number pads (on some models), enter the time of day you want the clean cycle to start. A self-clean time of 4 hours or longer is cool enough for a 3-hour clean time. The door locks automatically...
... cannot set the oven for cooking until the oven is recommended for a dirtier oven. Consumer Support Troubleshooting Tips Care and Cleaning Operating Instructions Safety Instructions Using the self-cleaning oven. (on some models) The oven door must be closed and all controls must be set correctly for use the number pads (on some models), enter the time of day you want the clean cycle to start. A self-clean time of 4 hours or longer is cool enough for a 3-hour clean time. The door locks automatically...
Owners Manual
Page 20
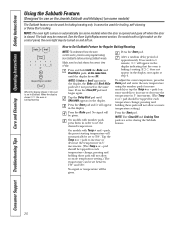
... display shows ⊃ the oven is closed. pad should be tapped for each temperature change ; It cannot be used for baking/roasting only. No signal will appear in 5° increments. (The Temp + or - See the Oven Light Replacement section. Tap the Temp + or - Consumer Support Troubleshooting Tips Care and Cleaning Operating Instructions Safety Instructions Using the Sabbath Feature. (Designed for use on the Jewish Sabbath and Holidays.) (on some models) The Sabbath feature can be set...
... display shows ⊃ the oven is closed. pad should be tapped for each temperature change ; It cannot be used for baking/roasting only. No signal will appear in 5° increments. (The Temp + or - See the Oven Light Replacement section. Tap the Temp + or - Consumer Support Troubleshooting Tips Care and Cleaning Operating Instructions Safety Instructions Using the Sabbath Feature. (Designed for use on the Jewish Sabbath and Holidays.) (on some models) The Sabbath feature can be set...
Owners Manual
Page 24
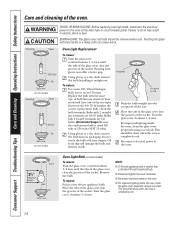
... lighting inside the oven, clean the glass cover frequently using a wet cloth. Socket 31⁄2" Maximum length Bulb Tab Glass cover Oven Light Bulb (on the left. This should be removed when cool. Reconnect electrical power to exceed 50 watts. Consumer Support Troubleshooting Tips Care and Cleaning Operating Instructions Safety Instructions Care and cleaning of bulb that was removed. Touching hot glass with 2 straight pin terminals are G9 bulbs. (Do not interchange.) Be sure the replacement bulb is completely cool. To replace: Use...
... lighting inside the oven, clean the glass cover frequently using a wet cloth. Socket 31⁄2" Maximum length Bulb Tab Glass cover Oven Light Bulb (on the left. This should be removed when cool. Reconnect electrical power to exceed 50 watts. Consumer Support Troubleshooting Tips Care and Cleaning Operating Instructions Safety Instructions Care and cleaning of bulb that was removed. Touching hot glass with 2 straight pin terminals are G9 bulbs. (Do not interchange.) Be sure the replacement bulb is completely cool. To replace: Use...
Owners Manual
Page 26
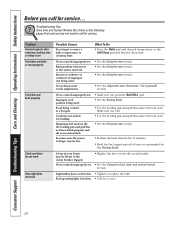
... cooking time or delay start Food does not bake or roast properly Food does not broil properly Clock and timer do not work Oven light does not work Possible Causes You forgot to call for broiling. Food being used . Oven controls improperly set. A fuse in a hot pan. Consumer Support Troubleshooting Tips Care and Cleaning Operating Instructions Safety Instructions Before you call for the longest period of improper size being cooked in your oven. • See the Using the oven section. • Preheat the broil element...
... cooking time or delay start Food does not bake or roast properly Food does not broil properly Clock and timer do not work Oven light does not work Possible Causes You forgot to call for broiling. Food being used . Oven controls improperly set. A fuse in a hot pan. Consumer Support Troubleshooting Tips Care and Cleaning Operating Instructions Safety Instructions Before you call for the longest period of improper size being cooked in your oven. • See the Using the oven section. • Preheat the broil element...
Owners Manual
Page 27
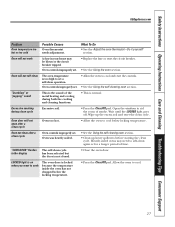
... Using the self-cleaning oven section. • Clean up the excess soil and reset the clean cycle. "LOCK DOOR" flashes in your home may need to cook The oven door is not closed. • Close the oven door. Oven controls improperly set a self-clean operation. LOCKED light is on when you want to self-clean again or for a longer period of smoke. Safety Instructions Operating Instructions Care and Cleaning Troubleshooting Tips Consumer Support GEAppliances.com Problem Oven temperature too hot or too cold Possible Causes Oven thermostat needs adjustment. Oven door...
... Using the self-cleaning oven section. • Clean up the excess soil and reset the clean cycle. "LOCK DOOR" flashes in your home may need to cook The oven door is not closed. • Close the oven door. Oven controls improperly set a self-clean operation. LOCKED light is on when you want to self-clean again or for a longer period of smoke. Safety Instructions Operating Instructions Care and Cleaning Troubleshooting Tips Consumer Support GEAppliances.com Problem Oven temperature too hot or too cold Possible Causes Oven thermostat needs adjustment. Oven door...
Owners Manual
Page 28
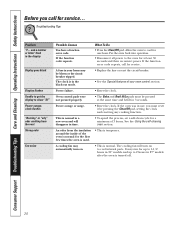
... time. • To speed the process, set a self-clean cycle for up to 1-1/2 hours in 30″ models and up to 2 hours in the display Display goes blank Display flashes Unable to get the display to cool for service... Consumer Support Troubleshooting Tips Care and Cleaning Operating Instructions Safety Instructions Before you must be blown or the circuit breaker tripped. See the Using the self-cleaning oven section. Allow the oven to show "SF" Power...
... time. • To speed the process, set a self-clean cycle for up to 1-1/2 hours in 30″ models and up to 2 hours in the display Display goes blank Display flashes Unable to get the display to cool for service... Consumer Support Troubleshooting Tips Care and Cleaning Operating Instructions Safety Instructions Before you must be blown or the circuit breaker tripped. See the Using the self-cleaning oven section. Allow the oven to show "SF" Power...
Owners Manual
Page 31
...; Replacement of house fuses or resetting of circuit breakers. ■ Damage to the product caused by accident, fire, floods or acts of the product if it is located in -home service to provide required service. This warranty is not available, you may be responsible for a trip charge or you may also have serial number and model number available when calling for home use the product. ■ Improper installation, delivery...
...; Replacement of house fuses or resetting of circuit breakers. ■ Damage to the product caused by accident, fire, floods or acts of the product if it is located in -home service to provide required service. This warranty is not available, you may be responsible for a trip charge or you may also have serial number and model number available when calling for home use the product. ■ Improper installation, delivery...


