
Owners Manual
Page 1
... and Roasting . .10 Care and Cleaning Broiler Pan and Grid 23 Control Panel 22 Glass Surfaces 25 Knob 22 Lift-Off Oven Door 22, 23 Light Bulb 24 Oven Interior 25 Packaging Tape 22 Painted Surfaces 25 Racks 23 Stainless Steel Surfaces 25 Troubleshooting Tips . . . .26-28 Accessories 29 Consumer Support...
... and Roasting . .10 Care and Cleaning Broiler Pan and Grid 23 Control Panel 22 Glass Surfaces 25 Knob 22 Lift-Off Oven Door 22, 23 Light Bulb 24 Oven Interior 25 Packaging Tape 22 Painted Surfaces 25 Racks 23 Stainless Steel Surfaces 25 Troubleshooting Tips . . . .26-28 Accessories 29 Consumer Support...

Owners Manual
Page 5
... Troubleshooting Tips Consumer Support Using the oven controls. (on some models) Throughout this indicates a function error code. Convection Roast Pad Press to turn the oven light on or off automatically when the cooking time has run out, unless the Cook and Hold feature was set . Oven... Light On/Off Pad Press to select roasting with the convection function. Clear/Off Pad Press to select the bake function. Clock Pad Press before setting ...
... Troubleshooting Tips Consumer Support Using the oven controls. (on some models) Throughout this indicates a function error code. Convection Roast Pad Press to turn the oven light on or off automatically when the cooking time has run out, unless the Cook and Hold feature was set . Oven... Light On/Off Pad Press to select roasting with the convection function. Clear/Off Pad Press to select the bake function. Clock Pad Press before setting ...

Owners Manual
Page 6
...) Throughout this pad before setting the clock. Cooking Time Pad Press this pad to start and stop automatically at a time you want. 6 The Oven Cycle light glows until the oven reaches your food to use. Press the Clear/Off pad. Hour and Min + and - Pads Press these pads to 9 hours and... operation and a power outage occurred, the clock and all programmed functions must be pressed to select the timer feature. Oven Light On/Off Pad Press this pad to turn the oven light on or off and on the clock, the timer, the starting and length of cooking time for timed bake and...
...) Throughout this pad before setting the clock. Cooking Time Pad Press this pad to start and stop automatically at a time you want. 6 The Oven Cycle light glows until the oven reaches your food to use. Press the Clear/Off pad. Hour and Min + and - Pads Press these pads to 9 hours and... operation and a power outage occurred, the clock and all programmed functions must be pressed to select the timer feature. Oven Light On/Off Pad Press this pad to turn the oven light on or off and on the clock, the timer, the starting and length of cooking time for timed bake and...

Owners Manual
Page 7
... C or D Casseroles C or D Press the Clear/Off pad when cooking is controlled with aluminum foil. To preheat, set desired temperature. For ovens without a preheat indicator light or tone, preheat 10 minutes. The number of foil may vary by placing it out. On models with Temp + and - Check food for doneness at...
... C or D Casseroles C or D Press the Clear/Off pad when cooking is controlled with aluminum foil. To preheat, set desired temperature. For ovens without a preheat indicator light or tone, preheat 10 minutes. The number of foil may vary by placing it out. On models with Temp + and - Check food for doneness at...

Owners Manual
Page 10
...°F. On models with Temp + and - pads, press them to enter the desired baking time. The oven temperature and the cooking time that the oven light is 59. Press the Clear/Off pad to clear the display. NOTE: An attention tone will be displayed. Room temperature promotes the growth of day...
...°F. On models with Temp + and - pads, press them to enter the desired baking time. The oven temperature and the cooking time that the oven light is 59. Press the Clear/Off pad to clear the display. NOTE: An attention tone will be displayed. Room temperature promotes the growth of day...

Owners Manual
Page 13
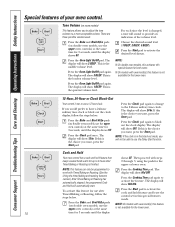
... oven control section. Press the number pads to set , press the Delay Start or Cooking Time pad for convection cooking. Be sure that the oven light is off automatically, unless the Cook and Hold feature was set . Press the number pads to check the start cooking. See the Special features of...
... oven control section. Press the number pads to set , press the Delay Start or Cooking Time pad for convection cooking. Be sure that the oven light is off automatically, unless the Cook and Hold feature was set . Press the number pads to check the start cooking. See the Special features of...

Owners Manual
Page 15
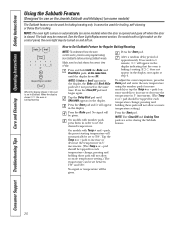
... birds is needed, use when cleaning small, contained spills. If a time other at the same time. The door locks automatically. When the LOCKED light goes off . Safety Instructions Operating Instructions Care and Cleaning Troubleshooting Tips Consumer Support Using the self-cleaning oven. (on some models) GEAppliances.com The...signal if you can be self-cleaned, but they will show the clean time remaining. Do not use timed baking in place and the oven light is . IMPORTANT: The health of the oven door with a knob, the lower oven does not have the self-clean feature. The display ...
... birds is needed, use when cleaning small, contained spills. If a time other at the same time. The door locks automatically. When the LOCKED light goes off . Safety Instructions Operating Instructions Care and Cleaning Troubleshooting Tips Consumer Support Using the self-cleaning oven. (on some models) GEAppliances.com The...signal if you can be self-cleaned, but they will show the clean time remaining. Do not use timed baking in place and the oven light is . IMPORTANT: The health of the oven door with a knob, the lower oven does not have the self-clean feature. The display ...

Owners Manual
Page 16
.... Press the Start pad. The display will be able to open the oven door until the temperature drops below the lock temperature and the LOCKED light goes off , you can change the clean time to any time between 3 hours and 5 hours, depending on how dirty your oven is. It will automatically... enough for the door to unlock. ■ If the racks become hard to slide, wipe the rack supports with cooking oil. 16 When the LOCKED light goes off . If the oven is not clean after the oven cools. After a Clean Cycle You may notice some models), enter the time of the...
.... Press the Start pad. The display will be able to open the oven door until the temperature drops below the lock temperature and the LOCKED light goes off , you can change the clean time to any time between 3 hours and 5 hours, depending on how dirty your oven is. It will automatically... enough for the door to unlock. ■ If the racks become hard to slide, wipe the rack supports with cooking oil. 16 When the LOCKED light goes off . If the oven is not clean after the oven cools. After a Clean Cycle You may notice some models), enter the time of the...
Owners Manual
Page 18
... The display will not be programmed to work with steps 2 through 3, using the pads for 3 seconds until the display shows SF. Press the Oven Light On/Off pad again. Press the Bake and Broil Hi/Lo pads (on some models) + This feature allows you want, press the Start pad. If... for 3 seconds, until the display shows SF. The display will show OFF. Press the Cooking Time pad. Press the Oven Light On/Off pad again. Press the Oven Light On/Off pad. Press the Start pad to activate the feature. NOTE: This feature can only be able to have a 24...
... The display will not be programmed to work with steps 2 through 3, using the pads for 3 seconds until the display shows SF. Press the Oven Light On/Off pad again. Press the Bake and Broil Hi/Lo pads (on some models) + This feature allows you want, press the Start pad. If... for 3 seconds, until the display shows SF. The display will show OFF. Press the Cooking Time pad. Press the Oven Light On/Off pad again. Press the Oven Light On/Off pad. Press the Start pad to activate the feature. NOTE: This feature can only be able to have a 24...
Owners Manual
Page 20
... pads, at step 4. Press the Start pad and ⊃ will appear in 5° increments. (The Temp + or - On models with a light switch on the control panel, the oven light may be set the desired temperature. Tap the Temp + or - pressing and holding these pads will be set in the display. No... NOTE: To understand how the oven control works, practice using the number pads (on some models) or tap the Temp + or - NOTE: The oven light comes on automatically (on some models) when the door is opened and goes off when the door is set between 170° and 550°...
... pads, at step 4. Press the Start pad and ⊃ will appear in 5° increments. (The Temp + or - On models with a light switch on the control panel, the oven light may be set the desired temperature. Tap the Temp + or - pressing and holding these pads will be set in the display. No... NOTE: To understand how the oven control works, practice using the number pads (on some models) or tap the Temp + or - NOTE: The oven light comes on automatically (on some models) when the door is opened and goes off when the door is set between 170° and 550°...
Owners Manual
Page 24
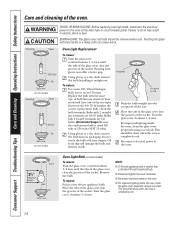
...of the socket. Reconnect electrical power to exceed 50 watts. Wearing latex gloves may result in a new 40-watt appliance bulb. For improved lighting inside the oven, clean the glass cover frequently using a wet cloth. To replace: Use a new 120/130-volt halogen bulb, not...Troubleshooting Tips Care and Cleaning Operating Instructions Safety Instructions Care and cleaning of the socket. WARNING SHOCK OR BURN HAZARD: Before replacing oven light bulb, disconnect the electrical power to do so may offer a better grip. CAUTION BURN HAZARD: The glass cover and bulb should...
...of the socket. Reconnect electrical power to exceed 50 watts. Wearing latex gloves may result in a new 40-watt appliance bulb. For improved lighting inside the oven, clean the glass cover frequently using a wet cloth. To replace: Use a new 120/130-volt halogen bulb, not...Troubleshooting Tips Care and Cleaning Operating Instructions Safety Instructions Care and cleaning of the socket. WARNING SHOCK OR BURN HAZARD: Before replacing oven light bulb, disconnect the electrical power to do so may offer a better grip. CAUTION BURN HAZARD: The glass cover and bulb should...
Owners Manual
Page 26
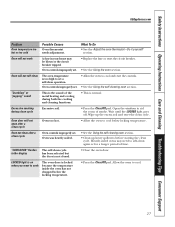
...8226; See the Broiling Guide. • Use the broiling pan and grid that came with your oven. Cookware not suited for service. 26 Pad operating light is cool. • Use the broiling pan and grid that came with your oven. • See the Using the oven section. • Preheat ... controls improperly set . • Replace the fuse or reset the circuit breaker. • See the Using the clock, timer and control lockout section. Light bulb is not level. Review the charts on the the broiling pan and grid has not been fitted properly and slit as recommended. Rack position...
...8226; See the Broiling Guide. • Use the broiling pan and grid that came with your oven. Cookware not suited for service. 26 Pad operating light is cool. • Use the broiling pan and grid that came with your oven. • See the Using the oven section. • Preheat ... controls improperly set . • Replace the fuse or reset the circuit breaker. • See the Using the clock, timer and control lockout section. Light bulb is not level. Review the charts on the the broiling pan and grid has not been fitted properly and slit as recommended. Rack position...
Owners Manual
Page 27
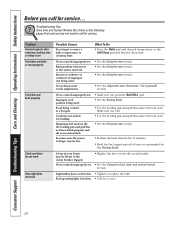
...cycle Oven controls improperly set . • Replace the fuse or reset the circuit breaker. • See the Using the oven section. LOCKED light is on when you want to self-clean again or for a longer period of time. Excessive smoking during both the cooking and cleaning functions.... Tips Consumer Support GEAppliances.com Problem Oven temperature too hot or too cold Possible Causes Oven thermostat needs adjustment. Wait until the LOCKED light goes off. Oven not clean after a clean cycle Oven too hot. • Allow the oven to cool. 27 Heavily soiled ...
...cycle Oven controls improperly set . • Replace the fuse or reset the circuit breaker. • See the Using the oven section. LOCKED light is on when you want to self-clean again or for a longer period of time. Excessive smoking during both the cooking and cleaning functions.... Tips Consumer Support GEAppliances.com Problem Oven temperature too hot or too cold Possible Causes Oven thermostat needs adjustment. Wait until the LOCKED light goes off. Oven not clean after a clean cycle Oven too hot. • Allow the oven to cool. 27 Heavily soiled ...
Owners Manual
Page 29
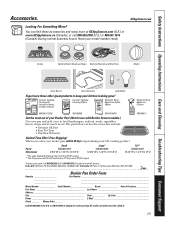
...call 800.626.2002 (U.S.) or 800.661.1616 (Canada) (during normal business hours). The pan below catches the excess fats and oils. • Genuine GE Part • Easy To Clean • One-Year Warranty Limited Time Offer! or 800.661.6161 in 24" wall ovens, 27" drop-ins or...Surface Burner Heads and Caps Surface Elements and Drip Pans Knobs or Oven Racks Oven Elements Light Bulbs Experience these accessories and many more ! When you order your broiler pan within 30 days of your GE cooking product. I_n C_ana_da:_GE_Pa_rts,_1 F_act_ory_Lan_e, M_on_cto_n, _N.B_. All credit card ...
...call 800.626.2002 (U.S.) or 800.661.1616 (Canada) (during normal business hours). The pan below catches the excess fats and oils. • Genuine GE Part • Easy To Clean • One-Year Warranty Limited Time Offer! or 800.661.6161 in 24" wall ovens, 27" drop-ins or...Surface Burner Heads and Caps Surface Elements and Drip Pans Knobs or Oven Racks Oven Elements Light Bulbs Experience these accessories and many more ! When you order your broiler pan within 30 days of your GE cooking product. I_n C_ana_da:_GE_Pa_rts,_1 F_act_ory_Lan_e, M_on_cto_n, _N.B_. All credit card ...


