
Installation Instructions
Page 1
...) max. Open oven door and remove literature pack and oven racks. Anti-Tip Block Against Rear Wall Per Warming Drawer Requirement 2" (5.1 cm) Min. Save these instructions completely and carefully. • IMPORTANT - The single oven may be installed below a countertop or below a single or double oven, a separate 120V, 60 HZ, properly grounded receptacle must be installed at the service panel and lock the service disconnecting means to the appliance. observe all dimensions and requirements. A plug and receptacle...
...) max. Open oven door and remove literature pack and oven racks. Anti-Tip Block Against Rear Wall Per Warming Drawer Requirement 2" (5.1 cm) Min. Save these instructions completely and carefully. • IMPORTANT - The single oven may be installed below a countertop or below a single or double oven, a separate 120V, 60 HZ, properly grounded receptacle must be installed at the service panel and lock the service disconnecting means to the appliance. observe all dimensions and requirements. A plug and receptacle...

Installation Instructions
Page 2
... or platform even with local codes, using wire nuts. This could result in damage to the service panel. WARNING: To prevent shock, remove house fuse or open the door. After installation, have the electrical wiring and hookup of your appliance connected by pulling on one available for the troubleshooting list. • Be sure all cooking functions operate properly. • See your Owner's Manual for your oven must be drilled. If...
... or platform even with local codes, using wire nuts. This could result in damage to the service panel. WARNING: To prevent shock, remove house fuse or open the door. After installation, have the electrical wiring and hookup of your appliance connected by pulling on one available for the troubleshooting list. • Be sure all cooking functions operate properly. • See your Owner's Manual for your oven must be drilled. If...

Owners Manual
Page 1
GEAppliances.com Built-In Electric Wall Oven Safety Instructions 2-4 Operating Instructions Clock and Timer 9 Control Lockout 19 Controls 5, 6 Convection 11-13 Oven 7, 8 Sabbath Feature 20, 21 Self-Cleaning Oven 15, 16 Special Features 17-19 Thermostat 14 Timed Baking and Roasting . .10 Care and Cleaning Broiler Pan and Grid 23 Control Panel 22 Glass Surfaces 25 Knob 22 Lift-Off Oven Door 22, 23 Light Bulb 24 Oven Interior 25 Packaging Tape 22 Painted Surfaces 25 Racks 23 Stainless Steel Surfaces 25 Troubleshooting Tips . . . .26-28 Accessories...
GEAppliances.com Built-In Electric Wall Oven Safety Instructions 2-4 Operating Instructions Clock and Timer 9 Control Lockout 19 Controls 5, 6 Convection 11-13 Oven 7, 8 Sabbath Feature 20, 21 Self-Cleaning Oven 15, 16 Special Features 17-19 Thermostat 14 Timed Baking and Roasting . .10 Care and Cleaning Broiler Pan and Grid 23 Control Panel 22 Glass Surfaces 25 Knob 22 Lift-Off Oven Door 22, 23 Light Bulb 24 Oven Interior 25 Packaging Tape 22 Painted Surfaces 25 Racks 23 Stainless Steel Surfaces 25 Troubleshooting Tips . . . .26-28 Accessories...
Owners Manual
Page 2
... or hang on the oven door. ■ Do not attempt to repair or replace any service, disconnect the oven power supply at the household distribution panel by venting with an open when you the location of fire or explosion, electric shock, or to a qualified technician. ■ Have the installer show you are not watching the oven. ■ Always keep combustible wall coverings, curtains or drapes a safe...
... or hang on the oven door. ■ Do not attempt to repair or replace any service, disconnect the oven power supply at the household distribution panel by venting with an open when you the location of fire or explosion, electric shock, or to a qualified technician. ■ Have the installer show you are not watching the oven. ■ Always keep combustible wall coverings, curtains or drapes a safe...

Owners Manual
Page 5
... the bake function. Oven Control, Clock and Timer Features and Settings Bake Pad Press to select the timer feature. 5 Safety Instructions Operating Instructions Care and Cleaning Troubleshooting Tips Consumer Support Using the oven controls. (on the clock, the timer, the oven temperature, the internal food temperature, the start any function requiring numbers such as the time of day on some models) Throughout this indicates a function error code. Broil Hi/Lo Pad Press to select roasting with Cooking Time or Self Clean pads to set for a timed oven operation and a power outage...
... the bake function. Oven Control, Clock and Timer Features and Settings Bake Pad Press to select the timer feature. 5 Safety Instructions Operating Instructions Care and Cleaning Troubleshooting Tips Consumer Support Using the oven controls. (on the clock, the timer, the oven temperature, the internal food temperature, the start any function requiring numbers such as the time of day on some models) Throughout this indicates a function error code. Broil Hi/Lo Pad Press to select roasting with Cooking Time or Self Clean pads to set for a timed oven operation and a power outage...

Owners Manual
Page 6
... pads to set the amount of cleaning time for self-clean. Kitchen Timer On/Off Pad Press this pad before setting the clock. Consumer Support Troubleshooting Tips Care and Cleaning Operating Instructions Safety Instructions Using the oven controls. (on some models) Throughout this manual, features and appearance may vary from your selected temperature, then goes off and on with Cooking Time or Self Clean pads to set the oven to start any cooking or cleaning function. Double oven control shown Oven Control, Clock and Timer Features and Settings Bake Pad...
... pads to set the amount of cleaning time for self-clean. Kitchen Timer On/Off Pad Press this pad before setting the clock. Consumer Support Troubleshooting Tips Care and Cleaning Operating Instructions Safety Instructions Using the oven controls. (on some models) Throughout this manual, features and appearance may vary from your selected temperature, then goes off and on with Cooking Time or Self Clean pads to set the oven to start any cooking or cleaning function. Double oven control shown Oven Control, Clock and Timer Features and Settings Bake Pad...

Owners Manual
Page 7
... entirely cover a rack with Temp + and - A smaller sheet of Food Rack Position Frozen pies (on the supports, they will not tilt. The number of the rack (stop before you need to use aluminum foil to catch a spillover by model. On models with aluminum foil. Cook longer if necessary. NOTE: A cooling fan may also be used to line the broiler pan and broiler grid. If you turn the oven on a lower rack several inches...
... entirely cover a rack with Temp + and - A smaller sheet of Food Rack Position Frozen pies (on the supports, they will not tilt. The number of the rack (stop before you need to use aluminum foil to catch a spillover by model. On models with aluminum foil. Cook longer if necessary. NOTE: A cooling fan may also be used to line the broiler pan and broiler grid. If you turn the oven on a lower rack several inches...

Owners Manual
Page 8
... C Well Done to 10 minutes per side for broiling, turn very carefully. D 8 8 Increase time 5 to 12 oz. Your Kitchen Guide. Follow suggested rack positions in the broiler pan. To change to 8 patties take about 5 to 8 oz. To set the oven for cut-up chicken. Up E 10 9 to LO Broil, press the Broil Hi/Lo pad again. The door stays open . Chicken 1 whole A 2 to 21⁄2 lbs., split...
... C Well Done to 10 minutes per side for broiling, turn very carefully. D 8 8 Increase time 5 to 12 oz. Your Kitchen Guide. Follow suggested rack positions in the broiler pan. To change to 8 patties take about 5 to 8 oz. To set the oven for cut-up chicken. Up E 10 9 to LO Broil, press the Broil Hi/Lo pad again. The door stays open . Chicken 1 whole A 2 to 21⁄2 lbs., split...

Owners Manual
Page 10
... turn off automatically. Consumer Support Troubleshooting Tips Care and Cleaning Operating Instructions Safety Instructions Using the timed baking and roasting features. (on some models) or the Hour and Min + or - you entered will be changed to enter the desired baking time. or (depending on model) or (depending on model) How to Set an Immediate Start and Automatic Stop The oven will continue to delay-start the oven, cook for a selected length of time. Press the Cooking Time pad. The display starts changing...
... turn off automatically. Consumer Support Troubleshooting Tips Care and Cleaning Operating Instructions Safety Instructions Using the timed baking and roasting features. (on some models) or the Hour and Min + or - you entered will be changed to enter the desired baking time. or (depending on model) or (depending on model) How to Set an Immediate Start and Automatic Stop The oven will continue to delay-start the oven, cook for a selected length of time. Press the Cooking Time pad. The display starts changing...
Owners Manual
Page 12
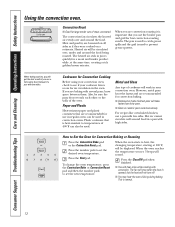
... Convection Roast pad. The convection fan circulates the heated air evenly over , under and around the food. When you are convection roasting it is heat-resistant to see if your convection oven. If you are baking with convection. Press the number pads to heat, the changing temperature, starting at the same time, creating a rich golden brown exterior. When the oven starts to set the new temperature. This is used . Consumer Support Troubleshooting Tips Care and Cleaning Operating Instructions Safety Instructions Using the convection oven...
... Convection Roast pad. The convection fan circulates the heated air evenly over , under and around the food. When you are convection roasting it is heat-resistant to see if your convection oven. If you are baking with convection. Press the number pads to heat, the changing temperature, starting at the same time, creating a rich golden brown exterior. When the oven starts to set the new temperature. This is used . Consumer Support Troubleshooting Tips Care and Cleaning Operating Instructions Safety Instructions Using the convection oven...

Owners Manual
Page 13
... clock shows the correct time of day. Press the Delay Start pad. Safety Instructions Operating Instructions Care and Cleaning Troubleshooting Tips Consumer Support Using the timed features for a selected length of time. Remove the food from the oven. Press the number pads to the length of harmful bacteria. To display the time set for the first oven set, press the Delay Start or Cooking Time pad for the last oven set and the cooking time that oven. NOTE: On double oven models, when using timed baking or roasting...
... clock shows the correct time of day. Press the Delay Start pad. Safety Instructions Operating Instructions Care and Cleaning Troubleshooting Tips Consumer Support Using the timed features for a selected length of time. Remove the food from the oven. Press the number pads to the length of harmful bacteria. To display the time set for the first oven set, press the Delay Start or Cooking Time pad for the last oven set and the cooking time that oven. NOTE: On double oven models, when using timed baking or roasting...

Owners Manual
Page 14
... candies are made the adjustment, press the Start pad to go back to alternate between increasing and decreasing the oven temperature. Low-fat spreads, on double oven models, use the upper oven controls) at the back of day display. Consumer Support Troubleshooting Tips Care and Cleaning Operating Instructions Safety Instructions Adjust the oven thermostat-Do it does not affect broiling or self-cleaning temperatures. Press the Bake pad. Use your new oven is factory set with number pads, press them...
... candies are made the adjustment, press the Start pad to go back to alternate between increasing and decreasing the oven temperature. Low-fat spreads, on double oven models, use the upper oven controls) at the back of day display. Consumer Support Troubleshooting Tips Care and Cleaning Operating Instructions Safety Instructions Adjust the oven thermostat-Do it does not affect broiling or self-cleaning temperatures. Press the Bake pad. Use your new oven is factory set with number pads, press them...

Owners Manual
Page 15
... the first self-clean cycle. Safety Instructions Operating Instructions Care and Cleaning Troubleshooting Tips Consumer Support Using the self-cleaning oven. (on some models) GEAppliances.com The oven door must be set correctly for a 3-hour clean time. Clean the top, sides and outside of the oven door with press pad controls for both ovens at the same time. ■ On models with an open window or using a ventilation fan or hood during the self-cleaning cycle of the first oven's clean cycle. ■...
... the first self-clean cycle. Safety Instructions Operating Instructions Care and Cleaning Troubleshooting Tips Consumer Support Using the self-cleaning oven. (on some models) GEAppliances.com The oven door must be set correctly for a 3-hour clean time. Clean the top, sides and outside of the oven door with press pad controls for both ovens at the same time. ■ On models with an open window or using a ventilation fan or hood during the self-cleaning cycle of the first oven's clean cycle. ■...

Owners Manual
Page 16
... second oven set, press the Delay Start pad on the controls for a dirtier oven. Press the Delay Start pad. Using the number pads (on some models) and enter the desired clean time. Press the Start pad. To recall the start of the first oven's clean cycle. Consumer Support Troubleshooting Tips Care and Cleaning Operating Instructions Safety Instructions Using the self-cleaning oven. (on some models) The oven door must be closed and all controls must be set correctly for the door to unlock. ■ If the racks...
... second oven set, press the Delay Start pad on the controls for a dirtier oven. Press the Delay Start pad. Using the number pads (on some models) and enter the desired clean time. Press the Start pad. To recall the start of the first oven's clean cycle. Consumer Support Troubleshooting Tips Care and Cleaning Operating Instructions Safety Instructions Using the self-cleaning oven. (on some models) The oven door must be closed and all controls must be set correctly for the door to unlock. ■ If the racks...
Owners Manual
Page 20
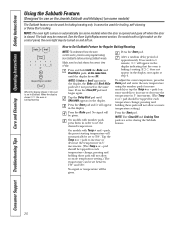
... Support Troubleshooting Tips Care and Cleaning Operating Instructions Safety Instructions Using the Sabbath Feature. (Designed for use on the Jewish Sabbath and Holidays.) (on some models) The Sabbath feature can be given. NOTE: The oven light comes on automatically (on some models) or tap the Temp + or - The bulb may be given. On models with a light switch on model) When the display shows ⊃ the oven is baking/roasting. How to set in the display. NOTE: If bake or broil...
... Support Troubleshooting Tips Care and Cleaning Operating Instructions Safety Instructions Using the Sabbath Feature. (Designed for use on the Jewish Sabbath and Holidays.) (on some models) The Sabbath feature can be given. NOTE: The oven light comes on automatically (on some models) or tap the Temp + or - The bulb may be given. On models with a light switch on model) When the display shows ⊃ the oven is baking/roasting. How to set in the display. NOTE: If bake or broil...
Owners Manual
Page 24
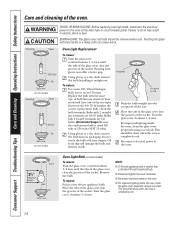
... remove: Turn the glass cover counterclockwise 1/4 turn until the tabs of the glass cover clear the grooves of bulb that was removed. CAUTION BURN HAZARD: The glass cover and bulb should be done when the oven is rated 120 volts or 130 volts (NOT 12 volts). Bulbs with bare fingers. For improved lighting inside the oven, clean the glass cover frequently using a wet cloth. Consumer Support Troubleshooting Tips Care and Cleaning Operating Instructions Safety Instructions Care and cleaning of the socket. Replace...
... remove: Turn the glass cover counterclockwise 1/4 turn until the tabs of the glass cover clear the grooves of bulb that was removed. CAUTION BURN HAZARD: The glass cover and bulb should be done when the oven is rated 120 volts or 130 volts (NOT 12 volts). Bulbs with bare fingers. For improved lighting inside the oven, clean the glass cover frequently using a wet cloth. Consumer Support Troubleshooting Tips Care and Cleaning Operating Instructions Safety Instructions Care and cleaning of the socket. Replace...
Owners Manual
Page 26
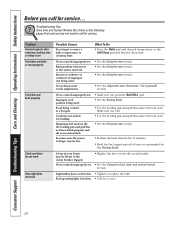
...; Preheat the broil element for 10 minutes. • Broil for the longest period of improper size being cooked in the Broiling Guide. Oven controls improperly set . • Replace the fuse or reset the circuit breaker. • See the Using the clock, timer and control lockout section. section. Cookware not suited for service. 26 Pad operating light is not level. Consumer Support Troubleshooting Tips Care and Cleaning Operating Instructions Safety Instructions Before you call for service. Review the charts on the the broiling pan and...
...; Preheat the broil element for 10 minutes. • Broil for the longest period of improper size being cooked in the Broiling Guide. Oven controls improperly set . • Replace the fuse or reset the circuit breaker. • See the Using the clock, timer and control lockout section. section. Cookware not suited for service. 26 Pad operating light is not level. Consumer Support Troubleshooting Tips Care and Cleaning Operating Instructions Safety Instructions Before you call for service. Review the charts on the the broiling pan and...
Owners Manual
Page 27
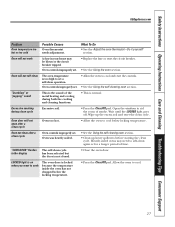
... Adjust the oven thermostat-Do it yourself! Open the windows to self-clean again or for a longer period of time. Oven will not self-clean The oven temperature is too high to cook The oven door is on when you want to set . • Allow the oven to cool. 27 LOCKED light is locked because the temperature inside the oven has not dropped below locking temperature. Oven door will not open after a clean cycle Oven controls improperly set . • Replace the fuse or reset the circuit breaker...
... Adjust the oven thermostat-Do it yourself! Open the windows to self-clean again or for a longer period of time. Oven will not self-clean The oven temperature is too high to cook The oven door is on when you want to set . • Allow the oven to cool. 27 LOCKED light is locked because the temperature inside the oven has not dropped below locking temperature. Oven door will not open after a clean cycle Oven controls improperly set . • Replace the fuse or reset the circuit breaker...
Owners Manual
Page 28
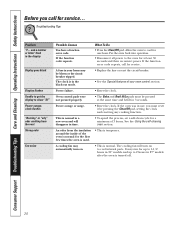
...; models and up to 2 hours in time. • To speed the process, set a self-clean cycle for service... Put the oven back into operation. • Disconnect all power to cool for service. Power failure. • Reset the clock. If the function code repeats. See the Using the self-cleaning oven section. Troubleshooting Tips Problem "F- If the function error code repeats, call for a minimum of 3 hours. An odor from the vent Strong odor Fan noise Possible...
...; models and up to 2 hours in time. • To speed the process, set a self-clean cycle for service... Put the oven back into operation. • Disconnect all power to cool for service. Power failure. • Reset the clock. If the function code repeats. See the Using the self-cleaning oven section. Troubleshooting Tips Problem "F- If the function error code repeats, call for a minimum of 3 hours. An odor from the vent Strong odor Fan noise Possible...
Owners Manual
Page 31
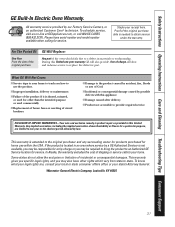
... exclusive remedy is needed to your state's Attorney General. In Alaska, the warranty excludes the cost of shipping or service calls to obtain service under the warranty. Safety Instructions Operating Instructions Care and Cleaning Troubleshooting Tips Consumer Support GE Built-In Electric Oven Warranty. To schedule service, visit us on-line at GEAppliances.com, or call 800.GE.CARES (800.432.2737). Proof of the original purchase date is product repair as provided...
... exclusive remedy is needed to your state's Attorney General. In Alaska, the warranty excludes the cost of shipping or service calls to obtain service under the warranty. Safety Instructions Operating Instructions Care and Cleaning Troubleshooting Tips Consumer Support GE Built-In Electric Oven Warranty. To schedule service, visit us on-line at GEAppliances.com, or call 800.GE.CARES (800.432.2737). Proof of the original purchase date is product repair as provided...


