User Manual
Page 1
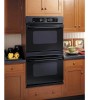
Built-In Electric Wall Oven ge.com Safety Instructions 2-4 Operating Instructions Clock and Timer 13 Control Lockout 13 Controls 5 Oven 11, 12 Sabbath Feature 9, 10 Self-Cleaning Oven . . . . . .16, 17 Special Features 6-8 Thermostat 15 Timed Baking and Roasting . .14 Care and Cleaning Control... Panel 18 Glass Surfaces 21 Heating Element 21 Knob 18 Lift-Off Oven Door . . . . . .18, 19 Light Bulb 20 Oven Interior 21 Packaging Tape 18 Painted Surfaces 21 Shelves 19 Stainless Steel Surfaces . . . . . .21 Troubleshooting Tips ...
Built-In Electric Wall Oven ge.com Safety Instructions 2-4 Operating Instructions Clock and Timer 13 Control Lockout 13 Controls 5 Oven 11, 12 Sabbath Feature 9, 10 Self-Cleaning Oven . . . . . .16, 17 Special Features 6-8 Thermostat 15 Timed Baking and Roasting . .14 Care and Cleaning Control... Panel 18 Glass Surfaces 21 Heating Element 21 Knob 18 Lift-Off Oven Door . . . . . .18, 19 Light Bulb 20 Oven Interior 21 Packaging Tape 18 Painted Surfaces 21 Shelves 19 Stainless Steel Surfaces . . . . . .21 Troubleshooting Tips ...
User Manual
Page 2
...utensils and canned food a safe distance away from your appliance is firmly attached to play with the controls or any part of your oven. s Teach children not to the house structure. s Always keep combustible wall coverings, curtains or drapes a safe distance from your safety...to warn customers of life. All other reproductive harm, and requires businesses to sit or stand on any service, disconnect the oven power supply at the household distribution panel by venting with the provided installation instructions. IMPORTANT SAFETY NOTICE The California Safe Drinking ...
...utensils and canned food a safe distance away from your appliance is firmly attached to play with the controls or any part of your oven. s Teach children not to the house structure. s Always keep combustible wall coverings, curtains or drapes a safe distance from your safety...to warn customers of life. All other reproductive harm, and requires businesses to sit or stand on any service, disconnect the oven power supply at the household distribution panel by venting with the provided installation instructions. IMPORTANT SAFETY NOTICE The California Safe Drinking ...

User Manual
Page 3
...Consumer Support ge.com WARNING! SAFETY PRECAUTIONS s Do not store flammable materials in cabinets over the oven. s CAUTION: Items of this or any interior area of the window and metal trim parts above an oven; Be careful when reaching for items stored in an oven. Flammable ... hot heating elements. s Flame in or near the openings, crevices around the oven door, the edges of the oven; s Keep the oven free from the oven when opening the oven door. s Potentially hot surfaces include oven vent openings, surfaces near your appliance for cooling first. s Never leave jars...
...Consumer Support ge.com WARNING! SAFETY PRECAUTIONS s Do not store flammable materials in cabinets over the oven. s CAUTION: Items of this or any interior area of the window and metal trim parts above an oven; Be careful when reaching for items stored in an oven. Flammable ... hot heating elements. s Flame in or near the openings, crevices around the oven door, the edges of the oven; s Keep the oven free from the oven when opening the oven door. s Potentially hot surfaces include oven vent openings, surfaces near your appliance for cooling first. s Never leave jars...
User Manual
Page 4
...Tips Care and Cleaning Operating Instructions Safety Instructions IMPORTANT SAFETY INFORMATION. I Do not leave paper products, cooking utensils or food in the oven when not in use oven cleaners. I Pulling out the shelf to the stop-lock is essential for a storage area. Have it . SAVE THESE INSTRUCTIONS ...use . I Do not clean the door gasket. COOK MEAT AND POULTRY THOROUGHLY... Cooking to rub, damage or move the gasket. SELF-CLEANING OVEN I Clean only parts listed in lifting heavy foods. I Do not use aluminum foil to at least an INTERNAL temperature of 160°F and ...
...Tips Care and Cleaning Operating Instructions Safety Instructions IMPORTANT SAFETY INFORMATION. I Do not leave paper products, cooking utensils or food in the oven when not in use oven cleaners. I Pulling out the shelf to the stop-lock is essential for a storage area. Have it . SAVE THESE INSTRUCTIONS ...use . I Do not clean the door gasket. COOK MEAT AND POULTRY THOROUGHLY... Cooking to rub, damage or move the gasket. SELF-CLEANING OVEN I Clean only parts listed in lifting heavy foods. I Do not use aluminum foil to at least an INTERNAL temperature of 160°F and ...
User Manual
Page 5
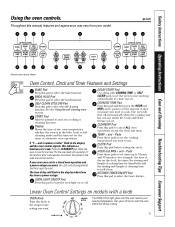
... bake function. Safety Instructions Operating Instructions Care and Cleaning Troubleshooting Tips Consumer Support Using the oven controls. ge.com Double oven control shown Oven Control, Clock and Timer Features and Settings BAKE Pad Press this pad to cool for a timed oven operation and a power outage occurred, the clock and all programmed functions must be pressed...
... bake function. Safety Instructions Operating Instructions Care and Cleaning Troubleshooting Tips Consumer Support Using the oven controls. ge.com Double oven control shown Oven Control, Clock and Timer Features and Settings BAKE Pad Press this pad to cool for a timed oven operation and a power outage occurred, the clock and all programmed functions must be pressed...

User Manual
Page 6
...in this feature is showing the time of your choice, press the START pad. The display will show F (Fahrenheit). NOTE: s On models with oven knob(s), this feature is set in memory after a power failure, except for the Sabbath feature, which will be reset. 12-Hour Shut-Off With ...off) feature and leave the control set to use the Fahrenheit temperature selections but you may change this to be displayed for both ovens. Press the upper oven BAKE and BROIL HI/LO pads at the same time for 3 seconds until the display shows SF. NOTE: s On models with...
...in this feature is showing the time of your choice, press the START pad. The display will show F (Fahrenheit). NOTE: s On models with oven knob(s), this feature is set in memory after a power failure, except for the Sabbath feature, which will be reset. 12-Hour Shut-Off With ...off) feature and leave the control set to use the Fahrenheit temperature selections but you may change this to be displayed for both ovens. Press the upper oven BAKE and BROIL HI/LO pads at the same time for 3 seconds until the display shows SF. NOTE: s On models with...

User Manual
Page 7
...: If the clock is pressed. Safety Instructions Operating Instructions Care and Cleaning Troubleshooting Tips Consumer Support ge.com Tones at the End of a Timed Cycle At the end of cycle tone for the lower oven. 12-Hour, 24-Hour or Clock Black-Out Your control is the choice you would prefer to... display, follow the steps below. Press the CLOCK pad again to the 24-hour military time clock. To cancel the 6-second beep: Press the upper oven BAKE and BROIL HI/LO pads at the same time for 3 seconds until the display shows SF. The display shows CON BEEP (continuous beep). The...
...: If the clock is pressed. Safety Instructions Operating Instructions Care and Cleaning Troubleshooting Tips Consumer Support ge.com Tones at the End of a Timed Cycle At the end of cycle tone for the lower oven. 12-Hour, 24-Hour or Clock Black-Out Your control is the choice you would prefer to... display, follow the steps below. Press the CLOCK pad again to the 24-hour military time clock. To cancel the 6-second beep: Press the upper oven BAKE and BROIL HI/LO pads at the same time for 3 seconds until the display shows SF. The display shows CON BEEP (continuous beep). The...
User Manual
Page 8
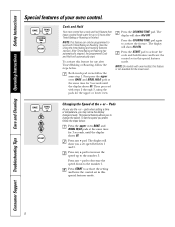
... + pad. pad to decrease the speed down to activate the feature. Press the COOKING TIME pad again to the number 1. Changing the Speed of your oven control. This special feature allows you prefer, follow the same step 1. Press any + pad to increase the speed up to the number 5. Then proceed with.... Cook and Hold Your new control has a cook and hold feature and leave the control set in this feature is finished. First press the upper oven BAKE and BROIL HI/LO pads at the same time for 3 seconds, until the display shows SF. Pads As you may notice the display changes...
... + pad. pad to decrease the speed down to activate the feature. Press the COOKING TIME pad again to the number 1. Changing the Speed of your oven control. This special feature allows you prefer, follow the same step 1. Press any + pad to increase the speed up to the number 5. Then proceed with.... Cook and Hold Your new control has a cook and hold feature and leave the control set in this feature is finished. First press the upper oven BAKE and BROIL HI/LO pads at the same time for 3 seconds, until the display shows SF. Pads As you may notice the display changes...
User Manual
Page 9
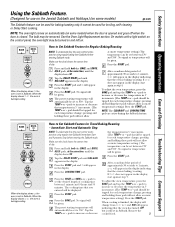
... and Cleaning Troubleshooting Tips Consumer Support Using the Sabbath Feature. (Designed for use on the Jewish Sabbath and Holidays.) (on some models) ge.com The Sabbath feature can be used for broiling, self-cleaning or Delay Start cooking. The bulb may be removed. If ⊃ ... change ; When cooking is finished, the display will change ; How to Set Sabbath Feature for Regular Baking/Roasting NOTE: To understand how the oven control works, practice using regular (non-Sabbath) Immediate Start and Automatic Stop before entering Sabbath mode. Press the HOUR and MIN + or -...
... and Cleaning Troubleshooting Tips Consumer Support Using the Sabbath Feature. (Designed for use on the Jewish Sabbath and Holidays.) (on some models) ge.com The Sabbath feature can be used for broiling, self-cleaning or Delay Start cooking. The bulb may be removed. If ⊃ ... change ; When cooking is finished, the display will change ; How to Set Sabbath Feature for Regular Baking/Roasting NOTE: To understand how the oven control works, practice using regular (non-Sabbath) Immediate Start and Automatic Stop before entering Sabbath mode. Press the HOUR and MIN + or -...
User Manual
Page 10
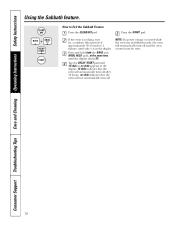
Tap the DELAY START pad until 12 shdn or no shdn indicates that the oven will automatically turn off and the oven control must be reset. 10 Press and hold both the BAKE and BROIL HI/LO pads, at the same time, until only ⊃ is cooking, ... to Exit the Sabbath Feature Press the CLEAR/OFF pad. NOTE: If a power outage occurred while the oven was in the display. no shdn appears in the display. 12 shdn indicates that the oven will automatically turn off. Consumer Support Troubleshooting Tips Care and Cleaning Operating Instructions Safety Instructions Using the Sabbath...
Tap the DELAY START pad until 12 shdn or no shdn indicates that the oven will automatically turn off and the oven control must be reset. 10 Press and hold both the BAKE and BROIL HI/LO pads, at the same time, until only ⊃ is cooking, ... to Exit the Sabbath Feature Press the CLEAR/OFF pad. NOTE: If a power outage occurred while the oven was in the display. no shdn appears in the display. 12 shdn indicates that the oven will automatically turn off. Consumer Support Troubleshooting Tips Care and Cleaning Operating Instructions Safety Instructions Using the Sabbath...
User Manual
Page 11
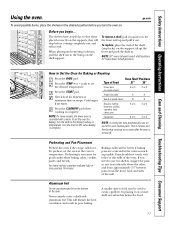
...pads to run even after the oven is not directly above the other or the walls of the oven. NOTE: On some models, the lower oven is complete. Baking results will disturb the heat circulation and result in the oven as much as possible. ge.com To avoid possible burns, place... START pad. A smaller sheet of the shelf (stop -locks, so that when placed correctly on recipe. NOTE: 30 ″ ovens (shown) have 6 shelf positions. 27 ″ovens have stop -locks) on . To preheat, set the desired temperature. To replace, place the end of foil may automatically turn the...
...pads to run even after the oven is not directly above the other or the walls of the oven. NOTE: On some models, the lower oven is complete. Baking results will disturb the heat circulation and result in the oven as much as possible. ge.com To avoid possible burns, place... START pad. A smaller sheet of the shelf (stop -locks, so that when placed correctly on recipe. NOTE: 30 ″ ovens (shown) have 6 shelf positions. 27 ″ovens have stop -locks) on . To preheat, set the desired temperature. To replace, place the end of foil may automatically turn the...

User Manual
Page 12
... broiler grid in the Broiling Guide. The size, weight, thickness, starting temperature and your oven is complete. 27" 27" Ovens 27" Ovens 30" Ovens 30" Ovens 30" Ovens Quantity and/ Ovens Shelf First Side Second Side Shelf First Side Second Side Food or Thickness Position Time (min...Medium Well Done 11⁄2″ thick 2 to 3/4″ thick 7 E 10 7 Space evenly. Spread open by preheating the broiler and positioning the oven shelf one position higher. Preheat broiler to 10 minutes per side for broiling. Ham Slices 1″ thick (precooked) B 8 8 D 8 8 ...
... broiler grid in the Broiling Guide. The size, weight, thickness, starting temperature and your oven is complete. 27" 27" Ovens 27" Ovens 30" Ovens 30" Ovens 30" Ovens Quantity and/ Ovens Shelf First Side Second Side Shelf First Side Second Side Food or Thickness Position Time (min...Medium Well Done 11⁄2″ thick 2 to 3/4″ thick 7 E 10 7 Space evenly. Spread open by preheating the broiler and positioning the oven shelf one position higher. Preheat broiler to 10 minutes per side for broiling. Ham Slices 1″ thick (precooked) B 8 8 D 8 8 ...

User Manual
Page 13
...TIMER ON/OFF pad and then pressing the HOUR and MIN + or - NOTE: On models with oven knob(s), this feature is not available for 3 seconds until the last minute is counting down , ... this feature for both ovens. s The control lockout mode affects all touch pads. The time of time you make a mistake, press KITCHEN TIMER ON/OFF and begin again. ge.com Press the CLOCK pad. ...Press the HOUR and MIN + or - To Cancel the Timer Press KITCHEN TIMER ON/OFF pad twice. To unlock the control, press the HOUR and MIN - s On models with touch pad controls for both ovens...
...TIMER ON/OFF pad and then pressing the HOUR and MIN + or - NOTE: On models with oven knob(s), this feature is not available for 3 seconds until the last minute is counting down , ... this feature for both ovens. s The control lockout mode affects all touch pads. The time of time you make a mistake, press KITCHEN TIMER ON/OFF and begin again. ge.com Press the CLOCK pad. ...Press the HOUR and MIN + or - To Cancel the Timer Press KITCHEN TIMER ON/OFF pad twice. To unlock the control, press the HOUR and MIN - s On models with touch pad controls for both ovens...
User Manual
Page 14
...using self-clean in the display will be changed to clear the display. How to check the length of NOTE: If your oven control section. The oven will turn on at the time of cooking time you have set . Press the COOKING TIME pad. Consumer Support Troubleshooting Tips ...stuffings, poultry and pork-should not be allowed to sit for more than 59 minutes should be displayed. Using the TEMP + or - The oven will speed harmful bacteria growth. See the Special features of time and then turn off because heat from the bulb will continue to Using the...
...using self-clean in the display will be changed to clear the display. How to check the length of NOTE: If your oven control section. The oven will turn on at the time of cooking time you have set . Press the COOKING TIME pad. Consumer Support Troubleshooting Tips ...stuffings, poultry and pork-should not be allowed to sit for more than 59 minutes should be displayed. Using the TEMP + or - The oven will speed harmful bacteria growth. See the Special features of time and then turn off because heat from the bulb will continue to Using the...
User Manual
Page 15
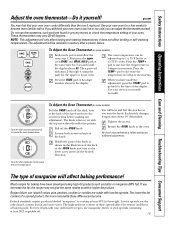
ge.com You may find that your oven. These thermometers may not give the same results as shown in the illustration of the back of day display. Press the TEMP + pad to decrease the oven temperature. Press the TEMP - A two-digit number shows in the desired direction. To Adjust the Oven Thermostat ... cooler. Loosen both parts of the knob as with it yourself! If you have been developed using the pads for the upper or lower oven. For best results with the top screw directly under the pointer. Use your old favorite recipes, use thermometers, such as butter or margarine (...
ge.com You may find that your oven. These thermometers may not give the same results as shown in the illustration of the back of day display. Press the TEMP + pad to decrease the oven temperature. Press the TEMP - A two-digit number shows in the desired direction. To Adjust the Oven Thermostat ... cooler. Loosen both parts of the knob as with it yourself! If you have been developed using the pads for the upper or lower oven. For best results with the top screw directly under the pointer. Use your old favorite recipes, use thermometers, such as butter or margarine (...
User Manual
Page 16
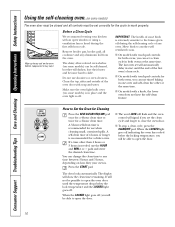
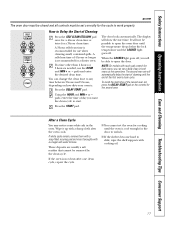
... Cleaning Press the SELF CLEAN STD/LOW pad once for a 4-hour clean time or twice for both ovens, you can use timed baking in place and the oven light is extremely sensitive to the fumes given off . s On models with touch pad controls for a 3-hour clean time. How ...The door locks automatically. Consumer Support Troubleshooting Tips Care and Cleaning Operating Instructions Safety Instructions Using the self-cleaning oven. (on some models) The oven door must be closed and all cookware and any oven. Clean the top, sides and outside of 4 hours or longer is . It will not be self...
... Cleaning Press the SELF CLEAN STD/LOW pad once for a 4-hour clean time or twice for both ovens, you can use timed baking in place and the oven light is extremely sensitive to the fumes given off . s On models with touch pad controls for a 3-hour clean time. How ...The door locks automatically. Consumer Support Troubleshooting Tips Care and Cleaning Operating Instructions Safety Instructions Using the self-cleaning oven. (on some models) The oven door must be closed and all cookware and any oven. Clean the top, sides and outside of 4 hours or longer is . It will not be self...
User Manual
Page 17
...to start. Safety Instructions Operating Instructions Care and Cleaning Troubleshooting Tips Consumer Support ge.com The oven door must be closed and all controls must be set correctly for the cycle to open the oven door until the temperature drops below the lock temperature and the LOCKED light ... display will automatically delay the start time. Press the DELAY START pad. The second oven set , press the DELAY START pad on how dirty your oven is recommended for a dirtier oven. If the oven is needed, use when cleaning small, contained spills. How to unlock. pads and enter...
...to start. Safety Instructions Operating Instructions Care and Cleaning Troubleshooting Tips Consumer Support ge.com The oven door must be closed and all controls must be set correctly for the cycle to open the oven door until the temperature drops below the lock temperature and the LOCKED light ... display will automatically delay the start time. Press the DELAY START pad. The second oven set , press the DELAY START pad on how dirty your oven is recommended for a dirtier oven. If the oven is needed, use when cleaning small, contained spills. How to unlock. pads and enter...
User Manual
Page 18
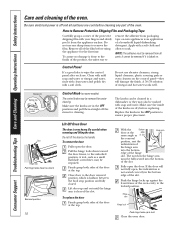
... all of the film before replacing. Be careful when removing and lifting the door. How to the locked position. A 50/50 solution of the oven. Make sure the inside of the knobs are cool before cleaning any sharp items to soak. Do not lift the door by the handle. A ... Make sure the knobs are in the bottom edge of the slot. Do not use abrasive cleansers, strong liquid cleansers, plastic scouring pads or oven cleaners on new appliances is clear of the slot. To remove the door: Fully open the door. Consumer Support Troubleshooting Tips Care and Cleaning ...
... all of the film before replacing. Be careful when removing and lifting the door. How to the locked position. A 50/50 solution of the oven. Make sure the inside of the knobs are cool before cleaning any sharp items to soak. Do not lift the door by the handle. A ... Make sure the knobs are in the bottom edge of the slot. Do not use abrasive cleansers, strong liquid cleansers, plastic scouring pads or oven cleaners on new appliances is clear of the slot. To remove the door: Fully open the door. Consumer Support Troubleshooting Tips Care and Cleaning ...

User Manual
Page 19
... of the door. You may cause a dull spot even after cleaning. Do not allow food spills with a mild abrasive cleaner. They may also use an oven cleaner. If necessary, you may require cleaning with a high sugar or acid content (such as tomatoes, sauerkraut, fruit juices or pie filling) to abrasion.... clean the inside the gasket is cool, clean and rinse. Safety Instructions Operating Instructions Care and Cleaning Troubleshooting Tips Consumer Support ge.com Do not rub or clean the door gasket- If you notice the gasket becoming worn, frayed or damaged in color, lose their luster ...
... of the door. You may cause a dull spot even after cleaning. Do not allow food spills with a mild abrasive cleaner. They may also use an oven cleaner. If necessary, you may require cleaning with a high sugar or acid content (such as tomatoes, sauerkraut, fruit juices or pie filling) to abrasion.... clean the inside the gasket is cool, clean and rinse. Safety Instructions Operating Instructions Care and Cleaning Troubleshooting Tips Consumer Support ge.com Do not rub or clean the door gasket- If you notice the gasket becoming worn, frayed or damaged in color, lose their luster ...

User Manual
Page 20
...cool. NOTE: s A 40-watt appliance bulb is smaller than a standard 40-watt household bulb. For improved lighting inside the oven, clean the glass cover frequently using a wet cloth. To remove: Turn the glass cover counterclockwise 1/4 turn until the tabs of ... glass cover clockwise 1/4 turn . Place the tabs of the glass cover into the receptacle all the way. Reconnect electrical power to the oven. Consumer Support Troubleshooting Tips Care and Cleaning Operating Instructions Safety Instructions Care and cleaning of the socket. Before replacing the bulb, disconnect electrical ...
...cool. NOTE: s A 40-watt appliance bulb is smaller than a standard 40-watt household bulb. For improved lighting inside the oven, clean the glass cover frequently using a wet cloth. To remove: Turn the glass cover counterclockwise 1/4 turn until the tabs of ... glass cover clockwise 1/4 turn . Place the tabs of the glass cover into the receptacle all the way. Reconnect electrical power to the oven. Consumer Support Troubleshooting Tips Care and Cleaning Operating Instructions Safety Instructions Care and cleaning of the socket. Before replacing the bulb, disconnect electrical ...


