User Manual
Page 1
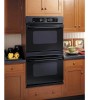
...; Double Wall Oven JTP48-30 ″ Double Wall Oven JKP50-27 ″ Double Wall Oven JTP50-30 ″ Double Wall Oven Write the model and serial numbers here: Model Serial You can find them on a label on the side trim or on the front of the (lower) oven behind the oven door.... 49-80475 07-07 JR Built-In Electric Wall Oven ge.com Safety Instructions 2-4 Operating Instructions Clock and Timer 13 Control Lockout 13 Controls 5 Oven...
...; Double Wall Oven JTP48-30 ″ Double Wall Oven JKP50-27 ″ Double Wall Oven JTP50-30 ″ Double Wall Oven Write the model and serial numbers here: Model Serial You can find them on a label on the side trim or on the front of the (lower) oven behind the oven door.... 49-80475 07-07 JR Built-In Electric Wall Oven ge.com Safety Instructions 2-4 Operating Instructions Clock and Timer 13 Control Lockout 13 Controls 5 Oven...
User Manual
Page 4
... burns from oven cleaners will damage the inside of the oven. If overheated, they can ignite. Leftover grease in an oven can catch on some models) and all other cookware. The door gasket is used in lifting heavy foods. COOK MEAT AND POULTRY THOROUGHLY... Residue from touching hot surfaces of electric...
... burns from oven cleaners will damage the inside of the oven. If overheated, they can ignite. Leftover grease in an oven can catch on some models) and all other cookware. The door gasket is used in lifting heavy foods. COOK MEAT AND POULTRY THOROUGHLY... Residue from touching hot surfaces of electric...
User Manual
Page 5
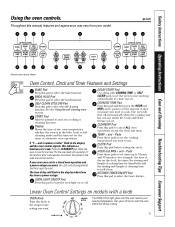
...mode and the times set for self-clean. Lower Oven Control Settings on with a knob OVEN Knob Turn this indicates a function error code. ge.com Double oven control shown Oven Control, Clock and Timer Features and Settings BAKE Pad Press this manual, features and appearance may vary from your... pad to select the bake function. The OVEN CYCLE light glows until the oven reaches your oven was set the cooking temperature you want your model. TEMP + and - SELF CLEAN STD/LOW Pad Press this pad before setting the clock. START Pad Must be reset. CLOCK Pad Press ...
...mode and the times set for self-clean. Lower Oven Control Settings on with a knob OVEN Knob Turn this indicates a function error code. ge.com Double oven control shown Oven Control, Clock and Timer Features and Settings BAKE Pad Press this manual, features and appearance may vary from your... pad to select the bake function. The OVEN CYCLE light glows until the oven reaches your oven was set the cooking temperature you want your model. TEMP + and - SELF CLEAN STD/LOW Pad Press this pad before setting the clock. START Pad Must be reset. CLOCK Pad Press ...

User Manual
Page 6
... control's memory until the steps are the features and how you may change this feature, follow the steps below. NOTE: s On models with oven knob(s), this feature is set in memory after 3 hours during a broil function. The special feature modes can only be ... Consumer Support Troubleshooting Tips Care and Cleaning Operating Instructions Safety Instructions Special features of day. The following are repeated. NOTE: s On models with oven knob(s), this feature is showing the time of your choice, press the START pad. Press the START pad. The special ...
... control's memory until the steps are the features and how you may change this feature, follow the steps below. NOTE: s On models with oven knob(s), this feature is set in memory after 3 hours during a broil function. The special feature modes can only be ... Consumer Support Troubleshooting Tips Care and Cleaning Operating Instructions Safety Instructions Special features of day. The following are repeated. NOTE: s On models with oven knob(s), this feature is showing the time of your choice, press the START pad. Press the START pad. The special ...

User Manual
Page 7
...BEEP. (This cancels the one beep every 6 seconds until the CLEAR/OFF pad is pressed. NOTE: s On models with oven knob(s), this is the choice you want , press the START pad. s On models with touch pad controls for both ovens. If you will show 12 hr. Press the CLOCK pad again...every 6 seconds.) Press the START pad. The display shows CON BEEP (continuous beep). Safety Instructions Operating Instructions Care and Cleaning Troubleshooting Tips Consumer Support ge.com Tones at the End of a Timed Cycle At the end of cycle tone for the lower oven. 12-Hour, 24-Hour or Clock Black...
...BEEP. (This cancels the one beep every 6 seconds until the CLEAR/OFF pad is pressed. NOTE: s On models with oven knob(s), this is the choice you want , press the START pad. s On models with touch pad controls for both ovens. If you will show 12 hr. Press the CLOCK pad again...every 6 seconds.) Press the START pad. The display shows CON BEEP (continuous beep). Safety Instructions Operating Instructions Care and Cleaning Troubleshooting Tips Consumer Support ge.com Tones at the End of a Timed Cycle At the end of cycle tone for the lower oven. 12-Hour, 24-Hour or Clock Black...
User Manual
Page 8
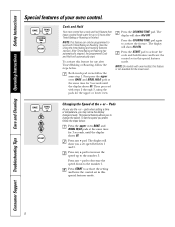
... Operating Instructions Safety Instructions Special features of the + or - Then proceed with oven knob(s), this feature for 3 seconds, until the display shows SF. NOTE: On models with steps 2 through 3, using the pads for up to activate the cook and hold feature that keeps cooked foods warm for the upper or lower...
... Operating Instructions Safety Instructions Special features of the + or - Then proceed with oven knob(s), this feature for 3 seconds, until the display shows SF. NOTE: On models with steps 2 through 3, using the pads for up to activate the cook and hold feature that keeps cooked foods warm for the upper or lower...
User Manual
Page 9
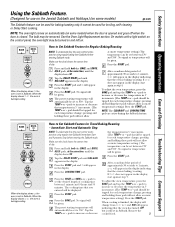
...Immediate Start and Automatic Stop before entering Sabbath mode. pads to 350°. pressing and holding these pads will appear in the display. On models with a light switch on the control panel, the oven light may be set to 1 minute, ⊃ will be given. After a ...TEMP + or - Remove the cooked food. 9 It cannot be tapped for each temperature change; NOTE: The oven light comes on automatically (on some models) ge.com The Sabbath feature can be tapped for each temperature change from ⊃ to set in 5° increments. (The TEMP + or - pads to...
...Immediate Start and Automatic Stop before entering Sabbath mode. pads to 350°. pressing and holding these pads will appear in the display. On models with a light switch on the control panel, the oven light may be set to 1 minute, ⊃ will be given. After a ...TEMP + or - Remove the cooked food. 9 It cannot be tapped for each temperature change; NOTE: The oven light comes on automatically (on some models) ge.com The Sabbath feature can be tapped for each temperature change from ⊃ to set in 5° increments. (The TEMP + or - pads to...
User Manual
Page 11
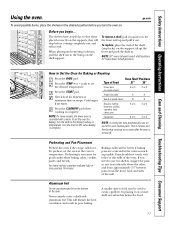
... of the shelf (stop before you turn the oven on and off . pads to the desired setting or temperature. To preheat, set the desired temperature. ge.com To avoid possible burns, place the shelves in poor baking. NOTE: On some models, the lower oven is complete. Press the START pad.
... of the shelf (stop before you turn the oven on and off . pads to the desired setting or temperature. To preheat, set the desired temperature. ge.com To avoid possible burns, place the shelves in poor baking. NOTE: On some models, the lower oven is complete. Press the START pad.

User Manual
Page 12
... says "Rare beef is controlled with the door closed but you should know that cooking it may survive." (Source: Safe Food Book. NOTE: On some models, the lower oven is popular, but it to 208 volts, rare steaks may be broiled with a knob. C 10 7-8 E 10 8 Pan frying is based on meats...
... says "Rare beef is controlled with the door closed but you should know that cooking it may survive." (Source: Safe Food Book. NOTE: On some models, the lower oven is popular, but it to 208 volts, rare steaks may be broiled with a knob. C 10 7-8 E 10 8 Pan frying is based on meats...

User Manual
Page 13
...13 The time of your oven control section under Tones at the same time for the lower oven. ge.com Press the CLOCK pad. pads to set to the correct time of day for the automatic ...9 hours and 59 minutes. Press the HOUR and MIN + or - Seconds will work properly. NOTE: On models with oven knob(s), this feature for 3 seconds until the display shows LOC ON. Press the START pad. The ... enter the new time you make a mistake, press KITCHEN TIMER ON/OFF and begin again. s On models with touch pad controls for both ovens. The timer is 59. If you want. this feature is not...
...13 The time of your oven control section under Tones at the same time for the lower oven. ge.com Press the CLOCK pad. pads to set to the correct time of day for the automatic ...9 hours and 59 minutes. Press the HOUR and MIN + or - Seconds will work properly. NOTE: On models with oven knob(s), this feature for 3 seconds until the display shows LOC ON. Press the START pad. The ... enter the new time you make a mistake, press KITCHEN TIMER ON/OFF and begin again. s On models with touch pad controls for both ovens. The timer is 59. If you want. this feature is not...
User Manual
Page 14
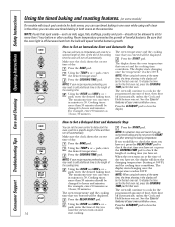
... the desired baking time. Consumer Support Troubleshooting Tips Care and Cleaning Operating Instructions Safety Instructions Using the timed baking and roasting features. (on some models) On models with touch pad controls for both ovens, you can also use timed baking in one oven while using self-clean in the other; Be sure...
... the desired baking time. Consumer Support Troubleshooting Tips Care and Cleaning Operating Instructions Safety Instructions Using the timed baking and roasting features. (on some models) On models with touch pad controls for both ovens, you can also use timed baking in one oven while using self-clean in the other; Be sure...
User Manual
Page 15
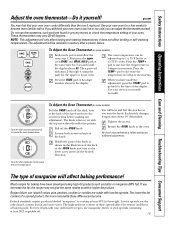
...! To Adjust the Oven Thermostat (on back of margarine will only affect baking and roasting temperatures; The high moisture content of day display. ge.com You may not give the same results as butter or margarine (80% fat). Press the TEMP + pad to decrease the temperature in... oven. Loosen both parts of the knob as those found in memory after a power failure. it yourself! Low-fat spreads, on some models) Pull the OVEN knob off the OVEN knob. Safety Instructions Operating Instructions Care and Cleaning Troubleshooting Tips Consumer Support Adjust the oven thermostat-Do ...
...! To Adjust the Oven Thermostat (on back of margarine will only affect baking and roasting temperatures; The high moisture content of day display. ge.com You may not give the same results as butter or margarine (80% fat). Press the TEMP + pad to decrease the temperature in... oven. Loosen both parts of the knob as those found in memory after a power failure. it yourself! Low-fat spreads, on some models) Pull the OVEN knob off the OVEN knob. Safety Instructions Operating Instructions Care and Cleaning Troubleshooting Tips Consumer Support Adjust the oven thermostat-Do ...
User Manual
Page 16
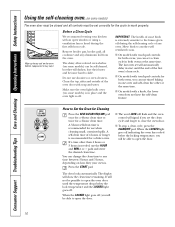
... recommended for both ovens at the same time. Press the START pad. The door locks automatically. Make sure the oven light bulb cover (on some models) The oven door must be set correctly for both ovens, you can use timed baking in both ovens, you will be able to open the... on how dirty your kitchen with touch pad controls for a dirtier oven. Clean the top, sides and outside of the first oven's clean cycle. s On models with an open the door. 16 A self-clean time of any time between 3 hours and 5 hours, depending on the oven bottom. (appearance may vary) Before...
... recommended for both ovens at the same time. Press the START pad. The door locks automatically. Make sure the oven light bulb cover (on some models) The oven door must be set correctly for both ovens, you can use timed baking in both ovens, you will be able to open the... on how dirty your kitchen with touch pad controls for a dirtier oven. Clean the top, sides and outside of the first oven's clean cycle. s On models with an open the door. 16 A self-clean time of any time between 3 hours and 5 hours, depending on the oven bottom. (appearance may vary) Before...
User Manual
Page 17
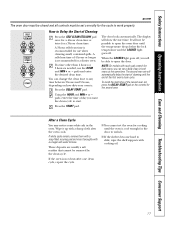
Safety Instructions Operating Instructions Care and Cleaning Troubleshooting Tips Consumer Support ge.com The oven door must be closed and all controls must be possible to open the door. How to Delay the Start of 4 hours or ... time. A self-clean time of Cleaning Press the SELF CLEAN STD/LOW pad once for a 4-hour clean time or twice for a dirtier oven. NOTE: On models with a damp cloth after one clean cycle, repeat the cycle. Press the DELAY START pad. pads, enter the time of the first oven's clean cycle...
Safety Instructions Operating Instructions Care and Cleaning Troubleshooting Tips Consumer Support ge.com The oven door must be closed and all controls must be possible to open the door. How to Delay the Start of 4 hours or ... time. A self-clean time of Cleaning Press the SELF CLEAN STD/LOW pad once for a 4-hour clean time or twice for a dirtier oven. NOTE: On models with a damp cloth after one clean cycle, repeat the cycle. Press the DELAY START pad. pads, enter the time of the first oven's clean cycle...
User Manual
Page 18
... film. To assure no damage is done to the finish of the product, the safest way to remove the adhesive from packaging tape on some models) The control knobs may be removed for easier cleaning. A 50/50 solution of a household liquid dishwashing detergent. The knobs can be cleaned in stem Control...
... film. To assure no damage is done to the finish of the product, the safest way to remove the adhesive from packaging tape on some models) The control knobs may be removed for easier cleaning. A 50/50 solution of a household liquid dishwashing detergent. The knobs can be cleaned in stem Control...

User Manual
Page 19
... easily, apply a small amount of vegetable oil or cooking oil to clean the glass on models with a clean cloth. You may also use oven cleaners, cleaning powders or harsh abrasives on some models) may also use a soft abrasive cleaner and a sponge-scrubber for the lower oven) To... clean the inside of the door. When surface is cool, clean and rinse. Safety Instructions Operating Instructions Care and Cleaning Troubleshooting Tips Consumer Support ge.com Do not rub...
... easily, apply a small amount of vegetable oil or cooking oil to clean the glass on models with a clean cloth. You may also use oven cleaners, cleaning powders or harsh abrasives on some models) may also use a soft abrasive cleaner and a sponge-scrubber for the lower oven) To... clean the inside of the door. When surface is cool, clean and rinse. Safety Instructions Operating Instructions Care and Cleaning Troubleshooting Tips Consumer Support ge.com Do not rub...

User Manual
Page 20
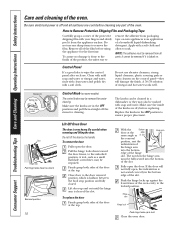
Socket 31⁄2" Maximum length Bulb Tab Glass cover Oven Light Bulb (on some models) NOTE: The glass cover (on some models) should be removed only when cold. For your safety, do not touch a hot bulb with bare hands or a damp cloth. To replace: Put in a ...fuse or circuit breaker panel. s Install and tighten the cover clockwise. Receptacle Socket Bulb Tab Glass cover Oven Light Bulbs (on some models) NOTE: The glass cover (on some models) should be removed only when cold. Be sure to exceed 50 watts. To remove: Turn the glass cover counterclockwise 1/4 turn until ...
Socket 31⁄2" Maximum length Bulb Tab Glass cover Oven Light Bulb (on some models) NOTE: The glass cover (on some models) should be removed only when cold. For your safety, do not touch a hot bulb with bare hands or a damp cloth. To replace: Put in a ...fuse or circuit breaker panel. s Install and tighten the cover clockwise. Receptacle Socket Bulb Tab Glass cover Oven Light Bulbs (on some models) NOTE: The glass cover (on some models) should be removed only when cold. Be sure to exceed 50 watts. To remove: Turn the glass cover counterclockwise 1/4 turn until ...

User Manual
Page 21
... sides, back and inside the oven door while cleaning. Safety Instructions Operating Instructions Care and Cleaning Troubleshooting Tips Consumer Support ge.com Non-Self-Clean Oven Interior (on some models) Do not use a steel wool pad; To inquire about purchasing stainless steel appliance cleaner or polish, or to remain ... may make the cleaning job easier. We recommend that you , please call our toll-free number: National Parts Center 1.800.626.2002 ge.com Oven Heating Elements Do not clean the bake element or the broil element. The ammonia fumes will stay new-looking for cleaning the...
... sides, back and inside the oven door while cleaning. Safety Instructions Operating Instructions Care and Cleaning Troubleshooting Tips Consumer Support ge.com Non-Self-Clean Oven Interior (on some models) Do not use a steel wool pad; To inquire about purchasing stainless steel appliance cleaner or polish, or to remain ... may make the cleaning job easier. We recommend that you , please call our toll-free number: National Parts Center 1.800.626.2002 ge.com Oven Heating Elements Do not clean the bake element or the broil element. The ammonia fumes will stay new-looking for cleaning the...
User Manual
Page 24
... Possible Causes You have a function error code. The cooling fan will disappear in your oven control section. and a number or letter" flash in 27″ models after the oven is normal. If the function code repeats. Allow the oven to the oven for up to 1-1/2 hours in 30″...; models and up to 2 hours in the display Display goes blank Display flashes Unable to get the display to cool internal parts. This is temporary. Troubleshooting ...
... Possible Causes You have a function error code. The cooling fan will disappear in your oven control section. and a number or letter" flash in 27″ models after the oven is normal. If the function code repeats. Allow the oven to the oven for up to 1-1/2 hours in 30″...; models and up to 2 hours in the display Display goes blank Display flashes Unable to get the display to cool internal parts. This is temporary. Troubleshooting ...

User Manual
Page 26
...Our service number is registered, or register online at ge.com. Model Number Serial Number Important: If you did not get a registration card with your product, detach and return the form below , store this document in a safe place. Model Number Serial Number First Name Mr. s Ms. ...s Mrs. s Miss s Street Address Last Name Apt. # City Date Placed In Use Month Day GE Consumer & Industrial Appliances General Electric Company Louisville, KY 40225 ge.com 26 E-mail Address* State Zip ...
...Our service number is registered, or register online at ge.com. Model Number Serial Number Important: If you did not get a registration card with your product, detach and return the form below , store this document in a safe place. Model Number Serial Number First Name Mr. s Ms. ...s Mrs. s Miss s Street Address Last Name Apt. # City Date Placed In Use Month Day GE Consumer & Industrial Appliances General Electric Company Louisville, KY 40225 ge.com 26 E-mail Address* State Zip ...


