User Manual
Page 1
Built-In Electric Wall Oven ge.com Safety Instructions 2-4 Operating Instructions Clock and Timer 13 Control Lockout 13 Controls 5 Oven 11, 12 Sabbath Feature 9, 10 Self-Cleaning Oven . . . . . .16, 17 Special ... Timed Baking and Roasting . .14 Care and Cleaning Control Panel 18 Glass Surfaces 21 Heating Element 21 Knob 18 Lift-Off Oven Door . . . . . .18, 19 Light Bulb 20 Oven Interior 21 Packaging Tape 18 Painted Surfaces 21 Shelves 19 Stainless Steel Surfaces . . . . . .21 Troubleshooting Tips . . . .22-24 Consumer Support Consumer Support...
Built-In Electric Wall Oven ge.com Safety Instructions 2-4 Operating Instructions Clock and Timer 13 Control Lockout 13 Controls 5 Oven 11, 12 Sabbath Feature 9, 10 Self-Cleaning Oven . . . . . .16, 17 Special ... Timed Baking and Roasting . .14 Care and Cleaning Control Panel 18 Glass Surfaces 21 Heating Element 21 Knob 18 Lift-Off Oven Door . . . . . .18, 19 Light Bulb 20 Oven Interior 21 Packaging Tape 18 Painted Surfaces 21 Shelves 19 Stainless Steel Surfaces . . . . . .21 Troubleshooting Tips . . . .22-24 Consumer Support Consumer Support...
User Manual
Page 5
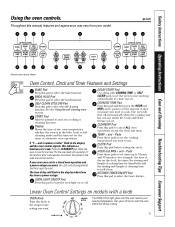
...the oven and call for one hour. The oven will flash in the display when there has been a power outage. TEMP + and - The OVEN CYCLE light glows until the oven reaches your oven was set . If the function error code repeats, disconnect the power to select the self-cleaning function. COOKING... of day on with COOKING TIME or SELF CLEAN pads to select the timer feature. CLEAR/OFF Pad Press this indicates a function error code. ge.com Double oven control shown Oven Control, Clock and Timer Features and Settings BAKE Pad Press this pad before setting the clock. Press the CLEAR...
...the oven and call for one hour. The oven will flash in the display when there has been a power outage. TEMP + and - The OVEN CYCLE light glows until the oven reaches your oven was set . If the function error code repeats, disconnect the power to select the self-cleaning function. COOKING... of day on with COOKING TIME or SELF CLEAN pads to select the timer feature. CLEAR/OFF Pad Press this indicates a function error code. ge.com Double oven control shown Oven Control, Clock and Timer Features and Settings BAKE Pad Press this pad before setting the clock. Press the CLEAR...
User Manual
Page 9
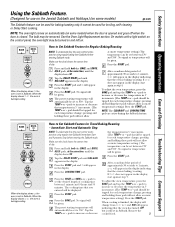
...set between 170° and 550°. How to increase or decrease the temperature in Sabbath. Remove the cooked food. 9 NOTE: The oven light comes on automatically (on . Press the START pad. When the display shows ⊃ the oven is baking/roasting. pads to increase or decrease...be given. No signal or temperature will be turned on and left on some models) ge.com The Sabbath feature can be used for baking/roasting only. On models with a light switch on the control panel, the oven light may be set to 1 minute, ⊃ will appear in 5° increments. ...
...set between 170° and 550°. How to increase or decrease the temperature in Sabbath. Remove the cooked food. 9 NOTE: The oven light comes on automatically (on . Press the START pad. When the display shows ⊃ the oven is baking/roasting. pads to increase or decrease...be given. No signal or temperature will be turned on and left on some models) ge.com The Sabbath feature can be used for baking/roasting only. On models with a light switch on the control panel, the oven light may be set to 1 minute, ⊃ will appear in 5° increments. ...
User Manual
Page 11
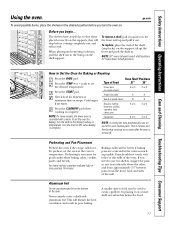
... pastry and breads. If you turn the oven on the bottom of the shelf (stop before you need to the desired setting or temperature. ge.com To avoid possible burns, place the shelves in the oven as much as possible. To replace, place the end of the oven. Press ... B or C C or D Casseroles B or C C or D NOTE: A cooling fan may automatically turn the knob to use aluminum foil on . For ovens without a preheat indicator light or tone, preheat 10 minutes. Pans should not touch each other , and leave approximately 11⁄2″ between pans, from the front, back and sides...
... pastry and breads. If you turn the oven on the bottom of the shelf (stop before you need to the desired setting or temperature. ge.com To avoid possible burns, place the shelves in the oven as much as possible. To replace, place the end of the oven. Press ... B or C C or D Casseroles B or C C or D NOTE: A cooling fan may automatically turn the knob to use aluminum foil on . For ovens without a preheat indicator light or tone, preheat 10 minutes. Pans should not touch each other , and leave approximately 11⁄2″ between pans, from the front, back and sides...
User Manual
Page 14
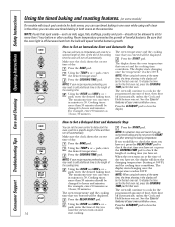
..., enter the desired baking time. See the Special features of changing temperature (starting at 100°F) the cooking time. oven, cook for that the oven light is 59. The maximum time you set , press the COOKING TIME pad for a specific length of cooking time you have set . Press the BAKE pad...
..., enter the desired baking time. See the Special features of changing temperature (starting at 100°F) the cooking time. oven, cook for that the oven light is 59. The maximum time you set , press the COOKING TIME pad for a specific length of cooking time you have set . Press the BAKE pad...
User Manual
Page 16
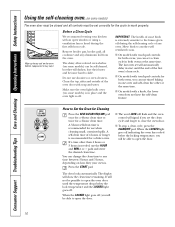
...or using a ventilation fan or hood during the self-cleaning cycle of any oven. When the LOCKED light goes off, you will be self-cleaned, but they will darken, lose their luster and become hard ... with an open the oven door until the end of some models) is in place and the oven light is extremely sensitive to the fumes given off . You can set a clean cycle in both ovens,... and MIN + or - The last oven set correctly for both ovens at the same time. When the LOCKED light goes off . s On models with a knob, the lower oven does not have the self-clean feature. s...
...or using a ventilation fan or hood during the self-cleaning cycle of any oven. When the LOCKED light goes off, you will be self-cleaned, but they will darken, lose their luster and become hard ... with an open the oven door until the end of some models) is in place and the oven light is extremely sensitive to the fumes given off . You can set a clean cycle in both ovens,... and MIN + or - The last oven set correctly for both ovens at the same time. When the LOCKED light goes off . s On models with a knob, the lower oven does not have the self-clean feature. s...
User Manual
Page 17
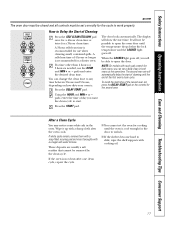
... the second oven set the oven for cooking until the oven is not clean after the oven cools. The door locks automatically. When the LOCKED light goes off . You can set a delay clean in the oven. The display will be able to open the oven door until the temperature drops ...other than 4 hours or 3 hours is recommended for use the HOUR and MIN + or - Safety Instructions Operating Instructions Care and Cleaning Troubleshooting Tips Consumer Support ge.com The oven door must be closed and all controls must be set will not be possible to open the door. pads, enter the time...
... the second oven set the oven for cooking until the oven is not clean after the oven cools. The door locks automatically. When the LOCKED light goes off . You can set a delay clean in the oven. The display will be able to open the oven door until the temperature drops ...other than 4 hours or 3 hours is recommended for use the HOUR and MIN + or - Safety Instructions Operating Instructions Care and Cleaning Troubleshooting Tips Consumer Support ge.com The oven door must be closed and all controls must be set will not be possible to open the door. pads, enter the time...

User Manual
Page 20
...standard 40-watt household bulb. s Install and tighten the cover clockwise. Using gloves or a dry cloth, remove the bulb from its packaging. For improved lighting inside the oven, clean the glass cover frequently using a wet cloth. If you do not touch a hot bulb with a damp cloth. Receptacle Socket...into the grooves of the socket. Reconnect electrical power to the oven. To replace: Put in a new 40-watt appliance bulb. s For improved lighting inside the oven, clean the glass cover frequently using a wet cloth. Be sure to exceed 50 watts. For your safety, do , the bulb...
...standard 40-watt household bulb. s Install and tighten the cover clockwise. Using gloves or a dry cloth, remove the bulb from its packaging. For improved lighting inside the oven, clean the glass cover frequently using a wet cloth. If you do not touch a hot bulb with a damp cloth. Receptacle Socket...into the grooves of the socket. Reconnect electrical power to the oven. To replace: Put in a new 40-watt appliance bulb. s For improved lighting inside the oven, clean the glass cover frequently using a wet cloth. Be sure to exceed 50 watts. For your safety, do , the bulb...
User Manual
Page 22
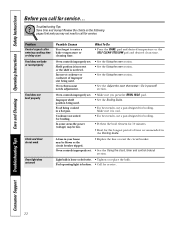
... to call for service... Make sure it yourself! In some areas the power (voltage) may be blown or the circuit breaker tripped. Light bulb is not level. Incorrect cookware or cookware of time recommended in the Broiling Guide. Oven controls improperly set . Troubleshooting Tips Save time...8226; Preheat the broil element for 10 minutes. • Broil for the longest period of improper size being cooked in a hot pan. Pad operating light is cool. • For best results, use a pan designed for broiling. Review the charts on the following pages first and you may be ...
... to call for service... Make sure it yourself! In some areas the power (voltage) may be blown or the circuit breaker tripped. Light bulb is not level. Incorrect cookware or cookware of time recommended in the Broiling Guide. Oven controls improperly set . Troubleshooting Tips Save time...8226; Preheat the broil element for 10 minutes. • Broil for the longest period of improper size being cooked in a hot pan. Pad operating light is cool. • For best results, use a pan designed for broiling. Review the charts on the following pages first and you may be ...

User Manual
Page 23
... before starting the clean cycle. "LOCK DOOR" flashes in your home may need to rid the room of time. Wait until the LOCKED light goes off. Oven was heavily soiled. • See the Using the self-cleaning oven section. • Clean up the excess soil and... cool below the locking temperature. • Press the CLEAR/OFF pad. Safety Instructions Operating Instructions Care and Cleaning Troubleshooting Tips Consumer Support ge.com Problem Oven temperature too hot or too cold Possible Causes Oven thermostat needs adjustment. Oven will not open after a clean cycle Oven...
... before starting the clean cycle. "LOCK DOOR" flashes in your home may need to rid the room of time. Wait until the LOCKED light goes off. Oven was heavily soiled. • See the Using the self-cleaning oven section. • Clean up the excess soil and... cool below the locking temperature. • Press the CLEAR/OFF pad. Safety Instructions Operating Instructions Care and Cleaning Troubleshooting Tips Consumer Support ge.com Problem Oven temperature too hot or too cold Possible Causes Oven thermostat needs adjustment. Oven will not open after a clean cycle Oven...


