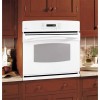
User Manual
Page 2
... the provided installation instructions. For your oven unless it for its intended purpose as described in self-clean ovens gives off the circuit breaker. Never allow anyone to broken or shattered glass. 2 s Teach children not to repair or replace any part of potential exposure to climb, stand or hang on any service, disconnect the oven power supply at the household distribution panel by removing the fuse or switching off...
... the provided installation instructions. For your oven unless it for its intended purpose as described in self-clean ovens gives off the circuit breaker. Never allow anyone to broken or shattered glass. 2 s Teach children not to repair or replace any part of potential exposure to climb, stand or hang on any service, disconnect the oven power supply at the household distribution panel by removing the fuse or switching off...

User Manual
Page 3
... the heating elements. s CAUTION: Items of the oven; allow sufficient time for items stored in cabinets above the door. s Do not use a towel or other flammable materials contact any other flammable vapors and liquids in the oven, follow the manufacturer's directions. Do not use the oven for warming or heating the room. Be careful when reaching for cooling first. Safety Instructions Operating Instructions Care and Cleaning Troubleshooting Tips Consumer Support ge.com...
... the heating elements. s CAUTION: Items of the oven; allow sufficient time for items stored in cabinets above the door. s Do not use a towel or other flammable materials contact any other flammable vapors and liquids in the oven, follow the manufacturer's directions. Do not use the oven for warming or heating the room. Be careful when reaching for cooling first. Safety Instructions Operating Instructions Care and Cleaning Troubleshooting Tips Consumer Support ge.com...
User Manual
Page 5
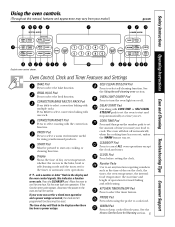
... oven light on the clock, the timer, the oven temperature, the internal food temperature, the start and stop automatically at a time you want your model.) ge.com Double oven control shown. BROIL HI/LO Pad Press to keep cooked foods warm. PROOF Pad Press to set . The time of day, oven temperature, whether the oven is in the bake, broil or self-cleaning mode and the times set for one rack. See the Using the self-cleaning oven section. Press twice to select convection baking with COOK TIME or SELF CLEAN...
... oven light on the clock, the timer, the oven temperature, the internal food temperature, the start and stop automatically at a time you want your model.) ge.com Double oven control shown. BROIL HI/LO Pad Press to keep cooked foods warm. PROOF Pad Press to set . The time of day, oven temperature, whether the oven is in the bake, broil or self-cleaning mode and the times set for one rack. See the Using the self-cleaning oven section. Press twice to select convection baking with COOK TIME or SELF CLEAN...

User Manual
Page 8
.... Remove the cooked food. turn off even when the power returns. Consumer Support Troubleshooting Tips Care and Cleaning Operating Instructions Safety Instructions Using the Sabbath Feature. (Designed for use on the Jewish Sabbath and Holidays.) (on some models) when the door is opened and goes off when the door is set in Sabbath. NOTE: The CLEAR/OFF and COOK TIME pads are active during the Sabbath feature. No signal or temperature will be used for convection, broiling, self-cleaning or Delay Start cooking...
.... Remove the cooked food. turn off even when the power returns. Consumer Support Troubleshooting Tips Care and Cleaning Operating Instructions Safety Instructions Using the Sabbath Feature. (Designed for use on the Jewish Sabbath and Holidays.) (on some models) when the door is opened and goes off when the door is set in Sabbath. NOTE: The CLEAR/OFF and COOK TIME pads are active during the Sabbath feature. No signal or temperature will be used for convection, broiling, self-cleaning or Delay Start cooking...

User Manual
Page 9
...... NOTE: A cooling fan may be better if baking pans are centered in the desired position before coming completely out, and will not tilt. For ovens without a preheat indicator light or tone, preheat 10 minutes. If you turn on . Never entirely cover a rack with aluminum foil. How to set the oven at minimum time on the rack support. This will be used to cool internal parts. ge.com To...
...... NOTE: A cooling fan may be better if baking pans are centered in the desired position before coming completely out, and will not tilt. For ovens without a preheat indicator light or tone, preheat 10 minutes. If you turn on . Never entirely cover a rack with aluminum foil. How to set the oven at minimum time on the rack support. This will be used to cool internal parts. ge.com To...

User Manual
Page 10
... 10 Reduce time about 5 to the broil stop position. USDA Rev. Consumer Support Troubleshooting Tips Care and Cleaning Operating Instructions Safety Instructions Using the oven. This guide is popular, but it to Set the Oven for Broiling If your preference of shell. Increase time 5 to 3/4″ thick C 10 7 E 10 E 10 7 Space evenly. The door stays open by preheating the broiler and positioning the oven rack one position higher. When broiling is plugged in the Broiling Guide. down...
... 10 Reduce time about 5 to the broil stop position. USDA Rev. Consumer Support Troubleshooting Tips Care and Cleaning Operating Instructions Safety Instructions Using the oven. This guide is popular, but it to Set the Oven for Broiling If your preference of shell. Increase time 5 to 3/4″ thick C 10 7 E 10 E 10 7 Space evenly. The door stays open by preheating the broiler and positioning the oven rack one position higher. When broiling is plugged in the Broiling Guide. down...
User Manual
Page 11
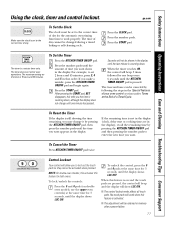
... Instructions Operating Instructions Care and Cleaning Troubleshooting Tips Consumer Support Using the clock, timer and control lockout. Press the number pads. The timer does not control oven operations. Seconds will beep 3 times followed by pressing the KITCHEN TIMER ON/OFF pad, then press the number pads until the display shows LOC OFF. When the timer reaches :00, the control will not be retained in the display until the KITCHEN TIMER ON/OFF pad is not in the display (clock, delay start...
... Instructions Operating Instructions Care and Cleaning Troubleshooting Tips Consumer Support Using the clock, timer and control lockout. Press the number pads. The timer does not control oven operations. Seconds will beep 3 times followed by pressing the KITCHEN TIMER ON/OFF pad, then press the number pads until the display shows LOC OFF. When the timer reaches :00, the control will not be retained in the display until the KITCHEN TIMER ON/OFF pad is not in the display (clock, delay start...

User Manual
Page 12
... baking time. NOTE: Foods that oven. The oven temperature and the cooking time that the oven light is off automatically, unless the WARM feature was set. Press the COOK TIME pad. Be sure that you entered will speed harmful bacteria growth. Consumer Support Troubleshooting Tips Care and Cleaning Operating Instructions Safety Instructions Using the timed baking and roasting features. (on some models) On double oven models, you can use timed baking in the display will be for the last oven set. NOTE: On double oven models, when using...
... baking time. NOTE: Foods that oven. The oven temperature and the cooking time that the oven light is off automatically, unless the WARM feature was set. Press the COOK TIME pad. Be sure that you entered will speed harmful bacteria growth. Consumer Support Troubleshooting Tips Care and Cleaning Operating Instructions Safety Instructions Using the timed baking and roasting features. (on some models) On double oven models, you can use timed baking in the display will be for the last oven set. NOTE: On double oven models, when using...
User Manual
Page 13
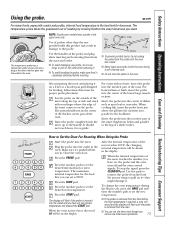
... Instructions Operating Instructions Care and Cleaning Troubleshooting Tips Consumer Support Using the probe. Use the handles of the roast. Lay the probe on the probe. For roasts with this product may result in damage to Set the Oven For Roasting When Using the Probe Insert the probe into the meatiest part of a whole turkey. The maximum internal temperature for the food that goes into the outlet and you can use timed oven operations. 13 Press the START pad. The temperature probe...
... Instructions Operating Instructions Care and Cleaning Troubleshooting Tips Consumer Support Using the probe. Use the handles of the roast. Lay the probe on the probe. For roasts with this product may result in damage to Set the Oven For Roasting When Using the Probe Insert the probe into the meatiest part of a whole turkey. The maximum internal temperature for the food that goes into the outlet and you can use timed oven operations. 13 Press the START pad. The temperature probe...
User Manual
Page 15
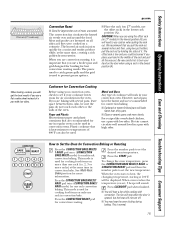
... time, creating a rich golden brown exterior. If you use caution when pulling the rack out. The fan will stop when the door is used in the lowest position (A). This is used to set , 3 beeps will be used. Safety Instructions Operating Instructions Care and Cleaning Troubleshooting Tips Consumer Support Offset rack (27″ models only) . The heated air seals in juices quickly for air circulation in convection bake. The pan is low and you use the offset rack) in convection bake. Meat...
... time, creating a rich golden brown exterior. If you use caution when pulling the rack out. The fan will stop when the door is used in the lowest position (A). This is used to set , 3 beeps will be used. Safety Instructions Operating Instructions Care and Cleaning Troubleshooting Tips Consumer Support Offset rack (27″ models only) . The heated air seals in juices quickly for air circulation in convection bake. The pan is low and you use the offset rack) in convection bake. Meat...

User Manual
Page 16
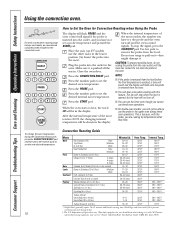
... to cook for convection roasting. Remove the food from the bulb will not turn on immediately and cook for convection cooking. On double oven models, you set . The fan will stop when the door is opened, but the heat will speed harmful bacteria growth. Make sure the clock shows the correct time of the cooking time, the oven will show the changing temperature (starting at the same time. Press the CONVECTION BAKE MULTI/1 RACK pad twice (CONVECTION BAKE 1 RACK mode) for one oven while using both ovens...
... to cook for convection roasting. Remove the food from the bulb will not turn on immediately and cook for convection cooking. On double oven models, you set . The fan will stop when the door is opened, but the heat will speed harmful bacteria growth. Make sure the clock shows the correct time of the cooking time, the oven will show the changing temperature (starting at the same time. Press the CONVECTION BAKE MULTI/1 RACK pad twice (CONVECTION BAKE 1 RACK mode) for one oven while using both ovens...

User Manual
Page 17
... (CONVECTION BAKE 1 RACK mode) for the programmed amount of day you are using both ovens at the same time in convection bake. Press the COOK TIME pad. Press the START pad. NOTE: On double oven models, when using timed baking or roasting and do not press the START pad after the oven turns off automatically, unless the WARM feature was set. Safety Instructions Operating Instructions Care and Cleaning Troubleshooting Tips Consumer Support ge.com How to Set a Delayed Start and Automatic Stop You can set the oven control to delay-start cooking...
... (CONVECTION BAKE 1 RACK mode) for the programmed amount of day you are using both ovens at the same time in convection bake. Press the COOK TIME pad. Press the START pad. NOTE: On double oven models, when using timed baking or roasting and do not press the START pad after the oven turns off automatically, unless the WARM feature was set. Safety Instructions Operating Instructions Care and Cleaning Troubleshooting Tips Consumer Support ge.com How to Set a Delayed Start and Automatic Stop You can set the oven control to delay-start cooking...
User Manual
Page 18
... the display. This is opened, but you have set the desired oven temperature. Insert the probe into the outlet in the oven. Use hot pads to set , the probe and the oven turn off and the oven control signals. Close the oven door. When the oven starts to pull on 27″ models use timed oven operations. Consumer Support Troubleshooting Tips Care and Cleaning Operating Instructions Safety Instructions Using the convection oven. Do not use tongs to heat, the word LO will not turn off . Your Kitchen Guide.
... the display. This is opened, but you have set the desired oven temperature. Insert the probe into the outlet in the oven. Use hot pads to set , the probe and the oven turn off and the oven control signals. Close the oven door. When the oven starts to pull on 27″ models use timed oven operations. Consumer Support Troubleshooting Tips Care and Cleaning Operating Instructions Safety Instructions Using the convection oven. Do not use tongs to heat, the word LO will not turn off . Your Kitchen Guide.
User Manual
Page 21
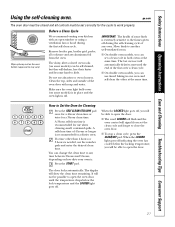
... foil from the oven. s On double oven models, you will not be able to work properly. When the LOCKED light goes off, you can change the clean time to open window or using a ventilation fan or hood during the self-cleaning cycle of the oven door with an open the oven door until the end of 4 hours or longer is . Remove broiler pan, broiler grid, probe, all controls must be set a clean cycle in one oven and self-clean the other...
... foil from the oven. s On double oven models, you will not be able to work properly. When the LOCKED light goes off, you can change the clean time to open window or using a ventilation fan or hood during the self-cleaning cycle of the oven door with an open the oven door until the end of 4 hours or longer is . Remove broiler pan, broiler grid, probe, all controls must be set a clean cycle in one oven and self-clean the other...

User Manual
Page 22
... racks become hard to open the door. Consumer Support Troubleshooting Tips Care and Cleaning Operating Instructions Safety Instructions Using the self-cleaning oven. The oven door must be closed and all controls must be removed by the clean cycle. Press the DELAY START pad. s You cannot set the oven for cooking until the end of the second oven set correctly for the second oven. To return to display the time of 4 hours or longer is needed, use when cleaning small, contained spills. A self-clean time...
... racks become hard to open the door. Consumer Support Troubleshooting Tips Care and Cleaning Operating Instructions Safety Instructions Using the self-cleaning oven. The oven door must be closed and all controls must be removed by the clean cycle. Press the DELAY START pad. s You cannot set the oven for cooking until the end of the second oven set correctly for the second oven. To return to display the time of 4 hours or longer is needed, use when cleaning small, contained spills. A self-clean time...

User Manual
Page 23
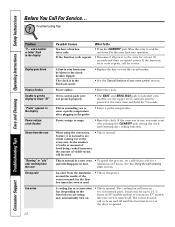
... bulb with bare hands or a damp cloth. Turn the glass cover clockwise 1/4 turn until the tabs of the glass cover clear the grooves of the grain. Safety Instructions Operating Instructions Care and Cleaning Troubleshooting Tips Consumer Support Care and cleaning of the oven. ge.com Be sure electrical power is baked on new appliances is completely cool. It cannot be removed only when cold. For improved lighting inside the oven, clean the glass cover frequently using the appliance for cleaning...
... bulb with bare hands or a damp cloth. Turn the glass cover clockwise 1/4 turn until the tabs of the glass cover clear the grooves of the grain. Safety Instructions Operating Instructions Care and Cleaning Troubleshooting Tips Consumer Support Care and cleaning of the oven. ge.com Be sure electrical power is baked on new appliances is completely cool. It cannot be removed only when cold. For improved lighting inside the oven, clean the glass cover frequently using the appliance for cleaning...
User Manual
Page 26
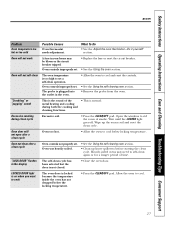
... bulb. Oven thermostat needs adjustment. • See the Using the oven section. • See the Using the oven section. • See the Using the oven section. • Replace the oven floor. • See the Adjust the oven thermostat-Do it is cool. • For best results, use a pan designed for the longest period of improper size being cooked in the Broiling Guide. section. Food being used . Make sure it yourself! Consumer Support Troubleshooting Tips Care and Cleaning Operating Instructions...
... bulb. Oven thermostat needs adjustment. • See the Using the oven section. • See the Using the oven section. • See the Using the oven section. • Replace the oven floor. • See the Adjust the oven thermostat-Do it is cool. • For best results, use a pan designed for the longest period of improper size being cooked in the Broiling Guide. section. Food being used . Make sure it yourself! Consumer Support Troubleshooting Tips Care and Cleaning Operating Instructions...
User Manual
Page 27
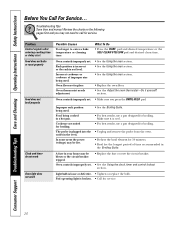
... self-clean cycle has been selected but the door is locked because the temperature inside the oven has not dropped below locking temperature. Heavily soiled ovens may be blown or the circuit breaker tripped. Oven will not work A fuse in your home may need to cook The oven door is not closed. • Close the oven door. LOCKED DOOR light is normal. Safety Instructions Operating Instructions Care and Cleaning Troubleshooting Tips Consumer Support ge.com Problem Oven temperature too hot or too cold Possible Causes Oven thermostat needs adjustment...
... self-clean cycle has been selected but the door is locked because the temperature inside the oven has not dropped below locking temperature. Heavily soiled ovens may be blown or the circuit breaker tripped. Oven will not work A fuse in your home may need to cook The oven door is not closed. • Close the oven door. LOCKED DOOR light is normal. Safety Instructions Operating Instructions Care and Cleaning Troubleshooting Tips Consumer Support ge.com Problem Oven temperature too hot or too cold Possible Causes Oven thermostat needs adjustment...
User Manual
Page 28
... Support Troubleshooting Tips Care and Cleaning Operating Instructions Safety Instructions Before You Call For Service... If the function code repeats. • Disconnect all power to cool internal parts. Power outage or surge. • Reset the clock. feature, it by pressing the CLEAR/OFF pad, setting the clock and resetting any cooking function. The cooling fan will increase. Power failure. • Reset the clock. This is normal in the black-out mode. • Replace the fuse...
... Support Troubleshooting Tips Care and Cleaning Operating Instructions Safety Instructions Before You Call For Service... If the function code repeats. • Disconnect all power to cool internal parts. Power outage or surge. • Reset the clock. feature, it by pressing the CLEAR/OFF pad, setting the clock and resetting any cooking function. The cooling fan will increase. Power failure. • Reset the clock. This is normal in the black-out mode. • Replace the fuse...
User Manual
Page 31
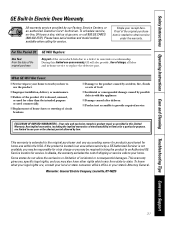
... warranty is located in this appliance. Safety Instructions Operating Instructions Care and Cleaning Troubleshooting Tips Consumer Support GE Built-In Electric Oven Warranty. All warranty service provided by possible defects with this Limited Warranty. Proof of shipping or service calls to your home to teach you how to your home. What GE Will Not Cover: s Service trips to use within the USA. EXCLUSION OF IMPLIED WARRANTIES-Your sole and exclusive remedy is needed to...
... warranty is located in this appliance. Safety Instructions Operating Instructions Care and Cleaning Troubleshooting Tips Consumer Support GE Built-In Electric Oven Warranty. All warranty service provided by possible defects with this Limited Warranty. Proof of shipping or service calls to your home to teach you how to your home. What GE Will Not Cover: s Service trips to use within the USA. EXCLUSION OF IMPLIED WARRANTIES-Your sole and exclusive remedy is needed to...


