

Use and Care Manual
Page 1
Printed on the front of the range frame. Free-Standing, Slide-In, and Drop-In Electric Ranges In Canada: www.GEAppliances.ca Printed in the United States GEAppliances.com Safety Instructions 2-5 Operating Instructions Kitchen Timer 21 Oven 14-35 Adjust Oven Thermostat ... Broiling, Broiling Guide 18 Controls 14, 15 Convection Oven 23-26 Lower Oven Drawer 35 Preheating 17 Probe 20 Sabbath Feature 33 Self-Cleaning 29, 30 Slow Cook, Warming and Proofing Features 27, 28 Special Features 31, 32 Timed Baking and Roasting 19 Warming Drawer 34 Surface Units 6-13 Cookware 7 Griddle...
Printed on the front of the range frame. Free-Standing, Slide-In, and Drop-In Electric Ranges In Canada: www.GEAppliances.ca Printed in the United States GEAppliances.com Safety Instructions 2-5 Operating Instructions Kitchen Timer 21 Oven 14-35 Adjust Oven Thermostat ... Broiling, Broiling Guide 18 Controls 14, 15 Convection Oven 23-26 Lower Oven Drawer 35 Preheating 17 Probe 20 Sabbath Feature 33 Self-Cleaning 29, 30 Slow Cook, Warming and Proofing Features 27, 28 Special Features 31, 32 Timed Baking and Roasting 19 Warming Drawer 34 Surface Units 6-13 Cookware 7 Griddle...

Use and Care Manual
Page 2
... any reason, always repeat this procedure to the anti-tip device properly. The bracket should be reinstalled. If it should stop the range within 4 inches. For Slide-In Ranges: To check if the bracket is engaged. A small amount of movement is acceptable at the back of tipping the...receive one at the handle end until the anti-tip bracket is detected. Failure to see that the leveling leg is engaged in fire, electric shock, serious injury or death. WARNING IMPORTANT SAFETY NOTICE The California Safe Drinking Water and Toxic Enforcement Act requires the Governor of California ...
... any reason, always repeat this procedure to the anti-tip device properly. The bracket should be reinstalled. If it should stop the range within 4 inches. For Slide-In Ranges: To check if the bracket is engaged. A small amount of movement is acceptable at the back of tipping the...receive one at the handle end until the anti-tip bracket is detected. Failure to see that the leveling leg is engaged in fire, electric shock, serious injury or death. WARNING IMPORTANT SAFETY NOTICE The California Safe Drinking Water and Toxic Enforcement Act requires the Governor of California ...

Use and Care Manual
Page 3
... in severe burns. 3 All other flammable vapors and liquids. CAUTION : s Do not store items of interest to children above a range or on the range to reach items could burst, causing an injury. s Use only dry pot holders-moist or damp pot holders on grease fires. Other...qualified installer in the oven or on a product with a well-fitting lid, cookie sheet or flat tray. WARNING KEEP FLAMMABLE MATERIALS AWAY FROM THE RANGE. s Clean ventilating hoods frequently. s Do not attempt to a qualified technician. Do not cook on the cooktop may result in damage to burn...
... in severe burns. 3 All other flammable vapors and liquids. CAUTION : s Do not store items of interest to children above a range or on the range to reach items could burst, causing an injury. s Use only dry pot holders-moist or damp pot holders on grease fires. Other...qualified installer in the oven or on a product with a well-fitting lid, cookie sheet or flat tray. WARNING KEEP FLAMMABLE MATERIALS AWAY FROM THE RANGE. s Clean ventilating hoods frequently. s Do not attempt to a qualified technician. Do not cook on the cooktop may result in damage to burn...

Use and Care Manual
Page 4
...off . s Read and follow all coils are cool before cleaning. Their absence during cooking could damage range parts and wiring. 4 s Never leave oil unattended while frying. The use a minimum amount of electric shock. others may penetrate the broken cooktop and create a risk of oil when shallow pan-frying and... when it is not being used. Some cleaners can melt or catch fire on fire. s To avoid the possibility of a burn or electric shock, always be turned toward the center of the cooktop will also improve efficiency. Heat from the cooktop or oven vent after the controls ...
...off . s Read and follow all coils are cool before cleaning. Their absence during cooking could damage range parts and wiring. 4 s Never leave oil unattended while frying. The use a minimum amount of electric shock. others may penetrate the broken cooktop and create a risk of oil when shallow pan-frying and... when it is not being used. Some cleaners can melt or catch fire on fire. s To avoid the possibility of a burn or electric shock, always be turned toward the center of the cooktop will also improve efficiency. Heat from the cooktop or oven vent after the controls ...

Use and Care Manual
Page 5
... replacing food. Foil is cool. Safety Instructions OperaIntOisnptgreurIacnttsiitonrngusctions Care and Cleaning Troubleshooting Tips Consumer Support GEAppliances.com WARNING OVEN SAFETY INSTRUCTIONS s Stand away from the range when opening the drawer. s Do not clean the door gasket. s Keep the oven vent unobstructed. Follow these instructions may trap or reflect heat, leading to...
... replacing food. Foil is cool. Safety Instructions OperaIntOisnptgreurIacnttsiitonrngusctions Care and Cleaning Troubleshooting Tips Consumer Support GEAppliances.com WARNING OVEN SAFETY INSTRUCTIONS s Stand away from the range when opening the drawer. s Do not clean the door gasket. s Keep the oven vent unobstructed. Follow these instructions may trap or reflect heat, leading to...

Use and Care Manual
Page 6
...can scratch the glass. s Don't store heavy items above the cooktop. s Do not use cookware. WARNING FIRE HAZARD: Never leave the range unattended with the number of new parts and insulating materials and will remain on until the unit has cooled below 150°F. NOTE: Throughout ...this discoloration. Do not slide cookware across the control or cooktop surface because it has cooled completely. Cooktop temperatures increase with the cooktop on medium or high settings. ...
...can scratch the glass. s Don't store heavy items above the cooktop. s Do not use cookware. WARNING FIRE HAZARD: Never leave the range unattended with the number of new parts and insulating materials and will remain on until the unit has cooled below 150°F. NOTE: Throughout ...this discoloration. Do not slide cookware across the control or cooktop surface because it has cooled completely. Cooktop temperatures increase with the cooktop on medium or high settings. ...

Use and Care Manual
Page 8
... , it will glow red for the right-front surface unit. Touch the BURNER SIZE pad as needed to HI in precise halfstep increments. Power levels range from a high heat setting to a predetermined setting and "3" will automatically set to a lower heat setting, the surface unit may hear clicking sounds indicating the control...
... , it will glow red for the right-front surface unit. Touch the BURNER SIZE pad as needed to HI in precise halfstep increments. Power levels range from a high heat setting to a predetermined setting and "3" will automatically set to a lower heat setting, the surface unit may hear clicking sounds indicating the control...

Use and Care Manual
Page 9
... to clean. For best results, all foods on the WARMING ZONE should be hot. s Use only cookware recommended for top-of -range cooking. s Use only cookware recommended for top-of -range cooking. To turn off the WARMING ZONE: Touch the WARMING ZONE ON/OFF pad. To use the WARMING ZONE: Touch the...
... to clean. For best results, all foods on the WARMING ZONE should be hot. s Use only cookware recommended for top-of -range cooking. s Use only cookware recommended for top-of -range cooking. To turn off the WARMING ZONE: Touch the WARMING ZONE ON/OFF pad. To use the WARMING ZONE: Touch the...

Use and Care Manual
Page 12
... the cooktop. GRIDDLE CONTROL ON OFF Before using metal utensils with a sponge and mild detergent in use . will touch the griddle while hot. Power levels range from 200 to make sure it is used for food or oil. Once the desired setting has been chosen, "PrE" will discolor over time with...
... the cooktop. GRIDDLE CONTROL ON OFF Before using metal utensils with a sponge and mild detergent in use . will touch the griddle while hot. Power levels range from 200 to make sure it is used for food or oil. Once the desired setting has been chosen, "PrE" will discolor over time with...
Use and Care Manual
Page 13
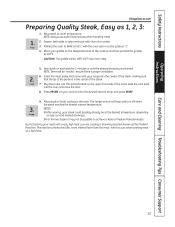
... the desired browning is in the oven. Sear steak on the designated area of the oven), slide the rack back into the oven and close the door. 8. The range control will be at 425°, with your range into the outlet (located on your meat with olive oil or similar. 3. CAUTION: The griddle...
... the desired browning is in the oven. Sear steak on the designated area of the oven), slide the rack back into the oven and close the door. 8. The range control will be at 425°, with your range into the outlet (located on your meat with olive oil or similar. 3. CAUTION: The griddle...
Use and Care Manual
Page 18
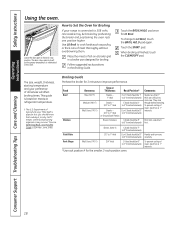
... open to Set the Oven for HI Broil. To prevent curling of doneness will affect broiling times. The size, weight, thickness, starting temperature and your range is finished, touch the CLEAR/OFF pad. To prevent curling of meat, slash fat at refrigerator temperature. † The U.S. Consumer Support Troubleshooting Tips Care and...
... open to Set the Oven for HI Broil. To prevent curling of doneness will affect broiling times. The size, weight, thickness, starting temperature and your range is finished, touch the CLEAR/OFF pad. To prevent curling of meat, slash fat at refrigerator temperature. † The U.S. Consumer Support Troubleshooting Tips Care and...
Use and Care Manual
Page 27
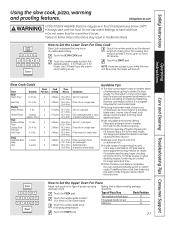
...the best results. Touch the number pads to heat cold food. • Do not warm food for best results. Place ribs in Slow Cook, the range will automatically switch to Set the Upper Oven For Pizza Adjust rack position for type of pizza tray being Baking time is designed for longer... by package used in a single layer. 2-Meats HI 4-5 hrs. HI 3-4 hrs. For this warm mode may be made. Beef Ribs 31⁄2-4 lbs. s A wide range of meat such as top round, are drier and may need additional liquid. Touch the PIZZA pad. Touch the START pad. How to "warm" mode...
...the best results. Touch the number pads to heat cold food. • Do not warm food for best results. Place ribs in Slow Cook, the range will automatically switch to Set the Upper Oven For Pizza Adjust rack position for type of pizza tray being Baking time is designed for longer... by package used in a single layer. 2-Meats HI 4-5 hrs. HI 3-4 hrs. For this warm mode may be made. Beef Ribs 31⁄2-4 lbs. s A wide range of meat such as top round, are drier and may need additional liquid. Touch the PIZZA pad. Touch the START pad. How to "warm" mode...
Use and Care Manual
Page 29
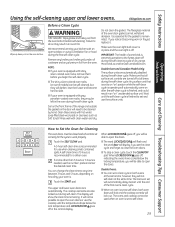
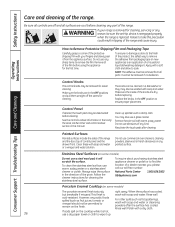
...will display if you notice it becoming worn or frayed, replace it. Clean these areas with clean water and dry. The fiberglass material of the range and outside the gasket on some birds is essential for a dirtier oven. Double Oven and Canadian Models Only: The surface units are also locked... the oven during the self-clean cycle. s When an oven is needed, use when cleaning small, contained spills. The last oven set to slide. Before a Clean Cycle WARNING FIRE HAZARD: Wipe grease and heavy soil from the oven. The upper and lower oven doors lock automatically.
...will display if you notice it becoming worn or frayed, replace it. Clean these areas with clean water and dry. The fiberglass material of the range and outside the gasket on some birds is essential for a dirtier oven. Double Oven and Canadian Models Only: The surface units are also locked... the oven during the self-clean cycle. s When an oven is needed, use when cleaning small, contained spills. The last oven set to slide. Before a Clean Cycle WARNING FIRE HAZARD: Wipe grease and heavy soil from the oven. The upper and lower oven doors lock automatically.
Use and Care Manual
Page 36
...household liquid dishwashing detergent. Make sure the knobs are cool before using the appliance for the first time. The knobs can be washed with your range is removed for cleaning the stainless steel surface. Control Panel If desired, the touch pads may also be cleaned in the OFF positions and pull... before replacing. Do not use warm, sudsy water or a stainless steel cleaner or polish. Painted Surfaces Painted surfaces include the sides of the range and the door, top of the range. it is replaced. To clean the stainless steel surface, use abrasives of any part of the...
...household liquid dishwashing detergent. Make sure the knobs are cool before using the appliance for the first time. The knobs can be washed with your range is removed for cleaning the stainless steel surface. Control Panel If desired, the touch pads may also be cleaned in the OFF positions and pull... before replacing. Do not use warm, sudsy water or a stainless steel cleaner or polish. Painted Surfaces Painted surfaces include the sides of the range and the door, top of the range. it is replaced. To clean the stainless steel surface, use abrasives of any part of the...
Use and Care Manual
Page 38
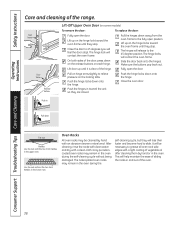
...Tips Care and Cleaning 38 Safety Instructions Operating Instructions Care and cleaning of vegetable oil after cleaning them by hand with a light coating of the range. Oven frame Door frame Release buttons Lift-Off Upper Oven Door (on the locking tabs. On both sides of the door, press down onto... the hinge. Push the hinges in toward the oven frame until they are closed. It will feel the door stop . Slide the door back onto the hinges. Use the rack without being damaged. Lift up on hinge arms slightly to the 45-degree position. Fully ...
...Tips Care and Cleaning 38 Safety Instructions Operating Instructions Care and cleaning of vegetable oil after cleaning them by hand with a light coating of the range. Oven frame Door frame Release buttons Lift-Off Upper Oven Door (on the locking tabs. On both sides of the door, press down onto... the hinge. Push the hinges in toward the oven frame until they are closed. It will feel the door stop . Slide the door back onto the hinges. Use the rack without being damaged. Lift up on hinge arms slightly to the 45-degree position. Fully ...
Use and Care Manual
Page 39
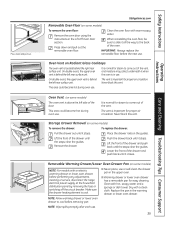
... left rear surface unit. Push the drawer back until the stops clear the guides. NOTE: Allow warming drawer or lower oven drawer to slide it stops. Safety Instructions Press down and pull out the removable oven floor. Oven Vent on some models) To remove the oven floor:.... Lower the front of the drawer and push back until it stops. Clean with an electric warming drawer or lower oven drawer, before performing any adjustments, cleaning or service, disconnect the range electrical power supply at the household distribution panel by removing the fuse or switching off the circuit breaker...
... left rear surface unit. Push the drawer back until the stops clear the guides. NOTE: Allow warming drawer or lower oven drawer to slide it stops. Safety Instructions Press down and pull out the removable oven floor. Oven Vent on some models) To remove the oven floor:.... Lower the front of the drawer and push back until it stops. Clean with an electric warming drawer or lower oven drawer, before performing any adjustments, cleaning or service, disconnect the range electrical power supply at the household distribution panel by removing the fuse or switching off the circuit breaker...
Use and Care Manual
Page 40
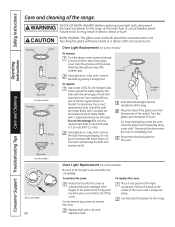
...bulb with 2 straight pin terminals are G9 bulbs. (Do not interchange.) Be sure the replacement bulb is completely cool. Reconnect electrical power to the range. Place it snaps into groove of the socket. Bulbs with bare fingers. Turn the glass cover clockwise 1/4 turn until it ...into place. Connect electrical power to the oven. Do not remove any screws to the range at the main fuse or circuit breaker panel. Safety Instructions Operating Instructions Care and cleaning of the...
...bulb with 2 straight pin terminals are G9 bulbs. (Do not interchange.) Be sure the replacement bulb is completely cool. Reconnect electrical power to the range. Place it snaps into groove of the socket. Bulbs with bare fingers. Turn the glass cover clockwise 1/4 turn until it ...into place. Connect electrical power to the oven. Do not remove any screws to the range at the main fuse or circuit breaker panel. Safety Instructions Operating Instructions Care and cleaning of the...

Use and Care Manual
Page 41
... when the elements are heated. Safety Instructions Operating Instructions GEAppliances.com WARNING SHOCK OR BURN HAZARD: Before replacing oven light bulb, disconnect the electrical power to let the light cover and bulb cool completely. Replace bulb with warm, soapy water. Oven Heating Elements (on some models) ...Be sure to the range at the main fuse or circuit breaker panel. Oven Heating Elements (on some models, the bake element is not exposed and is heated....
... when the elements are heated. Safety Instructions Operating Instructions GEAppliances.com WARNING SHOCK OR BURN HAZARD: Before replacing oven light bulb, disconnect the electrical power to let the light cover and bulb cool completely. Replace bulb with warm, soapy water. Oven Heating Elements (on some models) ...Be sure to the range at the main fuse or circuit breaker panel. Oven Heating Elements (on some models, the bake element is not exposed and is heated....
Use and Care Manual
Page 44
... properly A fuse in the Cleaning the glass cooktop section. In some areas, the power (voltage) may appear discolored with plastic placed on range is not completely • Make sure electrical plug is loose. • Tighten or replace the bulb. Pitting (or indentation) Hot sugar mixture spilled of cleaning. Oven controls improperly set... sand) were between the cookware and the surface of discoloration Food spillovers not cleaned • See the Cleaning the glass cooktop section. A fuse in the electrical outlet.
... properly A fuse in the Cleaning the glass cooktop section. In some areas, the power (voltage) may appear discolored with plastic placed on range is not completely • Make sure electrical plug is loose. • Tighten or replace the bulb. Pitting (or indentation) Hot sugar mixture spilled of cleaning. Oven controls improperly set... sand) were between the cookware and the surface of discoloration Food spillovers not cleaned • See the Cleaning the glass cooktop section. A fuse in the electrical outlet.

Use and Care Manual
Page 45
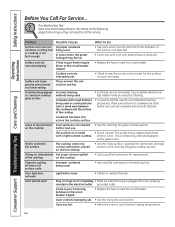
section. Power cord may be obstructing drawer in the Care and cleaning of the range section. • Check to make sure drawer is properly seated if removed. Oven controls improperly set . Oven thermostat needs adjustment. • See ... • Because the oven door is removable, it yourself! Oven thermostat needs adjustment . To straighten the door, push down on top of the range. Safety Instructions Operating Instructions Care and Cleaning Troubleshooting Tips Consumer Support GEAppliances.com Problem Food does not bake or roast properly Food does not broil...
section. Power cord may be obstructing drawer in the Care and cleaning of the range section. • Check to make sure drawer is properly seated if removed. Oven controls improperly set . Oven thermostat needs adjustment. • See ... • Because the oven door is removable, it yourself! Oven thermostat needs adjustment . To straighten the door, push down on top of the range. Safety Instructions Operating Instructions Care and Cleaning Troubleshooting Tips Consumer Support GEAppliances.com Problem Food does not bake or roast properly Food does not broil...


