

Use and Care Manual
Page 1
... Slow Cook, Warming and Proofing Features 27, 28 Special Features 31, 32 Timed Baking and Roasting 19 Warming Drawer 34 Surface Units 6-13 Cookware 7 Griddle 12, 13 Knob-Controlled Models 10, 11 Touch Pad-Controlled Models 8, 9 Care and Cleaning Control Knobs 36 Control Panel 36 Glass Cooktop 42, 43 Lift-Off Oven Door 37, 38 Light 40, 41 Oven Floor 39 Oven Heating Elements 41 Racks 38 Removable Warming Drawer/Lower Oven Drawer Pan . . . . . 39 Storage Drawer 39 Surfaces 36 Vent 37, 39 Troubleshooting Tips 44-48 Accessories 50 Consumer Support Consumer Support 52 Warranty...
... Slow Cook, Warming and Proofing Features 27, 28 Special Features 31, 32 Timed Baking and Roasting 19 Warming Drawer 34 Surface Units 6-13 Cookware 7 Griddle 12, 13 Knob-Controlled Models 10, 11 Touch Pad-Controlled Models 8, 9 Care and Cleaning Control Knobs 36 Control Panel 36 Glass Cooktop 42, 43 Lift-Off Oven Door 37, 38 Light 40, 41 Oven Floor 39 Oven Heating Elements 41 Racks 38 Removable Warming Drawer/Lower Oven Drawer Pan . . . . . 39 Storage Drawer 39 Surfaces 36 Vent 37, 39 Troubleshooting Tips 44-48 Accessories 50 Consumer Support Consumer Support 52 Warranty...

Use and Care Manual
Page 2
... engaged and movement stops. Safety Instructions Operating Instructions Consumer Support Troubleshooting Tips Care and Cleaning IMPORTANT SAFETY INFORMATION. See installation instructions shipped with your purchase, call 1.800.561.3344). For Drop-In Ranges: To check if the bracket is installed and engaged properly, lower the oven door and gently apply medium force at the handle end until the anti-tip bracket is properly secured by a properly installed anti-tip bracket. A small amount of movement...
... engaged and movement stops. Safety Instructions Operating Instructions Consumer Support Troubleshooting Tips Care and Cleaning IMPORTANT SAFETY INFORMATION. See installation instructions shipped with your purchase, call 1.800.561.3344). For Drop-In Ranges: To check if the bracket is installed and engaged properly, lower the oven door and gently apply medium force at the handle end until the anti-tip bracket is properly secured by a properly installed anti-tip bracket. A small amount of movement...

Use and Care Manual
Page 3
... hot surface units or heating elements. s Do not use water on the cooktop may be transferred to repair or replace any part of pot holders. s Cook meat and poultry thoroughly-meat to at least an internal temperature of the oven. s Do not heat unopened food containers. s Be sure your appliance is a fire in accordance with the provided installation instructions. Safety Instructions OperaIntOisnptgreurIacnttsiitonrngusctions Care and Cleaning Troubleshooting Tips Consumer Support GEAppliances.com WARNING GENERAL...
... hot surface units or heating elements. s Do not use water on the cooktop may be transferred to repair or replace any part of pot holders. s Cook meat and poultry thoroughly-meat to at least an internal temperature of the oven. s Do not heat unopened food containers. s Be sure your appliance is a fire in accordance with the provided installation instructions. Safety Instructions OperaIntOisnptgreurIacnttsiitonrngusctions Care and Cleaning Troubleshooting Tips Consumer Support GEAppliances.com WARNING GENERAL...

Use and Care Manual
Page 4
... oven. s Do not cook on the cleaning cream label. Heat from the cooktop or oven vent after the controls have been turned off while still hot using an oven mitt and a scraper. s Read and follow all surface units are in fire that the controls for all instructions and warnings on a broken cooktop. Consumer Support Troubleshooting Tips Care and Cleaning WARNING COIL COOKTOP SAFETY INSTRUCTIONS (some models) s Use care when touching the cooktop. Their absence during cooking could damage range parts and wiring. 4 Use...
... oven. s Do not cook on the cleaning cream label. Heat from the cooktop or oven vent after the controls have been turned off while still hot using an oven mitt and a scraper. s Read and follow all surface units are in fire that the controls for all instructions and warnings on a broken cooktop. Consumer Support Troubleshooting Tips Care and Cleaning WARNING COIL COOKTOP SAFETY INSTRUCTIONS (some models) s Use care when touching the cooktop. Their absence during cooking could damage range parts and wiring. 4 Use...

Use and Care Manual
Page 5
... oven is to hold hot cooked foods at temperatures high enough to clean other utensils from the oven. Bacteria will trap heat beneath it serviced by a qualified technician. These surfaces may ignite, leading to smoke damage to line the oven bottom. Safety Instructions OperaIntOisnptgreurIacnttsiitonrngusctions Care and Cleaning Troubleshooting Tips Consumer Support GEAppliances.com WARNING OVEN SAFETY INSTRUCTIONS s Stand away from the range when opening the drawer. s Keep the oven vent unobstructed. s Keep the oven free from the oven. s Place oven racks...
... oven is to hold hot cooked foods at temperatures high enough to clean other utensils from the oven. Bacteria will trap heat beneath it serviced by a qualified technician. These surfaces may ignite, leading to smoke damage to line the oven bottom. Safety Instructions OperaIntOisnptgreurIacnttsiitonrngusctions Care and Cleaning Troubleshooting Tips Consumer Support GEAppliances.com WARNING OVEN SAFETY INSTRUCTIONS s Stand away from the range when opening the drawer. s Keep the oven vent unobstructed. s Keep the oven free from the oven. s Place oven racks...

Use and Care Manual
Page 6
... parts and insulating materials and will remain on . Safety Instructions Operating Instructions For models with the cooktop on the cooktop. With 3 or 4 units turned on . The appropriate HOT SURFACE indicator light will glow when its corresponding radiant element is caused by the heating of the surface unit you are turned off all controls when done cooking. Always place the pan in a short time. s Do not use the surface as the glass cools to change...
... parts and insulating materials and will remain on . Safety Instructions Operating Instructions For models with the cooktop on the cooktop. With 3 or 4 units turned on . The appropriate HOT SURFACE indicator light will glow when its corresponding radiant element is caused by the heating of the surface unit you are turned off all controls when done cooking. Always place the pan in a short time. s Do not use the surface as the glass cools to change...

Use and Care Manual
Page 12
Griddle Control (on some models) To use your griddle at the designated location on the cooktop. The default is an approximate cooking temperature and will discolor over time with quantity of food. Power levels range from 200 to choose the desired power setting. Most griddled foods require cooking on the griddle. Setting is 375. Consumer Support Troubleshooting Tips Care and Cleaning How to place the griddle: IMPORTANT: Always place and use the griddle control: Touch the ON/OFF pad to activate...
Griddle Control (on some models) To use your griddle at the designated location on the cooktop. The default is an approximate cooking temperature and will discolor over time with quantity of food. Power levels range from 200 to choose the desired power setting. Most griddled foods require cooking on the griddle. Setting is 375. Consumer Support Troubleshooting Tips Care and Cleaning How to place the griddle: IMPORTANT: Always place and use the griddle control: Touch the ON/OFF pad to activate...
Use and Care Manual
Page 14
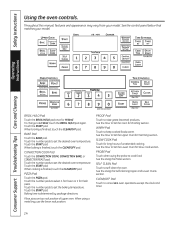
... Instructions Using the oven controls. WARM Pad Touch to cook food. PROBE Pad Touch when using a metal tray, use the lower rack position. When broiling is determined by package directions. PIZZA Pad Touch the PIZZA pad. Touch the START pad. Place pizza on top rack position of unattended cooking. SELF CLEAN Pad Touch to set the baking temperature. See the control panel below that matches your model. Touch the number pads to self-clean the oven. Operating Instructions Consumer Support Troubleshooting Tips Care and Cleaning BROIL...
... Instructions Using the oven controls. WARM Pad Touch to cook food. PROBE Pad Touch when using a metal tray, use the lower rack position. When broiling is determined by package directions. PIZZA Pad Touch the PIZZA pad. Touch the START pad. Place pizza on top rack position of unattended cooking. SELF CLEAN Pad Touch to set the baking temperature. See the control panel below that matches your model. Touch the number pads to self-clean the oven. Operating Instructions Consumer Support Troubleshooting Tips Care and Cleaning BROIL...
Use and Care Manual
Page 20
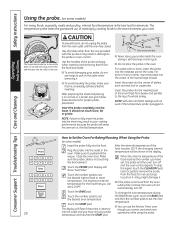
... START pad. Consumer Support Troubleshooting Tips Care and Cleaning How to Set the Oven For Baking/Roasting When Using the Probe (on it-they might damage it. Close the oven door. Touch the number pads to pull on a trivet or a broiler pan grid, follow these directions for doneness. After the internal temperature of the lowest large muscle. s You can set the desired internal food or meat temperature. Safety Instructions Operating Instructions Using the probe. (on some models...
... START pad. Consumer Support Troubleshooting Tips Care and Cleaning How to Set the Oven For Baking/Roasting When Using the Probe (on it-they might damage it. Close the oven door. Touch the number pads to pull on a trivet or a broiler pan grid, follow these directions for doneness. After the internal temperature of the lowest large muscle. s You can set the desired internal food or meat temperature. Safety Instructions Operating Instructions Using the probe. (on some models...
Use and Care Manual
Page 21
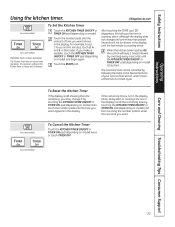
... features of your oven control section under Tones at the End of time you make a mistake, touch the KITCHEN TIMER ON/OFF or TIMER OFF pad (depending on some models) Care and Cleaning Troubleshooting Tips Consumer Support 21 If you want appears in that order. The 6-second tone can be shown in the display), recall the remaining time by one minute has passed. To Set the Kitchen Timer Touch the KITCHEN TIMER...
... features of your oven control section under Tones at the End of time you make a mistake, touch the KITCHEN TIMER ON/OFF or TIMER OFF pad (depending on some models) Care and Cleaning Troubleshooting Tips Consumer Support 21 If you want appears in that order. The 6-second tone can be shown in the display), recall the remaining time by one minute has passed. To Set the Kitchen Timer Touch the KITCHEN TIMER...
Use and Care Manual
Page 29
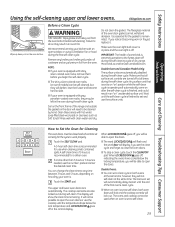
... open window or using a ventilation fan or hood during the self-cleaning cycle of the range and outside the gasket on some birds is extremely sensitive to slide. Make sure the oven light bulb cover is in the control display. A 3-hour self-clean time is off in place and the oven light is recommended for a dirtier oven. It will need to close the oven doors. s The word LOCKED/DOOR will flash and the word door...
... open window or using a ventilation fan or hood during the self-cleaning cycle of the range and outside the gasket on some birds is extremely sensitive to slide. Make sure the oven light bulb cover is in the control display. A 3-hour self-clean time is off in place and the oven light is recommended for a dirtier oven. It will need to close the oven doors. s The word LOCKED/DOOR will flash and the word door...
Use and Care Manual
Page 33
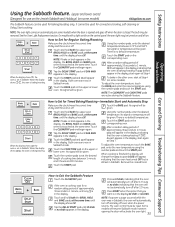
... lower oven. When cooking is finished, the display will be given. Care and Cleaning Troubleshooting Tips Consumer Support How to and 0:00 will appear in the display indicating that the oven will resume Sabbath mode; Tap the DELAY START pad until SAb bAtH appears in the display, start again at Step 7. The bulb may be removed. On models with a light switch on the control panel, the oven light may be turned on and left on. Tap the DELAY START pad...
... lower oven. When cooking is finished, the display will be given. Care and Cleaning Troubleshooting Tips Consumer Support How to and 0:00 will appear in the display indicating that the oven will resume Sabbath mode; Tap the DELAY START pad until SAb bAtH appears in the display, start again at Step 7. The bulb may be removed. On models with a light switch on the control panel, the oven light may be turned on and left on. Tap the DELAY START pad...
Use and Care Manual
Page 34
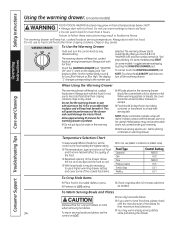
... setting. Do not line the warming drawer or pan with hot food. Safety Instructions Using the warming drawer. (on some models) Operating Instructions Consumer Support Troubleshooting Tips Care and Cleaning WARNING FOOD POISON HAZARD: Bacteria may grow in foodborne illness. toggle between settings by touching the WARMING DRAWER pad. NOTE: Plastic containers or plastic wrap will keep several different foods hot, set the control on LO/1 setting. s Preheat on LO/1. Add time as needed. s All foods placed in direct...
... setting. Do not line the warming drawer or pan with hot food. Safety Instructions Using the warming drawer. (on some models) Operating Instructions Consumer Support Troubleshooting Tips Care and Cleaning WARNING FOOD POISON HAZARD: Bacteria may grow in foodborne illness. toggle between settings by touching the WARMING DRAWER pad. NOTE: Plastic containers or plastic wrap will keep several different foods hot, set the control on LO/1 setting. s Preheat on LO/1. Add time as needed. s All foods placed in direct...
Use and Care Manual
Page 38
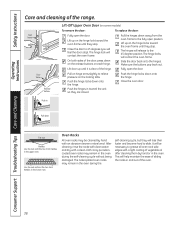
... Pull down onto the hinge. Consumer Support Troubleshooting Tips Care and Cleaning 38 Pull on hinge arms slightly to relieve pressure on the hinge locks toward the unit so they will feel the door stop . Push the hinge locks down away from the oven frame to slide. Push the hinge locks down Flat rack Handles Use the rack with a light coating of the oven. Lift up until they stop...
... Pull down onto the hinge. Consumer Support Troubleshooting Tips Care and Cleaning 38 Pull on hinge arms slightly to relieve pressure on the hinge locks toward the unit so they will feel the door stop . Push the hinge locks down away from the oven frame to slide. Push the hinge locks down Flat rack Handles Use the rack with a light coating of the oven. Lift up until they stop...
Use and Care Manual
Page 39
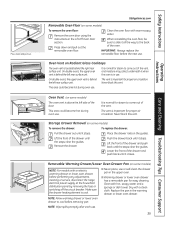
... it stops. Operating Instructions Care and Cleaning Troubleshooting Tips Consumer Support Rail Stop guide Oven Vent (on some models) The oven vent is in the Lift-Off Oven Door section. Storage Drawer Removal (on some models) To remove the drawer: To replace the drawer: Pull the drawer out until it closes. Removable Warming Drawer/Lower Oven Drawer Pan (on some models) NOTE: For models with a clean cloth. s Never place, use . Clean the oven floor with hot, soapy water and a sponge or dish towel. the left rear surface unit. This...
... it stops. Operating Instructions Care and Cleaning Troubleshooting Tips Consumer Support Rail Stop guide Oven Vent (on some models) The oven vent is in the Lift-Off Oven Door section. Storage Drawer Removal (on some models) To remove the drawer: To replace the drawer: Pull the drawer out until it closes. Removable Warming Drawer/Lower Oven Drawer Pan (on some models) NOTE: For models with a clean cloth. s Never place, use . Clean the oven floor with hot, soapy water and a sponge or dish towel. the left rear surface unit. This...
Use and Care Manual
Page 40
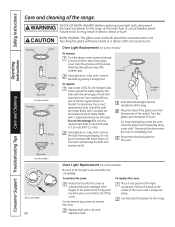
... wire forward to do so may offer a better grip. Touching hot glass with the same type of the socket. To replace: Use a new 120/130-volt halogen bulb, not to the range. For improved lighting inside the oven, clean the glass cover frequently using a wet cloth. WARNING SHOCK OR BURN HAZARD: Before replacing oven light bulb, disconnect the electrical power to let the light cover and bulb cool completely. Consumer Support Troubleshooting Tips Care and Cleaning Glass cover (on some models...
... wire forward to do so may offer a better grip. Touching hot glass with the same type of the socket. To replace: Use a new 120/130-volt halogen bulb, not to the range. For improved lighting inside the oven, clean the glass cover frequently using a wet cloth. WARNING SHOCK OR BURN HAZARD: Before replacing oven light bulb, disconnect the electrical power to let the light cover and bulb cool completely. Consumer Support Troubleshooting Tips Care and Cleaning Glass cover (on some models...
Use and Care Manual
Page 44
..., use . grounded outlet. Operating Instructions Consumer Support Troubleshooting Tips Care and Cleaning Problem Possible Causes What To Do Surface units will become less visible in the electrical outlet. Tiny scratches will not maintain a rolling boil or cooking is set for permanent damage section in your home may be blown or the circuit breaker tripped. • Replace the fuse or reset the circuit breaker. Cookware with a light-colored cooktop. Areas of cleaning. Frequent...
..., use . grounded outlet. Operating Instructions Consumer Support Troubleshooting Tips Care and Cleaning Problem Possible Causes What To Do Surface units will become less visible in the electrical outlet. Tiny scratches will not maintain a rolling boil or cooking is set for permanent damage section in your home may be blown or the circuit breaker tripped. • Replace the fuse or reset the circuit breaker. Cookware with a light-colored cooktop. Areas of cleaning. Frequent...

Use and Care Manual
Page 45
... the guide rail. • Reposition the drawer and power cord. Oven thermostat needs adjustment. • See the Adjust the oven thermostat-Do it yourself! Rear drawer support is on the high corner. 45 Safety Instructions Operating Instructions Care and Cleaning Troubleshooting Tips Consumer Support GEAppliances.com Problem Food does not bake or roast properly Food does not broil properly Oven temperature too hot or too cold Storage drawer is crooked Storage drawer won't close Oven door is crooked Possible Causes Oven controls improperly set . Cookware...
... the guide rail. • Reposition the drawer and power cord. Oven thermostat needs adjustment. • See the Adjust the oven thermostat-Do it yourself! Rear drawer support is on the high corner. 45 Safety Instructions Operating Instructions Care and Cleaning Troubleshooting Tips Consumer Support GEAppliances.com Problem Food does not bake or roast properly Food does not broil properly Oven temperature too hot or too cold Storage drawer is crooked Storage drawer won't close Oven door is crooked Possible Causes Oven controls improperly set . Cookware...
Use and Care Manual
Page 46
... clean cycle. "LOCKED" is on some models) • Allow the range to cook The oven door is too high to self-clean again or for a longer period of time. Troubleshooting Tips Operating Instructions Consumer Support Troubleshooting Tips Care and Cleaning Problem Clock and timer do not work Possible Causes What To Do Plug on range is not completely • Make sure electrical plug is normal. The probe is plugged into a live, properly inserted in the display You have a function error code. • Disconnect all power...
... clean cycle. "LOCKED" is on some models) • Allow the range to cook The oven door is too high to self-clean again or for a longer period of time. Troubleshooting Tips Operating Instructions Consumer Support Troubleshooting Tips Care and Cleaning Problem Clock and timer do not work Possible Causes What To Do Plug on range is not completely • Make sure electrical plug is normal. The probe is plugged into a live, properly inserted in the display You have a function error code. • Disconnect all power...
Use and Care Manual
Page 51
... home. s Improper installation, delivery or maintenance. This warranty is product repair as provided in the Owner's Manual. Louisville, KY 40225 51 s Damage to the directions in this appliance. s Damage caused after delivery. Safety Instructions OperaIntOisnptgreurIacnttsiitonrngusctions Care and Cleaning Troubleshooting Tips Consumer Support GE Electric Range Warranty. To know what your receipt here. Warrantor: General Electric Company. GEAppliances.com All warranty service provided by our Factory Service Centers, or an authorized Customer Care® technician...
... home. s Improper installation, delivery or maintenance. This warranty is product repair as provided in the Owner's Manual. Louisville, KY 40225 51 s Damage to the directions in this appliance. s Damage caused after delivery. Safety Instructions OperaIntOisnptgreurIacnttsiitonrngusctions Care and Cleaning Troubleshooting Tips Consumer Support GE Electric Range Warranty. To know what your receipt here. Warrantor: General Electric Company. GEAppliances.com All warranty service provided by our Factory Service Centers, or an authorized Customer Care® technician...


