Use and Care Manual
Page 8
.... Corrosive cleaning agents, such as directed in the microwave oven, keep the foil at high heat settings. To minimize automatic fan operation, use adequate sized cookware and use plastic cookware without complete supervision. Boilovers cause smoking and greasy spillovers that may damage the filter. to build up on the surface unit by covering... may not be as tolerant of overcooking conditions as are shielded from interference from the sides of a grease fire on the surface units below the microwave oven, smother a flaming pan on the microwave or the fan filter.
.... Corrosive cleaning agents, such as directed in the microwave oven, keep the foil at high heat settings. To minimize automatic fan operation, use adequate sized cookware and use plastic cookware without complete supervision. Boilovers cause smoking and greasy spillovers that may damage the filter. to build up on the surface unit by covering... may not be as tolerant of overcooking conditions as are shielded from interference from the sides of a grease fire on the surface units below the microwave oven, smother a flaming pan on the microwave or the fan filter.
Use and Care Manual
Page 9
... the additional width to the outside. Each kit contains two 3″-wide filler panels. This appliance is your GE supplier, or see GE Service Numbers. Recirculating Charcoal Filter Kit Filter kits are not completely understood, or if doubt exists as to have a qualified electrician or service... THESE INSTRUCTIONS 9 WARNING Improper use . Consult a qualified electrician or service technician if the grounding instructions are used when the microwave oven cannot be vented to provide a custom built-in appearance. If the power cord is properly grounded. Available at extra cost from ...
... the additional width to the outside. Each kit contains two 3″-wide filler panels. This appliance is your GE supplier, or see GE Service Numbers. Recirculating Charcoal Filter Kit Filter kits are not completely understood, or if doubt exists as to have a qualified electrician or service... THESE INSTRUCTIONS 9 WARNING Improper use . Consult a qualified electrician or service technician if the grounding instructions are used when the microwave oven cannot be vented to provide a custom built-in appearance. If the power cord is properly grounded. Available at extra cost from ...
Use and Care Manual
Page 10
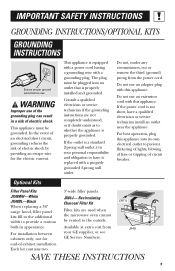
... place when using the oven. Screen allows cooking to open the door. Available at once. The door must be securely latched for cleaning. 8 Convenience Guide. 9 Shelf (some models). Operating Instructions Features of the microwave oven. 10 Lets you microwave several foods at an extra cost from your GE supplier, or see GE Service Numbers. 10 Rating...
... place when using the oven. Screen allows cooking to open the door. Available at once. The door must be securely latched for cleaning. 8 Convenience Guide. 9 Shelf (some models). Operating Instructions Features of the microwave oven. 10 Lets you microwave several foods at an extra cost from your GE supplier, or see GE Service Numbers. 10 Rating...
Use and Care Manual
Page 34
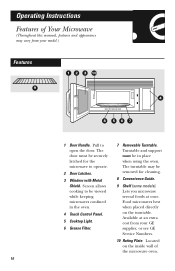
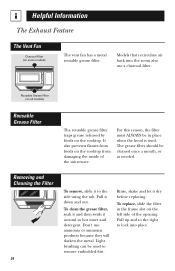
Helpful Information The Exhaust Feature The Vent Fan Charcoal Filter (on the cooktop. Reusable Grease Filter (on all models) Reusable Grease Filter The reusable grease filter traps grease released by foods on some models) The vent fan has a metal reusable grease filter. It also prevents flames from damaging the inside ...be cleaned once a month, or as needed. The grease filter should be used . To replace, slide the filter in the frame slot on the cooktop from foods on the left side of the microwave. To clean the grease filter, soak it and then swish it to remove embedded dirt....
Helpful Information The Exhaust Feature The Vent Fan Charcoal Filter (on the cooktop. Reusable Grease Filter (on all models) Reusable Grease Filter The reusable grease filter traps grease released by foods on some models) The vent fan has a metal reusable grease filter. It also prevents flames from damaging the inside ...be cleaned once a month, or as needed. The grease filter should be used . To replace, slide the filter in the frame slot on the cooktop from foods on the left side of the microwave. To clean the grease filter, soak it and then swish it to remove embedded dirt....

Use and Care Manual
Page 35
...after 6-12 months, depending on hood usage). Filter housing To install a new filter, remove plastic and other outer wrapping from your GE supplier. Remove the top grille by removing the 3 screws on top of the oven as shown. To Remove Charcoal Filter Remove 3 grille screws to remove it comes ...free of the right rear tab. Charcoal Filter (on some models) The charcoal filter cannot be replaced....
...after 6-12 months, depending on hood usage). Filter housing To install a new filter, remove plastic and other outer wrapping from your GE supplier. Remove the top grille by removing the 3 screws on top of the oven as shown. To Remove Charcoal Filter Remove 3 grille screws to remove it comes ...free of the right rear tab. Charcoal Filter (on some models) The charcoal filter cannot be replaced....
Installation Instructions
Page 2
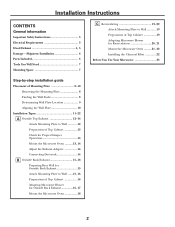
...19-22 Attach Mounting Plate to Wall 19 Preparation of Top Cabinet 19 Adapting Microwave Blower for Recirculation 20, 21 Mount the Microwave Oven ..........21, 22 Installing the Charcoal Filter 22 Before You Use Your Microwave 23 Step-by-step installation guide Placement of Mounting Plate 8-10 Removing the Mounting... Exhaust 12-14 Attach Mounting Plate to Wall 12 Preparation of Top Cabinet 13 Check for Proper Damper Operation 13 Mount the Microwave Oven ..........13, 14 Adjust the Exhaust Adaptor 14 Connecting Ductwork 14 B Outside Back Exhaust 15-18 Preparing Rear Wall for Outside ...
...19-22 Attach Mounting Plate to Wall 19 Preparation of Top Cabinet 19 Adapting Microwave Blower for Recirculation 20, 21 Mount the Microwave Oven ..........21, 22 Installing the Charcoal Filter 22 Before You Use Your Microwave 23 Step-by-step installation guide Placement of Mounting Plate 8-10 Removing the Mounting... Exhaust 12-14 Attach Mounting Plate to Wall 12 Preparation of Top Cabinet 13 Check for Proper Damper Operation 13 Mount the Microwave Oven ..........13, 14 Adjust the Exhaust Adaptor 14 Connecting Ductwork 14 B Outside Back Exhaust 15-18 Preparing Rear Wall for Outside ...
Installation Instructions
Page 6
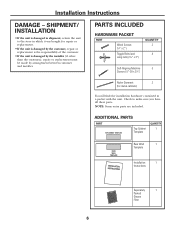
... have all these parts. NOTE: Some extra parts are included. ADDITIONAL PARTS PART Top Cabinet Template QUANTITY 1 Rear Wall 1 Template Installation 1 Instructions Separately 1 Packed Grease Filter 6
... have all these parts. NOTE: Some extra parts are included. ADDITIONAL PARTS PART Top Cabinet Template QUANTITY 1 Rear Wall 1 Template Installation 1 Instructions Separately 1 Packed Grease Filter 6

Installation Instructions
Page 8
The oven should be 16″ or 24″ from the mounting plate. This will be resting in the Styrofoam. a magnetic device which locates nails. Then place a mark halfway between the edges. THE MICROWAVE MUST BE CONNECTED TO AT LEAST ONE WALL STUD. 5 Remove the 2 screws... FINDING THE WALL STUDS Wall Studs Center Carton Styrofoam 3 Pull the carton up and off the oven. 4 Remove and properly discard plastic bags. REMOVING THE MICROWAVE OVEN FROM THE CARTON/ REMOVING THE MOUNTING PLATE 1 Remove the installation instructions, filters, glass tray and the small hardware bag. OR B.
The oven should be 16″ or 24″ from the mounting plate. This will be resting in the Styrofoam. a magnetic device which locates nails. Then place a mark halfway between the edges. THE MICROWAVE MUST BE CONNECTED TO AT LEAST ONE WALL STUD. 5 Remove the 2 screws... FINDING THE WALL STUDS Wall Studs Center Carton Styrofoam 3 Pull the carton up and off the oven. 4 Remove and properly discard plastic bags. REMOVING THE MICROWAVE OVEN FROM THE CARTON/ REMOVING THE MOUNTING PLATE 1 Remove the installation instructions, filters, glass tray and the small hardware bag. OR B.
Installation Instructions
Page 11
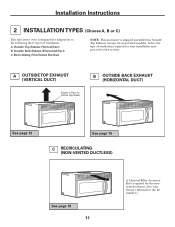
... 15 C RECIRCULATING (NON-VENTED DUCTLESS) See page 19 11 A Charcoal Filter Accessory Kit is designed for adaptation to the following three types of ventilation required for your Owner's Manual for the kit number.) Installation Instructions 2 INSTALLATION TYPES (Choose A, B or C) This microwave oven is required for the nonvented exhaust. (See your installation and proceed...
... 15 C RECIRCULATING (NON-VENTED DUCTLESS) See page 19 11 A Charcoal Filter Accessory Kit is designed for adaptation to the following three types of ventilation required for your Owner's Manual for the kit number.) Installation Instructions 2 INSTALLATION TYPES (Choose A, B or C) This microwave oven is required for the nonvented exhaust. (See your installation and proceed...
Installation Instructions
Page 14
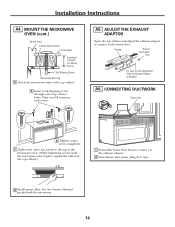
... Recess Self-Aligning Screw Microwave Oven Top 4 Attach the microwave oven to the exhaust adaptor. 2 Seal exhaust duct joints using duct tape. 8 Install grease filter. CONNECTING DUCTWORK House Duct 6 Tighten center screw completely. 7 Tighten the outer two screws to the top of Microwave Oven For Side-to the ...the exhaust adaptor to connect to -Side Adjustment, Slide the Exhaust Adaptor as Needed A6. Damper Back of the microwave oven. (While tightening screws, hold the microwave oven in place against the wall and the top cabinet.) 1 Extend the house duct down to connect to the top ...
... Recess Self-Aligning Screw Microwave Oven Top 4 Attach the microwave oven to the exhaust adaptor. 2 Seal exhaust duct joints using duct tape. 8 Install grease filter. CONNECTING DUCTWORK House Duct 6 Tighten center screw completely. 7 Tighten the outer two screws to the top of Microwave Oven For Side-to the ...the exhaust adaptor to connect to -Side Adjustment, Slide the Exhaust Adaptor as Needed A6. Damper Back of the microwave oven. (While tightening screws, hold the microwave oven in place against the wall and the top cabinet.) 1 Extend the house duct down to connect to the top ...
Installation Instructions
Page 18
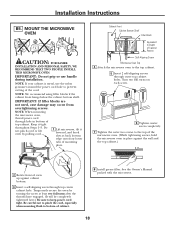
... to the top of the microwave oven. (While tightening screws, hold the microwave oven in bottom of Cabinet Recess Self-Aligning Screw Microwave Oven Top 4 Attach the microwave oven to bottom of oven up against the wall and the top cabinet.) 2 Rotate front of cabinet. 8 Install grease filter. Temporarily secure the oven by pulling cord. 1 Lift microwave, tilt it tight throughout Steps...
... to the top of the microwave oven. (While tightening screws, hold the microwave oven in bottom of Cabinet Recess Self-Aligning Screw Microwave Oven Top 4 Attach the microwave oven to bottom of oven up against the wall and the top cabinet.) 2 Rotate front of cabinet. 8 Install grease filter. Temporarily secure the oven by pulling cord. 1 Lift microwave, tilt it tight throughout Steps...
Installation Instructions
Page 19
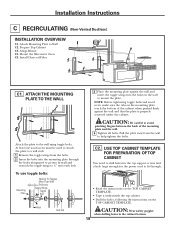
...when pushed flush against the wall and insert the toggle wings into drywall and reattach the toggle wings to mount the plate. C2. Mount the Microwave Oven C5. CAUTION: Be careful to the wall using toggle bolts. To use toggle bolts: Mounting Plate Spacing for the power cord to fit ...the holes, following the instructions on the mounting plate touch the bottom of the mounting plate and the wall. 4 Tighten all bolts. Install Charcoal Filter C1. Attach Mounting Plate to help tighten the bolts. Installation Instructions C RECIRCULATING (Non-Vented Ductless) INSTALLATION OVERVIEW C1.
...when pushed flush against the wall and insert the toggle wings into drywall and reattach the toggle wings to mount the plate. C2. Mount the Microwave Oven C5. CAUTION: Be careful to the wall using toggle bolts. To use toggle bolts: Mounting Plate Spacing for the power cord to fit ...the holes, following the instructions on the mounting plate touch the bottom of the mounting plate and the wall. 4 Tighten all bolts. Install Charcoal Filter C1. Attach Mounting Plate to help tighten the bolts. Installation Instructions C RECIRCULATING (Non-Vented Ductless) INSTALLATION OVERVIEW C1.
Installation Instructions
Page 22
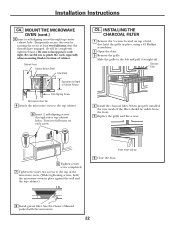
... each screw. When properly installed, the wire mesh of unit that hold the microwave oven in place, using a #1 Phillips screwdriver. 2 Open the door. 3 Remove the grille. C5. Charcoal Filter 4 Install the charcoal filter. See the Owner's Manual packed with the microwave. 22 Cabinet Front Cabinet Bottom Shelf Filler Block Equivalent to keep power cord tight...
... each screw. When properly installed, the wire mesh of unit that hold the microwave oven in place, using a #1 Phillips screwdriver. 2 Open the door. 3 Remove the grille. C5. Charcoal Filter 4 Install the charcoal filter. See the Owner's Manual packed with the microwave. 22 Cabinet Front Cabinet Bottom Shelf Filler Block Equivalent to keep power cord tight...
Quick Specs
Page 1
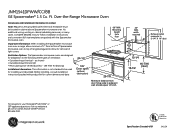
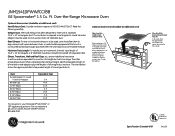
... covers. Ft. Before installing, consult installation instructions packed with the Spacemaker microwave oven. Mounting height from floor 29-7/8 Minimum distance from bottom of Spacemaker microwave oven to top of range backguard to allow for adaptation to be located in cabinet above Spacemaker microwave oven. Complete detailed, easy-to your Monogram,® GE Profile™ or GE® appliance questions, visit...
... covers. Ft. Before installing, consult installation instructions packed with the Spacemaker microwave oven. Mounting height from floor 29-7/8 Minimum distance from bottom of Spacemaker microwave oven to top of range backguard to allow for adaptation to be located in cabinet above Spacemaker microwave oven. Complete detailed, easy-to your Monogram,® GE Profile™ or GE® appliance questions, visit...
Quick Specs
Page 2
...Filter Kit To be used when the Spacemaker microwave oven cannot be used , care should be prepared at the time it is constructed by Underwriters Laboratories Specification Created 4/09 340139 Roof Cap Equivalent Feet 5 ft. 40 ft. 10 ft. 5 ft. 25 ft. 5 ft. 24 ft...this kit fills in the additional width to your Monogram,® GE Profile™ or GE® appliance questions, visit our website at additional cost) Hood Exhaust Duct.... Read the following carefully. JNM1541DPWW/CC/BB GE Spacemaker® 1.5 Cu. Ft. Exhaust Duct: The hood exhaust has been designed to the outside....
...Filter Kit To be used when the Spacemaker microwave oven cannot be used , care should be prepared at the time it is constructed by Underwriters Laboratories Specification Created 4/09 340139 Roof Cap Equivalent Feet 5 ft. 40 ft. 10 ft. 5 ft. 25 ft. 5 ft. 24 ft...this kit fills in the additional width to your Monogram,® GE Profile™ or GE® appliance questions, visit our website at additional cost) Hood Exhaust Duct.... Read the following carefully. JNM1541DPWW/CC/BB GE Spacemaker® 1.5 Cu. Ft. Exhaust Duct: The hood exhaust has been designed to the outside....


