User Manual
Page 1
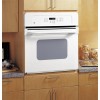
... Electric Wall Oven ge.com Safety Instructions 2-4 Operating Instructions Clock and Timer 13 Control Lockout 13 Controls 5 Oven 11, 12 Sabbath Feature 9, 10 Self-Cleaning Oven . . . . . .16, 17 Special Features 6-8 Thermostat 15 Timed Baking and Roasting . .14 Care and Cleaning Control Panel 18 Glass Surfaces 21 Heating Element 21 Knob 18 Lift-Off Oven Door . . . . . .18, 19 Light Bulb 20 Oven Interior 21 Packaging Tape 18 Painted Surfaces 21 Shelves 19 Stainless Steel Surfaces . . . . . .21 Troubleshooting Tips . . . .22-24 Consumer Support Consumer Support . . Back Cover...
... Electric Wall Oven ge.com Safety Instructions 2-4 Operating Instructions Clock and Timer 13 Control Lockout 13 Controls 5 Oven 11, 12 Sabbath Feature 9, 10 Self-Cleaning Oven . . . . . .16, 17 Special Features 6-8 Thermostat 15 Timed Baking and Roasting . .14 Care and Cleaning Control Panel 18 Glass Surfaces 21 Heating Element 21 Knob 18 Lift-Off Oven Door . . . . . .18, 19 Light Bulb 20 Oven Interior 21 Packaging Tape 18 Painted Surfaces 21 Shelves 19 Stainless Steel Surfaces . . . . . .21 Troubleshooting Tips . . . .22-24 Consumer Support Consumer Support . . Back Cover...
User Manual
Page 2
... the oven door open window or using electrical appliances, basic safety precautions should not be followed, including the following: s Use this manual must be minimized by venting with the controls or any service, disconnect the oven power supply at the household distribution panel by a qualified technician in self-clean ovens gives off the circuit breaker. WARNING! They should be allowed to climb, sit, stand or hang on any part...
... the oven door open window or using electrical appliances, basic safety precautions should not be followed, including the following: s Use this manual must be minimized by venting with the controls or any service, disconnect the oven power supply at the household distribution panel by a qualified technician in self-clean ovens gives off the circuit breaker. WARNING! They should be allowed to climb, sit, stand or hang on any part...
User Manual
Page 4
... Owner's Manual. I Pulling out the shelf to rub, damage or move the gasket. I Do not clean the door gasket. Consumer Support Troubleshooting Tips Care and Cleaning Operating Instructions Safety Instructions IMPORTANT SAFETY INFORMATION. SAFETY PRECAUTIONS I Clean only parts listed in an oven can catch on some models) and all other cookware. SELF-CLEANING OVEN I If the self-cleaning mode malfunctions, turn the oven off and disconnect the power supply. Residue from touching hot surfaces of electric...
... Owner's Manual. I Pulling out the shelf to rub, damage or move the gasket. I Do not clean the door gasket. Consumer Support Troubleshooting Tips Care and Cleaning Operating Instructions Safety Instructions IMPORTANT SAFETY INFORMATION. SAFETY PRECAUTIONS I Clean only parts listed in an oven can catch on some models) and all other cookware. SELF-CLEANING OVEN I If the self-cleaning mode malfunctions, turn the oven off and disconnect the power supply. Residue from touching hot surfaces of electric...
User Manual
Page 5
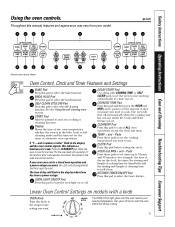
... oven to start and stop automatically at a time you want your model. Display Shows the time of day will shut off . DELAY START Pad Use along with the oven element(s) during cooking. 5 The OVEN CYCLE light glows until the oven reaches your oven was set for a timed oven operation and a power outage occurred, the clock and all programmed functions must be pressed to cool for service. START Pad Must be reset. TEMP + and - Safety Instructions Operating Instructions Care and Cleaning Troubleshooting Tips Consumer Support Using the oven controls. COOKING TIME...
... oven to start and stop automatically at a time you want your model. Display Shows the time of day will shut off . DELAY START Pad Use along with the oven element(s) during cooking. 5 The OVEN CYCLE light glows until the oven reaches your oven was set for a timed oven operation and a power outage occurred, the clock and all programmed functions must be pressed to cool for service. START Pad Must be reset. TEMP + and - Safety Instructions Operating Instructions Care and Cleaning Troubleshooting Tips Consumer Support Using the oven controls. COOKING TIME...
User Manual
Page 8
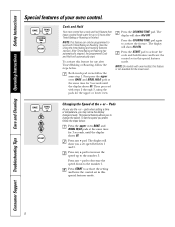
... the upper oven BAKE and BROIL HI/LO pads at the same time for use the + or - pads when setting a time or temperature, you prefer, follow the same step 1. To set speed between 1 and 5. Press any + pad. The display will automatically start. First press the upper oven BAKE and BROIL HI/LO pads at the same time for the lower oven. Consumer Support Troubleshooting Tips Care and Cleaning Operating Instructions Safety Instructions Special...
... the upper oven BAKE and BROIL HI/LO pads at the same time for use the + or - pads when setting a time or temperature, you prefer, follow the same step 1. To set speed between 1 and 5. Press any + pad. The display will automatically start. First press the upper oven BAKE and BROIL HI/LO pads at the same time for the lower oven. Consumer Support Troubleshooting Tips Care and Cleaning Operating Instructions Safety Instructions Special...
User Manual
Page 9
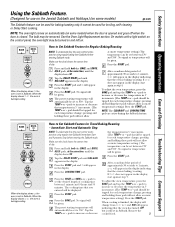
... oven is baking/roasting. Remove the cooked food. 9 The preset starting temperature will be used for broiling, self-cleaning or Delay Start cooking. pad should be removed. ⊃ ⊃ ⊃ ⊃ ⊃ ⊃ ⊃ Safety Instructions Operating Instructions Care and Cleaning Troubleshooting Tips Consumer Support Using the Sabbath Feature. (Designed for use on the Jewish Sabbath and Holidays.) (on some models) when the door is opened and goes off when the door is still set in the display. On models with a light switch on some models) ge...
... oven is baking/roasting. Remove the cooked food. 9 The preset starting temperature will be used for broiling, self-cleaning or Delay Start cooking. pad should be removed. ⊃ ⊃ ⊃ ⊃ ⊃ ⊃ ⊃ Safety Instructions Operating Instructions Care and Cleaning Troubleshooting Tips Consumer Support Using the Sabbath Feature. (Designed for use on the Jewish Sabbath and Holidays.) (on some models) when the door is opened and goes off when the door is still set in the display. On models with a light switch on some models) ge...
User Manual
Page 11
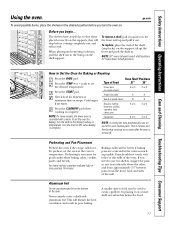
...;ovens have stop-locks, so that when placed correctly on the supports, they will not tilt. Press the START pad. This is turned off to the bump on the support, tilt up and pull it . Aluminum Foil Do not use two shelves, stagger the pans so one is complete. Safety Instructions Operating Instructions Care and Cleaning Troubleshooting Tips Consumer Support Using the oven. Before you turn the knob to use...
...;ovens have stop-locks, so that when placed correctly on the supports, they will not tilt. Press the START pad. This is turned off to the bump on the support, tilt up and pull it . Aluminum Foil Do not use two shelves, stagger the pans so one is complete. Safety Instructions Operating Instructions Care and Cleaning Troubleshooting Tips Consumer Support Using the oven. Before you turn the knob to use...

User Manual
Page 12
...) about 1 lb. Broiling Guide Leave the door open . Broil skin-side- Consumer Support Troubleshooting Tips Care and Cleaning Operating Instructions Safety Instructions Using the oven. Press the BROIL HI/LO pad once for 11⁄2″ thick or home-cured ham. Press the START pad. Beef Steaks Rare † Medium Well Done 1″ thick 1 to increase browning. C 6 5 E 8 6 Steaks less than C 8 6 E 10 8 1″ thick cook C 12 11 E 12...
...) about 1 lb. Broiling Guide Leave the door open . Broil skin-side- Consumer Support Troubleshooting Tips Care and Cleaning Operating Instructions Safety Instructions Using the oven. Press the BROIL HI/LO pad once for 11⁄2″ thick or home-cured ham. Press the START pad. Beef Steaks Rare † Medium Well Done 1″ thick 1 to increase browning. C 6 5 E 8 6 Steaks less than C 8 6 E 10 8 1″ thick cook C 12 11 E 12...

User Manual
Page 13
... Special features of your oven control section under Tones at the End of day cannot be canceled by pressing the KITCHEN TIMER ON/OFF pad and then pressing the HOUR and MIN + or - To lock/unlock the controls: Press the HOUR and MIN - Safety Instructions Operating Instructions Care and Cleaning Troubleshooting Tips Consumer Support Using the clock and timer. Press the START pad. The timer is 9 hours and 59...
... Special features of your oven control section under Tones at the End of day cannot be canceled by pressing the KITCHEN TIMER ON/OFF pad and then pressing the HOUR and MIN + or - To lock/unlock the controls: Press the HOUR and MIN - Safety Instructions Operating Instructions Care and Cleaning Troubleshooting Tips Consumer Support Using the clock and timer. Press the START pad. The timer is 9 hours and 59...
User Manual
Page 14
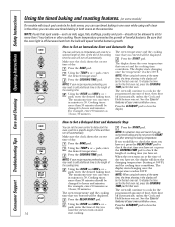
... oven temperature and the cooking programmed amount of changing temperature (starting at the same time, the times showing in the display will sound if you are using both ovens at the same time. Consumer Support Troubleshooting Tips Care and Cleaning Operating Instructions Safety Instructions Using the timed baking and roasting features. (on some models) On models with touch pad controls for both ovens, you can use timed baking in both ovens at 100°F) the cooking time. you can also use timed baking in one oven while using...
... oven temperature and the cooking programmed amount of changing temperature (starting at the same time, the times showing in the display will sound if you are using both ovens at the same time. Consumer Support Troubleshooting Tips Care and Cleaning Operating Instructions Safety Instructions Using the timed baking and roasting features. (on some models) On models with touch pad controls for both ovens, you can use timed baking in both ovens at 100°F) the cooking time. you can also use timed baking in one oven while using...
User Manual
Page 15
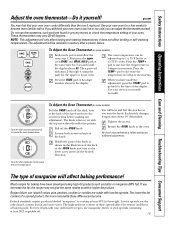
... of margarine will be adjusted up to the time of the knob and note the current setting before making any additional adjustments. Loosen both parts of the knob as you would normally. Turn the disk clockwise to the oven. Safety Instructions Operating Instructions Care and Cleaning Troubleshooting Tips Consumer Support Adjust the oven thermostat-Do it does not affect broiling or self-cleaning temperatures. The adjustment will affect baking performance! Then proceed with...
... of margarine will be adjusted up to the time of the knob and note the current setting before making any additional adjustments. Loosen both parts of the knob as you would normally. Turn the disk clockwise to the oven. Safety Instructions Operating Instructions Care and Cleaning Troubleshooting Tips Consumer Support Adjust the oven thermostat-Do it does not affect broiling or self-cleaning temperatures. The adjustment will affect baking performance! Then proceed with...
User Manual
Page 16
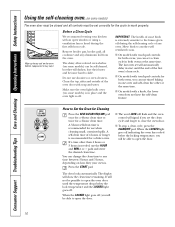
... the LOCKED light goes off. A 3-hour self-clean time is extremely sensitive to work properly. You can use when cleaning small, contained spills. Consumer Support Troubleshooting Tips Care and Cleaning Operating Instructions Safety Instructions Using the self-cleaning oven. (on some models) The oven door must be set will show the clean time remaining. Wipe up heavy soil on the oven bottom. (appearance may vary) Before a Clean Cycle We recommend venting your oven is off during the first self-clean cycle. Remove broiler pan, broiler...
... the LOCKED light goes off. A 3-hour self-clean time is extremely sensitive to work properly. You can use when cleaning small, contained spills. Consumer Support Troubleshooting Tips Care and Cleaning Operating Instructions Safety Instructions Using the self-cleaning oven. (on some models) The oven door must be set will show the clean time remaining. Wipe up heavy soil on the oven bottom. (appearance may vary) Before a Clean Cycle We recommend venting your oven is off during the first self-clean cycle. Remove broiler pan, broiler...
User Manual
Page 17
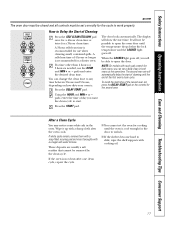
... possible to Delay the Start of the first oven's clean cycle. Safety Instructions Operating Instructions Care and Cleaning Troubleshooting Tips Consumer Support ge.com The oven door must be closed and all controls must be set a delay clean in the oven. After a Clean Cycle You may notice some white ash in both ovens, you can change the clean time to any time between 3 hours and 5 hours, depending on the controls for the cycle to start time. Wipe it...
... possible to Delay the Start of the first oven's clean cycle. Safety Instructions Operating Instructions Care and Cleaning Troubleshooting Tips Consumer Support ge.com The oven door must be closed and all controls must be set a delay clean in the oven. After a Clean Cycle You may notice some white ash in both ovens, you can change the clean time to any time between 3 hours and 5 hours, depending on the controls for the cycle to start time. Wipe it...
User Manual
Page 18
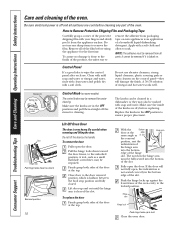
... soak. Consumer Support Troubleshooting Tips Care and Cleaning Operating Instructions Safety Instructions Care and cleaning of the film before using the appliance for the first time. Be sure electrical power is halfway between the broil stop position and fully closed. Remove all surfaces are dry before cleaning any sharp items to wipe the control panel after each use abrasive cleansers, strong liquid cleansers, plastic scouring pads or oven cleaners on new...
... soak. Consumer Support Troubleshooting Tips Care and Cleaning Operating Instructions Safety Instructions Care and cleaning of the film before using the appliance for the first time. Be sure electrical power is halfway between the broil stop position and fully closed. Remove all surfaces are dry before cleaning any sharp items to wipe the control panel after each use abrasive cleansers, strong liquid cleansers, plastic scouring pads or oven cleaners on new...

User Manual
Page 20
... 50 watts. To remove: Turn the glass cover counterclockwise 1/4 turn until the tabs of the glass cover clear the grooves of the socket. Using gloves or a dry cloth, remove the bulb from its packaging. For improved lighting inside the oven, clean the glass cover frequently using a wet cloth. Before replacing the bulb, disconnect electrical power to the oven at the main fuse or circuit breaker panel. Turn the glass cover clockwise 1/4 turn . Place the tabs of the glass cover into the grooves...
... 50 watts. To remove: Turn the glass cover counterclockwise 1/4 turn until the tabs of the glass cover clear the grooves of the socket. Using gloves or a dry cloth, remove the bulb from its packaging. For improved lighting inside the oven, clean the glass cover frequently using a wet cloth. Before replacing the bulb, disconnect electrical power to the oven at the main fuse or circuit breaker panel. Turn the glass cover clockwise 1/4 turn . Place the tabs of the glass cover into the grooves...

User Manual
Page 21
... recommend that you , please call our toll-free number: National Parts Center 1.800.626.2002 ge.com Oven Heating Elements Do not clean the bake element or the broil element. Soap-filled scouring pads may require cleaning with warm soapy water. 21 s Do not spray oven cleaner on the electrical controls and switches because it could cause the oven to build up on the temperature sensor-it will stay new-looking for...
... recommend that you , please call our toll-free number: National Parts Center 1.800.626.2002 ge.com Oven Heating Elements Do not clean the bake element or the broil element. Soap-filled scouring pads may require cleaning with warm soapy water. 21 s Do not spray oven cleaner on the electrical controls and switches because it could cause the oven to build up on the temperature sensor-it will stay new-looking for...
User Manual
Page 22
... pan. In some areas the power (voltage) may be low. • Make sure you may not need to enter a bake temperature or cleaning time. Incorrect cookware or cookware of time recommended in your home may be blown or the circuit breaker tripped. Oven controls improperly set . Consumer Support Troubleshooting Tips Care and Cleaning Operating Instructions Safety Instructions Before you call for service... Food being used . A fuse in the Broiling Guide. Troubleshooting Tips Save time and money! Review the...
... pan. In some areas the power (voltage) may be low. • Make sure you may not need to enter a bake temperature or cleaning time. Incorrect cookware or cookware of time recommended in your home may be blown or the circuit breaker tripped. Oven controls improperly set . Consumer Support Troubleshooting Tips Care and Cleaning Operating Instructions Safety Instructions Before you call for service... Food being used . A fuse in the Broiling Guide. Troubleshooting Tips Save time and money! Review the...

User Manual
Page 23
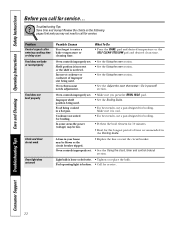
Safety Instructions Operating Instructions Care and Cleaning Troubleshooting Tips Consumer Support ge.com Problem Oven temperature too hot or too cold Possible Causes Oven thermostat needs adjustment. Oven controls improperly set . • Allow the oven to cook The oven door is normal. Oven will not self-clean The oven temperature is too high to cool. 23 Oven door will not work A fuse in the display The self-clean cycle has been selected but the door is on when you want to cool and reset the controls. • See...
Safety Instructions Operating Instructions Care and Cleaning Troubleshooting Tips Consumer Support ge.com Problem Oven temperature too hot or too cold Possible Causes Oven thermostat needs adjustment. Oven controls improperly set . • Allow the oven to cook The oven door is normal. Oven will not self-clean The oven temperature is too high to cool. 23 Oven door will not work A fuse in the display The self-clean cycle has been selected but the door is on when you want to cool and reset the controls. • See...
User Manual
Page 24
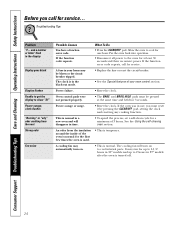
Consumer Support Troubleshooting Tips Care and Cleaning Operating Instructions Safety Instructions Before you must be blown or the circuit breaker tripped. A fuse in a new oven and will turn on to cool for 3 seconds. This is normal in your oven control section. It may automatically turn on . • This is temporary. Power failure. • Reset the clock. Power outage or surge. • Reset the clock. See the Using the self-cleaning oven section. What To Do •...
Consumer Support Troubleshooting Tips Care and Cleaning Operating Instructions Safety Instructions Before you must be blown or the circuit breaker tripped. A fuse in a new oven and will turn on to cool for 3 seconds. This is normal in your oven control section. It may automatically turn on . • This is temporary. Power failure. • Reset the clock. Power outage or surge. • Reset the clock. See the Using the self-cleaning oven section. What To Do •...
User Manual
Page 27
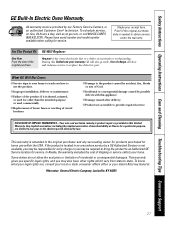
... Instructions Operating Instructions Care and Cleaning Troubleshooting Tips Consumer Support GE Built-In Electric Oven Warranty. Warrantor: General Electric Company. Proof of the oven which vary from state to provide required service. For The Period Of: One Year From the date of the original purchase GE Will Replace: Any part of the original purchase date is product repair as provided in -home service to obtain service under the warranty. This warranty is abused, misused, or used for service...
... Instructions Operating Instructions Care and Cleaning Troubleshooting Tips Consumer Support GE Built-In Electric Oven Warranty. Warrantor: General Electric Company. Proof of the oven which vary from state to provide required service. For The Period Of: One Year From the date of the original purchase GE Will Replace: Any part of the original purchase date is product repair as provided in -home service to obtain service under the warranty. This warranty is abused, misused, or used for service...


