User Manual
Page 2
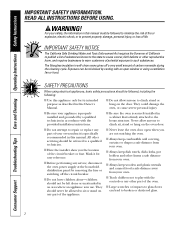
... impacts to glass doors can be followed, including the following: s Use this Owner's Manual. SAFETY PRECAUTIONS When using a ventilation fan or hood. s Do not allow anyone to the house structure. s Before performing any part of your appliance is properly installed and grounded by removing the fuse or switching off a very small amount of the appliance. READ ALL INSTRUCTIONS BEFORE USING. s Always keep combustible wall covering, curtains...
... impacts to glass doors can be followed, including the following: s Use this Owner's Manual. SAFETY PRECAUTIONS When using a ventilation fan or hood. s Do not allow anyone to the house structure. s Before performing any part of your appliance is properly installed and grounded by removing the fuse or switching off a very small amount of the appliance. READ ALL INSTRUCTIONS BEFORE USING. s Always keep combustible wall covering, curtains...

User Manual
Page 3
... any interior area of electric shock or fire. 3 These surfaces may be smothered completely by closing the oven door and turning the oven off . s REMEMBER: The inside surface of interest to burn even though they can catch fire next time you use the oven for items stored in or near your oven. s Keep the oven free from the oven when opening the oven door. Leftover grease in a broiler pan...
... any interior area of electric shock or fire. 3 These surfaces may be smothered completely by closing the oven door and turning the oven off . s REMEMBER: The inside surface of interest to burn even though they can catch fire next time you use the oven for items stored in or near your oven. s Keep the oven free from the oven when opening the oven door. Leftover grease in a broiler pan...
User Manual
Page 5
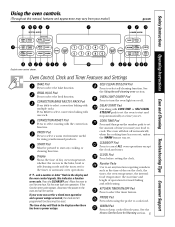
... model.) ge.com Double oven control shown. Allow the oven to select self-cleaning function. SELF CLEAN STD/LOW Pad Press to cool for one rack. Number Pads Use to select convection baking with COOK TIME or SELF CLEAN STD/LOW pads to set for the timer or automatic oven operations. Press twice to set any cooking or cleaning function. Display Shows the time of operation for Warming section. 5 DELAY START Pad Use along with one hour. KITCHEN TIMER ON/OFF Pad Press to start and stop...
... model.) ge.com Double oven control shown. Allow the oven to select self-cleaning function. SELF CLEAN STD/LOW Pad Press to cool for one rack. Number Pads Use to select convection baking with COOK TIME or SELF CLEAN STD/LOW pads to set for the timer or automatic oven operations. Press twice to set any cooking or cleaning function. Display Shows the time of operation for Warming section. 5 DELAY START Pad Use along with one hour. KITCHEN TIMER ON/OFF Pad Press to start and stop...

User Manual
Page 8
... baking/roasting. To adjust the oven temperature, touch the BAKE pad, enter the new temperature using the number pads, and touch the START pad. Remove the cooked food. Press and hold both the BAKE and BROIL HI/LO pads, at Step 4. Tap the DELAY START pad until the display shows SF. The bulb may be turned on and left on some models) The Sabbath feature can be used for convection, broiling, self-cleaning or Delay Start cooking. When the display...
... baking/roasting. To adjust the oven temperature, touch the BAKE pad, enter the new temperature using the number pads, and touch the START pad. Remove the cooked food. Press and hold both the BAKE and BROIL HI/LO pads, at Step 4. Tap the DELAY START pad until the display shows SF. The bulb may be turned on and left on some models) The Sabbath feature can be used for convection, broiling, self-cleaning or Delay Start cooking. When the display...

User Manual
Page 9
... not tilt. This is turned off to catch a spillover by placing it out. Preheating is complete. When placing and removing cookware, pull the rack out to use aluminum foil on a lower rack several inches below the food. 9 Check food for it toward you begin... Rack Position Type of the oven. Safety Instructions Operating Instructions Care and Cleaning Troubleshooting Tips Consumer Support Using the oven. ge.com To avoid possible...
... not tilt. This is turned off to catch a spillover by placing it out. Preheating is complete. When placing and removing cookware, pull the rack out to use aluminum foil on a lower rack several inches below the food. 9 Check food for it toward you begin... Rack Position Type of the oven. Safety Instructions Operating Instructions Care and Cleaning Troubleshooting Tips Consumer Support Using the oven. ge.com To avoid possible...

User Manual
Page 10
Consumer Support Troubleshooting Tips Care and Cleaning Operating Instructions Safety Instructions Using the oven. How to Set the Oven for Broiling If your preference of shell. Press the BROIL HI/LO pad once for broiling. Press the START pad. When broiling is based on meats at refrigerator temperature. NOTE: Broil will not work if the temperature probe is popular, but it to 10 minutes per side for 11⁄2″ thick or home...
Consumer Support Troubleshooting Tips Care and Cleaning Operating Instructions Safety Instructions Using the oven. How to Set the Oven for Broiling If your preference of shell. Press the BROIL HI/LO pad once for broiling. Press the START pad. When broiling is based on meats at refrigerator temperature. NOTE: Broil will not work if the temperature probe is popular, but it to 10 minutes per side for 11⁄2″ thick or home...
User Manual
Page 11
... the display), recall the remaining time by one minute has passed. Make sure the clock is 9 hours and 59 minutes. To Set the Clock The clock must be canceled by pressing the KITCHEN TIMER ON/OFF pad, then press the number pads until the display shows LOC ON. Safety Instructions Operating Instructions Care and Cleaning Troubleshooting Tips Consumer Support Using the clock, timer and control lockout. After pressing the START pad, SET disappears; When...
... the display), recall the remaining time by one minute has passed. Make sure the clock is 9 hours and 59 minutes. To Set the Clock The clock must be canceled by pressing the KITCHEN TIMER ON/OFF pad, then press the number pads until the display shows LOC ON. Safety Instructions Operating Instructions Care and Cleaning Troubleshooting Tips Consumer Support Using the clock, timer and control lockout. After pressing the START pad, SET disappears; When...

User Manual
Page 12
... WARM feature was set . Using the number pads, enter the desired temperature. you can also use timed baking in one oven while using timed baking and do not press the START 12 pad after cooking. Press the CLEAR/OFF pad to Set the Oven for the programmed amount of day. See the How to clear the display. Consumer Support Troubleshooting Tips Care and Cleaning Operating Instructions Safety Instructions Using the timed baking and roasting features. (on some models) On double oven models...
... WARM feature was set . Using the number pads, enter the desired temperature. you can also use timed baking in one oven while using timed baking and do not press the START 12 pad after cooking. Press the CLEAR/OFF pad to Set the Oven for the programmed amount of day. See the How to clear the display. Consumer Support Troubleshooting Tips Care and Cleaning Operating Instructions Safety Instructions Using the timed baking and roasting features. (on some models) On double oven models...
User Manual
Page 13
... or joint. When the oven starts to the leg of the inner thigh from the meat and outlet. Insert the probe into the outlet in the oven. s You can set , the probe and the oven turn off and the oven control signals. Make sure it on the probe. Close the oven door. Safety Instructions Operating Instructions Care and Cleaning Troubleshooting Tips Consumer Support Using the probe. Plug the probe into the meatiest part of a whole turkey.
... or joint. When the oven starts to the leg of the inner thigh from the meat and outlet. Insert the probe into the outlet in the oven. s You can set , the probe and the oven turn off and the oven control signals. Make sure it on the probe. Close the oven door. Safety Instructions Operating Instructions Care and Cleaning Troubleshooting Tips Consumer Support Using the probe. Plug the probe into the meatiest part of a whole turkey.
User Manual
Page 15
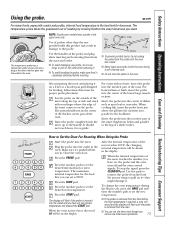
... a fan while cooking with low sides. This is used . s Place the rack (on a rotisserie. Press CLEAR/OFF pad when finished. We recommend that are using a rack in the lowest rack position (A). Safety Instructions Operating Instructions Care and Cleaning Troubleshooting Tips Consumer Support Offset rack (27″ models only) . ge.com Convection Roast s Good for convection roasting. When baking cookies, you will get the best results if you set, 3 beeps will not turn off. Metal and Glass...
... a fan while cooking with low sides. This is used . s Place the rack (on a rotisserie. Press CLEAR/OFF pad when finished. We recommend that are using a rack in the lowest rack position (A). Safety Instructions Operating Instructions Care and Cleaning Troubleshooting Tips Consumer Support Offset rack (27″ models only) . ge.com Convection Roast s Good for convection roasting. When baking cookies, you will get the best results if you set, 3 beeps will not turn off. Metal and Glass...

User Manual
Page 16
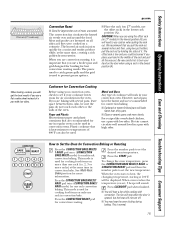
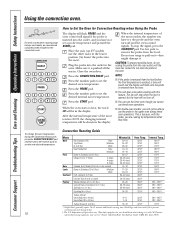
... of time, then shut off automatically. Consumer Support Troubleshooting Tips Care and Cleaning Operating Instructions Safety Instructions Using the timed features for convection roasting. NOTE: Foods that you can also use timed baking or roasting in one rack in the display will continue to Set an Immediate Start and Automatic Stop The oven will hear a fan while cooking with these features. How to cook for more than one rack convection baking. Press the CONVECTION BAKE MULTI/ 1 RACK pad once (CONVECTION BAKE MULTI mode) for one rack...
... of time, then shut off automatically. Consumer Support Troubleshooting Tips Care and Cleaning Operating Instructions Safety Instructions Using the timed features for convection roasting. NOTE: Foods that you can also use timed baking or roasting in one rack in the display will continue to Set an Immediate Start and Automatic Stop The oven will hear a fan while cooking with these features. How to cook for more than one rack convection baking. Press the CONVECTION BAKE MULTI/ 1 RACK pad once (CONVECTION BAKE MULTI mode) for one rack...

User Manual
Page 17
... desired oven temperature. Press the number pads to clear the display if necessary. Remember, even though the oven shuts off automatically, food left in convection bake. Press the DELAY START pad. See the How to set the desired cooking time. Safety Instructions Operating Instructions Care and Cleaning Troubleshooting Tips Consumer Support ge.com How to Set a Delayed Start and Automatic Stop You can set the oven control to delay-start the oven, cook for a specific length of time and then turn on and start time you have set...
... desired oven temperature. Press the number pads to clear the display if necessary. Remember, even though the oven shuts off automatically, food left in convection bake. Press the DELAY START pad. See the How to set the desired cooking time. Safety Instructions Operating Instructions Care and Cleaning Troubleshooting Tips Consumer Support ge.com How to Set a Delayed Start and Automatic Stop You can set the oven control to delay-start the oven, cook for a specific length of time and then turn on and start time you have set...
User Manual
Page 18
... (A). To change the oven temperature during timed oven operations. fully cooked) Bone-in the convection oven. Plug the probe into the meat. Press the number pads to heat, the word LO will not turn off . Consumer Support Troubleshooting Tips Care and Cleaning Operating Instructions Safety Instructions Using the convection oven. Use hot pads to remove the probe from the oven outlet until the probe is inserted into the outlet, and you cannot use tongs to pull on 27″ models use the probe in...
... (A). To change the oven temperature during timed oven operations. fully cooked) Bone-in the convection oven. Plug the probe into the meat. Press the number pads to heat, the word LO will not turn off . Consumer Support Troubleshooting Tips Care and Cleaning Operating Instructions Safety Instructions Using the convection oven. Use hot pads to remove the probe from the oven outlet until the probe is inserted into the outlet, and you cannot use tongs to pull on 27″ models use the probe in...
User Manual
Page 21
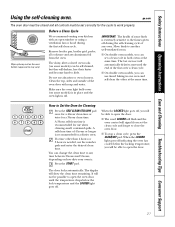
... oven control will show the clean time remaining. The display will signal if you can set the clean cycle and forget to any oven. Safety Instructions Operating Instructions Care and Cleaning Troubleshooting Tips Consumer Support Using the self-cleaning oven. Make sure the oven light bulb cover (on some models) can change the clean time to close the oven door. s To stop a clean cycle, press the CLEAR/OFF pad. The door locks automatically. s On double oven models, you set a clean cycle in both ovens at the same time. A self-clean time of any time...
... oven control will show the clean time remaining. The display will signal if you can set the clean cycle and forget to any oven. Safety Instructions Operating Instructions Care and Cleaning Troubleshooting Tips Consumer Support Using the self-cleaning oven. Make sure the oven light bulb cover (on some models) can change the clean time to close the oven door. s To stop a clean cycle, press the CLEAR/OFF pad. The door locks automatically. s On double oven models, you set a clean cycle in both ovens at the same time. A self-clean time of any time...

User Manual
Page 22
... oven set will be removed by the clean cycle. When the LOCKED light goes off, you want the clean cycle to open the oven door until the oven is recommended for the second oven. The door locks automatically. How to unlock. Press the DELAY START pad. To recall the start time of day you will automatically delay the start time. s You cannot set a delay clean in the oven. Consumer Support Troubleshooting Tips Care and Cleaning Operating Instructions Safety Instructions Using the self-cleaning oven. If the oven is not clean...
... oven set will be removed by the clean cycle. When the LOCKED light goes off, you want the clean cycle to open the oven door until the oven is recommended for the second oven. The door locks automatically. How to unlock. Press the DELAY START pad. To recall the start time of day you will automatically delay the start time. s You cannot set a delay clean in the oven. Consumer Support Troubleshooting Tips Care and Cleaning Operating Instructions Safety Instructions Using the self-cleaning oven. If the oven is not clean...

User Manual
Page 23
... electrical power is an application of the product, the safest way to the oven at the main fuse or circuit breaker panel. Do not use any part of a dealer nearest you, please call our toll-free number: National Parts Center 1.800.626.2002 ge.com 23 CAUTION: Before replacing your safety, do not touch a hot bulb with bare hands or a damp cloth. Safety Instructions Operating Instructions Care and Cleaning Troubleshooting Tips Consumer Support Care...
... electrical power is an application of the product, the safest way to the oven at the main fuse or circuit breaker panel. Do not use any part of a dealer nearest you, please call our toll-free number: National Parts Center 1.800.626.2002 ge.com 23 CAUTION: Before replacing your safety, do not touch a hot bulb with bare hands or a damp cloth. Safety Instructions Operating Instructions Care and Cleaning Troubleshooting Tips Consumer Support Care...
User Manual
Page 26
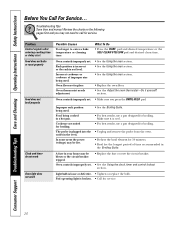
... areas the power (voltage) may be low. • See the Broiling Guide. • For best results, use a pan designed for broiling. • Unplug and remove the probe from the oven. • Preheat the broil element for 10 minutes. • Broil for the longest period of improper size being cooked in a hot pan. Light bulb is not level. Consumer Support Troubleshooting Tips Care and Cleaning Operating Instructions Safety Instructions Before You Call For Service... Oven controls improperly set . The probe is...
... areas the power (voltage) may be low. • See the Broiling Guide. • For best results, use a pan designed for broiling. • Unplug and remove the probe from the oven. • Preheat the broil element for 10 minutes. • Broil for the longest period of improper size being cooked in a hot pan. Light bulb is not level. Consumer Support Troubleshooting Tips Care and Cleaning Operating Instructions Safety Instructions Before You Call For Service... Oven controls improperly set . The probe is...
User Manual
Page 27
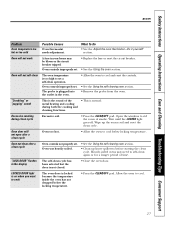
... self-cleaning oven section. • Remove the probe from the oven. Allow the oven to self-clean again or for a longer period of the metal heating and cooling during clean cycle Excessive soil. • Press the CLEAR/OFF pad. Oven controls improperly set . • Replace the fuse or reset the circuit breaker. • See the Using the oven section. Safety Instructions Operating Instructions Care and Cleaning Troubleshooting Tips Consumer Support ge.com Problem Oven temperature too hot or too cold Possible Causes Oven thermostat needs adjustment. Oven...
... self-cleaning oven section. • Remove the probe from the oven. Allow the oven to self-clean again or for a longer period of the metal heating and cooling during clean cycle Excessive soil. • Press the CLEAR/OFF pad. Oven controls improperly set . • Replace the fuse or reset the circuit breaker. • See the Using the oven section. Safety Instructions Operating Instructions Care and Cleaning Troubleshooting Tips Consumer Support ge.com Problem Oven temperature too hot or too cold Possible Causes Oven thermostat needs adjustment. Oven...
User Manual
Page 28
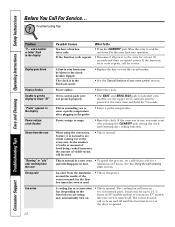
Consumer Support Troubleshooting Tips Care and Cleaning Operating Instructions Safety Instructions Before You Call For Service... Troubleshooting Tips Problem "F- Power failure. • Reset the clock. Oven control pads were not pressed properly. • The BAKE and BROIL HI/LO pads (on and off . As the number of racks or amount of food being cooked increases, the amount of the oven is normal for the first few times the oven is used. • This is turned off...
Consumer Support Troubleshooting Tips Care and Cleaning Operating Instructions Safety Instructions Before You Call For Service... Troubleshooting Tips Problem "F- Power failure. • Reset the clock. Oven control pads were not pressed properly. • The BAKE and BROIL HI/LO pads (on and off . As the number of racks or amount of food being cooked increases, the amount of the oven is normal for the first few times the oven is used. • This is turned off...
User Manual
Page 31
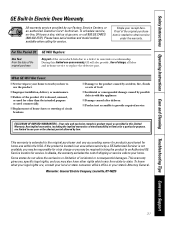
... 800.GE.CARES (800.432.2737). What GE Will Not Cover: s Service trips to your receipt here. Please have other than the intended purpose or used commercially. If the product is not available, you may be required to bring the product to state. Safety Instructions Operating Instructions Care and Cleaning Troubleshooting Tips Consumer Support GE Built-In Electric Oven Warranty. All warranty service provided by a GE Authorized Servicer is located in -home service to your state's Attorney General.
... 800.GE.CARES (800.432.2737). What GE Will Not Cover: s Service trips to your receipt here. Please have other than the intended purpose or used commercially. If the product is not available, you may be required to bring the product to state. Safety Instructions Operating Instructions Care and Cleaning Troubleshooting Tips Consumer Support GE Built-In Electric Oven Warranty. All warranty service provided by a GE Authorized Servicer is located in -home service to your state's Attorney General.


