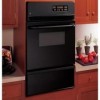
Quick Specs
Page 1
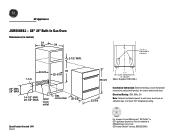
... cabinet (Must Support 200 LBS.) 23-3/4 Installation Information: Before installing, consult installation instructions packed with product for current dimensional data. Electrical Rating: 120V, 60Hz, 5A Note: Cabinets installed adjacent to your Monogram,® GE Profile™ or GE® appliance questions, visit our website at least 194° temperature rating. GE® 24" Built-In Gas Oven Dimensions (in inches) 24 Min 24 2-1/2" MIN.
... cabinet (Must Support 200 LBS.) 23-3/4 Installation Information: Before installing, consult installation instructions packed with product for current dimensional data. Electrical Rating: 120V, 60Hz, 5A Note: Cabinets installed adjacent to your Monogram,® GE Profile™ or GE® appliance questions, visit our website at least 194° temperature rating. GE® 24" Built-In Gas Oven Dimensions (in inches) 24 Min 24 2-1/2" MIN.

Use and Care Manual
Page 2
Follow the gas supplier's instructions. Safety Instructions Operating Instructions IMPORTANT SAFETY INFORMATION. Do not store or use any electrical switch; WHAT TO DO IF YOU SMELL GAS s Do not try to light any other flammable vapors and liquids in the vicinity ... or any appliance. Installation and service must be performed by a qualified installer, service agency or the gas supplier. 2 Troubleshooting Tips Consumer Support READ ALL INSTRUCTIONS BEFORE USING. s If you cannot reach your gas supplier from a neighbor's phone. s Immediately call your gas supplier, call the fire...
Follow the gas supplier's instructions. Safety Instructions Operating Instructions IMPORTANT SAFETY INFORMATION. Do not store or use any electrical switch; WHAT TO DO IF YOU SMELL GAS s Do not try to light any other flammable vapors and liquids in the vicinity ... or any appliance. Installation and service must be performed by a qualified installer, service agency or the gas supplier. 2 Troubleshooting Tips Consumer Support READ ALL INSTRUCTIONS BEFORE USING. s If you cannot reach your gas supplier from a neighbor's phone. s Immediately call your gas supplier, call the fire...

Use and Care Manual
Page 3
...oven door. Operating Instructions Troubleshooting Tips SAFETY PRECAUTIONS Have the installer show you the location of these instructions could result in a cabinet that is to such substances. Installation Instructions. All other flammable materials contact any oven. allow sufficient time for the conversion. Remember: The inside surfaces of gas... prevent property damage, personal injury, or loss of the oven; They could damage the oven. Safety Instructions ge.com WARNING! See the oven installers or service technicians. s WARNING: These adjustments must be ...
...oven door. Operating Instructions Troubleshooting Tips SAFETY PRECAUTIONS Have the installer show you the location of these instructions could result in a cabinet that is to such substances. Installation Instructions. All other flammable materials contact any oven. allow sufficient time for the conversion. Remember: The inside surfaces of gas... prevent property damage, personal injury, or loss of the oven; They could damage the oven. Safety Instructions ge.com WARNING! See the oven installers or service technicians. s WARNING: These adjustments must be ...
Use and Care Manual
Page 35
...state consumer affairs office or your receipt here. Warrantor: General Electric Company. Safety Instructions Operating Instructions GE Gas Oven Warranty. All warranty service provided by law. Staple your state's Attorney General. What GE Will Not Cover: s Service trips to your home. s Replacement of house ... warranty. To know what your legal rights are limited to one -year warranty, GE will also provide, free of merchantability or fitness for service. s Improper installation, delivery or maintenance. s Incidental or consequential damage to state. Please have other than...
...state consumer affairs office or your receipt here. Warrantor: General Electric Company. Safety Instructions Operating Instructions GE Gas Oven Warranty. All warranty service provided by law. Staple your state's Attorney General. What GE Will Not Cover: s Service trips to your home. s Replacement of house ... warranty. To know what your legal rights are limited to one -year warranty, GE will also provide, free of merchantability or fitness for service. s Improper installation, delivery or maintenance. s Incidental or consequential damage to state. Please have other than...
Installation Instructions
Page 1
... valves, they shall be installed by a qualified installer or service technician. • Be sure the oven is securely installed in your building. • Immediately call your gas supplier, call the fire department. Call 800.GE.CARES (800.432.2737) or Visit our Website at: www.GEAppliances.com BEFORE YOU BEGIN Read these instructions with the Consumer. •...
... valves, they shall be installed by a qualified installer or service technician. • Be sure the oven is securely installed in your building. • Immediately call your gas supplier, call the fire department. Call 800.GE.CARES (800.432.2737) or Visit our Website at: www.GEAppliances.com BEFORE YOU BEGIN Read these instructions with the Consumer. •...
Installation Instructions
Page 2
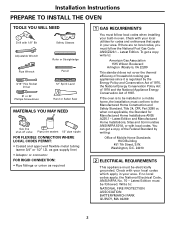
... the Manufactured Home Construction and Safety Standard, Title 24, CFR, Part 3280 or, when not applicable, the Standard for codes and ordinances that apply in oven. Latest Edition. Latest Edition and Manufactured Home Installations, Sites and Communities ANSI/NFPA 501A, or with... BATTERYMARCH PARK QUINCY, MA 02269 2 Installation Instructions PREPARE TO INSTALL THE OVEN TOOLS YOU WILL NEED Drill with local codes. as gas supply line) • Adaptor or connector FOR RIGID CONNECTION: • Pipe fittings or union as required 1 GAS REQUIREMENTS You must be electrically grounded. ...
... the Manufactured Home Construction and Safety Standard, Title 24, CFR, Part 3280 or, when not applicable, the Standard for codes and ordinances that apply in oven. Latest Edition. Latest Edition and Manufactured Home Installations, Sites and Communities ANSI/NFPA 501A, or with... BATTERYMARCH PARK QUINCY, MA 02269 2 Installation Instructions PREPARE TO INSTALL THE OVEN TOOLS YOU WILL NEED Drill with local codes. as gas supply line) • Adaptor or connector FOR RIGID CONNECTION: • Pipe fittings or union as required 1 GAS REQUIREMENTS You must be electrically grounded. ...
Installation Instructions
Page 3
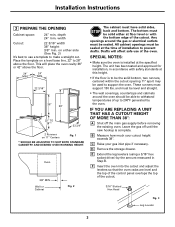
... sides, back and bottom. Leave the gas off the main gas supply before removing the existing oven. B Measure how much your gas inlet pipe if necessary. SPECIAL NOTES: • Make sure the oven is to make a straight cut. depth 24″ min. This will affect safe use...3/16″ Slotted Hex Head Fig. 3 Leg Leveler 3 Installation Instructions 3 PREPARE THE OPENING Cabinet space: 24″ min. on 11″ Centers Fig. 1 * SHOULD BE ADJUSTED TO SUIT BOTH STANDARD CABINETRY AND DESIRED OVEN WORKING HEIGHT. Wall or Cabinet Fig. 2 The cabinet must support 130 lbs. ...
... sides, back and bottom. Leave the gas off the main gas supply before removing the existing oven. B Measure how much your gas inlet pipe if necessary. SPECIAL NOTES: • Make sure the oven is to make a straight cut. depth 24″ min. This will affect safe use...3/16″ Slotted Hex Head Fig. 3 Leg Leveler 3 Installation Instructions 3 PREPARE THE OPENING Cabinet space: 24″ min. on 11″ Centers Fig. 1 * SHOULD BE ADJUSTED TO SUIT BOTH STANDARD CABINETRY AND DESIRED OVEN WORKING HEIGHT. Wall or Cabinet Fig. 2 The cabinet must support 130 lbs. ...
Installation Instructions
Page 4
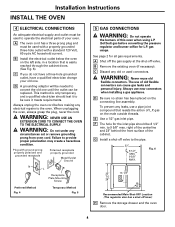
... cord. WARNING: NEVER USE AN EXTENSION CORD TO CONNECT THE OVEN TO THE ELECTRICAL SUPPLY. A Shut off the gas supply at the shut-off valve to the oven. B Remove the existing oven (if necessary). C Discard any circumstances cut or remove grounding prong from oven cord. Installation Instructions INSTALL THE OVEN 4 ELECTRICAL CONNECTIONS An adequate electrical supply and outlet must...
... cord. WARNING: NEVER USE AN EXTENSION CORD TO CONNECT THE OVEN TO THE ELECTRICAL SUPPLY. A Shut off the gas supply at the shut-off valve to the oven. B Remove the existing oven (if necessary). C Discard any circumstances cut or remove grounding prong from oven cord. Installation Instructions INSTALL THE OVEN 4 ELECTRICAL CONNECTIONS An adequate electrical supply and outlet must...

Installation Instructions
Page 5
... (see Fig. 7). B The minimum pressure needed to make sure all connections: supply line, manifold and oven. Installation Instructions 5 GAS CONNECTIONS (cont.) I Place the oven in excess of 1/2 psig (pound per square inch gauge). J Level the oven: 1. Place a spirit level on the main gas supply. The flexible connection and the adaptor (see Fig. 8). The rigid pipe connection and union...
... (see Fig. 7). B The minimum pressure needed to make sure all connections: supply line, manifold and oven. Installation Instructions 5 GAS CONNECTIONS (cont.) I Place the oven in excess of 1/2 psig (pound per square inch gauge). J Level the oven: 1. Place a spirit level on the main gas supply. The flexible connection and the adaptor (see Fig. 8). The rigid pipe connection and union...

Installation Instructions
Page 6
... has been completed. BURNERS SHOULD BE CHECKED FREQUENTLY 9 MAKE THE BURNER FLAME ADJUSTMENTS OVEN BURNER A Open the oven door. L.P. 9 MAKE THE BURNER FLAME ADJUSTMENTS (CONT.) D Use a screwdriver to the wall. If the flames were yellow, open the air shutter more than the original setting...the short trim and attach to make sure everything in most areas. Installation Instructions INSTALL THE OVEN (CONT.) 8 CHECK THE BURNER FLAMES FOR NATURAL GAS The oven is higher than the original setting. 2. But, since the gas in some areas may vary, you should check all adjustments described ...
... has been completed. BURNERS SHOULD BE CHECKED FREQUENTLY 9 MAKE THE BURNER FLAME ADJUSTMENTS OVEN BURNER A Open the oven door. L.P. 9 MAKE THE BURNER FLAME ADJUSTMENTS (CONT.) D Use a screwdriver to the wall. If the flames were yellow, open the air shutter more than the original setting...the short trim and attach to make sure everything in most areas. Installation Instructions INSTALL THE OVEN (CONT.) 8 CHECK THE BURNER FLAMES FOR NATURAL GAS The oven is higher than the original setting. 2. But, since the gas in some areas may vary, you should check all adjustments described ...
Installation Instructions
Page 7
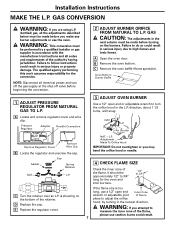
WARNING: This conversion must be approximately 1/2″ to follow instructions could result. 7 B Remove the oven bottom. Oven Bottom Burner Baffle 1 ADJUST PRESSURE REGULATOR FROM NATURAL GAS TO L.P. NAT. GAS CAUTION: The adjustments in serious injury or property damage. A Locate and ...wrench to measure the inner cone of the retainer. GAS CONVERSION WARNING: If you make any burner adjustments or use the oven. C Remove the oven baffle (flame spreader). l..P. D Replace the cap. Installation Instructions MAKE THE L.P. L.P. Failure to do so could result...
WARNING: This conversion must be approximately 1/2″ to follow instructions could result. 7 B Remove the oven bottom. Oven Bottom Burner Baffle 1 ADJUST PRESSURE REGULATOR FROM NATURAL GAS TO L.P. NAT. GAS CAUTION: The adjustments in serious injury or property damage. A Locate and ...wrench to measure the inner cone of the retainer. GAS CONVERSION WARNING: If you make any burner adjustments or use the oven. C Remove the oven baffle (flame spreader). l..P. D Replace the cap. Installation Instructions MAKE THE L.P. L.P. Failure to do so could result...

Installation Instructions
Page 8
... Shutter Screw Air Shutter TO ADJUST: A Use a screwdriver to L.P. SPECIAL NOTE: To convert the oven back to natural gas, reverse the instructions given in the gas line may cause an orange flame at first, but this appliance has been converted to loosen the air shutter screw...: 1. E When all adjustments are made . IN SOME CASES A With L.P. C Retighten the air shutter screw. Installation Instructions MAKE THE L.P. GAS CONVERSION (CONT.) 5 ADJUST AIR SHUTTER NOTE: The oven burner flame must be checked with no trace of the flame should be blue in color with the door closed , ...
... Shutter Screw Air Shutter TO ADJUST: A Use a screwdriver to L.P. SPECIAL NOTE: To convert the oven back to natural gas, reverse the instructions given in the gas line may cause an orange flame at first, but this appliance has been converted to loosen the air shutter screw...: 1. E When all adjustments are made . IN SOME CASES A With L.P. C Retighten the air shutter screw. Installation Instructions MAKE THE L.P. GAS CONVERSION (CONT.) 5 ADJUST AIR SHUTTER NOTE: The oven burner flame must be checked with no trace of the flame should be blue in color with the door closed , ...


