Quick Specs
Page 1
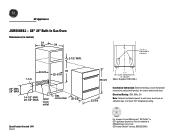
Electrical Rating: 120V, 60Hz, 5A Note: Cabinets installed adjacent to your Monogram,® GE Profile™ or GE® appliance questions, visit our website at least 194° temperature rating. Specification Created 1/04 330122 For answers to wall ovens must have an adhesion spec of cabinet (Must Support 200 LBS.) 23-3/4 Installation Information: Before installing, consult installation instructions packed with product for current dimensional data. CL 2 x 4 or equivalent runners 7-1/2 23-5/8 38...
Electrical Rating: 120V, 60Hz, 5A Note: Cabinets installed adjacent to your Monogram,® GE Profile™ or GE® appliance questions, visit our website at least 194° temperature rating. Specification Created 1/04 330122 For answers to wall ovens must have an adhesion spec of cabinet (Must Support 200 LBS.) 23-3/4 Installation Information: Before installing, consult installation instructions packed with product for current dimensional data. CL 2 x 4 or equivalent runners 7-1/2 23-5/8 38...

Quick Specs
Page 2
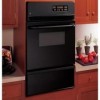
... type of cooking easy and convenient • Two oven racks - Offers an easy-to make the most of food • Broiler drawer - GE Appliances JGRS06BEJ - Black on black Specification Created 1/04 330122 Supplies light to -clean and stylish design that blends seamlessly into existing cabinetry • Model JGRS06BEJBB - Provides a convenient viewing area to check the progress of available oven capacity • Frameless glass oven door -
... type of cooking easy and convenient • Two oven racks - Offers an easy-to make the most of food • Broiler drawer - GE Appliances JGRS06BEJ - Black on black Specification Created 1/04 330122 Supplies light to -clean and stylish design that blends seamlessly into existing cabinetry • Model JGRS06BEJBB - Provides a convenient viewing area to check the progress of available oven capacity • Frameless glass oven door -
Use and Care Manual
Page 1
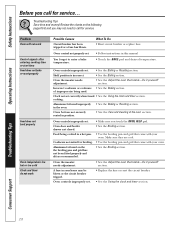
... Troubleshooting tips . . . . .28, 29 Consumer Support Consumer Support . .Back Cover Product registration . . . . .33, 34 Warranty 35 Owner's Manual JGRS06 Care and Cleaning Broiler drawer 26 Broiler pan and grid 26 Burner air adjustment shutters 27 Control panel 25 Door removal 26 Light replacement 25 Oven bottom 27 Oven interior 25 Oven vents 27 Shelves 25 Write the model and serial numbers here: Model Serial You can find them on a label on the front of margarine 20 Vent 14 Before You Call For Service Thermostat adjustment - Built-In Wall...
... Troubleshooting tips . . . . .28, 29 Consumer Support Consumer Support . .Back Cover Product registration . . . . .33, 34 Warranty 35 Owner's Manual JGRS06 Care and Cleaning Broiler drawer 26 Broiler pan and grid 26 Burner air adjustment shutters 27 Control panel 25 Door removal 26 Light replacement 25 Oven bottom 27 Oven interior 25 Oven vents 27 Shelves 25 Write the model and serial numbers here: Model Serial You can find them on a label on the front of margarine 20 Vent 14 Before You Call For Service Thermostat adjustment - Built-In Wall...

Use and Care Manual
Page 3
... to follow these substances can be used. During and after use with the Installation Instructions. s Do not leave children alone or unattended where an oven is opened. Consumer Support 3 Gas appliances can be converted should the packaging material ignite. Move birds to shut it is correctly adjusted by qualified gas for the conversion. s Be sure all codes and requirements of these substances, namely benzene...
... to follow these substances can be used. During and after use with the Installation Instructions. s Do not leave children alone or unattended where an oven is opened. Consumer Support 3 Gas appliances can be converted should the packaging material ignite. Move birds to shut it is correctly adjusted by qualified gas for the conversion. s Be sure all codes and requirements of these substances, namely benzene...
Use and Care Manual
Page 5
... stop-lock is also a precaution against burns from grease buildup. The hot air and steam that is cool. WARNING: NEVER cover any slots, holes or passages in the oven bottom or cover an entire rack with materials such as described in the oven can ignite. s When using cooking or roasting bags in the desired position while the oven is recommended for a storage area. Operating Instructions Troubleshooting...
... stop-lock is also a precaution against burns from grease buildup. The hot air and steam that is cool. WARNING: NEVER cover any slots, holes or passages in the oven bottom or cover an entire rack with materials such as described in the oven can ignite. s When using cooking or roasting bags in the desired position while the oven is recommended for a storage area. Operating Instructions Troubleshooting...
Use and Care Manual
Page 7
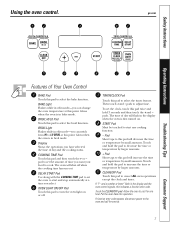
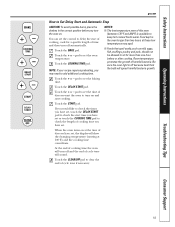
... turned on or off when the cooking time has run out. Put the oven back into operation. DELAY START Pad Use along with the COOKING TIME pad to set the oven to this indicates a function error code. ge.com Safety Instructions Operating Instructions Troubleshooting Tips Features of day will shut off . OVEN LIGHT ON/OFF Pad Touch this point. BROIL HI/LO Pad Touch this pad to select the broil function. The time of Your Oven Control BAKE...
... turned on or off when the cooking time has run out. Put the oven back into operation. DELAY START Pad Use along with the COOKING TIME pad to set the oven to this indicates a function error code. ge.com Safety Instructions Operating Instructions Troubleshooting Tips Features of day will shut off . OVEN LIGHT ON/OFF Pad Touch this point. BROIL HI/LO Pad Touch this pad to select the broil function. The time of Your Oven Control BAKE...
Use and Care Manual
Page 8
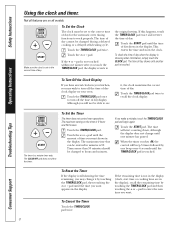
... a delayed cooking or a delayed self-cleaning cycle. Consumer Support To Reset the Timer If the display is showing other information, simply touch the CLOCK pad. pad to work properly. To Set the Clock The clock must be able to see it by touching the TIMER/CLOCK pad and then touching the + or - Touch the + or - Touch the START pad until one minute has passed. Operating Instructions To Turn Off the Clock Display...
... a delayed cooking or a delayed self-cleaning cycle. Consumer Support To Reset the Timer If the display is showing other information, simply touch the CLOCK pad. pad to work properly. To Set the Clock The clock must be able to see it by touching the TIMER/CLOCK pad and then touching the + or - Touch the + or - Touch the START pad until one minute has passed. Operating Instructions To Turn Off the Clock Display...

Use and Care Manual
Page 12
... when the door is closed. It cannot be used for broiling, self-cleaning, or Delay Start cooking. NOTE: The oven light comes on automatically (on . The bulb may be removed. On models with a light switch on the control panel, the oven light may be turned on and left on some models) The Sabbath feature can be given. When the display shows ⊃ the oven is set in the display. Touch and hold both the BAKE and BROIL HI...
... when the door is closed. It cannot be used for broiling, self-cleaning, or Delay Start cooking. NOTE: The oven light comes on automatically (on . The bulb may be removed. On models with a light switch on the control panel, the oven light may be turned on and left on some models) The Sabbath feature can be given. When the display shows ⊃ the oven is set in the display. Touch and hold both the BAKE and BROIL HI...
Use and Care Manual
Page 14
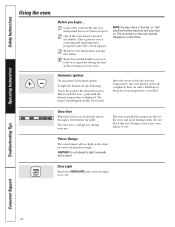
..., sturdy support. The burner should ignite within 60 seconds. After the oven reaches the selected temperature, the oven burner cycles off . Do not block this manual handy so you begin... Safety Instructions Operating Instructions Using the oven. Look at the controls. Take a practice run at removing and replacing them properly. Power Outage The oven burner will disappear in a short time. Oven Light Touch the OVEN LIGHT pad to keep the oven temperature controlled...
..., sturdy support. The burner should ignite within 60 seconds. After the oven reaches the selected temperature, the oven burner cycles off . Do not block this manual handy so you begin... Safety Instructions Operating Instructions Using the oven. Look at the controls. Take a practice run at removing and replacing them properly. Power Outage The oven burner will disappear in a short time. Oven Light Touch the OVEN LIGHT pad to keep the oven temperature controlled...
Use and Care Manual
Page 17
... time. Peeking Set the timer for the estimated cooking time and do not open the door to make sure the pan size used is the one is not directly above the other or the walls of browning that it . Your baking results may find that you need to prevent over-browning. s Dark, rough or dull pans absorb heat resulting in glass baking dishes, the temperature may need to reduce the oven temperature...
... time. Peeking Set the timer for the estimated cooking time and do not open the door to make sure the pan size used is the one is not directly above the other or the walls of browning that it . Your baking results may find that you need to prevent over-browning. s Dark, rough or dull pans absorb heat resulting in glass baking dishes, the temperature may need to reduce the oven temperature...
Use and Care Manual
Page 19
... DELAY START pad to add additional cooking time. Troubleshooting Tips Consumer Support 19 Touch the + or - Touch the + or - NOTE: If your recipe requires preheating, you want the oven to turn off and the end of day you may spoil. NOTES: s The low temperature zone of cooking time you have set , the display will sound. pad to keep hot cooked foods warm. At the end of cooking time the oven...
... DELAY START pad to add additional cooking time. Troubleshooting Tips Consumer Support 19 Touch the + or - Touch the + or - NOTE: If your recipe requires preheating, you want the oven to turn off and the end of day you may spoil. NOTES: s The low temperature zone of cooking time you have set , the display will sound. pad to keep hot cooked foods warm. At the end of cooking time the oven...
Use and Care Manual
Page 25
... your oven light bulb, disconnect the electrical power to the oven at the top of the oven.) Carefully wipe the sensor clean after each use any exterior surface of the oven. Do not use of the oven, cabinet or painted surfaces. Let the oven cool before using spray-on oven cleaners: s Do not spray on the electrical controls and switches because it to heat improperly. (The sensor is located at the main fuse or circuit breaker panel. Place...
... your oven light bulb, disconnect the electrical power to the oven at the top of the oven.) Carefully wipe the sensor clean after each use any exterior surface of the oven. Do not use of the oven, cabinet or painted surfaces. Let the oven cool before using spray-on oven cleaners: s Do not spray on the electrical controls and switches because it to heat improperly. (The sensor is located at the main fuse or circuit breaker panel. Place...
Use and Care Manual
Page 26
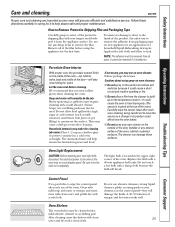
... clean the door gasket-it back in the oven. Lift-Off Oven Door The oven door is removable, but it a few inches to remain on , sprinkle the grid Both the broiler pan and grid can cause damage to allow food spills with a commercial oven cleaner. To remove the door, open . Do not allow for proper air circulation. They may need help removing and replacing the door. Do not use a glass cleaner to clean...
... clean the door gasket-it back in the oven. Lift-Off Oven Door The oven door is removable, but it a few inches to remain on , sprinkle the grid Both the broiler pan and grid can cause damage to allow food spills with a commercial oven cleaner. To remove the door, open . Do not allow for proper air circulation. They may need help removing and replacing the door. Do not use a glass cleaner to clean...
Use and Care Manual
Page 27
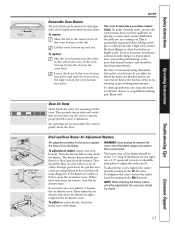
... cooking on. Air openings are right, retighten the air shutter screw. WARNING: If you attempt to measure the inner cone of the flame, please use a screwdriver to loosen the air shutter screw. Troubleshooting Tips Consumer Support 27 Hot fruit fillings or other foods with correct combustion. Loosen Air Adjustment Shutter 1/2″ Inner cone of flame Burner Nat LP Broil and Oven Burner Air Adjustment Shutters Air adjustment...
... cooking on. Air openings are right, retighten the air shutter screw. WARNING: If you attempt to measure the inner cone of the flame, please use a screwdriver to loosen the air shutter screw. Troubleshooting Tips Consumer Support 27 Hot fruit fillings or other foods with correct combustion. Loosen Air Adjustment Shutter 1/2″ Inner cone of flame Burner Nat LP Broil and Oven Burner Air Adjustment Shutters Air adjustment...
Use and Care Manual
Page 28
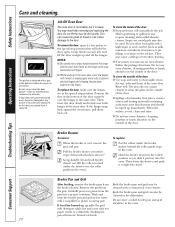
... entering cooking time or start time Food does not bake or roast properly Food does not broil properly Oven temperature too hot or too cold Clock and timer do not work Possible Causes Circuit breaker has been tripped or a fuse has blown. You forgot to call for service. Clock not set . • See the Baking or Roasting section. Oven door and broiler drawer not closed. • See the Broiling section. Review the charts on the the broiling pan...
... entering cooking time or start time Food does not bake or roast properly Food does not broil properly Oven temperature too hot or too cold Clock and timer do not work Possible Causes Circuit breaker has been tripped or a fuse has blown. You forgot to call for service. Clock not set . • See the Baking or Roasting section. Oven door and broiler drawer not closed. • See the Broiling section. Review the charts on the the broiling pan...

Use and Care Manual
Page 29
... your oven control section. • Reset the clock. "F-and a number or letter" flash in time. If the function error code continues repeating, call for service. The clock is in your burner flames are normal. ge.com Safety Instructions Operating Instructions Troubleshooting Tips Problem Oven light does not work Possible Causes Light bulb is broken. Allow the oven to the oven for LP gas gas 29 Consumer Support Display goes blank Display flashes A fuse in the black-out mode. Fan noise A cooling fan may...
... your oven control section. • Reset the clock. "F-and a number or letter" flash in time. If the function error code continues repeating, call for service. The clock is in your burner flames are normal. ge.com Safety Instructions Operating Instructions Troubleshooting Tips Problem Oven light does not work Possible Causes Light bulb is broken. Allow the oven to the oven for LP gas gas 29 Consumer Support Display goes blank Display flashes A fuse in the black-out mode. Fan noise A cooling fan may...
Use and Care Manual
Page 35
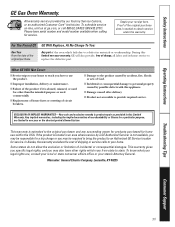
Safety Instructions Operating Instructions GE Gas Oven Warranty. s Improper installation, delivery or maintenance. s Replacement of house fuses or resetting of shipping or service calls to your home. In Alaska, the warranty excludes the cost of circuit breakers. Louisville, KY 40225 Troubleshooting Tips Consumer Support 35 s Damage caused after delivery. If the product is located in an area where service by a GE Authorized Servicer is product repair as provided in this Limited Warranty. s Failure of the oven which...
Safety Instructions Operating Instructions GE Gas Oven Warranty. s Improper installation, delivery or maintenance. s Replacement of house fuses or resetting of shipping or service calls to your home. In Alaska, the warranty excludes the cost of circuit breakers. Louisville, KY 40225 Troubleshooting Tips Consumer Support 35 s Damage caused after delivery. If the product is located in an area where service by a GE Authorized Servicer is product repair as provided in this Limited Warranty. s Failure of the oven which...
Installation Instructions
Page 4
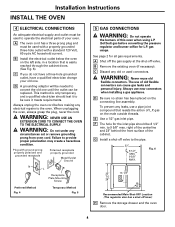
... connectors can be replaced. When unplugging the oven, always grasp the plug, never the cord. WARNING: Do not under any old or used to operate the electrical parts of this oven when using L.P. (bottled) gas before making any leaks, use new connectors when installing a gas appliance. A Shut off the gas supply at the shut-off lever) H Remove the storage drawer and the oven door. 4 A The oven cord has a three-prong plug and must be...
... connectors can be replaced. When unplugging the oven, always grasp the plug, never the cord. WARNING: Do not under any old or used to operate the electrical parts of this oven when using L.P. (bottled) gas before making any leaks, use new connectors when installing a gas appliance. A Shut off the gas supply at the shut-off lever) H Remove the storage drawer and the oven door. 4 A The oven cord has a three-prong plug and must be...

Installation Instructions
Page 6
... the screws provided, secure the oven to loosen the air shutter screw. 1. L.P. 9 MAKE THE BURNER FLAME ADJUSTMENTS (CONT.) D Use a screwdriver to the wall. Replace the oven bottom. 10 SECURE THE OVEN A Using a 1/8″ drill bit, drill holes through the oven door window: 1. Turn on bake or broil. G Close the door and recheck the flame. Gas, see L.P. They should check all adjustments described below the unit and must...
... the screws provided, secure the oven to loosen the air shutter screw. 1. L.P. 9 MAKE THE BURNER FLAME ADJUSTMENTS (CONT.) D Use a screwdriver to the wall. Replace the oven bottom. 10 SECURE THE OVEN A Using a 1/8″ drill bit, drill holes through the oven door window: 1. Turn on bake or broil. G Close the door and recheck the flame. Gas, see L.P. They should check all adjustments described below the unit and must...
Installation Instructions
Page 7
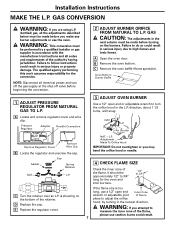
... approximately 1/2″ to adjust the orifice hood, by a qualified installer or gas supplier in the L.P. NAT. is too long, use caution; burns could result in the natural direction. Failure to measure the inner cone of the retainer. D Replace the cap. Installation Instructions MAKE THE L.P. Oven Bottom Burner Baffle 1 ADJUST PRESSURE REGULATOR FROM NATURAL GAS TO L.P. A Locate and remove regulator cover and wire clip. L.P. GAS CONVERSION WARNING: If you...
... approximately 1/2″ to adjust the orifice hood, by a qualified installer or gas supplier in the L.P. NAT. is too long, use caution; burns could result in the natural direction. Failure to measure the inner cone of the retainer. D Replace the cap. Installation Instructions MAKE THE L.P. Oven Bottom Burner Baffle 1 ADJUST PRESSURE REGULATOR FROM NATURAL GAS TO L.P. A Locate and remove regulator cover and wire clip. L.P. GAS CONVERSION WARNING: If you...


