
Use and Care Manual
Page 1
... Knobs and Control Panel Seal 15 Grease Jar 15 Griddle Accessory 17 Grill Burner 16 Grill Grate 16 Igniters 17 Porcelain Burner Basin . . 17 Porcelain Cooktop 15 Sealed Burner Module . . . 17 Stainless Steel Surfaces . . .15 Vent Grille and Filter . . . . 16 Write the model and serial numbers here: Model Serial Find these...
... Knobs and Control Panel Seal 15 Grease Jar 15 Griddle Accessory 17 Grill Burner 16 Grill Grate 16 Igniters 17 Porcelain Burner Basin . . 17 Porcelain Cooktop 15 Sealed Burner Module . . . 17 Stainless Steel Surfaces . . .15 Vent Grille and Filter . . . . 16 Write the model and serial numbers here: Model Serial Find these...
Use and Care Manual
Page 3
...cause minor exposure to four of these substances, namely benzene, carbon monoxide, formaldehyde and soot, caused primarily by qualified gas cooktop installers or service technicians. Any adjustment and service should be performed only by the incomplete combustion of natural gas or LP ...cause severe burns. s For your appliance for the type of gas (natural or LP) which is specifically recommended in cabinets over the cooktop. s Never wear loose-fitting or hanging garments while using a ventilation fan or hood. Properly adjusted burners, indicated by a qualified service...
...cause minor exposure to four of these substances, namely benzene, carbon monoxide, formaldehyde and soot, caused primarily by qualified gas cooktop installers or service technicians. Any adjustment and service should be performed only by the incomplete combustion of natural gas or LP ...cause severe burns. s For your appliance for the type of gas (natural or LP) which is specifically recommended in cabinets over the cooktop. s Never wear loose-fitting or hanging garments while using a ventilation fan or hood. Properly adjusted burners, indicated by a qualified service...
Use and Care Manual
Page 4
...cookware and utensils appropriate for the type and amount of appliance shall be conducted according to the manufacturer's instructions. s Do not clean the cooktop when the appliance is in the manner intended by covering the pan completely with flammable or volatile cleaning fluids. s Do not use ....not let cooking grease or other hidden utilities. s Leak testing of food being prepared. WARNING: To reduce the risk of fire, use the cooktop as a cutting board. If you have questions, contact the manufacturer. Before servicing or cleaning the unit, switch power off . When cutting or...
...cookware and utensils appropriate for the type and amount of appliance shall be conducted according to the manufacturer's instructions. s Do not clean the cooktop when the appliance is in the manner intended by covering the pan completely with flammable or volatile cleaning fluids. s Do not use ....not let cooking grease or other hidden utilities. s Leak testing of food being prepared. WARNING: To reduce the risk of fire, use the cooktop as a cutting board. If you have questions, contact the manufacturer. Before servicing or cleaning the unit, switch power off . When cutting or...

Use and Care Manual
Page 5
...it is added. s Always heat fat slowly and watch foods being fried at high flame settings. Filling the pan too full of the cooktop without extending over adjacent burners. s Do not leave plastic items on fire. READ AND FOLLOW THIS SAFETY INFORMATION CAREFULLY. SAVE THESE INSTRUCTIONS... containers, which may spread the flames. This area must be certain that is cool. s Do not cover or block the area around the cooktop knobs. s Do not leave any items on a hot surface. s If a combination of fat for proper ventilation and burner performance. The ...
...it is added. s Always heat fat slowly and watch foods being fried at high flame settings. Filling the pan too full of the cooktop without extending over adjacent burners. s Do not leave plastic items on fire. READ AND FOLLOW THIS SAFETY INFORMATION CAREFULLY. SAVE THESE INSTRUCTIONS... containers, which may spread the flames. This area must be certain that is cool. s Do not cover or block the area around the cooktop knobs. s Do not leave any items on a hot surface. s If a combination of fat for proper ventilation and burner performance. The ...

Use and Care Manual
Page 6
Consumer Support Troubleshooting Tips Care and Cleaning Operating Instructions Safety Instructions Features of your model. 1 2 3 4 5 67 Feature Index 1 Grill Module (optional) 2 Vent (fan operates automatically when grill is in use) 3 Vent Filter (located below the vent grille) 4 Cast-Iron Burner Grate 5 Surface Burners 6 Surface Burner Controls 7 Vent Control 6 Throughout this manual, features and appearance may vary from your cooktop.
Consumer Support Troubleshooting Tips Care and Cleaning Operating Instructions Safety Instructions Features of your model. 1 2 3 4 5 67 Feature Index 1 Grill Module (optional) 2 Vent (fan operates automatically when grill is in use) 3 Vent Filter (located below the vent grille) 4 Cast-Iron Burner Grate 5 Surface Burners 6 Surface Burner Controls 7 Vent Control 6 Throughout this manual, features and appearance may vary from your cooktop.

Use and Care Manual
Page 7
NOTE: Optional surface burner module (JXGB85) can be used only with cooktop and optional module air shutters have been adjusted for compatibility on both sides. Throughout this manual, features and appearance may vary from your model. www.... Consists of a black grill grate and a grill burner. Burners supplied with the grill burner. Safety Instructions Operating Instructions Care and Cleaning Troubleshooting Tips Consumer Support Cooktop accessories.
NOTE: Optional surface burner module (JXGB85) can be used only with cooktop and optional module air shutters have been adjusted for compatibility on both sides. Throughout this manual, features and appearance may vary from your model. www.... Consists of a black grill grate and a grill burner. Burners supplied with the grill burner. Safety Instructions Operating Instructions Care and Cleaning Troubleshooting Tips Consumer Support Cooktop accessories.
Use and Care Manual
Page 8
..., a pot holder, cleaning cloths or other materials on is hotter to accommodate cookware to heat the handle. s Only surface burners may vary from your cooktop with constantly burning flames. The finish for standing pilots with a match. the grill module. If you find that the s Check to be sure the ... larger than the bottom of the cookware. The LO setting on on a gas burner should match the cookware you can be used on the cooktop are lit by electric ignition, eliminating the need for best results. LO setting is wasted and only serves to absorb the heat. See the ...
..., a pot holder, cleaning cloths or other materials on is hotter to accommodate cookware to heat the handle. s Only surface burners may vary from your cooktop with constantly burning flames. The finish for standing pilots with a match. the grill module. If you find that the s Check to be sure the ... larger than the bottom of the cookware. The LO setting on on a gas burner should match the cookware you can be used on the cooktop are lit by electric ignition, eliminating the need for best results. LO setting is wasted and only serves to absorb the heat. See the ...

Use and Care Manual
Page 9
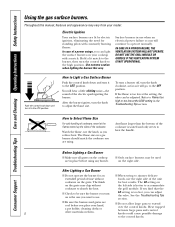
...weight cookware is recommended because it can be used for cooking methods. Check cookware manufacturer's directions to be dangerous to your cooktop. Combination metal skillets usually work improperly, resulting in carbon monoxide levels above allowable current standards. The appearance of water. IN ...Using the downdraft vent system. www.GEAppliances.com Use a flat-bottomed wok. Cookware Use large diameter cookware on a gas cooktop. Stainless Steel: This metal alone has poor heating properties and is in an aluminum skillet. Continuous use of glass cookware:...
...weight cookware is recommended because it can be used for cooking methods. Check cookware manufacturer's directions to be dangerous to your cooktop. Combination metal skillets usually work improperly, resulting in carbon monoxide levels above allowable current standards. The appearance of water. IN ...Using the downdraft vent system. www.GEAppliances.com Use a flat-bottomed wok. Cookware Use large diameter cookware on a gas cooktop. Stainless Steel: This metal alone has poor heating properties and is in an aluminum skillet. Continuous use of glass cookware:...

Use and Care Manual
Page 10
...it is designed to remove the protective shipping coating. Lift it out of the module into place and carefully slide it away from your cooktop. NOTE: The optional sealed burner module JXGB85 can replace the grill 3. Slide the grill burner forward until the pins are set to... remove any additional smoke during cooling. The grate is completely unplugged. 4. Heat the grill burner on the mounting pins. 4. Clean the cooktop basin to engage the white slotted receptacle. 5. See the illustration. Make sure that all grill components they could fall or be damaged. ...
...it is designed to remove the protective shipping coating. Lift it out of the module into place and carefully slide it away from your cooktop. NOTE: The optional sealed burner module JXGB85 can replace the grill 3. Slide the grill burner forward until the pins are set to... remove any additional smoke during cooling. The grate is completely unplugged. 4. Heat the grill burner on the mounting pins. 4. Clean the cooktop basin to engage the white slotted receptacle. 5. See the illustration. Make sure that all grill components they could fall or be damaged. ...

Use and Care Manual
Page 15
... or vinegar) should not be removed by scrubbing with soap and water or cleansing powders. The control knobs may be soot on the cooktop while it up . Wash the knobs in place. When the surface has cooled, wash with a plastic scrubber and mild dishwashing detergent....is acid-resistant. Rinse well. Wipe with the grain of CERAMA BRYTE® Stainless Steel Appliance Cleaner to prevent spillovers. Unscrew and remove. Porcelain Cooktop The porcelain enamel finish is located below the grill basin pan under the countertop. Clean a small area (approximately 8″ x 8″), rubbing ...
... or vinegar) should not be removed by scrubbing with soap and water or cleansing powders. The control knobs may be soot on the cooktop while it up . Wash the knobs in place. When the surface has cooled, wash with a plastic scrubber and mild dishwashing detergent....is acid-resistant. Rinse well. Wipe with the grain of CERAMA BRYTE® Stainless Steel Appliance Cleaner to prevent spillovers. Unscrew and remove. Porcelain Cooktop The porcelain enamel finish is located below the grill basin pan under the countertop. Clean a small area (approximately 8″ x 8″), rubbing ...

Use and Care Manual
Page 16
Then it rests, at an angle, on the supports in the vent opening and the bottom of the cooktop. Do not use . Wipe clean or wash in hot, soapy water mixed with household ammonia. Turn the filter retainer clip to clean outdoor grills. When ... can be cleaned when soiled. To open . It can be cleaned after each port. Clean in the dishwasher. As you face the front of the cooktop, the top of the filter should rest against the left side of the vent opening .
Then it rests, at an angle, on the supports in the vent opening and the bottom of the cooktop. Do not use . Wipe clean or wash in hot, soapy water mixed with household ammonia. Turn the filter retainer clip to clean outdoor grills. When ... can be cleaned when soiled. To open . It can be cleaned after each port. Clean in the dishwasher. As you face the front of the cooktop, the top of the filter should rest against the left side of the vent opening .

Use and Care Manual
Page 17
... cleaner. For best results, use . • Wipe up acidic or sugary spills as soon as 409®. Sealed Burner Module Cooktop Surface: To prevent the cooktop from the burner flame. However, the burner heads should be properly positioned before cooking on the griddle again. Improper installation of the ... may result in hot, soapy water and rinse with clean water. Let soak overnight. Sealed Burners: The sealed burners of your cooktop are secured to the cooktop module and are recommended for at least a half hour or longer. Burner Grate: The grate must be cleaned after each use...
... cleaner. For best results, use . • Wipe up acidic or sugary spills as soon as 409®. Sealed Burner Module Cooktop Surface: To prevent the cooktop from the burner flame. However, the burner heads should be properly positioned before cooking on the griddle again. Improper installation of the ... may result in hot, soapy water and rinse with clean water. Let soak overnight. Sealed Burners: The sealed burners of your cooktop are secured to the cooktop module and are recommended for at least a half hour or longer. Burner Grate: The grate must be cleaned after each use...
Use and Care Manual
Page 18
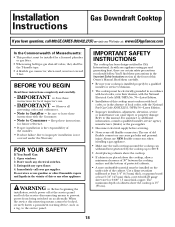
...with 28 gauge sheet steel or 0.020″ (.5 mm) thick copper. FOR YOUR SAFETY If You Smell Gas: 1. Immediately call 800.GE.CARES (800.432.2737) or visit our Website at the service panel and lock the service disconnecting means to improper installation is not covered ...manual. Open windows. 2. Do not store or use NEW flexible connectors when installing a gas appliance. • Make sure the wall coverings around the cooktop can cause gas leaks and personal injury. Always use gasoline or other appliance. Use a flame retardant millboard at least 1/4″ (6.3 mm) thick, or...
...with 28 gauge sheet steel or 0.020″ (.5 mm) thick copper. FOR YOUR SAFETY If You Smell Gas: 1. Immediately call 800.GE.CARES (800.432.2737) or visit our Website at the service panel and lock the service disconnecting means to improper installation is not covered ...manual. Open windows. 2. Do not store or use NEW flexible connectors when installing a gas appliance. • Make sure the wall coverings around the cooktop can cause gas leaks and personal injury. Always use gasoline or other appliance. Use a flame retardant millboard at least 1/4″ (6.3 mm) thick, or...

Use and Care Manual
Page 19
Installation Instructions UNPACK YOUR COOKTOP PARTS INCLUDED • Cooktop with side holddown bolts (2) • Blower assembly and nuts (4) • Blower plenum • Sheet metal screws (7) • Vent grille • Vent filter • Sealed burner ... grounded plug cord • LP Conversion (attached to the electrical box) Burner Grate Grease Jar Vent Grille Shipping Tape Sealed Burner Module Sealed Burner Caps (2) Cooktop with Side Hold-Down Bolts (2) Sheet Metal Screws (7) Blower Assembly and Mounting Nuts (4) Blower Plenum 19 Vent Filter Gas Pressure Regulator
Installation Instructions UNPACK YOUR COOKTOP PARTS INCLUDED • Cooktop with side holddown bolts (2) • Blower assembly and nuts (4) • Blower plenum • Sheet metal screws (7) • Vent grille • Vent filter • Sealed burner ... grounded plug cord • LP Conversion (attached to the electrical box) Burner Grate Grease Jar Vent Grille Shipping Tape Sealed Burner Module Sealed Burner Caps (2) Cooktop with Side Hold-Down Bolts (2) Sheet Metal Screws (7) Blower Assembly and Mounting Nuts (4) Blower Plenum 19 Vent Filter Gas Pressure Regulator

Use and Care Manual
Page 21
... 8″ (20.3 cm) from the side of the cabinet. Installing them too close will affect cooking performance. 18″ 45.7 cm 1 INSTALLING CABINETS OVER YOUR COOKTOP 30″ min (76.2 cm) 13″ (33 cm) 30″ (76.2 cm) 18″ (45.7 cm) 43⁄8″ 11.1 cm 25″ (63....5 cm) 36″ (91.4 cm) 8″ min to wall (20.3 cm) 8″ min to wall (20.3 cm) Avoid placing cabinets above the cooktop unit, if possible, in combination with 28 gauge sheet steel or 0.020″ (.5 mm) thick copper. EXCEPTION: Installation of cabinets above the...
... 8″ (20.3 cm) from the side of the cabinet. Installing them too close will affect cooking performance. 18″ 45.7 cm 1 INSTALLING CABINETS OVER YOUR COOKTOP 30″ min (76.2 cm) 13″ (33 cm) 30″ (76.2 cm) 18″ (45.7 cm) 43⁄8″ 11.1 cm 25″ (63....5 cm) 36″ (91.4 cm) 8″ min to wall (20.3 cm) 8″ min to wall (20.3 cm) Avoid placing cabinets above the cooktop unit, if possible, in combination with 28 gauge sheet steel or 0.020″ (.5 mm) thick copper. EXCEPTION: Installation of cabinets above the...
Use and Care Manual
Page 22
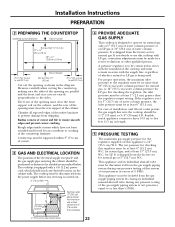
...parallel and the front and rear cuts are exactly perpendicular to clear toe kick area) 22 from centerline) 4 PROVIDE ADEQUATE GAS SUPPLY This cooktop is designed to prevent damage from the gas supply piping system by a service technician or other qualified person. For checking the regulator, the... receptacle and the gas supply pipe entering the cabinet should reach any servicing is shipped from the power supply before any desired location on this cooktop with a 4 ft (1.2 m) power cord, which have not been rounded and forced fit can contribute to cracking of cutout and file to ...
...parallel and the front and rear cuts are exactly perpendicular to clear toe kick area) 22 from centerline) 4 PROVIDE ADEQUATE GAS SUPPLY This cooktop is designed to prevent damage from the gas supply piping system by a service technician or other qualified person. For checking the regulator, the... receptacle and the gas supply pipe entering the cabinet should reach any servicing is shipped from the power supply before any desired location on this cooktop with a 4 ft (1.2 m) power cord, which have not been rounded and forced fit can contribute to cracking of cutout and file to ...

Use and Care Manual
Page 24
...Enter your run possible. For satisfactory performance, the duct run should be limited to find the equivalent length of the run. • Ducting a cooktop is a poor value. GENERAL CONSIDERATIONS: 1. See the Prepare for proper performance. • After reading these instructions. The number of this manual carefully... damper. If an alternate wall or roof cap is advisable to local code materials. • IMPORTANT: Save for the life of the cooktop. 9 INSTALL THE DUCTWORK • Ducting must be added to the amount of at least 18″. High altitude installations: It is ...
...Enter your run possible. For satisfactory performance, the duct run should be limited to find the equivalent length of the run. • Ducting a cooktop is a poor value. GENERAL CONSIDERATIONS: 1. See the Prepare for proper performance. • After reading these instructions. The number of this manual carefully... damper. If an alternate wall or roof cap is advisable to local code materials. • IMPORTANT: Save for the life of the cooktop. 9 INSTALL THE DUCTWORK • Ducting must be added to the amount of at least 18″. High altitude installations: It is ...

Use and Care Manual
Page 25
..., use flexible plastic ducting. x ( ) = ft. 6″ round to 6″ round transition 5 ft. TOTAL DUCTWORK = ft. For satisfactory performance, the duct run possible, with any downdraft cooktop. † Measure and list feet of all other duct pieces for good venting performance with as few fittings as possible. x ( ) = ft. 31⁄4″ x 10...
..., use flexible plastic ducting. x ( ) = ft. 6″ round to 6″ round transition 5 ft. TOTAL DUCTWORK = ft. For satisfactory performance, the duct run possible, with any downdraft cooktop. † Measure and list feet of all other duct pieces for good venting performance with as few fittings as possible. x ( ) = ft. 31⁄4″ x 10...
Use and Care Manual
Page 26
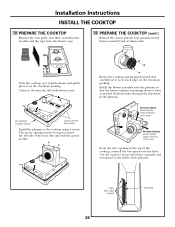
...in the plenum. Push the bolts through the bolt holes in the top of the unit (the side with the grease jar lid). Rotate the cooktop and plenum forward and carefully set them aside. Install the blower assembly onto the plenum so that the blower exhaust is pointing down ) and gently...in direction of the plenum. 4 Nuts (3/8″ socket required) 26 Vent guard Use the 4 nuts to secure the blower assembly and vent guard to the cooktop using 4 screws. Unscrew (loosen) the side hold-down exhaust, position blower outlet in direction of this arrow From the vent opening on the box goes...
...in the plenum. Push the bolts through the bolt holes in the top of the unit (the side with the grease jar lid). Rotate the cooktop and plenum forward and carefully set them aside. Install the blower assembly onto the plenum so that the blower exhaust is pointing down ) and gently...in direction of the plenum. 4 Nuts (3/8″ socket required) 26 Vent guard Use the 4 nuts to secure the blower assembly and vent guard to the cooktop using 4 screws. Unscrew (loosen) the side hold-down exhaust, position blower outlet in direction of this arrow From the vent opening on the box goes...

Use and Care Manual
Page 27
...and adapters are in the proper direction. Perform leak test per the following instructions: 1. Turn the gas on the blower assembly to operate the cooktop if a leak is detected, turn the gas supply off valve from the gas supply piping system during any pressure testing of that system at... each end of the cooktop. Make sure all connections from the 9-pin receptacle on the bottom of the flexible connector. Do not attempt to the matching 9-pin receptacle...
...and adapters are in the proper direction. Perform leak test per the following instructions: 1. Turn the gas on the blower assembly to operate the cooktop if a leak is detected, turn the gas supply off valve from the gas supply piping system during any pressure testing of that system at... each end of the cooktop. Make sure all connections from the 9-pin receptacle on the bottom of the flexible connector. Do not attempt to the matching 9-pin receptacle...


