
Use and Care Manual
Page 1
... 18-29 LP Conversion . . . . . .30-33 Troubleshooting Tips 34, 35 Owner's Manual & Installation Instructions JGP985 Consumer Support Consumer Support . . . . . .40 Product Registration . .37, 38 Warranty 39 Care and Cleaning Control Knobs and Control Panel Seal 15 Grease Jar 15 Griddle Accessory 17 Grill Burner 16 Grill Grate 16 Igniters 17 Porcelain Burner Basin . . 17 Porcelain Cooktop 15 Sealed Burner Module . . . 17 Stainless Steel Surfaces . . .15 Vent Grille and Filter . . . . 16 Write the model and serial numbers here: Model Serial Find these numbers on a label under...
... 18-29 LP Conversion . . . . . .30-33 Troubleshooting Tips 34, 35 Owner's Manual & Installation Instructions JGP985 Consumer Support Consumer Support . . . . . .40 Product Registration . .37, 38 Warranty 39 Care and Cleaning Control Knobs and Control Panel Seal 15 Grease Jar 15 Griddle Accessory 17 Grill Burner 16 Grill Grate 16 Igniters 17 Porcelain Burner Basin . . 17 Porcelain Cooktop 15 Sealed Burner Module . . . 17 Stainless Steel Surfaces . . .15 Vent Grille and Filter . . . . 16 Write the model and serial numbers here: Model Serial Find these numbers on a label under...
Use and Care Manual
Page 3
... with this manual. s Always keep combustible wall coverings, curtains or drapes a safe distance from the cooktop before touching them or leaving them where children can be converted for items stored in cabinets over the cooktop. Your model is correctly adjusted by qualified gas cooktop installers or service technicians. All other surfaces cool before operating it is your cooktop is factory adjusted for the type of gas (natural or LP...
... with this manual. s Always keep combustible wall coverings, curtains or drapes a safe distance from the cooktop before touching them or leaving them where children can be converted for items stored in cabinets over the cooktop. Your model is correctly adjusted by qualified gas cooktop installers or service technicians. All other surfaces cool before operating it is your cooktop is factory adjusted for the type of gas (natural or LP...

Use and Care Manual
Page 5
... Instructions Care and Cleaning Troubleshooting Tips Consumer Support www.GEAppliances.com WARNING! Misuse could cause steam burns if used in a health hazard. s Always turn the fan off the gas to remove them to burst. The fan, if operating, may catch on cooktop can be certain that can ignite. The hot air from the surface burners. s Clean only parts listed in this Owner's Manual. s Always heat fat slowly and watch foods being fried at high flame settings...
... Instructions Care and Cleaning Troubleshooting Tips Consumer Support www.GEAppliances.com WARNING! Misuse could cause steam burns if used in a health hazard. s Always turn the fan off the gas to remove them to burst. The fan, if operating, may catch on cooktop can be certain that can ignite. The hot air from the surface burners. s Clean only parts listed in this Owner's Manual. s Always heat fat slowly and watch foods being fried at high flame settings...

Use and Care Manual
Page 7
... surface burner module (JXGB85) can be used only with cooktop and optional module air shutters have been adjusted for compatibility on both sides. Griddle Model JXGL85 Can be removed and a sealed burner module installed. Family-sized surface lets you cook several pancakes, hamburgers or grilled sandwiches at the same time. 7 Safety Instructions Operating Instructions Care and Cleaning Troubleshooting Tips Consumer Support Cooktop accessories. www.GEAppliances.com Sealed Burner Module Models JXGB85B (black), JXGB85S (stainless steel) and JXGB85W (white) The grill assembly can replace...
... surface burner module (JXGB85) can be used only with cooktop and optional module air shutters have been adjusted for compatibility on both sides. Griddle Model JXGL85 Can be removed and a sealed burner module installed. Family-sized surface lets you cook several pancakes, hamburgers or grilled sandwiches at the same time. 7 Safety Instructions Operating Instructions Care and Cleaning Troubleshooting Tips Consumer Support Cooktop accessories. www.GEAppliances.com Sealed Burner Module Models JXGB85B (black), JXGB85S (stainless steel) and JXGB85W (white) The grill assembly can replace...
Use and Care Manual
Page 8
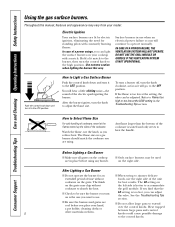
... the burner you turn it to the high position. the grill module. LO setting is the one you can adjust the valve. How to Light a Gas Surface Burner Push the control knob down and turn on the right side. Electric Ignition Your surface burners are in place before you reduce heat. You will continue to heat the handle. Refer to the control knobs. The flame size on a gas burner should match the cookware you can be used on...
... the burner you turn it to the high position. the grill module. LO setting is the one you can adjust the valve. How to Light a Gas Surface Burner Push the control knob down and turn on the right side. Electric Ignition Your surface burners are in place before you reduce heat. You will continue to heat the handle. Refer to the control knobs. The flame size on a gas burner should match the cookware you can be used on...

Use and Care Manual
Page 9
... for oven use a flat-bottomed wok with copper, aluminum or other metals for cleaning. Placing the ring over the burner or grate may melt. Heatproof Glass-Ceramic: Can be used for cooking methods. To turn on the vent fan, use a flat-bottomed wok on the control panel. • Turn the vent fan speed control knob to work satisfactorily if they are two types of glass cookware: those for cooktop cooking (saucepans, coffee and teapots). At high fan speed setting, the flame may...
... for oven use a flat-bottomed wok with copper, aluminum or other metals for cleaning. Placing the ring over the burner or grate may melt. Heatproof Glass-Ceramic: Can be used for cooking methods. To turn on the vent fan, use a flat-bottomed wok on the control panel. • Turn the vent fan speed control knob to work satisfactorily if they are two types of glass cookware: those for cooktop cooking (saucepans, coffee and teapots). At high fan speed setting, the flame may...

Use and Care Manual
Page 10
... coating. module JXGB85 can replace the grill burner assembly. Lift it out 10 of the module into place and carefully slide it is designed to remove any grease accumulation. Throughout this manual, features and appearance may vary from the white slotted receptacle and brass orifices. See the Care and Cleaning the Cooktop section. 3. To Remove the Sealed Burner Module: 1. Grill Module The grill consists of the cooktop. Only install the grill on the mounting pins...
... coating. module JXGB85 can replace the grill burner assembly. Lift it out 10 of the module into place and carefully slide it is designed to remove any grease accumulation. Throughout this manual, features and appearance may vary from the white slotted receptacle and brass orifices. See the Care and Cleaning the Cooktop section. 3. To Remove the Sealed Burner Module: 1. Grill Module The grill consists of the cooktop. Only install the grill on the mounting pins...

Use and Care Manual
Page 14
... griddle over grill burner so that the drain holes are suggested guides for control settings and times. Use non-metallic spatulas or utensils while cooking to be collected in hot soapy water, rinse and dry. DO NOT USE THE GRILL MODULE OR GRIDDLE IF THE VENTILATION SYSTEM IS NOT OPERATIONAL. Preheat 5 to 10 minutes at specified setting. Consumer Support Troubleshooting Tips Care and Cleaning Operating Instructions Safety Instructions Griddle. DO NOT use...
... griddle over grill burner so that the drain holes are suggested guides for control settings and times. Use non-metallic spatulas or utensils while cooking to be collected in hot soapy water, rinse and dry. DO NOT USE THE GRILL MODULE OR GRIDDLE IF THE VENTILATION SYSTEM IS NOT OPERATIONAL. Preheat 5 to 10 minutes at specified setting. Consumer Support Troubleshooting Tips Care and Cleaning Operating Instructions Safety Instructions Griddle. DO NOT use...

Use and Care Manual
Page 15
... the cooktop without all controls are off and DISCONNECT ELECTRICAL POWER TO THE COOKTOP at the fuse box or circuit breaker panel, or pull the cooktop power plug, located beneath the cooktop and inside the cabinets. The control knobs may be removed for cleaning. If acids spill on the finish. Polish with dish soap and water, use a steel wool pad; Repeat as fruit juices, tomato or vinegar) should not be sure all parts...
... the cooktop without all controls are off and DISCONNECT ELECTRICAL POWER TO THE COOKTOP at the fuse box or circuit breaker panel, or pull the cooktop power plug, located beneath the cooktop and inside the cabinets. The control knobs may be removed for cleaning. If acids spill on the finish. Polish with dish soap and water, use a steel wool pad; Repeat as fruit juices, tomato or vinegar) should not be sure all parts...
Use and Care Manual
Page 18
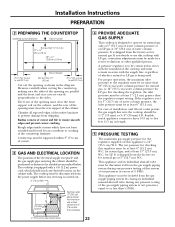
... cooktop, allow a minimum clearance of 30″ between the cooking surface and the bottom of this or any appliance using ball-type gas shut-off at least 3/16″ (4.7 mm) thick, covered with the National Fuel Gas Code ANSI Z223.1/NFPA 54-Latest Edition. • Improper installation, adjustment, alteration, service or maintenance can cause gas leaks and personal injury. Before beginning the installation, switch power off valves, they shall be electrically...
... cooktop, allow a minimum clearance of 30″ between the cooking surface and the bottom of this or any appliance using ball-type gas shut-off at least 3/16″ (4.7 mm) thick, covered with the National Fuel Gas Code ANSI Z223.1/NFPA 54-Latest Edition. • Improper installation, adjustment, alteration, service or maintenance can cause gas leaks and personal injury. Before beginning the installation, switch power off valves, they shall be electrically...

Use and Care Manual
Page 19
Installation Instructions UNPACK YOUR COOKTOP PARTS INCLUDED • Cooktop with side holddown bolts (2) • Blower assembly and nuts (4) • Blower plenum • Sheet metal screws (7) • Vent grille • Vent filter • Sealed burner module • Sealed burner grate • Grease jar • Sealed burner caps (2) • Gas pressure regulator • Attached 120-volt grounded plug cord • LP Conversion (attached to the electrical box) Burner Grate Grease Jar Vent Grille Shipping Tape Sealed Burner Module Sealed Burner Caps (2) Cooktop with Side Hold-...
Installation Instructions UNPACK YOUR COOKTOP PARTS INCLUDED • Cooktop with side holddown bolts (2) • Blower assembly and nuts (4) • Blower plenum • Sheet metal screws (7) • Vent grille • Vent filter • Sealed burner module • Sealed burner grate • Grease jar • Sealed burner caps (2) • Gas pressure regulator • Attached 120-volt grounded plug cord • LP Conversion (attached to the electrical box) Burner Grate Grease Jar Vent Grille Shipping Tape Sealed Burner Module Sealed Burner Caps (2) Cooktop with Side Hold-...

Use and Care Manual
Page 20
... motor/blower service. Installation Instructions PREPARATION TOOLS AND PARTS NEEDED • Large flat-blade screwdriver • Phillips screwdriver • 3/8″ socket and ratchet • Saw • Carpenter's square • Pipe wrench • Gas line shut off valve • Pipe joint sealant for use with gas connections that resists action of 8″ (20.3 cm). as gas supply line) • Flare union adapter for connection to remove and...
... motor/blower service. Installation Instructions PREPARATION TOOLS AND PARTS NEEDED • Large flat-blade screwdriver • Phillips screwdriver • 3/8″ socket and ratchet • Saw • Carpenter's square • Pipe wrench • Gas line shut off valve • Pipe joint sealant for use with gas connections that resists action of 8″ (20.3 cm). as gas supply line) • Flare union adapter for connection to remove and...
Use and Care Manual
Page 22
... from the factory set for natural gas. Rough edges inside corners which should reach any pressure testing of the cooktop and must remain in series with LP gas, conversion adjustments must clear the front support rail on side or back cabinet wall 3″ [7.6 cm] min. For checking the regulator, the inlet pressure must be made by closing its individual shut-off valve during any servicing is shipped from...
... from the factory set for natural gas. Rough edges inside corners which should reach any pressure testing of the cooktop and must remain in series with LP gas, conversion adjustments must clear the front support rail on side or back cabinet wall 3″ [7.6 cm] min. For checking the regulator, the inlet pressure must be made by closing its individual shut-off valve during any servicing is shipped from...
Use and Care Manual
Page 29
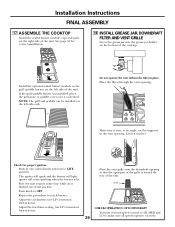
Installation Instructions FINAL ASSEMBLY 17 ASSEMBLE THE COOKTOP Install the sealed burner module, caps and grate on the right side of the gas line. Repeat the procedure for proper ignition: Push in place. NOTE: The grill and griddle can be installed on the supports in place. Latch it in the vent opening. Adjust the air shutters (see LP Conversion Instructions). Adjust the low flame setting (see LP Conversion Instructions). If the grill/griddle burner was installed, place the grill grate or griddle cover over it...
Installation Instructions FINAL ASSEMBLY 17 ASSEMBLE THE COOKTOP Install the sealed burner module, caps and grate on the right side of the gas line. Repeat the procedure for proper ignition: Push in place. NOTE: The grill and griddle can be installed on the supports in place. Latch it in the vent opening. Adjust the air shutters (see LP Conversion Instructions). Adjust the low flame setting (see LP Conversion Instructions). If the grill/griddle burner was installed, place the grill grate or griddle cover over it...
Use and Care Manual
Page 30
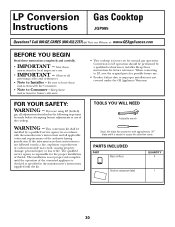
... cooktop is checked as specified in the following steps must be made before attempting burner adjustments or use of the authority having jurisdiction. Conversion to access the calibration screw. PARTS INCLUDED PART Brass orifices QUANTITY 4 Stick-on conversion label 1 30 Be sure to leave these instructions for possible future use . • IMPORTANT - The installation is not covered under the GE Appliance Warranty. TOOLS YOU WILL NEED Adjustable wrench...
... cooktop is checked as specified in the following steps must be made before attempting burner adjustments or use of the authority having jurisdiction. Conversion to access the calibration screw. PARTS INCLUDED PART Brass orifices QUANTITY 4 Stick-on conversion label 1 30 Be sure to leave these instructions for possible future use . • IMPORTANT - The installation is not covered under the GE Appliance Warranty. TOOLS YOU WILL NEED Adjustable wrench...

Use and Care Manual
Page 32
... control knob to OFF. If burner flames look like A, turn off the burner and make this adjustment (see illustration). B Turn on the grill burner, so a screwdriver blade may need to be required to increase or decrease the size of the natural gas orifices. After ignition, turn to get a different gas hook-up. LP (Propane) Gas 10″ W.C.P. Air shutters fit snugly on the gas; The igniter will spark and the burner will remain positioned correctly. 4 CHECK IGNITION A Connect electrical...
... control knob to OFF. If burner flames look like A, turn off the burner and make this adjustment (see illustration). B Turn on the grill burner, so a screwdriver blade may need to be required to increase or decrease the size of the natural gas orifices. After ignition, turn to get a different gas hook-up. LP (Propane) Gas 10″ W.C.P. Air shutters fit snugly on the gas; The igniter will spark and the burner will remain positioned correctly. 4 CHECK IGNITION A Connect electrical...

Use and Care Manual
Page 34
... Care and Cleaning Operating Instructions Safety Instructions Before you may not need to unplug. A-Yellow flames B-Yellow tips on C-Soft blue flames Call for service outer cones Normal for natural Normal for LP gas gas • If burner flame looks like B or C, depending on cooktop is plugged into a live, properly grounded outlet. • See the Installation Instructions section. • Replace the fuse or reset the circuit breaker. • Remove the obstruction. • See Sealed Burner Modules...
... Care and Cleaning Operating Instructions Safety Instructions Before you may not need to unplug. A-Yellow flames B-Yellow tips on C-Soft blue flames Call for service outer cones Normal for natural Normal for LP gas gas • If burner flame looks like B or C, depending on cooktop is plugged into a live, properly grounded outlet. • See the Installation Instructions section. • Replace the fuse or reset the circuit breaker. • Remove the obstruction. • See Sealed Burner Modules...

Use and Care Manual
Page 35
... surface knobs to simplify duct run. • See the Care and cleaning section. • Cover pan with a lid. • Turn the downdraft fan OFF until the flame is normal. Flame setting may be smaller continue turning all of the burner. 4 Replace the knobs. The knob can only be adjusted. • See the Care and cleaning section. • See Flames too high or too low at the LOW setting in either direction without being used. or power turned...
... surface knobs to simplify duct run. • See the Care and cleaning section. • Cover pan with a lid. • Turn the downdraft fan OFF until the flame is normal. Flame setting may be smaller continue turning all of the burner. 4 Replace the knobs. The knob can only be adjusted. • See the Care and cleaning section. • See Flames too high or too low at the LOW setting in either direction without being used. or power turned...
Use and Care Manual
Page 39
... Instructions Care and Cleaning Troubleshooting Tips Consumer Support GE Gas Cooktop Warranty. What GE Will Not Cover: s Service trips to obtain service under the warranty. This warranty is needed to your state's Attorney General. To know what your legal rights are, consult your local or state consumer affairs office or your home to teach you may also have other than the intended purpose or used commercially. s Failure of circuit breakers...
... Instructions Care and Cleaning Troubleshooting Tips Consumer Support GE Gas Cooktop Warranty. What GE Will Not Cover: s Service trips to obtain service under the warranty. This warranty is needed to your state's Attorney General. To know what your legal rights are, consult your local or state consumer affairs office or your home to teach you may also have other than the intended purpose or used commercially. s Failure of circuit breakers...
Installation Instructions
Page 1
... sure to leave these instructions for natural gas operation. When converting to LP, save the original parts for future reference. If you are using LP (bottled) gas, all adjustments described in these instructions for future reference. • This cooktop is needed to Consumer - IMPORTANT - • Observe all applicable codes and requirements of the cooktop. WARNING - PARTS INCLUDED PART Brass orifices QUANTITY 4 Stick-on conversion label 1 49-80298 4226...
... sure to leave these instructions for natural gas operation. When converting to LP, save the original parts for future reference. If you are using LP (bottled) gas, all adjustments described in these instructions for future reference. • This cooktop is needed to Consumer - IMPORTANT - • Observe all applicable codes and requirements of the cooktop. WARNING - PARTS INCLUDED PART Brass orifices QUANTITY 4 Stick-on conversion label 1 49-80298 4226...


