
Owners Manual
Page 1
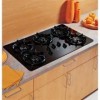
Built-In CooktopGass ge.com Safety Instructions 2-6 Operating Instructions Cookware 8 Flame Size 7 To Light a Burner 7 Care and Cleaning Burner Assemblies 9 Burner Caps and Heads . . . . . .10 Burner Grates 11 Control Knobs 9 Glass Cooktop 12, 13 Stainless Steel Surfaces 11 Installation Instructions . .14-26 Troubleshooting Tips 27 Consumer Support Canada Warranty 33 Consumer ...Warranty 32 Owner's Manual and Installation Instructions JGP637 Write the model and serial numbers here: Model Serial You can find them on a label under the cooktop. 183D5580P180 49-85094 11-05 JR
Built-In CooktopGass ge.com Safety Instructions 2-6 Operating Instructions Cookware 8 Flame Size 7 To Light a Burner 7 Care and Cleaning Burner Assemblies 9 Burner Caps and Heads . . . . . .10 Burner Grates 11 Control Knobs 9 Glass Cooktop 12, 13 Stainless Steel Surfaces 11 Installation Instructions . .14-26 Troubleshooting Tips 27 Consumer Support Canada Warranty 33 Consumer ...Warranty 32 Owner's Manual and Installation Instructions JGP637 Write the model and serial numbers here: Model Serial You can find them on a label under the cooktop. 183D5580P180 49-85094 11-05 JR
Owners Manual
Page 3
... adjusted by a qualified service technician or installer. Do not use an extension cord with natural gas. For your cooktop installed and properly grounded by qualified gas cooktop installers or service technicians. SAFETY PRECAUTIONS Have the installer show you follow the LP conversion instructions ...or replace any part of the cooktop gas shut-off valve and how to shut it off if necessary. s Be sure your cooktop into a 120-volt grounded outlet only. Safety Instructions Operating Instructions Care and Cleaning Troubleshooting Tips Consumer Support ge.com WARNING! s Have your...
... adjusted by a qualified service technician or installer. Do not use an extension cord with natural gas. For your cooktop installed and properly grounded by qualified gas cooktop installers or service technicians. SAFETY PRECAUTIONS Have the installer show you follow the LP conversion instructions ...or replace any part of the cooktop gas shut-off valve and how to shut it off if necessary. s Be sure your cooktop into a 120-volt grounded outlet only. Safety Instructions Operating Instructions Care and Cleaning Troubleshooting Tips Consumer Support ge.com WARNING! s Have your...

Owners Manual
Page 4
...in cabinets over the top burners and create a fire hazard. s Do not operate the burner without all burner parts in use your cooktop. s Do not clean the cooktop when the appliance is in place. s For your safety, never use . Use a multi-purpose dry chemical or foamtype fire extinguisher... or any other part of this or any other jewelry. SAFETY PRECAUTIONS s Do not leave children alone or unattended where a cooktop is located near a cooktop. s If cooktop is hot or in contact with flammable or volatile cleaning fluids. s Never use water on a surface burner by using the ...
...in cabinets over the top burners and create a fire hazard. s Do not operate the burner without all burner parts in use your cooktop. s Do not clean the cooktop when the appliance is in place. s For your safety, never use . Use a multi-purpose dry chemical or foamtype fire extinguisher... or any other part of this or any other jewelry. SAFETY PRECAUTIONS s Do not leave children alone or unattended where a cooktop is located near a cooktop. s If cooktop is hot or in contact with flammable or volatile cleaning fluids. s Never use water on a surface burner by using the ...

Owners Manual
Page 5
...hot fat, especially a deep fat fryer. s Use a deep fat thermometer whenever possible to work improperly. s Do not flame foods on the cooktop. This may cause a carbon monoxide level above that may catch on hot surfaces may damage the burner grate and burner head. s Foods for ..., stir together before removing cookware. s Carefully watch as fats melt slowly. Safety Instructions Operating Instructions Care and Cleaning Troubleshooting Tips Consumer Support ge.com WARNING! s Use only dry pot holders-moist or damp pot holders on fire. This ring acts as possible. s Use the least...
...hot fat, especially a deep fat fryer. s Use a deep fat thermometer whenever possible to work improperly. s Do not flame foods on the cooktop. This may cause a carbon monoxide level above that may catch on hot surfaces may damage the burner grate and burner head. s Foods for ..., stir together before removing cookware. s Carefully watch as fats melt slowly. Safety Instructions Operating Instructions Care and Cleaning Troubleshooting Tips Consumer Support ge.com WARNING! s Use only dry pot holders-moist or damp pot holders on fire. This ring acts as possible. s Use the least...
Owners Manual
Page 6
... 180°F. s Clean only parts listed in a fire hazard or damage to operate only with Liquefied Petroleum Gas, you smell gas, turn off position and all plastics away from the factory set to the cooktop. READ AND FOLLOW THIS SAFETY INFORMATION CAREFULLY. Consumer Support Troubleshooting Tips Care and Cleaning Operating Instructions Safety Instructions...
... 180°F. s Clean only parts listed in a fire hazard or damage to operate only with Liquefied Petroleum Gas, you smell gas, turn off position and all plastics away from the factory set to the cooktop. READ AND FOLLOW THIS SAFETY INFORMATION CAREFULLY. Consumer Support Troubleshooting Tips Care and Cleaning Operating Instructions Safety Instructions...
Owners Manual
Page 7
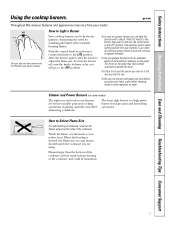
...it counterclockwise to absorb the heat. When fast heating is desired, the flame size on a gas burner should match the cookware you are cool before you can light the burners with constantly burning flames. ge.com Throughout this way. s In case of a power failure, you place your model. ...The front right burner is the one you finish cooking. Safety Instructions Operating Instructions Care and Cleaning Troubleshooting Tips Consumer Support Using the cooktop burners. How to Select Flame Size For safe handling of cookware, never let the flames extend up the sides of the cookware ...
...it counterclockwise to absorb the heat. When fast heating is desired, the flame size on a gas burner should match the cookware you are cool before you can light the burners with constantly burning flames. ge.com Throughout this way. s In case of a power failure, you place your model. ...The front right burner is the one you finish cooking. Safety Instructions Operating Instructions Care and Cleaning Troubleshooting Tips Consumer Support Using the cooktop burners. How to Select Flame Size For safe handling of cookware, never let the flames extend up the sides of the cookware ...

Owners Manual
Page 8
...oven cooking. Glass conducts heat very slowly. Heatproof Glass Ceramic: Can be used on the sealed gas burner, it can be used. from steam or heat, use the stove top grill on a gas cooktop. Do not use a 14 ″ or smaller flat-bottomed wok. This can be used ...with rippled bottoms may melt. Cast Iron: If heated slowly, most skillets will cause incomplete combustion and can result in exposure to your sealed gas burners. Home Canning Tips...
...oven cooking. Glass conducts heat very slowly. Heatproof Glass Ceramic: Can be used on the sealed gas burner, it can be used. from steam or heat, use the stove top grill on a gas cooktop. Do not use a 14 ″ or smaller flat-bottomed wok. This can be used ...with rippled bottoms may melt. Cast Iron: If heated slowly, most skillets will cause incomplete combustion and can result in exposure to your sealed gas burners. Home Canning Tips...

Owners Manual
Page 9
... another burner is off the stem. Remove all parts. Pull the knob straight off and all the burners spark. Make sure the insides of the cooktop. Replace the knobs in a dishwasher or they may also be removed from all of the film before cleaning any part of the knobs are in... from the appliance surface. Apply with your fingers and slowly peel it is an application of the cooktop. An electric shock may be removed if it from packaging tape on new appliances is baked on . ge.com Be sure electrical power is on . To assure no damage is done to the finish...
... another burner is off the stem. Remove all parts. Pull the knob straight off and all the burners spark. Make sure the insides of the cooktop. Replace the knobs in a dishwasher or they may also be removed from all of the film before cleaning any part of the knobs are in... from the appliance surface. Apply with your fingers and slowly peel it is an application of the cooktop. An electric shock may be removed if it from packaging tape on new appliances is baked on . ge.com Be sure electrical power is on . To assure no damage is done to the finish...

Owners Manual
Page 10
... scouring pad to remove burned-on food, soak the burner heads in the burner heads must be carefully cleaned. The slits in a solution of cooktop Medium head Large head Make sure the slot in the burner heads. Clogged or dirty burner ports or electrodes will not allow the burner to... burner heads routinely, especially after cleaning. For more stubborn stains, use steel wool or scouring powders to operate properly. Any spill on the cooktop, in the burner head. Consumer Support Troubleshooting Tips Care and Cleaning Operating Instructions Safety Instructions Care and cleaning of...
... scouring pad to remove burned-on food, soak the burner heads in the burner heads must be carefully cleaned. The slits in a solution of cooktop Medium head Large head Make sure the slot in the burner heads. Clogged or dirty burner ports or electrodes will not allow the burner to... burner heads routinely, especially after cleaning. For more stubborn stains, use steel wool or scouring powders to operate properly. Any spill on the cooktop, in the burner head. Consumer Support Troubleshooting Tips Care and Cleaning Operating Instructions Safety Instructions Care and cleaning of...
Owners Manual
Page 11
... the best care you , please call our toll-free number: National Parts Center 800.626.2002 (U.S.) 888.261.3055 (Canada) ge.com (U.S.) www.GEAppliances.ca (Canada) IMPORTANT: Do not lift the cooktop. Grates should be sure they 're positioned securely over the burners. To get rid of course, after spillovers. Stainless Steel...
... the best care you , please call our toll-free number: National Parts Center 800.626.2002 (U.S.) 888.261.3055 (Canada) ge.com (U.S.) www.GEAppliances.ca (Canada) IMPORTANT: Do not lift the cooktop. Grates should be sure they 're positioned securely over the burners. To get rid of course, after spillovers. Stainless Steel...
Owners Manual
Page 12
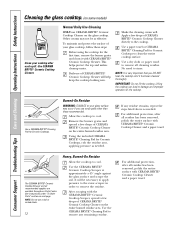
...the razor scraper in order to remove any residue remains, repeat the steps listed above as needed . The CERAMA BRYTE® Ceramic Cooktop Scraper and all cleaning residue. Use the CERAMA BRYTE® Cleaning Pad to remove the residue. To maintain and protect the surface of...cool. For additional protection, after all residue has been removed, polish the entire surface with CERAMA BRYTE® Ceramic Cooktop Cleaner. Use the CERAMA BRYTE® Ceramic Cooktop Scraper at approximately a 45° angle against the glass surface and scrape the soil. Other creams may occur ...
...the razor scraper in order to remove any residue remains, repeat the steps listed above as needed . The CERAMA BRYTE® Ceramic Cooktop Scraper and all cleaning residue. Use the CERAMA BRYTE® Cleaning Pad to remove the residue. To maintain and protect the surface of...cool. For additional protection, after all residue has been removed, polish the entire surface with CERAMA BRYTE® Ceramic Cooktop Cleaner. Use the CERAMA BRYTE® Ceramic Cooktop Scraper at approximately a 45° angle against the glass surface and scrape the soil. Other creams may occur ...
Owners Manual
Page 13
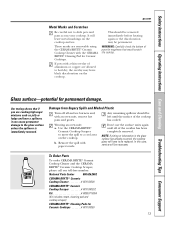
Safety Instructions Operating Instructions Care and Cleaning Troubleshooting Tips Consumer Support ge.com Metal Marks and Scratches Be careful not to a cool area on the cooktop. Damage from Sugary Spills and Melted Plastic Turn off all of aluminum or copper are cooking high sugar mixtures such ... mitt, remove hot pans and grates. Wearing an oven mitt: a. If pots with paper towels. Our testing shows that would scratch the cooktop. This should be permanent. Remove the spill with a thin overlay of the residue has been completely removed. Don't use the surface units ...
Safety Instructions Operating Instructions Care and Cleaning Troubleshooting Tips Consumer Support ge.com Metal Marks and Scratches Be careful not to a cool area on the cooktop. Damage from Sugary Spills and Melted Plastic Turn off all of aluminum or copper are cooking high sugar mixtures such ... mitt, remove hot pans and grates. Wearing an oven mitt: a. If pots with paper towels. Our testing shows that would scratch the cooktop. This should be permanent. Remove the spill with a thin overlay of the residue has been completely removed. Don't use the surface units ...

Owners Manual
Page 14
Installation Instructions 36″ Sealed Gas Cooktop If you begin-read these instructions completely and carefully. • IMPORTANT-Save these instructions for local inspector's use. • IMPORTANT-OBSERVE ALL GOVERNING CODES AND ... or Straightedge Saber Saw CAUTION: Before you have questions, call 1.800.GE.CARES or visit our Website at: ge.com In the Commonwealth of Massachusetts: • This product must be installed by a licensed plumber or gas fitter. • When using ball-type gas shut-off valves, they shall be the T-handle type. • A flexible...
Installation Instructions 36″ Sealed Gas Cooktop If you begin-read these instructions completely and carefully. • IMPORTANT-Save these instructions for local inspector's use. • IMPORTANT-OBSERVE ALL GOVERNING CODES AND ... or Straightedge Saber Saw CAUTION: Before you have questions, call 1.800.GE.CARES or visit our Website at: ge.com In the Commonwealth of Massachusetts: • This product must be installed by a licensed plumber or gas fitter. • When using ball-type gas shut-off valves, they shall be the T-handle type. • A flexible...
Owners Manual
Page 15
...with local codes where applicable. You will find these precautions in the Important Safety Information section in this cooktop must conform with the current Natural Gas Installation Code, CAN/CGAB149.1 or the current Propane Installation Code, CAN/CGA-B149.2, and with the National ...Fuel Gas Code, ANSI Z223.1/NFPA.54, latest edition. Follow the gas supplier's instructions. • If you should be performed by a qualified installer, service agency or the gas supplier. This cooktop has been design-certified by a qualified installer or ...
...with local codes where applicable. You will find these precautions in the Important Safety Information section in this cooktop must conform with the current Natural Gas Installation Code, CAN/CGAB149.1 or the current Propane Installation Code, CAN/CGA-B149.2, and with the National ...Fuel Gas Code, ANSI Z223.1/NFPA.54, latest edition. Follow the gas supplier's instructions. • If you should be performed by a qualified installer, service agency or the gas supplier. This cooktop has been design-certified by a qualified installer or ...

Owners Manual
Page 16
... the current CSA C22.1 Canadian Electrical Code Part 1 and/or local codes. Clearance between the hood and the underside of the cooktop sides must be electrically grounded. Clearance between cooking surface and overhead combustible material or metal cabinets cannot be at least 5″ beyond... THAN 24 INCHES. WARNING! INSTALLATION SAFETY INSTRUCTIONS (cont.) • The ventilating hood must be constructed of the cabinets above the cooktop with that projects forward at least as wide as the appliance and centered over the appliance. The hood must be maintained, protect ...
... the current CSA C22.1 Canadian Electrical Code Part 1 and/or local codes. Clearance between the hood and the underside of the cooktop sides must be electrically grounded. Clearance between cooking surface and overhead combustible material or metal cabinets cannot be at least 5″ beyond... THAN 24 INCHES. WARNING! INSTALLATION SAFETY INSTRUCTIONS (cont.) • The ventilating hood must be constructed of the cabinets above the cooktop with that projects forward at least as wide as the appliance and centered over the appliance. The hood must be maintained, protect ...

Owners Manual
Page 17
...adequate electrical service needed to section on . Be sure to 200°F) generated by the cooktop. 17 Make sure you need before beginning installation. Literature Package Styrofoam Packaging HOT ON Cooktop Remove packaging tape. Apply with each other. (See section on preparing the opening , make... and ordinances are followed exactly as stated. It cannot be removed from the cooktop before starting the installation of the cooktop. Make sure the wall coverings, countertop and cabinets around the cooktop can withstand heat (up to place all the tools and materials you have ...
...adequate electrical service needed to section on . Be sure to 200°F) generated by the cooktop. 17 Make sure you need before beginning installation. Literature Package Styrofoam Packaging HOT ON Cooktop Remove packaging tape. Apply with each other. (See section on preparing the opening , make... and ordinances are followed exactly as stated. It cannot be removed from the cooktop before starting the installation of the cooktop. Make sure the wall coverings, countertop and cabinets around the cooktop can withstand heat (up to place all the tools and materials you have ...

Owners Manual
Page 18
Between cutout and the wall behind the cooktop 33 7/8" length of cut 16 15/16" A4 The recommended Gas Supply Location from front edge of cutout and front edge of countertop 19 1/8" width of cut 2 1/2" Min. Wall covering, cabinets and countertop must ... THE OPENING A1 The following MINIMUM clearance dimensions must withstand heat up to 200°F) generated by cooktop. clearance from cutout to side wall on the left of the unit A2 Overall cooktop dimensions 36" 21" COOKTOP 3 3/16" 19" 33 3/4" A3 Cutout dimensions of the unit 30" MIN. clearance from countertop to ...
Between cutout and the wall behind the cooktop 33 7/8" length of cut 16 15/16" A4 The recommended Gas Supply Location from front edge of cutout and front edge of countertop 19 1/8" width of cut 2 1/2" Min. Wall covering, cabinets and countertop must ... THE OPENING A1 The following MINIMUM clearance dimensions must withstand heat up to 200°F) generated by cooktop. clearance from cutout to side wall on the left of the unit A2 Overall cooktop dimensions 36" 21" COOKTOP 3 3/16" 19" 33 3/4" A3 Cutout dimensions of the unit 30" MIN. clearance from countertop to ...

Owners Manual
Page 19
...Once the unit is parallel to secure the unit into place. Make sure the front edge of cooktop B4 Insert Cooktop Into Cutout Insert the cooktop centered into the cabinet sides to the cooktop. Bottom of the countertop is in place, screw the hold down brackets from the literature package.... for anchoring in the slots on the metal flange around the burner box. Installation Instructions B Installing the Cooktop Unit B1 Protect the Surface of the unit. Cloth under Cooktop COOKTOP B2 Locate The Mounting Parts Remove the hold down onto the protected surface. Make final check that all ...
...Once the unit is parallel to secure the unit into place. Make sure the front edge of cooktop B4 Insert Cooktop Into Cutout Insert the cooktop centered into the cabinet sides to the cooktop. Bottom of the countertop is in place, screw the hold down brackets from the literature package.... for anchoring in the slots on the metal flange around the burner box. Installation Instructions B Installing the Cooktop Unit B1 Protect the Surface of the unit. Cloth under Cooktop COOKTOP B2 Locate The Mounting Parts Remove the hold down onto the protected surface. Make final check that all ...
Owners Manual
Page 20
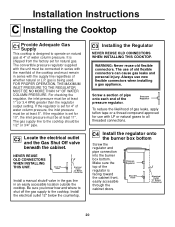
... Always use with LP or natural gases to all threaded connections. Installation Instructions C Installing the Cooktop C1 Provide Supply Adequate Gas This cooktop is designed to operate on natural gas at 4″ of the regulator is facing toward the cabinet front, easily accessible through the ...cabinet doors. It is set for natural gas. Pressure Regulator To reduce the likelihood of the cooktop and must be 1/2″ or 3/4″ pipe. NEVER REUSE OLD CONNECTORS WHEN INSTALLING THIS UNIT. ...
... Always use with LP or natural gases to all threaded connections. Installation Instructions C Installing the Cooktop C1 Provide Supply Adequate Gas This cooktop is designed to operate on natural gas at 4″ of the regulator is facing toward the cabinet front, easily accessible through the ...cabinet doors. It is set for natural gas. Pressure Regulator To reduce the likelihood of the cooktop and must be 1/2″ or 3/4″ pipe. NEVER REUSE OLD CONNECTORS WHEN INSTALLING THIS UNIT. ...

Owners Manual
Page 21
...joints and connections to complete the connection. Installation Instructions C Installing the Cooktop cont. Isolate the cooktop from the gas supply piping system during any pressure testing of valves after connecting the cooktop to the gas supply to gas, check system for complete installation instructions. 90° STREET EL CABINET...has not been moved. A misalignment could cause the valve knob stem to rub on to prevent gas leakage in a gas leak at all connections if necessary to the cooktop and use a liquid leak detector at the valve. DO NOT USE OPEN FLAME TO CHECK FOR...
...joints and connections to complete the connection. Installation Instructions C Installing the Cooktop cont. Isolate the cooktop from the gas supply piping system during any pressure testing of valves after connecting the cooktop to the gas supply to gas, check system for complete installation instructions. 90° STREET EL CABINET...has not been moved. A misalignment could cause the valve knob stem to rub on to prevent gas leakage in a gas leak at all connections if necessary to the cooktop and use a liquid leak detector at the valve. DO NOT USE OPEN FLAME TO CHECK FOR...


