
Owners Manual
Page 1
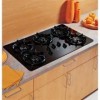
...32 Owner's Manual and Installation Instructions JGP637 Write the model and serial numbers here: Model Serial You can find them on a label under the cooktop. 183D5580P180 49-85094 11-05 JR Built-In CooktopGass ge.com Safety Instructions 2-6 Operating Instructions Cookware 8 Flame Size 7 To Light a Burner 7 Care and Cleaning Burner Assemblies 9 Burner Caps and Heads . . . . . .10 Burner Grates 11 Control Knobs 9 Glass Cooktop 12, 13 Stainless Steel Surfaces 11 Installation Instructions . .14-26 Troubleshooting Tips 27 Consumer Support Canada Warranty 33 Consumer Support 34...
...32 Owner's Manual and Installation Instructions JGP637 Write the model and serial numbers here: Model Serial You can find them on a label under the cooktop. 183D5580P180 49-85094 11-05 JR Built-In CooktopGass ge.com Safety Instructions 2-6 Operating Instructions Cookware 8 Flame Size 7 To Light a Burner 7 Care and Cleaning Burner Assemblies 9 Burner Caps and Heads . . . . . .10 Burner Grates 11 Control Knobs 9 Glass Cooktop 12, 13 Stainless Steel Surfaces 11 Installation Instructions . .14-26 Troubleshooting Tips 27 Consumer Support Canada Warranty 33 Consumer Support 34...

Owners Manual
Page 2
... to publish a list of substances known to the state to cause cancer, birth defects or other reproductive harm, and requires businesses to warn customers of natural gas or LP fuels. do not use gasoline or other appliance. - WHAT TO DO IF YOU SMELL GAS s Do not try to such substances. Consumer Support Troubleshooting Tips Care and Cleaning Operating Instructions Safety Instructions IMPORTANT SAFETY...
... to publish a list of substances known to the state to cause cancer, birth defects or other reproductive harm, and requires businesses to warn customers of natural gas or LP fuels. do not use gasoline or other appliance. - WHAT TO DO IF YOU SMELL GAS s Do not try to such substances. Consumer Support Troubleshooting Tips Care and Cleaning Operating Instructions Safety Instructions IMPORTANT SAFETY...
Owners Manual
Page 3
... have an ungrounded outlet replaced with a properly grounded, three-prong outlet in accordance with the National Electrical Code. SAFETY PRECAUTIONS Have the installer show you follow the LP conversion instructions packed with this manual. Do not use an extension cord with your cooktop is specifically recommended in this manual must be operated with natural gas. Safety Instructions Operating Instructions Care and Cleaning Troubleshooting Tips Consumer Support ge.com WARNING! For...
... have an ungrounded outlet replaced with a properly grounded, three-prong outlet in accordance with the National Electrical Code. SAFETY PRECAUTIONS Have the installer show you follow the LP conversion instructions packed with this manual. Do not use an extension cord with your cooktop is specifically recommended in this manual must be operated with natural gas. Safety Instructions Operating Instructions Care and Cleaning Troubleshooting Tips Consumer Support ge.com WARNING! For...

Owners Manual
Page 4
... distance from your cooktop. Smother a flaming pan on a surface burner by using the appliance. s If cooktop is located near a window, do not hang long curtains that could be stored in operation. s Do not store or use combustible materials, gasoline or other appliance. Turn the controls off. Use a multi-purpose dry chemical or foamtype fire extinguisher. Consumer Support Troubleshooting Tips Care and Cleaning Operating Instructions Safety Instructions IMPORTANT SAFETY...
... distance from your cooktop. Smother a flaming pan on a surface burner by using the appliance. s If cooktop is located near a window, do not hang long curtains that could be stored in operation. s Do not store or use combustible materials, gasoline or other appliance. Turn the controls off. Use a multi-purpose dry chemical or foamtype fire extinguisher. Consumer Support Troubleshooting Tips Care and Cleaning Operating Instructions Safety Instructions IMPORTANT SAFETY...

Owners Manual
Page 5
... until the fat is large enough to broken or shattered glass. 5 s Do not flame foods on the cooktop. Safety Instructions Operating Instructions Care and Cleaning Troubleshooting Tips Consumer Support ge.com WARNING! Use pans with handles that allowed by current standards, resulting in burns from steam. s Always use a wok on hot surfaces may damage the burner grate and burner head. s Use only dry pot holders-moist or damp pot holders...
... until the fat is large enough to broken or shattered glass. 5 s Do not flame foods on the cooktop. Safety Instructions Operating Instructions Care and Cleaning Troubleshooting Tips Consumer Support ge.com WARNING! Use pans with handles that allowed by current standards, resulting in burns from steam. s Always use a wok on hot surfaces may damage the burner grate and burner head. s Use only dry pot holders-moist or damp pot holders...
Owners Manual
Page 6
... of the cookware. Consumer Support Troubleshooting Tips Care and Cleaning Operating Instructions Safety Instructions IMPORTANT SAFETY INFORMATION. SURFACE BURNERS Adjust the top burner flame size so it is hot. Some cleaners produce noxious fumes and wet cloths could result in this Owner's Manual. Misuse could cause steam burns if used on or near your cooktop. This area must follow the LP conversion instructions packed with Natural Gas. s Clean only parts listed in a fire hazard...
... of the cookware. Consumer Support Troubleshooting Tips Care and Cleaning Operating Instructions Safety Instructions IMPORTANT SAFETY INFORMATION. SURFACE BURNERS Adjust the top burner flame size so it is hot. Some cleaners produce noxious fumes and wet cloths could result in this Owner's Manual. Misuse could cause steam burns if used on or near your cooktop. This area must follow the LP conversion instructions packed with Natural Gas. s Clean only parts listed in a fire hazard...
Owners Manual
Page 7
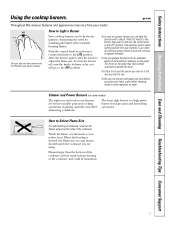
... flame size on them. How to absorb the heat. Use extreme caution when lighting burners this manual, features and appearance may chip without cookware on some models) The right rear and center rear burners are lit by electric ignition, eliminating the need for larger pans and fast boiling operations. Simmer and Power Burners (on the grate. After the burner ignites, turn the control knob to the OFF position. Be sure you turn the knob...
... flame size on them. How to absorb the heat. Use extreme caution when lighting burners this manual, features and appearance may chip without cookware on some models) The right rear and center rear burners are lit by electric ignition, eliminating the need for larger pans and fast boiling operations. Simmer and Power Burners (on the grate. After the burner ignites, turn the control knob to the OFF position. Be sure you turn the knob...

Owners Manual
Page 8
.... Stainless Steel: This metal alone has poor heating properties and is centered over the burner or grate may cause the burner to your local retail store. Cookware Aluminum: Medium-weight cookware is flat on the grate. Glass: There are available Make sure the canner is recommended because it will give satisfactory results. Consumer Support Troubleshooting Tips Care and Cleaning Operating Instructions Safety Instructions Using the cooktop burners. They...
.... Stainless Steel: This metal alone has poor heating properties and is centered over the burner or grate may cause the burner to your local retail store. Cookware Aluminum: Medium-weight cookware is flat on the grate. Glass: There are available Make sure the canner is recommended because it will give satisfactory results. Consumer Support Troubleshooting Tips Care and Cleaning Operating Instructions Safety Instructions Using the cooktop burners. They...

Owners Manual
Page 9
... BURNER WITHOUT ALL BURNER PARTS IN PLACE. 9 ge.com Be sure electrical power is removed. Remove all parts. Grate Sealed Burner Assemblies Turn all surfaces are dry before cleaning any sharp items to clean. Safety Instructions Operating Instructions Care and Cleaning Troubleshooting Tips Consumer Support Care and cleaning of the knobs are cool before replacing. It cannot be lifted off, making them straight off the stems for the first time. Pull the knob straight off and all controls...
... BURNER WITHOUT ALL BURNER PARTS IN PLACE. 9 ge.com Be sure electrical power is removed. Remove all parts. Grate Sealed Burner Assemblies Turn all surfaces are dry before cleaning any sharp items to clean. Safety Instructions Operating Instructions Care and Cleaning Troubleshooting Tips Consumer Support Care and cleaning of the knobs are cool before replacing. It cannot be lifted off, making them straight off the stems for the first time. Pull the knob straight off and all controls...
Owners Manual
Page 11
... you can lead to high temperatures. To inquire about purchasing stainless steel appliance cleaner or polish, or to absorb the heat. Do not operate a burner for cleaning the stainless steel surface. Follow the cleaner instructions for an extended period of time without cookware to find the location of the grain. Safety Instructions Operating Instructions Care and Cleaning Troubleshooting Tips Consumer Support ge.com When replacing the grates, be sure they...
... you can lead to high temperatures. To inquire about purchasing stainless steel appliance cleaner or polish, or to absorb the heat. Do not operate a burner for cleaning the stainless steel surface. Follow the cleaner instructions for an extended period of time without cookware to find the location of the grain. Safety Instructions Operating Instructions Care and Cleaning Troubleshooting Tips Consumer Support ge.com When replacing the grates, be sure they...
Owners Manual
Page 13
... left until all surface burners and, with the CERAMA BRYTE® Cleaning Pad for roughness that if you are cooking high sugar mixtures such as jelly or fudge and have to the glass surface unless the spillover is immediately removed. Damage from Sugary Spills and Melted Plastic Turn off all of pans for Ceramic Cooktops. Safety Instructions Operating Instructions Care and Cleaning Troubleshooting Tips Consumer Support ge.com Metal Marks...
... left until all surface burners and, with the CERAMA BRYTE® Cleaning Pad for roughness that if you are cooking high sugar mixtures such as jelly or fudge and have to the glass surface unless the spillover is immediately removed. Damage from Sugary Spills and Melted Plastic Turn off all of pans for Ceramic Cooktops. Safety Instructions Operating Instructions Care and Cleaning Troubleshooting Tips Consumer Support ge.com Metal Marks...

Owners Manual
Page 14
... inspector's use. • IMPORTANT-OBSERVE ALL GOVERNING CODES AND ORDINANCES. • Note to Installer-Be sure to leave these instructions with the Consumer. • Note to improper installation is not covered under the Warranty. PARTS INCLUDED MATERIALS YOU MAY NEED 2 screws Foam Tape 2 Hold Down Brackets TOOLS YOU WILL NEED Pipe Fittings Joint Sealant Shut Off Valves Flat-Blade Screwdriver Pipe Wrench 1/8″ Drill Bit & Electric or...
... inspector's use. • IMPORTANT-OBSERVE ALL GOVERNING CODES AND ORDINANCES. • Note to Installer-Be sure to leave these instructions with the Consumer. • Note to improper installation is not covered under the Warranty. PARTS INCLUDED MATERIALS YOU MAY NEED 2 screws Foam Tape 2 Hold Down Brackets TOOLS YOU WILL NEED Pipe Fittings Joint Sealant Shut Off Valves Flat-Blade Screwdriver Pipe Wrench 1/8″ Drill Bit & Electric or...

Owners Manual
Page 16
... the installation of this cooktop in your local codes which apply in a mobile home conforms with sheet metal not less than 0.0122″ thick. INSTALLATION SAFETY INSTRUCTIONS • Make sure the wall coverings, countertop and cabinets around the cooktop can get a copy of the Federal Standard by reaching over the open flames of operating burners, install a ventilation hood over the appliance. WARNING! Installation Instructions IMPORTANT SAFETY INSTRUCTIONS ELECTRICAL REQUIREMENTS This...
... the installation of this cooktop in your local codes which apply in a mobile home conforms with sheet metal not less than 0.0122″ thick. INSTALLATION SAFETY INSTRUCTIONS • Make sure the wall coverings, countertop and cabinets around the cooktop can get a copy of the Federal Standard by reaching over the open flames of operating burners, install a ventilation hood over the appliance. WARNING! Installation Instructions IMPORTANT SAFETY INSTRUCTIONS ELECTRICAL REQUIREMENTS This...

Owners Manual
Page 18
.... Installation Instructions A PREPARING THE OPENING A1 The following MINIMUM clearance dimensions must withstand heat up to make a template when cutting the opening in the counter. 2 1/4" Min. From Backwall 9" Recommended gas supply location. Wall covering, cabinets and countertop must be maintained. 13" MAX. clearance from countertop to nearest cabinet on the left of the unit A2 Overall cooktop dimensions 36" 21" COOKTOP 3 3/16" 19" 33 3/4" A3 Cutout dimensions of unit 3 3/4" MIN. clearance from cutout to side wall on...
.... Installation Instructions A PREPARING THE OPENING A1 The following MINIMUM clearance dimensions must withstand heat up to make a template when cutting the opening in the counter. 2 1/4" Min. From Backwall 9" Recommended gas supply location. Wall covering, cabinets and countertop must be maintained. 13" MAX. clearance from countertop to nearest cabinet on the left of the unit A2 Overall cooktop dimensions 36" 21" COOKTOP 3 3/16" 19" 33 3/4" A3 Cutout dimensions of unit 3 3/4" MIN. clearance from cutout to side wall on...
Owners Manual
Page 20
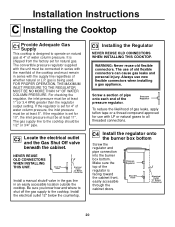
... easily accessible location outside the cooktop. Shut Off Valve Electrical Outlet 12" Below Countertop Install a manual shutoff valve in the gas line in series with the unit must be at least 1″ (or 3.4 KPA) greater than the regulator output setting. The convertible pressure regulator supplied with the manifold of whether natural or L.P. The gas supply line to all threaded connections. gas is facing toward the cabinet front, easily accessible through the cabinet doors. Pressure Regulator To...
... easily accessible location outside the cooktop. Shut Off Valve Electrical Outlet 12" Below Countertop Install a manual shutoff valve in the gas line in series with the unit must be at least 1″ (or 3.4 KPA) greater than the regulator output setting. The convertible pressure regulator supplied with the manifold of whether natural or L.P. The gas supply line to all threaded connections. gas is facing toward the cabinet front, easily accessible through the cabinet doors. Pressure Regulator To...

Owners Manual
Page 22
... three-prong wall receptacle. A grounding adaptor will be replaced. Installation Instructions D Installation-Electrical Connections D1 Because of potential safety hazards under any circumstances cut or remove grounding prong from the cooktop cord. Such extension cords are obtainable through your old one until the outlet can be needed to or greater than the branch circuit rating. N Insure proper L ground and firm connection before use of an...
... three-prong wall receptacle. A grounding adaptor will be replaced. Installation Instructions D Installation-Electrical Connections D1 Because of potential safety hazards under any circumstances cut or remove grounding prong from the cooktop cord. Such extension cords are obtainable through your old one until the outlet can be needed to or greater than the branch circuit rating. N Insure proper L ground and firm connection before use of an...

Owners Manual
Page 26
... ventilation air to natural gas. 26 If you want to convert back to the cooktop is located on the bottom of the cooktop. Make sure all controls are left the factory. When ordering parts, always include the serial number, model number and a code letter to LP gas, the conversion must be found in the OFF position. Keep these instructions and the orifices in case you the ratings of the burners...
... ventilation air to natural gas. 26 If you want to convert back to the cooktop is located on the bottom of the cooktop. Make sure all controls are left the factory. When ordering parts, always include the serial number, model number and a code letter to LP gas, the conversion must be found in the OFF position. Keep these instructions and the orifices in case you the ratings of the burners...
Owners Manual
Page 27
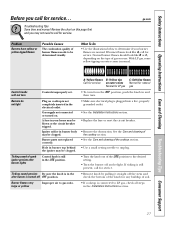
...! Burners do not light Plug on outer cones is plugged into a live, properly grounded outlet. • See the Installation Instructions section. • Replace the fuse or reset the circuit breaker. • Remove the obstruction. Igniter orifice in the electrical outlet. Ticking sound of burner flames needs to call for LP gas gas Control knobs will not turn Controls improperly set. • To turn from the OFF position, push the knob in the Installation Instructions section. 27 Safety Instructions Operating Instructions Care and Cleaning Troubleshooting...
...! Burners do not light Plug on outer cones is plugged into a live, properly grounded outlet. • See the Installation Instructions section. • Replace the fuse or reset the circuit breaker. • Remove the obstruction. Igniter orifice in the electrical outlet. Ticking sound of burner flames needs to call for LP gas gas Control knobs will not turn Controls improperly set. • To turn from the OFF position, push the knob in the Installation Instructions section. 27 Safety Instructions Operating Instructions Care and Cleaning Troubleshooting...
Owners Manual
Page 32
... or consequential damage caused by law. s Product not accessible to use within the USA. In Alaska, the warranty excludes the cost of circuit breakers. During this limited one year or the shortest period allowed by possible defects with this Limited Warranty. s Improper installation, delivery or maintenance. Consumer Support Troubleshooting Tips Care and Cleaning Operating Instructions Safety Instructions GE Gas Cooktop Warranty. (For Customers in materials or workmanship.
... or consequential damage caused by law. s Product not accessible to use within the USA. In Alaska, the warranty excludes the cost of circuit breakers. During this limited one year or the shortest period allowed by possible defects with this Limited Warranty. s Improper installation, delivery or maintenance. Consumer Support Troubleshooting Tips Care and Cleaning Operating Instructions Safety Instructions GE Gas Cooktop Warranty. (For Customers in materials or workmanship.
Owners Manual
Page 33
... Instructions Care and Cleaning Troubleshooting Tips Consumer Support GE Gas Cooktop Warranty. (For Customers in this Limited Warranty. For service, call 1.800.361.3400. For The Period Of: GE Will Replace: One Year From the date of the original purchase Any part of charge, all labor and related service costs to replace the defective part. EXCLUSION OF IMPLIED WARRANTIES-Your sole and exclusive remedy is product repair as provided in Canada...
... Instructions Care and Cleaning Troubleshooting Tips Consumer Support GE Gas Cooktop Warranty. (For Customers in this Limited Warranty. For service, call 1.800.361.3400. For The Period Of: GE Will Replace: One Year From the date of the original purchase Any part of charge, all labor and related service costs to replace the defective part. EXCLUSION OF IMPLIED WARRANTIES-Your sole and exclusive remedy is product repair as provided in Canada...


