Use and Care Manual
Page 3
... try to operate it with LP (bottled) gas unless you the location of life. Exposure to prevent fire or smoke damage should the packaging material ignite. ■ Be sure your cooktop installed and properly grounded by a qualified service technician or installer. See LP Conversion Instructions. 3 SAFETY PRECAUTIONS Have the installer show...
... try to operate it with LP (bottled) gas unless you the location of life. Exposure to prevent fire or smoke damage should the packaging material ignite. ■ Be sure your cooktop installed and properly grounded by a qualified service technician or installer. See LP Conversion Instructions. 3 SAFETY PRECAUTIONS Have the installer show...
Use and Care Manual
Page 4
Doing so may cause severe burns. ■ Teach children not to heat or warm the room. Flammable material could be ignited if brought in contact with the controls or any other part of the cooktop. Consumer Support Troubleshooting Tips Care and Cleaning Operating Instructions Safety Instructions ...
Doing so may cause severe burns. ■ Teach children not to heat or warm the room. Flammable material could be ignited if brought in contact with the controls or any other part of the cooktop. Consumer Support Troubleshooting Tips Care and Cleaning Operating Instructions Safety Instructions ...
Use and Care Manual
Page 5
... hazard. ■ Foods for frying should be certain that the controls for cooktop cooking. ■ To minimize the possibility of burns, ignition of flammable materials and spillage, turn cookware handles toward the side or back of a pot holder. Select cookware having flat bottoms large enough... before removing cookware. ■ Carefully watch foods being fried at the off position and all plastics away from the vent may ignite flammable items and will increase pressure in burns from steam. Boilovers cause smoking and greasy spillovers that are cool before attempting to ...
... hazard. ■ Foods for frying should be certain that the controls for cooktop cooking. ■ To minimize the possibility of burns, ignition of flammable materials and spillage, turn cookware handles toward the side or back of a pot holder. Select cookware having flat bottoms large enough... before removing cookware. ■ Carefully watch foods being fried at the off position and all plastics away from the vent may ignite flammable items and will increase pressure in burns from steam. Boilovers cause smoking and greasy spillovers that are cool before attempting to ...
Use and Care Manual
Page 7
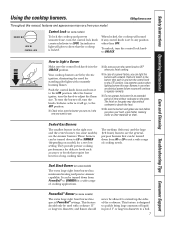
... to suit a wide range of time without cookware to absorb the heat. ■ Be sure the burners and grates are lit by electric ignition, eliminating the need for standing pilot lights with cookware 11″ or larger in and turn the control lock knob to the LITE position. .... This feature is locked. Dual Stack Burner (on them. The finish on the grate may vary from PowerBoil™ to LOCK. After the burner ignites, turn the control lock knob counterclockwise to SIMMER for a long cooking time. The medium (left rear) and the large (left front) burners are ...
... to suit a wide range of time without cookware to absorb the heat. ■ Be sure the burners and grates are lit by electric ignition, eliminating the need for standing pilot lights with cookware 11″ or larger in and turn the control lock knob to the LITE position. .... This feature is locked. Dual Stack Burner (on them. The finish on the grate may vary from PowerBoil™ to LOCK. After the burner ignites, turn the control lock knob counterclockwise to SIMMER for a long cooking time. The medium (left rear) and the large (left front) burners are ...
Use and Care Manual
Page 10
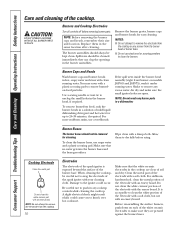
...not attempt to remove the electrode from the burner head or burner base. ■ Do not use steel wool or scouring powders to the igniter could cause you to 20-30 minutes, if required. Air dry and make sure they can clog the openings in the same location after ... part of the electrode with the emery board. Consumer Support Troubleshooting Tips Care and Cleaning Operating Instructions Safety Instructions Care and cleaning of the spark igniter with a plastic scouring pad to remove any excess water. CAUTION: DO NOT OPERATE A BURNER WITHOUT ALL BURNER PARTS IN PLACE. they are pressed...
...not attempt to remove the electrode from the burner head or burner base. ■ Do not use steel wool or scouring powders to the igniter could cause you to 20-30 minutes, if required. Air dry and make sure they can clog the openings in the same location after ... part of the electrode with the emery board. Consumer Support Troubleshooting Tips Care and Cleaning Operating Instructions Safety Instructions Care and cleaning of the spark igniter with a plastic scouring pad to remove any excess water. CAUTION: DO NOT OPERATE A BURNER WITHOUT ALL BURNER PARTS IN PLACE. they are pressed...
Use and Care Manual
Page 14
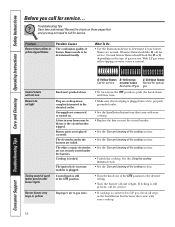
... the OFF position, push the knob down and then turn Burners do not light Ticking sound of the cooktop section. • Unlock the cooktop. The igniter hole (on the type of burner flames needs to gas ratio. • If cooktop is plugged into a live, properly grounded outlet. • See...and cleaning of the cooktop section. • See the Care and cleaning of the cooktop section. • See the Care and cleaning of spark igniter persists after burner lights Burner flames very large or yellow A-Yellow flames B-Yellow tips C-Soft blue flames Call for service. If ticking is not ...
... the OFF position, push the knob down and then turn Burners do not light Ticking sound of the cooktop section. • Unlock the cooktop. The igniter hole (on the type of burner flames needs to gas ratio. • If cooktop is plugged into a live, properly grounded outlet. • See...and cleaning of the cooktop section. • See the Care and cleaning of the cooktop section. • See the Care and cleaning of spark igniter persists after burner lights Burner flames very large or yellow A-Yellow flames B-Yellow tips C-Soft blue flames Call for service. If ticking is not ...

Installation Instructions
Page 10
... seated in the burner head is fully inserted inside the burner base. Installation Instructions COOKTOP BURNERS 1 ASSEMBLING THE COOKTOP BURNERS The electrode of the spark igniter is turned on. Make sure to push any burner while another burner is exposed. Be careful not to place the correct burner head on the...
... seated in the burner head is fully inserted inside the burner base. Installation Instructions COOKTOP BURNERS 1 ASSEMBLING THE COOKTOP BURNERS The electrode of the spark igniter is turned on. Make sure to push any burner while another burner is exposed. Be careful not to place the correct burner head on the...

Installation Instructions
Page 11
... FLAMES Turn each valve separately until all burners have been carefully checked for leaks and the cooktop has been connected to LITE, the spark igniter makes a series of electric sparks (ticking sounds) which light the burner. On models so equipped, check to LITE will not light automatically... turning the correct knob for specific positions. Flames should be checked after the cooktop and supply line have been checked. 3 BURNER IGNITION Cooktop Spark Ignition-When you attempt to light. Make sure that the tabs on either side of the center grate fit into the slots located on...
... FLAMES Turn each valve separately until all burners have been carefully checked for leaks and the cooktop has been connected to LITE, the spark igniter makes a series of electric sparks (ticking sounds) which light the burner. On models so equipped, check to LITE will not light automatically... turning the correct knob for specific positions. Flames should be checked after the cooktop and supply line have been checked. 3 BURNER IGNITION Cooktop Spark Ignition-When you attempt to light. Make sure that the tabs on either side of the center grate fit into the slots located on...

Installation Instructions
Page 14
...burner base (if required to push the nut driver down over the ring. A slight amount of force is required to access the orifices). Spark igniter 14 Using a No. 15 "Torx" head driver bit, remove the Orifice Spud Located screws holding the Through This Opening burner base in the... cooktop. Burner cap C Using a 7mm nut driver, remove the top burner orifices. Burner head Spark igniter Burner base 18,000 BTU Burner (on some models) Burner cap Burner base Burner head 3 CHANGE COOKTOP BURNER ORIFICES (CONT.) NOTE: On most ...
...burner base (if required to push the nut driver down over the ring. A slight amount of force is required to access the orifices). Spark igniter 14 Using a No. 15 "Torx" head driver bit, remove the Orifice Spud Located screws holding the Through This Opening burner base in the... cooktop. Burner cap C Using a 7mm nut driver, remove the top burner orifices. Burner head Spark igniter Burner base 18,000 BTU Burner (on some models) Burner cap Burner base Burner head 3 CHANGE COOKTOP BURNER ORIFICES (CONT.) NOTE: On most ...

Installation Instructions
Page 16
... GAS, REVERSE THE STEPS UNDER MAKING THE LP CONVERSION. This will soon disappear. Refer to the setting before the lowest setting. E Testing Flame Stability: Test 1 - Ignite each burner individually. Apply the sticker near the cooktop gas inlet opening to alert others know the appliance is complete and checked ok, fill out...
... GAS, REVERSE THE STEPS UNDER MAKING THE LP CONVERSION. This will soon disappear. Refer to the setting before the lowest setting. E Testing Flame Stability: Test 1 - Ignite each burner individually. Apply the sticker near the cooktop gas inlet opening to alert others know the appliance is complete and checked ok, fill out...


