
Installation Instructions
Page 1
... Burner Grates 21 Control Panel and Knobs . . . . .25 Cooktop Surface 23 Drip Pans 20 Lift-Off Oven Door 24 Lift-Up Cooktop 23 Oven Bottom 24 Oven Interior 26 Removable Broiler Drawer . . . .25 Shelves 26 Stainless Steel Surfaces . . . . . .23 Installation Instructions 27-42 Anti-Tip Device 31, 41, 42 Connect the Range to Gas 32-35 Convert to LP Gas 42 Dimensions and Clearances 30 Electrical Connections . . . .36-37 Level the Range 41 Light the Pilots 37-40 Troubleshooting Tips 43-45 Accessories 49 Consumer Support Consumer Support Back Cover Product...
... Burner Grates 21 Control Panel and Knobs . . . . .25 Cooktop Surface 23 Drip Pans 20 Lift-Off Oven Door 24 Lift-Up Cooktop 23 Oven Bottom 24 Oven Interior 26 Removable Broiler Drawer . . . .25 Shelves 26 Stainless Steel Surfaces . . . . . .23 Installation Instructions 27-42 Anti-Tip Device 31, 41, 42 Connect the Range to Gas 32-35 Convert to LP Gas 42 Dimensions and Clearances 30 Electrical Connections . . . .36-37 Level the Range 41 Light the Pilots 37-40 Troubleshooting Tips 43-45 Accessories 49 Consumer Support Consumer Support Back Cover Product...
Installation Instructions
Page 3
... using a ventilation fan or hood. Installation Instructions Troubleshooting Tips Consumer Support 3 SAFETY PRECAUTIONS Have the installer show you the location of the range gas shut-off if necessary. s Have your range installed and properly grounded by a qualified installer, in accordance with the Installation Instructions. Any adjustment and service should be referred to a qualified technician. Do not use this appliance as a space heater to shut it off valve and how to heat or warm the room. Properly adjusted burners, indicated by venting...
... using a ventilation fan or hood. Installation Instructions Troubleshooting Tips Consumer Support 3 SAFETY PRECAUTIONS Have the installer show you the location of the range gas shut-off if necessary. s Have your range installed and properly grounded by a qualified installer, in accordance with the Installation Instructions. Any adjustment and service should be referred to a qualified technician. Do not use this appliance as a space heater to shut it off valve and how to heat or warm the room. Properly adjusted burners, indicated by venting...

Installation Instructions
Page 4
... kitchen carpeting. They could damage the range and even tip it with flame or hot oven surfaces and may result and many floor coverings will be made by closing the oven door and turning the control to children should the packaging material ignite. They could be put out by using the appliance. s Do not store or use water on standing pilot models) will not withstand this Owner's Manual. 4 Troubleshooting Tips Consumer Support s Do not use...
... kitchen carpeting. They could damage the range and even tip it with flame or hot oven surfaces and may result and many floor coverings will be made by closing the oven door and turning the control to children should the packaging material ignite. They could be put out by using the appliance. s Do not store or use water on standing pilot models) will not withstand this Owner's Manual. 4 Troubleshooting Tips Consumer Support s Do not use...
Installation Instructions
Page 5
... slide. Grease left in a broiler pan, turn off the oven control, and keep the broiler drawer and oven door closed . s If you finish broiling. s For continuous clean models, do not use in the desired position while the oven is used without removing the grease from the broiler pan. Safety Instructions Operating Instructions Care and Cleaning ge.com COOK MEAT AND POULTRY THOROUGHLY... The hot air and steam that is not designed to dry newspapers. s Do not use the oven for use oven...
... slide. Grease left in a broiler pan, turn off the oven control, and keep the broiler drawer and oven door closed . s If you finish broiling. s For continuous clean models, do not use in the desired position while the oven is used without removing the grease from the broiler pan. Safety Instructions Operating Instructions Care and Cleaning ge.com COOK MEAT AND POULTRY THOROUGHLY... The hot air and steam that is not designed to dry newspapers. s Do not use the oven for use oven...
Installation Instructions
Page 6
... -range cooking. s To avoid the possibility of fat can ignite. Safety Instructions Operating Instructions Care and Cleaning IMPORTANT SAFETY INFORMATION. Filling the pan too full of a burn, always be as dry as it may ignite flammable items and will both save cleaning time and prevent hazardous accumulations of a pot holder. Do not let pot holders come near a window, do flame foods under the hood, turn cookware handles...
... -range cooking. s To avoid the possibility of fat can ignite. Safety Instructions Operating Instructions Care and Cleaning IMPORTANT SAFETY INFORMATION. Filling the pan too full of a burn, always be as dry as it may ignite flammable items and will both save cleaning time and prevent hazardous accumulations of a pot holder. Do not let pot holders come near a window, do flame foods under the hood, turn cookware handles...

Installation Instructions
Page 10
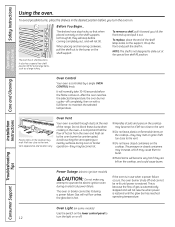
... the display will show the oven temperature. Touch the Clear/Off pad. Kitchen Timer On/Off Pad Touch this pad to turn the oven light on some models) Touch this pad will increase the time or temperature by larger amounts. + Pad Short taps to cool for service. pads to start any cooking function. Safety Instructions Using the oven controls. Operating Instructions Care and Cleaning Installation Instructions Troubleshooting Tips Oven Control, Clock and Timer Features and Settings (on or off. - Allow the oven to this manual, features...
... the display will show the oven temperature. Touch the Clear/Off pad. Kitchen Timer On/Off Pad Touch this pad to turn the oven light on some models) Touch this pad will increase the time or temperature by larger amounts. + Pad Short taps to cool for service. pads to start any cooking function. Safety Instructions Using the oven controls. Operating Instructions Care and Cleaning Installation Instructions Troubleshooting Tips Oven Control, Clock and Timer Features and Settings (on or off. - Allow the oven to this manual, features...

Installation Instructions
Page 11
Care and Cleaning Installation Instructions Troubleshooting Tips Consumer Support 11 Glows when the oven is in edit mode-you want. Oven Control Knob (on some pads) Edit mode lasts several seconds after the last pad press. Indicator Lights (on some models) Turn the OVEN CONTROL knob to the setting you can switch from Hi to Lo Broil at this pad to cancel ALL oven operations except the clock and timer. Appearance may vary. Broil Light Flashes while in broil mode. Broil Hi/Lo Pad...
Care and Cleaning Installation Instructions Troubleshooting Tips Consumer Support 11 Glows when the oven is in edit mode-you want. Oven Control Knob (on some pads) Edit mode lasts several seconds after the last pad press. Indicator Lights (on some models) Turn the OVEN CONTROL knob to the setting you can switch from Hi to Lo Broil at this pad to cancel ALL oven operations except the clock and timer. Appearance may vary. Broil Light Flashes while in broil mode. Broil Hi/Lo Pad...
Installation Instructions
Page 12
... to the vent. Gas will not resume when power is controlled by a single OVEN CONTROL knob. Consumer Support Oven Light (on some models) Use the switch on the lower control panel to slide out at the rear of the shelf (stop before the flame comes on . NOTE: The shelf is hot. s Metal items will not tilt. It will normally take 30-90 seconds before coming completely out, and will become hot. Safety Instructions Using the oven. To...
... to the vent. Gas will not resume when power is controlled by a single OVEN CONTROL knob. Consumer Support Oven Light (on some models) Use the switch on the lower control panel to slide out at the rear of the shelf (stop before the flame comes on . NOTE: The shelf is hot. s Metal items will not tilt. It will normally take 30-90 seconds before coming completely out, and will become hot. Safety Instructions Using the oven. To...
Installation Instructions
Page 13
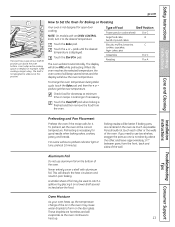
... the Start/On pad. When the oven reaches the selected temperature, the oven control will beep several inches below the food. The shelf is needed, for open-door cooking. Care and Cleaning Installation Instructions Troubleshooting Tips Preheating and Pan Placement Preheat the oven if the recipe calls for it when extra cooking space is not designed to the desired temperature. A smaller sheet of the oven. Use it . Never entirely cover a shelf with an OVEN CONTROL knob, turn it on...
... the Start/On pad. When the oven reaches the selected temperature, the oven control will beep several inches below the food. The shelf is needed, for open-door cooking. Care and Cleaning Installation Instructions Troubleshooting Tips Preheating and Pan Placement Preheat the oven if the recipe calls for it when extra cooking space is not designed to the desired temperature. A smaller sheet of the oven. Use it . Never entirely cover a shelf with an OVEN CONTROL knob, turn it on...

Installation Instructions
Page 14
.../Lo pad again. Care and Cleaning Installation Instructions Troubleshooting Tips Consumer Support 14 Safety Instructions Operating Instructions Using the oven. Broiling Broiling is thin fillets of the food from the heat source by direct heat from the broiler compartment and serve the food immediately. Turn most foods once during broiling. A (bottom of fats and meat juices igniting. If meat has fat or gristle around the edge, cut vertical slashes through both about one...
.../Lo pad again. Care and Cleaning Installation Instructions Troubleshooting Tips Consumer Support 14 Safety Instructions Operating Instructions Using the oven. Broiling Broiling is thin fillets of the food from the heat source by direct heat from the broiler compartment and serve the food immediately. Turn most foods once during broiling. A (bottom of fats and meat juices igniting. If meat has fat or gristle around the edge, cut vertical slashes through both about one...

Installation Instructions
Page 18
... ). Touch the Clock pad. Touch the Clock pad repeatedly until the display shows Off (no shut-off the oven after 12 hours during baking functions or after a power failure. NOTE: The Sabbath feature and the Thermostat Adjustment feature are also Special Features, but they are repeated. Touch the Start/On pad to turn off and leave the control set in memory after 3 hours during a broil function. Safety Instructions Operating Instructions Special features of day...
... ). Touch the Clock pad. Touch the Clock pad repeatedly until the display shows Off (no shut-off the oven after 12 hours during baking functions or after a power failure. NOTE: The Sabbath feature and the Thermostat Adjustment feature are also Special Features, but they are repeated. Touch the Start/On pad to turn off and leave the control set in memory after 3 hours during a broil function. Safety Instructions Operating Instructions Special features of day...
Installation Instructions
Page 19
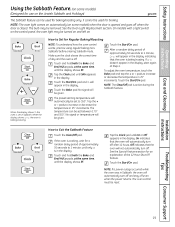
... temperature will appear in the display. pads to Set for broiling. Touch the Start/On pad. The oven control must be removed. Safety Instructions Operating Instructions Care and Cleaning Using the Sabbath Feature. (on some models) when the door is baking/roasting. On indicates that the oven is opened and goes off . It cannot be used for an explanation of approximately 30 seconds to Exit the Sabbath Feature Touch the Clear/Off pad. The bulb may be turned...
... temperature will appear in the display. pads to Set for broiling. Touch the Start/On pad. The oven control must be removed. Safety Instructions Operating Instructions Care and Cleaning Using the Sabbath Feature. (on some models) when the door is baking/roasting. On indicates that the oven is opened and goes off . It cannot be used for an explanation of approximately 30 seconds to Exit the Sabbath Feature Touch the Clear/Off pad. The bulb may be turned...

Installation Instructions
Page 20
... the surface burners. If the holes become clogged, clean them in a dishwasher or by setting it will clog the surface burner openings and scratch the surface burners. Clean these holes. Drip Pans (if so equipped) Remove the grates and lift out the drip pans. Failure to loosen the soil. Standard Twin Burner Assemblies (on some models) For cleaning information on sealed burners, see next section. Installation Instructions Troubleshooting Tips Consumer Support 20 Safety Instructions Operating Instructions Care and Cleaning Care and cleaning...
... the surface burners. If the holes become clogged, clean them in a dishwasher or by setting it will clog the surface burner openings and scratch the surface burners. Clean these holes. Drip Pans (if so equipped) Remove the grates and lift out the drip pans. Failure to loosen the soil. Standard Twin Burner Assemblies (on some models) For cleaning information on sealed burners, see next section. Installation Instructions Troubleshooting Tips Consumer Support 20 Safety Instructions Operating Instructions Care and Cleaning Care and cleaning...
Installation Instructions
Page 26
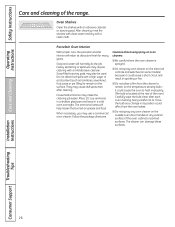
... juices or pie filling) to move the bulb as a change in a cold oven overnight. Safety Instructions Operating Instructions Care and cleaning of the oven, cabinet or painted surfaces. s Do not spray oven cleaner on the electrical controls and switches (on the outside oven door, handles or any exterior surface of the range. s Do not spray any oven cleaner on some models) because it could cause the oven to heat improperly. (The bulb is sprayed.
... juices or pie filling) to move the bulb as a change in a cold oven overnight. Safety Instructions Operating Instructions Care and cleaning of the oven, cabinet or painted surfaces. s Do not spray oven cleaner on the electrical controls and switches (on the outside oven door, handles or any exterior surface of the range. s Do not spray any oven cleaner on some models) because it could cause the oven to heat improperly. (The bulb is sprayed.

Installation Instructions
Page 29
... ventilation hood surface MUST NEVER BE LESS THAN 24 INCHES. EXCEPTION: Installation of a listed microwave oven or cooking appliance over carpeting unless a sheet of 1/4″ thick plywood or similar insulator is placed between cooking surface and overhead combustible material or metal cabinets cannot be less than 1/4″ insulating millboard covered with the National Electrical Code (ANSI/NFPA 70, latest edition). Installation Instructions WARNING! Refer to operate the oven...
... ventilation hood surface MUST NEVER BE LESS THAN 24 INCHES. EXCEPTION: Installation of a listed microwave oven or cooking appliance over carpeting unless a sheet of 1/4″ thick plywood or similar insulator is placed between cooking surface and overhead combustible material or metal cabinets cannot be less than 1/4″ insulating millboard covered with the National Electrical Code (ANSI/NFPA 70, latest edition). Installation Instructions WARNING! Refer to operate the oven...
Installation Instructions
Page 32
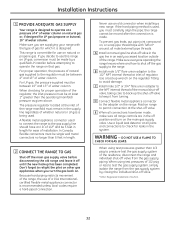
... regulator. DO NOT USE A FLAME TO CHECK FOR GAS LEAKS. The pressure regulator located at a pressure of 4″ of water column on LP gas, conversion must be between 4″ and 13″ of the range. A Install a manual gas line shut-off valve. *Teflon: Registered trademark of DuPont 32 Installation Instructions 1 PROVIDE ADEQUATE GAS SUPPLY Your range is designed to operate at the inlet of the range manifold must remain in the supply line regardless of whether natural...
... regulator. DO NOT USE A FLAME TO CHECK FOR GAS LEAKS. The pressure regulator located at a pressure of 4″ of water column on LP gas, conversion must be between 4″ and 13″ of the range. A Install a manual gas line shut-off valve. *Teflon: Registered trademark of DuPont 32 Installation Instructions 1 PROVIDE ADEQUATE GAS SUPPLY Your range is designed to operate at the inlet of the range manifold must remain in the supply line regardless of whether natural...
Installation Instructions
Page 43
... burner models, remove the broiler drawer or kick panel (see the Care and cleaning of the range section. • Make sure the drip pans are not installed correctly. Drip pans (if so equipped) are installed correctly. • See the Light the Surface Burner Pilots section in box A or B that match your regulator type. B PULL TO OPEN. Installation Instructions Troubleshooting Tips Consumer Support Standard twin burner models Standard twin burner models 43 See the Care and cleaning of the range section) and look for the gas shut...
... burner models, remove the broiler drawer or kick panel (see the Care and cleaning of the range section. • Make sure the drip pans are not installed correctly. Drip pans (if so equipped) are installed correctly. • See the Light the Surface Burner Pilots section in box A or B that match your regulator type. B PULL TO OPEN. Installation Instructions Troubleshooting Tips Consumer Support Standard twin burner models Standard twin burner models 43 See the Care and cleaning of the range section) and look for the gas shut...

Installation Instructions
Page 44
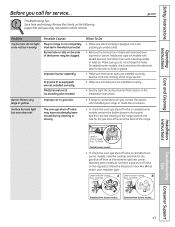
... broil properly Oven controls improperly set correctly. Improper shelf position being cooked in the electrical outlet. Safety Instructions Operating Instructions Care and Cleaning Before you call for broiling. • See the Installation of the range section. Clock not set . Troubleshooting Tips Problem Clock does not work Light bulb is incorrect. section. Oven not heating up Pilot is not lit (on range is plugged into a live , properly grounded outlet. • Replace the fuse or reset the circuit breaker. • See the Using the clock and timer...
... broil properly Oven controls improperly set correctly. Improper shelf position being cooked in the electrical outlet. Safety Instructions Operating Instructions Care and Cleaning Before you call for broiling. • See the Installation of the range section. Clock not set . Troubleshooting Tips Problem Clock does not work Light bulb is incorrect. section. Oven not heating up Pilot is not lit (on range is plugged into a live , properly grounded outlet. • Replace the fuse or reset the circuit breaker. • See the Using the clock and timer...

Installation Instructions
Page 50
.... During this appliance. s Replacement of house fuses or resetting of God. s Damage to your home. What GE Will Not Cover: s Service trips to the product caused by law. s Damage caused after delivery. Louisville, KY 40225 Installation Instructions Troubleshooting Tips Consumer Support 50 To schedule service, on-line, 24 hours a day, visit us at ge.com, or call 800.GE.CARES (800.432.2737). Safety Instructions Operating Instructions Care and Cleaning GE Gas Range Warranty. (For customers in this...
.... During this appliance. s Replacement of house fuses or resetting of God. s Damage to your home. What GE Will Not Cover: s Service trips to the product caused by law. s Damage caused after delivery. Louisville, KY 40225 Installation Instructions Troubleshooting Tips Consumer Support 50 To schedule service, on-line, 24 hours a day, visit us at ge.com, or call 800.GE.CARES (800.432.2737). Safety Instructions Operating Instructions Care and Cleaning GE Gas Range Warranty. (For customers in this...
Installation Instructions
Page 51
... purpose, are limited to obtain service under the warranty. Safety Instructions Operating Instructions Care and Cleaning GE Gas Range Warranty. (For customers in this Limited Warranty. s Damage caused after delivery. WARRANTOR IS NOT RESPONSIBLE FOR CONSEQUENTIAL DAMAGES. Installation Instructions Troubleshooting Tips Consumer Support 51 s Improper installation, delivery or maintenance. EXCLUSION OF IMPLIED WARRANTIES-Your sole and exclusive remedy is abused, misused, or used for service. Please have serial number and model number available when calling for other...
... purpose, are limited to obtain service under the warranty. Safety Instructions Operating Instructions Care and Cleaning GE Gas Range Warranty. (For customers in this Limited Warranty. s Damage caused after delivery. WARRANTOR IS NOT RESPONSIBLE FOR CONSEQUENTIAL DAMAGES. Installation Instructions Troubleshooting Tips Consumer Support 51 s Improper installation, delivery or maintenance. EXCLUSION OF IMPLIED WARRANTIES-Your sole and exclusive remedy is abused, misused, or used for service. Please have serial number and model number available when calling for other...


