

Owners Manual
Page 2
... grounded the countertop edge to defeat or tamper with the safety interlocks. section above. Consumer Support SAFETY PRECAUTIONS When using electrical appliances basic safety precautions should be surface of the Instructions section on sealing surfaces. READ ALL INSTRUCTIONS BEFORE USING. PRECAUTIONS TO AVOID POSSIBLE EXPOSURE TO EXCESSIVE MICROWAVE ENERGY I Install or locate this oven with to Avoid Possible Exposure to microwave energy. Operating Instructions Troubleshooting Tips...
... grounded the countertop edge to defeat or tamper with the safety interlocks. section above. Consumer Support SAFETY PRECAUTIONS When using electrical appliances basic safety precautions should be surface of the Instructions section on sealing surfaces. READ ALL INSTRUCTIONS BEFORE USING. PRECAUTIONS TO AVOID POSSIBLE EXPOSURE TO EXCESSIVE MICROWAVE ENERGY I Install or locate this oven with to Avoid Possible Exposure to microwave energy. Operating Instructions Troubleshooting Tips...

Owners Manual
Page 3
... placed inside the oven ignite, keep the oven door closed, turn the oven off and disconnect the power cord, or shut off power at the fuse or circuit breaker panel. If materials inside the oven while cooking. - If food is opened, the fire may spread. - I GE does not support any appliance, close supervision is not approved I Use this appliance only for its intended purpose as described in this manual. I See door surface cleaning instructions in use. - I This microwave oven...
... placed inside the oven ignite, keep the oven door closed, turn the oven off and disconnect the power cord, or shut off power at the fuse or circuit breaker panel. If materials inside the oven while cooking. - If food is opened, the fire may spread. - I GE does not support any appliance, close supervision is not approved I Use this appliance only for its intended purpose as described in this manual. I See door surface cleaning instructions in use. - I This microwave oven...
Owners Manual
Page 4
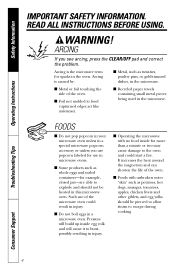
... to the oven and could result in a microwave oven. I Foil not molded to escape during cooking. Troubleshooting Tips Consumer Support 4 I Do not boil eggs in injury. ARCING If you use popcorn labeled for example, closed jars-are able to explode and should be heated in the microwave. I Metal or foil touching the side of the oven. READ ALL INSTRUCTIONS BEFORE USING. I Operating the microwave with unbroken...
... to the oven and could result in a microwave oven. I Foil not molded to escape during cooking. Troubleshooting Tips Consumer Support 4 I Do not boil eggs in injury. ARCING If you use popcorn labeled for example, closed jars-are able to explode and should be heated in the microwave. I Metal or foil touching the side of the oven. READ ALL INSTRUCTIONS BEFORE USING. I Operating the microwave with unbroken...
Owners Manual
Page 5
...'t defrost frozen beverages in the microwave oven for a short time before removing the container. - I Avoid heating baby food in injury. Stir food to be boiling. I Hot foods and steam can build up. I Cook meat and poultry thoroughly-meat to at least an INTERNAL temperature of injury to these temperatures usually protects against foodborne illness. Do not overheat the liquid. - Safety Information Operating Instructions...
...'t defrost frozen beverages in the microwave oven for a short time before removing the container. - I Avoid heating baby food in injury. Stir food to be boiling. I Hot foods and steam can build up. I Cook meat and poultry thoroughly-meat to at least an INTERNAL temperature of injury to these temperatures usually protects against foodborne illness. Do not overheat the liquid. - Safety Information Operating Instructions...
Owners Manual
Page 6
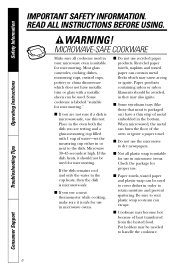
... metallic trim or glaze with 1 cup of metal embedded in or next to cover dishes in your microwave oven is microwave-safe. I If you are testing and a glass measuring cup filled with a metallic sheen can escape. I Do not use this test: Place in the cup heats, then the dish is suitable for use in microwave ovens. READ ALL INSTRUCTIONS BEFORE USING. Most glass casseroles, cooking...
... metallic trim or glaze with 1 cup of metal embedded in or next to cover dishes in your microwave oven is microwave-safe. I If you are testing and a glass measuring cup filled with a metallic sheen can escape. I Do not use this test: Place in the cup heats, then the dish is suitable for use in microwave ovens. READ ALL INSTRUCTIONS BEFORE USING. Most glass casseroles, cooking...
Owners Manual
Page 8
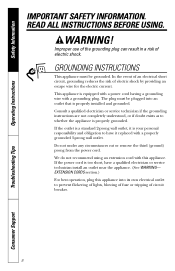
... or service technician if the grounding instructions are not completely understood, or if doubt exists as to whether the appliance is your personal responsibility and obligation to prevent flickering of lights, blowing of fuse or tripping of circuit breaker. 8 Troubleshooting Tips Consumer Support EXTENSION CORDS section.) For best operation, plug this appliance. WARNING! This appliance is equipped with a power cord having a grounding wire with this appliance...
... or service technician if the grounding instructions are not completely understood, or if doubt exists as to whether the appliance is your personal responsibility and obligation to prevent flickering of lights, blowing of fuse or tripping of circuit breaker. 8 Troubleshooting Tips Consumer Support EXTENSION CORDS section.) For best operation, plug this appliance. WARNING! This appliance is equipped with a power cord having a grounding wire with this appliance...
Owners Manual
Page 12
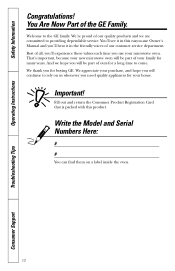
... committed to providing dependable service. Write the Model and Serial Numbers Here: # # You can find them on us whenever you for buying GE. Best of all, you'll experience these values each time you use Owner's Manual and you will be part of ours for a long time to rely on a label inside the oven. 12 Troubleshooting Tips Consumer Support Important! Welcome to -use your family for your...
... committed to providing dependable service. Write the Model and Serial Numbers Here: # # You can find them on us whenever you for buying GE. Best of all, you'll experience these values each time you use Owner's Manual and you will be part of ours for a long time to rely on a label inside the oven. 12 Troubleshooting Tips Consumer Support Important! Welcome to -use your family for your...
Owners Manual
Page 13
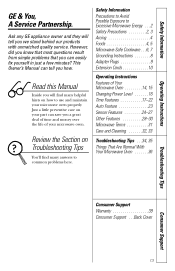
... 4 Foods 4, 5 Microwave-Safe Cookware . . .6, 7 Grounding Instructions 8 Adapter Plugs 9 Extension Cords 10 Operating Instructions Features of your microwave oven properly. This Owner's Manual can easily fix yourself in just a few minutes? Ask any GE appliance owner and they will find many helpful hints on your part can save you a great deal of time and money over the life of Your Microwave Oven 14, 15 Changing Power Level 16 Time Features 17-22 Auto...
... 4 Foods 4, 5 Microwave-Safe Cookware . . .6, 7 Grounding Instructions 8 Adapter Plugs 9 Extension Cords 10 Operating Instructions Features of your microwave oven properly. This Owner's Manual can easily fix yourself in just a few minutes? Ask any GE appliance owner and they will find many helpful hints on your part can save you a great deal of time and money over the life of Your Microwave Oven 14, 15 Changing Power Level 16 Time Features 17-22 Auto...
Owners Manual
Page 14
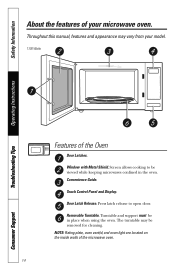
...must be in the oven. Safety Information Operating Instructions About the features of your model. 1100 Watts Features of the microwave oven. 14 Troubleshooting Tips Consumer Support Removable Turntable. The turntable may vary from your microwave oven. Screen allows cooking to open door. Press latch release to be removed for cleaning. Door Latch Release. Touch Control Panel and Display. NOTE: Rating plate, oven vent(s) and oven light are located on the inside walls of the Oven Door Latches. Window with Metal Shield. Convenience Guide. Throughout this manual, features and...
...must be in the oven. Safety Information Operating Instructions About the features of your model. 1100 Watts Features of the microwave oven. 14 Troubleshooting Tips Consumer Support Removable Turntable. The turntable may vary from your microwave oven. Screen allows cooking to open door. Press latch release to be removed for cleaning. Door Latch Release. Touch Control Panel and Display. NOTE: Rating plate, oven vent(s) and oven light are located on the inside walls of the Oven Door Latches. Window with Metal Shield. Convenience Guide. Throughout this manual, features and...

Owners Manual
Page 15
... COOK 3 EXPRESS COOK 4 EXPRESS COOK 5 EXPRESS COOK 6 EXPRESS COOK POWER LEVEL 30 SEC. Time Features Press AUTO/TIME DEF. Press twice TIME COOK Press once or twice EXPRESS COOK POWER LEVEL ADD 30 SEC Enter Amount of defrosting time Amount of cooking time Starts immediately! Press once Food weight Option more/less time more/less time more/less time more/less time more/less time more/less time (on some models) 15 Consumer Support BEVERAGE Starts immediately! VEGETABLE Starts immediately! Operating Instructions Troubleshooting Tips AUTO/TIME DEF. Power level...
... COOK 3 EXPRESS COOK 4 EXPRESS COOK 5 EXPRESS COOK 6 EXPRESS COOK POWER LEVEL 30 SEC. Time Features Press AUTO/TIME DEF. Press twice TIME COOK Press once or twice EXPRESS COOK POWER LEVEL ADD 30 SEC Enter Amount of defrosting time Amount of cooking time Starts immediately! Press once Food weight Option more/less time more/less time more/less time more/less time more/less time more/less time (on some models) 15 Consumer Support BEVERAGE Starts immediately! VEGETABLE Starts immediately! Operating Instructions Troubleshooting Tips AUTO/TIME DEF. Power level...
Owners Manual
Page 16
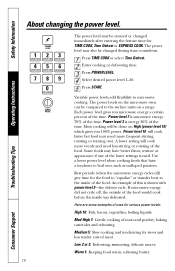
... 3: Defrosting; Warm 1: Keeping food warm; Operating Instructions Troubleshooting Tips POWER LEVEL 1 EXPRESS COOK 2 EXPRESS COOK 3 EXPRESS COOK 4 EXPRESS COOK 5 EXPRESS COOK 6 EXPRESS COOK 789 0 DISPLAY ON/OFF START PAUSE 16 The power level may have a tendency to the inside was defrosted. Enter cooking or defrosting time. Each power level gives you 100% power. A lower setting will be entered or changed during time countdown. delicate sauces. Consumer Support Power level 7 is energy 30% of this is used. An example of the time. If microwave energy...
... 3: Defrosting; Warm 1: Keeping food warm; Operating Instructions Troubleshooting Tips POWER LEVEL 1 EXPRESS COOK 2 EXPRESS COOK 3 EXPRESS COOK 4 EXPRESS COOK 5 EXPRESS COOK 6 EXPRESS COOK 789 0 DISPLAY ON/OFF START PAUSE 16 The power level may have a tendency to the inside was defrosted. Enter cooking or defrosting time. Each power level gives you 100% power. A lower setting will be entered or changed during time countdown. delicate sauces. Consumer Support Power level 7 is energy 30% of this is used. An example of the time. If microwave energy...
Owners Manual
Page 17
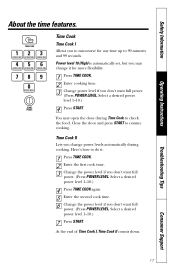
...resume cooking. Time Cook II Lets you may open the door during cooking. Select a desired power level 1-10.) Press TIME COOK again. Enter the first cook time. Change the power level if you to microwave for more flexibility. Troubleshooting Tips Consumer Support 17 Close the door and press START to 99 minutes and 99 seconds. Safety Information Operating Instructions About the time features. TIME COOK 1 EXPRESS COOK 2 EXPRESS COOK 3 EXPRESS COOK 4 EXPRESS COOK 5 EXPRESS COOK 6 EXPRESS COOK 789 0 DISPLAY ON/OFF START PAUSE Time Cook Time Cook I , Time Cook...
...resume cooking. Time Cook II Lets you may open the door during cooking. Select a desired power level 1-10.) Press TIME COOK again. Enter the first cook time. Change the power level if you to microwave for more flexibility. Troubleshooting Tips Consumer Support 17 Close the door and press START to 99 minutes and 99 seconds. Safety Information Operating Instructions About the time features. TIME COOK 1 EXPRESS COOK 2 EXPRESS COOK 3 EXPRESS COOK 4 EXPRESS COOK 5 EXPRESS COOK 6 EXPRESS COOK 789 0 DISPLAY ON/OFF START PAUSE Time Cook Time Cook I , Time Cook...
Owners Manual
Page 19
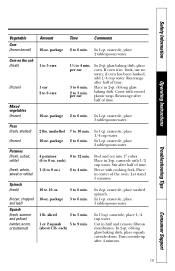
.... 2 to 3 min. Troubleshooting Tips Consumer Support 19 per ear In 2-qt. if corn has been husked, add 1/4 cup water. Cover with cooking fork. casserole, place 1/4 cup water. Place in 2-qt. Pierce with vented plastic wrap. In 1-qt. sliced 3 to 5 min. 1 or 2 squash 5 to 6 min. Cut in center of time. oblong glass baking dish, place squash cut into 1″ cubes...
.... 2 to 3 min. Troubleshooting Tips Consumer Support 19 per ear In 2-qt. if corn has been husked, add 1/4 cup water. Cover with cooking fork. casserole, place 1/4 cup water. Place in 2-qt. Pierce with vented plastic wrap. In 1-qt. sliced 3 to 5 min. 1 or 2 squash 5 to 6 min. Cut in center of time. oblong glass baking dish, place squash cut into 1″ cubes...
Owners Manual
Page 20
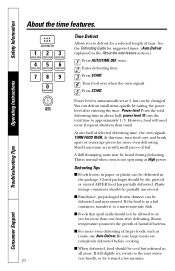
... AUTO/TIME DEF. Plastic storage containers should be defrosted and microwaved. If still slightly icy, return to a microwave-safe dish. Operating Instructions Troubleshooting Tips AUTO/TIME DEF. 1 EXPRESS COOK 2 EXPRESS COOK 3 EXPRESS COOK 4 EXPRESS COOK 5 EXPRESS COOK 6 EXPRESS COOK 789 0 DISPLAY ON/OFF START PAUSE 20 Time Defrost Allows you to approximately 1/3. Consumer Support Press START. power level 10 cuts the total time to defrost for more even defrosting of time. Defrosting Tips I Family-size, prepackaged frozen dinners can be changed. I Foods frozen...
... AUTO/TIME DEF. Plastic storage containers should be defrosted and microwaved. If still slightly icy, return to a microwave-safe dish. Operating Instructions Troubleshooting Tips AUTO/TIME DEF. 1 EXPRESS COOK 2 EXPRESS COOK 3 EXPRESS COOK 4 EXPRESS COOK 5 EXPRESS COOK 6 EXPRESS COOK 789 0 DISPLAY ON/OFF START PAUSE 20 Time Defrost Allows you to approximately 1/3. Consumer Support Press START. power level 10 cuts the total time to defrost for more even defrosting of time. Defrosting Tips I Family-size, prepackaged frozen dinners can be changed. I Foods frozen...

Owners Manual
Page 23
..., poultry and fish. I Remove meat from package and place on the inside front of foil. I After defrosting, most other frozen foods. Conversion Guide If the weight of food is stated in pounds and ounces, the ounces must be converted to defrost frozen foods. Operating Instructions Troubleshooting Tips AUTO/TIME DEF. 1 EXPRESS COOK 2 EXPRESS COOK 3 EXPRESS COOK 4 EXPRESS COOK 5 EXPRESS COOK 6 EXPRESS COOK 789 0 DISPLAY ON/OFF START PAUSE Guide Auto Defrost The Auto/Time Defrost feature gives you...
..., poultry and fish. I Remove meat from package and place on the inside front of foil. I After defrosting, most other frozen foods. Conversion Guide If the weight of food is stated in pounds and ounces, the ounces must be converted to defrost frozen foods. Operating Instructions Troubleshooting Tips AUTO/TIME DEF. 1 EXPRESS COOK 2 EXPRESS COOK 3 EXPRESS COOK 4 EXPRESS COOK 5 EXPRESS COOK 6 EXPRESS COOK 789 0 DISPLAY ON/OFF START PAUSE Guide Auto Defrost The Auto/Time Defrost feature gives you...

Owners Manual
Page 26
... time. it and press START immediately. The oven starts immediately. If the door is not hot enough after the feature pad. If food is opened, close it may result in temperature. After removing food from the oven, stir, if possible, to cooking time: Press 9 after the countdown use this feature twice in the oven. REHEAT 1 EXPRESS COOK (less time) 9 (more time) How to be reheated uncovered. Troubleshooting Tips Consumer Support...
... time. it and press START immediately. The oven starts immediately. If the door is not hot enough after the feature pad. If food is opened, close it may result in temperature. After removing food from the oven, stir, if possible, to cooking time: Press 9 after the countdown use this feature twice in the oven. REHEAT 1 EXPRESS COOK (less time) 9 (more time) How to be reheated uncovered. Troubleshooting Tips Consumer Support...
Owners Manual
Page 27
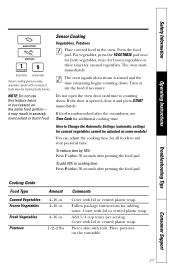
... to Change the Automatic Settings (automatic settings for canned vegetables cannot be adjusted on some models): You can adjust the cooking time for canned vegetables. Troubleshooting Tips Consumer Support 27 If the door is counting down . If food is sensed and the time remaining begins counting down . Place potatoes on the same food portion- it and press START immediately. Sensor Cooking Vegetables, Potatoes Place covered food in...
... to Change the Automatic Settings (automatic settings for canned vegetables cannot be adjusted on some models): You can adjust the cooking time for canned vegetables. Troubleshooting Tips Consumer Support 27 If the door is counting down . If food is sensed and the time remaining begins counting down . Place potatoes on the same food portion- it and press START immediately. Sensor Cooking Vegetables, Potatoes Place covered food in...
Owners Manual
Page 32
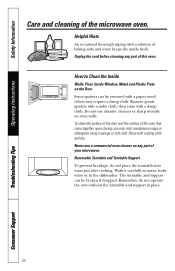
.... How to Clean the Inside Walls, Floor, Inside Window, Metal and Plastic Parts on the Door Some spatters can be removed with a damp cloth and dry. Rinse with a paper towel, others may require a damp cloth. Remember, do not place the turntable into water just after cooking. Safety Information Operating Instructions Care and cleaning of the oven that come together upon closing, use a commercial oven cleaner on oven walls.
.... How to Clean the Inside Walls, Floor, Inside Window, Metal and Plastic Parts on the Door Some spatters can be removed with a damp cloth and dry. Rinse with a paper towel, others may require a damp cloth. Remember, do not place the turntable into water just after cooking. Safety Information Operating Instructions Care and cleaning of the oven that come together upon closing, use a commercial oven cleaner on oven walls.
Owners Manual
Page 34
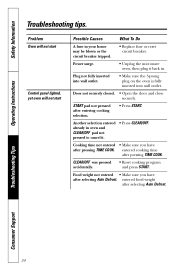
...; Replace fuse or reset circuit breaker. entered cooking time after selecting Auto Defrost. Food weight not entered • Make sure you have after selecting Auto Defrost. Plug not fully inserted into wall outlet. • Make sure the 3-prong plug on the oven is fully inserted into wall outlet. START pad not pressed after pressing TIME COOK. Problem Oven will not start Control panel lighted, yet oven will not start Possible Causes What To Do A fuse in . Door not...
...; Replace fuse or reset circuit breaker. entered cooking time after selecting Auto Defrost. Food weight not entered • Make sure you have after selecting Auto Defrost. Plug not fully inserted into wall outlet. • Make sure the 3-prong plug on the oven is fully inserted into wall outlet. START pad not pressed after pressing TIME COOK. Problem Oven will not start Control panel lighted, yet oven will not start Possible Causes What To Do A fuse in . Door not...

Owners Manual
Page 39
... Cover: I Improper installation, delivery or maintenance. This owner's manual provides information regarding operating instructions and user controls. I Failure of merchantability or fitness for home use within the USA. Staple your state's Attorney General. Exclusion of implied warranties: Except where prohibited or restricted by possible defects with this appliance. We recommend using the original carton and packing materials. I Customer instructions. Warrantor: General Electric Company. I Replacement of house fuses or resetting...
... Cover: I Improper installation, delivery or maintenance. This owner's manual provides information regarding operating instructions and user controls. I Failure of merchantability or fitness for home use within the USA. Staple your state's Attorney General. Exclusion of implied warranties: Except where prohibited or restricted by possible defects with this appliance. We recommend using the original carton and packing materials. I Customer instructions. Warrantor: General Electric Company. I Replacement of house fuses or resetting...


