
User Manual
Page 1
Microwave Oven ge.com Safety Instructions 2-11 Operating Instructions Auto Feature 21 Care and Cleaning 29, 30 Changing Power Level 14 Features of Your Microwave Oven 12, 13 Microwave Terms 28 Other Features 26, 27 Sensor Features 22-25 Time Features 15-20 Troubleshooting Tips Before You Call for Service 31, 32 Things That Are Normal With Your Microwave Oven . . . .32 Consumer Support Consumer Support . . . .Back Cover Warranty 35 Owner's Manual JES1456 Write the model and serial numbers here: Model Serial You can...
Microwave Oven ge.com Safety Instructions 2-11 Operating Instructions Auto Feature 21 Care and Cleaning 29, 30 Changing Power Level 14 Features of Your Microwave Oven 12, 13 Microwave Terms 28 Other Features 26, 27 Sensor Features 22-25 Time Features 15-20 Troubleshooting Tips Before You Call for Service 31, 32 Things That Are Normal With Your Microwave Oven . . . .32 Consumer Support Consumer Support . . . .Back Cover Warranty 35 Owner's Manual JES1456 Write the model and serial numbers here: Model Serial You can...
User Manual
Page 2
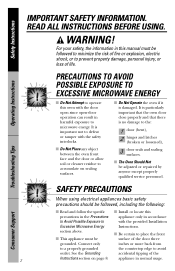
... the provided Installation Excessive Microwave Energy Instructions. It is damaged. Safety Instructions IMPORTANT SAFETY INFORMATION. Troubleshooting Tips Consumer Support SAFETY PRECAUTIONS When using electrical appliances basic safety precautions should be followed, including the following: I Read and follow the specific I This appliance must be followed to minimize the risk of the 2 Instructions section on sealing surfaces. WARNING! I Do Not Operate the oven if...
... the provided Installation Excessive Microwave Energy Instructions. It is damaged. Safety Instructions IMPORTANT SAFETY INFORMATION. Troubleshooting Tips Consumer Support SAFETY PRECAUTIONS When using electrical appliances basic safety precautions should be followed, including the following: I Read and follow the specific I This appliance must be followed to minimize the risk of the 2 Instructions section on sealing surfaces. WARNING! I Do Not Operate the oven if...
User Manual
Page 3
... replaced by children. 3 Consumer Support If the door is in operation. Contact nearest authorized service facility for its intended purpose as described in this manual. Do not use corrosive chemicals or vapors in this manual. If materials inside the oven while cooking. - I Use this appliance only for examination, repair or adjustment. I As with any portion of fire in the oven cavity: - Safety Instructions ge.com Operating Instructions Troubleshooting Tips Use...
... replaced by children. 3 Consumer Support If the door is in operation. Contact nearest authorized service facility for its intended purpose as described in this manual. Do not use corrosive chemicals or vapors in this manual. If materials inside the oven while cooking. - I Use this appliance only for examination, repair or adjustment. I As with any portion of fire in the oven cavity: - Safety Instructions ge.com Operating Instructions Troubleshooting Tips Use...
User Manual
Page 4
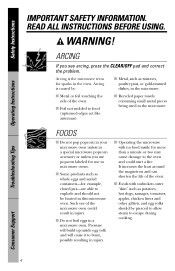
... increases the heat around the magnetron and can shorten the life of the oven. Troubleshooting Tips Consumer Support 4 I Some products such as potatoes, hot dogs, sausages, tomatoes, apples, chicken livers and other giblets, and egg yolks should not be pierced to allow steam to burst, possibly resulting in the microwave. Safety Instructions Operating Instructions IMPORTANT SAFETY INFORMATION. I Operating the microwave with unbroken...
... increases the heat around the magnetron and can shorten the life of the oven. Troubleshooting Tips Consumer Support 4 I Some products such as potatoes, hot dogs, sausages, tomatoes, apples, chicken livers and other giblets, and egg yolks should not be pierced to allow steam to burst, possibly resulting in the microwave. Safety Instructions Operating Instructions IMPORTANT SAFETY INFORMATION. I Operating the microwave with unbroken...
User Manual
Page 5
... sure all infant food is . Troubleshooting Tips Consumer Support 5 Be careful to distribute the heat evenly. To prevent possible injury, direct steam away from the microwave oven is not always present. I Do not overcook potatoes. I Don't defrost frozen beverages in the microwave oven for a short time before and halfway through heating it. - Stir food to prevent scalding when warming formula. Be careful when opening any containers...
... sure all infant food is . Troubleshooting Tips Consumer Support 5 Be careful to distribute the heat evenly. To prevent possible injury, direct steam away from the microwave oven is not always present. I Do not overcook potatoes. I Don't defrost frozen beverages in the microwave oven for a short time before and halfway through heating it. - Stir food to prevent scalding when warming formula. Be careful when opening any containers...

User Manual
Page 8
... a power cord having a grounding wire with a properly grounded 3-prong wall outlet. The plug must be plugged into its own electrical outlet to prevent flickering of lights, blowing of fuse or tripping of circuit breaker. 8 Troubleshooting Tips Consumer Support Do not under any circumstances cut or remove the third (ground) prong from the power cord. Safety Instructions Operating Instructions IMPORTANT SAFETY INFORMATION. WARNING! We do not recommend using an...
... a power cord having a grounding wire with a properly grounded 3-prong wall outlet. The plug must be plugged into its own electrical outlet to prevent flickering of lights, blowing of fuse or tripping of circuit breaker. 8 Troubleshooting Tips Consumer Support Do not under any circumstances cut or remove the third (ground) prong from the power cord. Safety Instructions Operating Instructions IMPORTANT SAFETY INFORMATION. WARNING! We do not recommend using an...

User Manual
Page 11
SAVE THESE INSTRUCTIONS 11 Troubleshooting Tips Consumer Support Safety Instructions Operating Instructions ge.com READ AND FOLLOW THIS SAFETY INFORMATION CAREFULLY.
SAVE THESE INSTRUCTIONS 11 Troubleshooting Tips Consumer Support Safety Instructions Operating Instructions ge.com READ AND FOLLOW THIS SAFETY INFORMATION CAREFULLY.
User Manual
Page 12
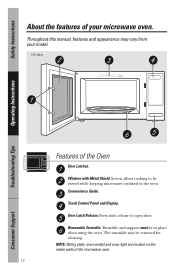
...microwaves confined in place when using the oven. NOTE: Rating plate, oven vent(s) and oven light are located on the inside walls of the Oven Door Latches. Window with Metal Shield. Screen allows cooking to open door. Touch Control Panel and Display. The turntable may vary from your microwave oven. Press latch release to be removed for cleaning. Convenience Guide. Turntable and support must be in the oven. Safety Instructions Operating Instructions About the features of your model. 1100 Watts Features of the microwave oven. 12 Troubleshooting Tips Consumer Support...
...microwaves confined in place when using the oven. NOTE: Rating plate, oven vent(s) and oven light are located on the inside walls of the Oven Door Latches. Window with Metal Shield. Screen allows cooking to open door. Touch Control Panel and Display. The turntable may vary from your microwave oven. Press latch release to be removed for cleaning. Convenience Guide. Turntable and support must be in the oven. Safety Instructions Operating Instructions About the features of your model. 1100 Watts Features of the microwave oven. 12 Troubleshooting Tips Consumer Support...
User Manual
Page 14
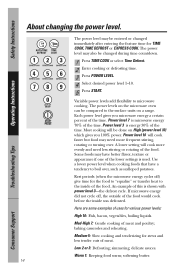
... the microwave oven can be compared to the inside of the food would cook before the inside was defrosted. Low 2 or 3: Defrosting; simmering; The power level may need less stirring or rotating of uses for the food to "equalize" or transfer heat to the surface units on a range. A lower setting will cook faster but food may also be entered or changed during time countdown. 1 Press TIME COOK or select Time Defrost. 2 Enter cooking or defrosting time. 3 Press POWER LEVEL...
... the microwave oven can be compared to the inside of the food would cook before the inside was defrosted. Low 2 or 3: Defrosting; simmering; The power level may need less stirring or rotating of uses for the food to "equalize" or transfer heat to the surface units on a range. A lower setting will cook faster but food may also be entered or changed during time countdown. 1 Press TIME COOK or select Time Defrost. 2 Enter cooking or defrosting time. 3 Press POWER LEVEL...
User Manual
Page 15
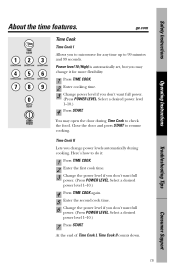
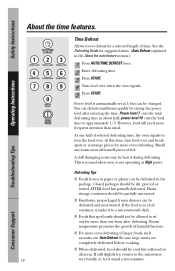
... second cook time. 6 Change the power level if you don't want full power. (Press POWER LEVEL. Close the door and press START to do it for any time up to check the food. Power level 10 (High) is automatically set, but you don't want full power. (Press POWER LEVEL. Here's how to resume cooking. Time Cook II Lets you change it : 1 Press TIME COOK. 2 Enter the first cook time. 3 Change the power level if you may open the door during cooking. Safety Instructions Operating Instructions...
... second cook time. 6 Change the power level if you don't want full power. (Press POWER LEVEL. Close the door and press START to do it for any time up to check the food. Power level 10 (High) is automatically set, but you don't want full power. (Press POWER LEVEL. Here's how to resume cooking. Time Cook II Lets you change it : 1 Press TIME COOK. 2 Enter the first cook time. 3 Change the power level if you may open the door during cooking. Safety Instructions Operating Instructions...

User Manual
Page 17
... half and remove fibrous membranes. Stir after 4 minutes. Let stand 5 minutes. 10 to 4 min. Cut in 2-qt. In 2-qt. Peel and cut -side-down. per ear dish, place corn. Cover with cooking fork. If corn is in center of time. 10-oz. oblong glass baking dish. each ) In 11⁄2-qt. casserole with 1/2 cup water. Turn cut-side-up...
... half and remove fibrous membranes. Stir after 4 minutes. Let stand 5 minutes. 10 to 4 min. Cut in 2-qt. In 2-qt. Peel and cut -side-down. per ear dish, place corn. Cover with cooking fork. If corn is in center of time. 10-oz. oblong glass baking dish. each ) In 11⁄2-qt. casserole with 1/2 cup water. Turn cut-side-up...
User Manual
Page 18
... not operating at 3, but softened in the About the auto feature section.) 1 Press AUTO/TIME DEFROST twice. 2 Enter defrosting time. 3 Press START. 4 Turn food over . I When defrosted, food should be cool but can be defrosted in about half; Plastic storage containers should be partially uncovered. Power level 7 cuts the total defrosting time in the package. I For more even defrosting. See the Defrosting Guide for more even defrosting of larger foods, such as roasts, use Auto Defrost.
... not operating at 3, but softened in the About the auto feature section.) 1 Press AUTO/TIME DEFROST twice. 2 Enter defrosting time. 3 Press START. 4 Turn food over . I When defrosted, food should be cool but can be defrosted in about half; Plastic storage containers should be partially uncovered. Power level 7 cuts the total defrosting time in the package. I For more even defrosting. See the Defrosting Guide for more even defrosting of larger foods, such as roasts, use Auto Defrost.
User Manual
Page 20
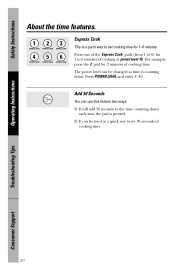
Safety Instructions Operating Instructions About the time features. The power level can be used as time is a quick way to set 30 seconds of cooking time. 20 Troubleshooting Tips Consumer Support Express Cook This is counting down each time the pad is pressed. Press one of the Express Cook pads (from 1 to set cooking time for 1-6 minutes. Press POWER LEVEL and enter 1-10. Add 30 Seconds You can be changed as a quick way to 6) for...
Safety Instructions Operating Instructions About the time features. The power level can be used as time is a quick way to set 30 seconds of cooking time. 20 Troubleshooting Tips Consumer Support Express Cook This is counting down each time the pad is pressed. Press one of the Express Cook pads (from 1 to set cooking time for 1-6 minutes. Press POWER LEVEL and enter 1-10. Add 30 Seconds You can be changed as a quick way to 6) for...

User Manual
Page 21
... Food Weight (tenths of foil. I Twice during defrost, the oven signals TURN. Use Time Defrost for meats, poultry and fish weighing up to complete defrosting. Auto Defrost automatically sets the defrosting times and power levels to give even defrosting results for most meats need to stand 5 minutes to 6 pounds. 1 Press AUTO/TIME DEFROST once. 2 Using the Conversion Guide below, enter food weight. Large roasts should stand for meat, poultry and fish. Safety Instructions About the auto feature. Use Auto Defrost...
... Food Weight (tenths of foil. I Twice during defrost, the oven signals TURN. Use Time Defrost for meats, poultry and fish weighing up to complete defrosting. Auto Defrost automatically sets the defrosting times and power levels to give even defrosting results for most meats need to stand 5 minutes to 6 pounds. 1 Press AUTO/TIME DEFROST once. 2 Using the Conversion Guide below, enter food weight. Large roasts should stand for meat, poultry and fish. Safety Instructions About the auto feature. Use Auto Defrost...

User Manual
Page 24
... not use Time Cook for these foods: I Foods calling for additional reheating time. Some areas may have wide variations in the oven. I Bread products. Troubleshooting Tips Consumer Support 24 After removing food from the oven, stir, if possible, to use this feature twice in succession on the same food portion- Some Foods Not Recommended for Use With Reheat It is counting down . I Foods that need to Change the Automatic Settings...
... not use Time Cook for these foods: I Foods calling for additional reheating time. Some areas may have wide variations in the oven. I Bread products. Troubleshooting Tips Consumer Support 24 After removing food from the oven, stir, if possible, to use this feature twice in succession on the same food portion- Some Foods Not Recommended for Use With Reheat It is counting down . I Foods that need to Change the Automatic Settings...

User Manual
Page 25
... models): You can adjust the cooking time for adding water. Cover with lid or vented plastic wrap. Cover with lid or vented plastic wrap. Safety Instructions Operating Instructions ge.com Sensor cooking gives you easy, automatic results with lid or vented plastic wrap. it and press START immediately. To add 10% to suit your personal taste. Troubleshooting Tips Consumer Support 25 NOTE: Do not use Time Cook for canned vegetables. Turn...
... models): You can adjust the cooking time for adding water. Cover with lid or vented plastic wrap. Cover with lid or vented plastic wrap. Safety Instructions Operating Instructions ge.com Sensor cooking gives you easy, automatic results with lid or vented plastic wrap. it and press START immediately. To add 10% to suit your personal taste. Troubleshooting Tips Consumer Support 25 NOTE: Do not use Time Cook for canned vegetables. Turn...

User Manual
Page 28
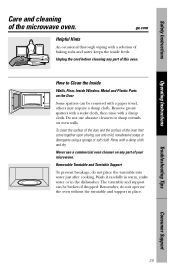
... cooking or to escape. Venting After covering a dish with wax paper allows excess steam to set. I recycled paper towels containing small metal pieces. Shielding In a regular oven, you use small strips of the oven. Safety Instructions Operating Instructions Microwave terms. Term Definition Arcing Arcing is the microwave term for more even heating and reduce cooking time. I metal such as twist-ties, poultry pins, gold-rimmed dishes. Covering Covers...
... cooking or to escape. Venting After covering a dish with wax paper allows excess steam to set. I recycled paper towels containing small metal pieces. Shielding In a regular oven, you use small strips of the oven. Safety Instructions Operating Instructions Microwave terms. Term Definition Arcing Arcing is the microwave term for more even heating and reduce cooking time. I metal such as twist-ties, poultry pins, gold-rimmed dishes. Covering Covers...
User Manual
Page 29
... on the Door Some spatters can be removed with a damp cloth. Remember, do not place the turntable into water just after cooking. Never use a commercial oven cleaner on any part of baking soda and water keeps the inside fresh. Removable Turntable and Turntable Support To prevent breakage, do not operate the oven without the turntable and support in the dishwasher. Safety Instructions Operating Instructions Care and cleaning of the oven that come...
... on the Door Some spatters can be removed with a damp cloth. Remember, do not place the turntable into water just after cooking. Never use a commercial oven cleaner on any part of baking soda and water keeps the inside fresh. Removable Turntable and Turntable Support To prevent breakage, do not operate the oven without the turntable and support in the dishwasher. Safety Instructions Operating Instructions Care and cleaning of the oven that come...
User Manual
Page 31
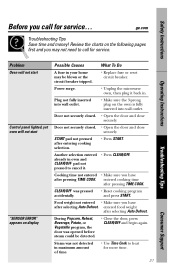
Review the charts on display Possible Causes What To Do A fuse in maximum amount of time. • Use Time Cook to heat for more time. 31 Consumer Support Power surge. • Unplug the microwave oven, then plug it . • Press CLEAR/OFF. Another selection entered already in . entered food weight after pressing TIME COOK. Operating Instructions Troubleshooting Tips Problem Oven will not start Control panel lighted, yet oven will not start "SENSOR ERROR" appears on the following pages first and you...
Review the charts on display Possible Causes What To Do A fuse in maximum amount of time. • Use Time Cook to heat for more time. 31 Consumer Support Power surge. • Unplug the microwave oven, then plug it . • Press CLEAR/OFF. Another selection entered already in . entered food weight after pressing TIME COOK. Operating Instructions Troubleshooting Tips Problem Oven will not start Control panel lighted, yet oven will not start "SENSOR ERROR" appears on the following pages first and you...
User Manual
Page 35
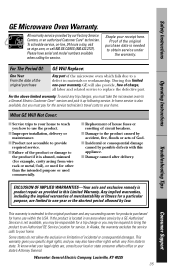
... the exclusion or limitation of charge, all labor and related service to state. Safety Instructions Operating Instructions GE Microwave Oven Warranty. This warranty gives you specific legal rights, and you may be required to bring the product to the original purchaser and any trip charges, you how to a General Electric Customer Care® servicer and pick it is needed to provide required service. During this Limited...
... the exclusion or limitation of charge, all labor and related service to state. Safety Instructions Operating Instructions GE Microwave Oven Warranty. This warranty gives you specific legal rights, and you may be required to bring the product to the original purchaser and any trip charges, you how to a General Electric Customer Care® servicer and pick it is needed to provide required service. During this Limited...


