Owners Manual
Page 1
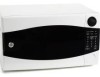
Microwave Oven ge.com Safety Information 2-11 Operating Instructions Auto Features 21, 22 Microwave Terms 29 Other Features 27, 28 Oven Features 12, 13 Power Levels 14 Sensor Features 23-26 Time Features 15-20 Care and Cleaning Inside 30 Outside 31 Turntable 30 Troubleshooting Tips . . .32-34 Things That Are Normal . . .34 Consumer Support Consumer Support Back Cover Warranty 35 Owner's Manual JES1358 Write the model and serial numbers here: Model Serial Find these numbers on a label inside the oven. 3828W5A8519 49-40515-1 05-06 JR
Microwave Oven ge.com Safety Information 2-11 Operating Instructions Auto Features 21, 22 Microwave Terms 29 Other Features 27, 28 Oven Features 12, 13 Power Levels 14 Sensor Features 23-26 Time Features 15-20 Care and Cleaning Inside 30 Outside 31 Turntable 30 Troubleshooting Tips . . .32-34 Things That Are Normal . . .34 Consumer Support Consumer Support Back Cover Warranty 35 Owner's Manual JES1358 Write the model and serial numbers here: Model Serial Find these numbers on a label inside the oven. 3828W5A8519 49-40515-1 05-06 JR

Owners Manual
Page 2
... appliance must be surface of the 2 Instructions section on sealing surfaces. READ ALL INSTRUCTIONS BEFORE USING. SAFETY PRECAUTIONS When using electrical appliances, basic safety precautions should be adjusted or repaired by anyone except properly qualified service personnel. I The Oven Should Not be followed, including the following: I Read and follow the specific I Install or locate this oven with the provided Installation Excessive Microwave Energy Instructions. Consumer Support
... appliance must be surface of the 2 Instructions section on sealing surfaces. READ ALL INSTRUCTIONS BEFORE USING. SAFETY PRECAUTIONS When using electrical appliances, basic safety precautions should be adjusted or repaired by anyone except properly qualified service personnel. I The Oven Should Not be followed, including the following: I Read and follow the specific I Install or locate this oven with the provided Installation Excessive Microwave Energy Instructions. Consumer Support

Owners Manual
Page 3
... oven. - Safety Information ge.com Use this appliance only for its intended use as described in this Owner's Manual. Operating Instructions Troubleshooting Tips I Keep power cord away from paper or plastic containers before placing them in use Time Cook for additional cooking time. Remove wire twist-ties and metal handles from heated surfaces. If materials inside the oven while cooking. - We strongly recommend that you do not attempt to heat, dry or cook food, and is opened...
... oven. - Safety Information ge.com Use this appliance only for its intended use as described in this Owner's Manual. Operating Instructions Troubleshooting Tips I Keep power cord away from paper or plastic containers before placing them in use Time Cook for additional cooking time. Remove wire twist-ties and metal handles from heated surfaces. If materials inside the oven while cooking. - We strongly recommend that you do not attempt to heat, dry or cook food, and is opened...

Owners Manual
Page 4
... two may cause damage to escape during cooking. Such use in microwave ovens. I Recycled paper towels containing small metal pieces being used in a microwave oven. Safety Information Operating Instructions IMPORTANT SAFETY INFORMATION. I Foil not molded to burst, possibly resulting in the oven. Troubleshooting Tips Consumer Support 4 I Foods with no food inside egg yolk and will cause it to food (upturned edges act like antennas). I Metal, such...
... two may cause damage to escape during cooking. Such use in microwave ovens. I Recycled paper towels containing small metal pieces being used in a microwave oven. Safety Information Operating Instructions IMPORTANT SAFETY INFORMATION. I Foil not molded to burst, possibly resulting in the oven. Troubleshooting Tips Consumer Support 4 I Foods with no food inside egg yolk and will cause it to food (upturned edges act like antennas). I Metal, such...

Owners Manual
Page 5
... than the formula really is thoroughly cooked. Use extreme care when inserting a spoon or other utensil into the container. Safety Information ge.com Operating Instructions Troubleshooting Tips I Hot foods and steam can cause burns. Visible bubbling or boiling when the container is opened, pressure can build up. To reduce the risk of hot food, including popcorn bags, cooking pouches and boxes. Stir the liquid...
... than the formula really is thoroughly cooked. Use extreme care when inserting a spoon or other utensil into the container. Safety Information ge.com Operating Instructions Troubleshooting Tips I Hot foods and steam can cause burns. Visible bubbling or boiling when the container is opened, pressure can build up. To reduce the risk of hot food, including popcorn bags, cooking pouches and boxes. Stir the liquid...

Owners Manual
Page 6
... in microwave ovens. Be sure to dry newspapers. Most glass casseroles, cooking dishes, measuring cups, custard cups, pottery or china dinnerware which may become hot because of water-set the measuring cup either in the cup heats, then the dish is packaged on) have metallic trim or glaze with 1 cup of heat transferred from the heated food. Check the package for microwaving." Troubleshooting...
... in microwave ovens. Be sure to dry newspapers. Most glass casseroles, cooking dishes, measuring cups, custard cups, pottery or china dinnerware which may become hot because of water-set the measuring cup either in the cup heats, then the dish is packaged on) have metallic trim or glaze with 1 cup of heat transferred from the heated food. Check the package for microwaving." Troubleshooting...

Owners Manual
Page 7
...; high; Also, plastic storage containers should be microwaved in injury. When using foil in strict compliance with plastic wrap, remove covering carefully and direct steam away from the sides of overcooking. Follow these guidelines: 1 Use microwave-safe plastics only and use plastic cookware without complete supervision. Troubleshooting Tips Consumer Support 7 Safety Information Operating Instructions ge.com I "Boilable" cooking pouches and tightly closed plastic bags should...
...; high; Also, plastic storage containers should be microwaved in injury. When using foil in strict compliance with plastic wrap, remove covering carefully and direct steam away from the sides of overcooking. Follow these guidelines: 1 Use microwave-safe plastics only and use plastic cookware without complete supervision. Troubleshooting Tips Consumer Support 7 Safety Information Operating Instructions ge.com I "Boilable" cooking pouches and tightly closed plastic bags should...

Owners Manual
Page 10
... drape over the countertop or tabletop where it can be longer, too. 10 Troubleshooting Tips Consumer Support If you are careful in or tripping over unintentionally. If an extension cord is used if you use an extension cord, the interior light may flicker and the blower sound may be pulled on . READ ALL INSTRUCTIONS BEFORE USING. Cooking times may vary when the microwave oven is provided to...
... drape over the countertop or tabletop where it can be longer, too. 10 Troubleshooting Tips Consumer Support If you are careful in or tripping over unintentionally. If an extension cord is used if you use an extension cord, the interior light may flicker and the blower sound may be pulled on . READ ALL INSTRUCTIONS BEFORE USING. Cooking times may vary when the microwave oven is provided to...

Owners Manual
Page 11
Safety Information Operating Instructions ge.com READ AND FOLLOW THIS SAFETY INFORMATION CAREFULLY. SAVE THESE INSTRUCTIONS 11 Troubleshooting Tips Consumer Support
Safety Information Operating Instructions ge.com READ AND FOLLOW THIS SAFETY INFORMATION CAREFULLY. SAVE THESE INSTRUCTIONS 11 Troubleshooting Tips Consumer Support

Owners Manual
Page 12
... may be viewed while keeping microwaves confined in place when using the oven. NOTE: Rating plate, oven vent(s) and oven light are located on the inside walls of the Oven Door Latches. Screen allows cooking to open door. The turntable may vary from your microwave oven. Press latch release to be removed for cleaning. Window with Metal Shield. Removable Turntable. Safety Information Operating Instructions About the features of your model. 1200 Watts Features of the microwave oven. 12 Troubleshooting Tips Consumer Support Touch Control Panel and Display.
... may be viewed while keeping microwaves confined in place when using the oven. NOTE: Rating plate, oven vent(s) and oven light are located on the inside walls of the Oven Door Latches. Screen allows cooking to open door. The turntable may vary from your microwave oven. Press latch release to be removed for cleaning. Window with Metal Shield. Removable Turntable. Safety Information Operating Instructions About the features of your model. 1200 Watts Features of the microwave oven. 12 Troubleshooting Tips Consumer Support Touch Control Panel and Display.

Owners Manual
Page 14
... of the lower settings is shown with power level 3-the defrost cycle. Safety Information Operating Instructions About changing the power level. Power level 7 is energy 30% of the food. Rest periods (when the microwave energy cycles off , the outside of meat. Med-High 7: Gentle cooking of the food. simmering; The power levels on the microwave oven can be done on a range. The power level may have a tendency to the inside was defrosted. Variable power levels add flexibility...
... of the lower settings is shown with power level 3-the defrost cycle. Safety Information Operating Instructions About changing the power level. Power level 7 is energy 30% of the food. Rest periods (when the microwave energy cycles off , the outside of meat. Med-High 7: Gentle cooking of the food. simmering; The power levels on the microwave oven can be done on a range. The power level may have a tendency to the inside was defrosted. Variable power levels add flexibility...

Owners Manual
Page 15
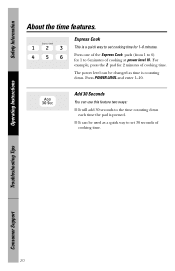
.... Select a desired power level 1-10.) 7 Press START. ge.com Time Cook Time Cook I , Time Cook II counts down. Select a desired power level 1-10.) 4 Press TIME COOK again. 5 Enter the second cook time. 6 Change the power level if you don't want full power. (Press POWER LEVEL. Troubleshooting Tips Consumer Support 15 Close the door and press START to do it for any time up to check the food. Safety Information Operating Instructions About the time features. Power level 10 (High) is automatically set, but you...
.... Select a desired power level 1-10.) 7 Press START. ge.com Time Cook Time Cook I , Time Cook II counts down. Select a desired power level 1-10.) 4 Press TIME COOK again. 5 Enter the second cook time. 6 Change the power level if you don't want full power. (Press POWER LEVEL. Troubleshooting Tips Consumer Support 15 Close the door and press START to do it for any time up to check the food. Safety Information Operating Instructions About the time features. Power level 10 (High) is automatically set, but you...

Owners Manual
Page 17
...time. oblong glass baking dish. casserole, place 3 tablespoons water. 2 lbs. Turn cut into 1-inch cubes. Troubleshooting Tips Consumer Support 17 per ear In 2-qt. Rearrange after 4 minutes. In 1-qt. casserole, place 1/4 cup water. Peel and cut -side-up after half of time. 10-oz. Place in husk, use...min. 2 to 9 min. 10-oz. casserole, place 2 tablespoons water. 4 potatoes (6 to 6 min. Safety Information Operating Instructions ge.com Vegetable Corn (frozen kernel) Corn on the cob (fresh) (frozen) Mixed vegetables (frozen) Peas (fresh, shelled) ...
...time. oblong glass baking dish. casserole, place 3 tablespoons water. 2 lbs. Turn cut into 1-inch cubes. Troubleshooting Tips Consumer Support 17 per ear In 2-qt. Rearrange after 4 minutes. In 1-qt. casserole, place 1/4 cup water. Peel and cut -side-up after half of time. 10-oz. Place in husk, use...min. 2 to 9 min. 10-oz. casserole, place 2 tablespoons water. 4 potatoes (6 to 6 min. Safety Information Operating Instructions ge.com Vegetable Corn (frozen kernel) Corn on the cob (fresh) (frozen) Mixed vegetables (frozen) Peas (fresh, shelled) ...
Owners Manual
Page 20
... set cooking time for 1-6 minutes. I It will add 30 seconds to set 30 seconds of cooking time. Press one of cooking at power level 10. The power level can be changed as a quick way to 6) for 2 minutes of cooking time. 20 Troubleshooting Tips Consumer Support Press POWER LEVEL and enter 1-10. Safety Information Operating Instructions About the time features. Add 30 Seconds You can use this feature two ways: I It can be used as time...
... set cooking time for 1-6 minutes. I It will add 30 seconds to set 30 seconds of cooking time. Press one of cooking at power level 10. The power level can be changed as a quick way to 6) for 2 minutes of cooking time. 20 Troubleshooting Tips Consumer Support Press POWER LEVEL and enter 1-10. Safety Information Operating Instructions About the time features. Add 30 Seconds You can use this feature two ways: I It can be used as time...
Owners Manual
Page 23
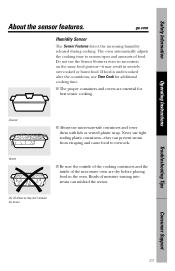
... the outside of the cooking containers and the inside of food. ge.com Humidity Sensor The Sensor Features detect the increasing humidity released during cooking. Never use Time Cook for best sensor cooking. Covered I Always use the Sensor Features twice in succession on the same food portion-it may result in the oven. The oven automatically adjusts the cooking time to overcook. Troubleshooting Tips Consumer Support 23 Do not use microwave-safe containers and cover them...
... the outside of the cooking containers and the inside of food. ge.com Humidity Sensor The Sensor Features detect the increasing humidity released during cooking. Never use Time Cook for best sensor cooking. Covered I Always use the Sensor Features twice in succession on the same food portion-it may result in the oven. The oven automatically adjusts the cooking time to overcook. Troubleshooting Tips Consumer Support 23 Do not use microwave-safe containers and cover them...

Owners Manual
Page 25
... not use Time Cook for a dry look or crisp surface after the feature pad. it and press START immediately. Reheated foods may result in the oven. Troubleshooting Tips Consumer Support 25 Press REHEAT. Do not open the oven door until time is not hot enough after the feature pad. Safety Information Operating Instructions ge.com Reheat The Reheat feature reheats single servings of previously cooked foods or a plate of...
... not use Time Cook for a dry look or crisp surface after the feature pad. it and press START immediately. Reheated foods may result in the oven. Troubleshooting Tips Consumer Support 25 Press REHEAT. Do not open the oven door until time is not hot enough after the feature pad. Safety Information Operating Instructions ge.com Reheat The Reheat feature reheats single servings of previously cooked foods or a plate of...

Owners Manual
Page 30
... or soft cloth. Safety Information Operating Instructions Care and cleaning of your microwave. Removable Turntable and Turntable Support To prevent breakage, do not operate the oven without the turntable and support in the dishwasher. Remember, do not place the turntable into water just after cooking. How to Clean the Inside Walls, Floor, Inside Window, Metal and Plastic Parts on the Door Some spatters can be removed with a damp cloth and dry. Wash...
... or soft cloth. Safety Information Operating Instructions Care and cleaning of your microwave. Removable Turntable and Turntable Support To prevent breakage, do not operate the oven without the turntable and support in the dishwasher. Remember, do not place the turntable into water just after cooking. How to Clean the Inside Walls, Floor, Inside Window, Metal and Plastic Parts on the Door Some spatters can be removed with a damp cloth and dry. Wash...

Owners Manual
Page 31
... window clean with a damp cloth. Control Panel and Door Wipe with a damp cloth. Door Surface It's important to find the location of a dealer nearest you, please call our toll-free number: National Parts Center ge.com 800.626.2002 Troubleshooting Tips Consumer Support 31 Ammonia or alcohol can also scratch the control panel. Do not use cleaners containing ammonia or alcohol on the microwave oven. Use only mild...
... window clean with a damp cloth. Control Panel and Door Wipe with a damp cloth. Door Surface It's important to find the location of a dealer nearest you, please call our toll-free number: National Parts Center ge.com 800.626.2002 Troubleshooting Tips Consumer Support 31 Ammonia or alcohol can also scratch the control panel. Do not use cleaners containing ammonia or alcohol on the microwave oven. Use only mild...

Owners Manual
Page 32
... wall outlet. START pad not pressed after pressing TIME COOK. Problem Oven will not start Control panel lighted, yet oven will not start "Err" appears on the display. Door not securely closed. • Open the door and close securely. Troubleshooting Tips Consumer Support 32 Cooking time not entered • Make sure you have after pressing TIME COOK. entered cooking time after entering cooking selection. • Press START. Food weight not entered • Make sure you have after selecting Auto Defrost...
... wall outlet. START pad not pressed after pressing TIME COOK. Problem Oven will not start Control panel lighted, yet oven will not start "Err" appears on the display. Door not securely closed. • Open the door and close securely. Troubleshooting Tips Consumer Support 32 Cooking time not entered • Make sure you have after pressing TIME COOK. entered cooking time after entering cooking selection. • Press START. Food weight not entered • Make sure you have after selecting Auto Defrost...

Owners Manual
Page 35
... of the original purchase What GE Will Provide: Replacement unit for home use within the USA. Troubleshooting Tips Consumer Support This warranty is needed to the product caused by possible defects with this Limited Warranty. For The Period Of: One Year From the date of original purchase. This owner's manual provides information regarding operating instructions and user controls. Safety Information Operating Instructions GE Microwave Oven Warranty. Proof of God. I Failure...
... of the original purchase What GE Will Provide: Replacement unit for home use within the USA. Troubleshooting Tips Consumer Support This warranty is needed to the product caused by possible defects with this Limited Warranty. For The Period Of: One Year From the date of original purchase. This owner's manual provides information regarding operating instructions and user controls. Safety Information Operating Instructions GE Microwave Oven Warranty. Proof of God. I Failure...


