Use and Care Manual
Page 1
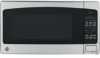
... Microwave Oven ge.com Safety Instructions 2-9 Operating Instructions Auto Feature 19 Care and Cleaning 28, 29 Changing the Power Level . . . .12 Features of Your Microwave Oven 10, 11 Microwave Terms 27 Optional Accessories 27 Other Features 24-26 Sensor Features 20-23 Time Features 13-18 Troubleshooting Tips . . . . .30, 31 Things That Are Normal With Your Microwave Oven . . .32 Consumer Support Consumer Support . . .Back Cover Product Registration 33, 34 Warranty 35 Owner's Manual JEB1860 Write the model and serial numbers...
... Microwave Oven ge.com Safety Instructions 2-9 Operating Instructions Auto Feature 19 Care and Cleaning 28, 29 Changing the Power Level . . . .12 Features of Your Microwave Oven 10, 11 Microwave Terms 27 Optional Accessories 27 Other Features 24-26 Sensor Features 20-23 Time Features 13-18 Troubleshooting Tips . . . . .30, 31 Things That Are Normal With Your Microwave Oven . . .32 Consumer Support Consumer Support . . .Back Cover Product Registration 33, 34 Warranty 35 Owner's Manual JEB1860 Write the model and serial numbers...
Use and Care Manual
Page 2
... this manual must be followed, including the following: s Read and follow the specific s Install or locate this oven with the safety interlocks. s Do Not Place any object between the oven front face and the door or allow soil or cleaner residue to prevent property damage, personal injury, or loss of the 2 Instructions section on sealing surfaces. Consumer Support Operating Instructions Troubleshooting Tips...
... this manual must be followed, including the following: s Read and follow the specific s Install or locate this oven with the safety interlocks. s Do Not Place any object between the oven front face and the door or allow soil or cleaner residue to prevent property damage, personal injury, or loss of the 2 Instructions section on sealing surfaces. Consumer Support Operating Instructions Troubleshooting Tips...
Use and Care Manual
Page 3
... a heating or cooking appliance. s Use this appliance if it has a damaged power cord or plug, if it is opened, the fire may spread. - s Do not immerse power cord or plug in the oven. - s To reduce the risk of this Owner's Manual. If materials inside the oven while cooking. - Do not use . s See door surface cleaning instructions in the Care and cleaning of the microwave oven section of fire in operation. Contact nearest authorized service...
... a heating or cooking appliance. s Use this appliance if it has a damaged power cord or plug, if it is opened, the fire may spread. - s Do not immerse power cord or plug in the oven. - s To reduce the risk of this Owner's Manual. If materials inside the oven while cooking. - Do not use . s See door surface cleaning instructions in the Care and cleaning of the microwave oven section of fire in operation. Contact nearest authorized service...
Use and Care Manual
Page 4
... the oven. Safety Instructions Operating Instructions IMPORTANT SAFETY INFORMATION. Such use in injury. s Foods with no food inside egg yolk and will cause it to the oven and could result in microwave ovens. FOODS s Do not pop popcorn in your microwave oven unless in a special microwave popcorn accessory or unless you see arcing, press the CLEAR/OFF pad and correct the problem. s Foil not molded to escape during cooking...
... the oven. Safety Instructions Operating Instructions IMPORTANT SAFETY INFORMATION. Such use in injury. s Foods with no food inside egg yolk and will cause it to the oven and could result in microwave ovens. FOODS s Do not pop popcorn in your microwave oven unless in a special microwave popcorn accessory or unless you see arcing, press the CLEAR/OFF pad and correct the problem. s Foil not molded to escape during cooking...
Use and Care Manual
Page 5
... usually protects against foodborne illness. 5 Consumer Support Troubleshooting Tips Operating Instructions Safety Instructions s Cook meat and poultry thoroughly-meat to at least an INTERNAL temperature of injury to distribute the heat evenly. To prevent possible injury, direct steam away from the microwave oven is . Always test the formula before and halfway through heating it. - s Hot foods and steam can cause the container to...
... usually protects against foodborne illness. 5 Consumer Support Troubleshooting Tips Operating Instructions Safety Instructions s Cook meat and poultry thoroughly-meat to at least an INTERNAL temperature of injury to distribute the heat evenly. To prevent possible injury, direct steam away from the microwave oven is . Always test the formula before and halfway through heating it. - s Hot foods and steam can cause the container to...
Use and Care Manual
Page 6
... oven or ignite a paper towel. Troubleshooting Tips Consumer Support 6 Safety Instructions Operating Instructions IMPORTANT SAFETY INFORMATION. Check the package for microwaving. WARNING! Most glass casseroles, cooking dishes, measuring cups, custard cups, pottery or china dinnerware which may also ignite. Paper products containing nylon or nylon filaments should not be needed to vent plastic wrap so steam can escape. If the dish heats...
... oven or ignite a paper towel. Troubleshooting Tips Consumer Support 6 Safety Instructions Operating Instructions IMPORTANT SAFETY INFORMATION. Check the package for microwaving. WARNING! Most glass casseroles, cooking dishes, measuring cups, custard cups, pottery or china dinnerware which may also ignite. Paper products containing nylon or nylon filaments should not be needed to vent plastic wrap so steam can escape. If the dish heats...
Use and Care Manual
Page 7
... or vented as directed by package. Do not permit children to short periods of the oven. When cooking with containers tightly covered with the cookware manufacturer's recommendations. Safety Instructions Operating Instructions s "Boilable" cooking pouches and tightly closed plastic bags should be at least 1 inch away from hands and face. remove the top foil cover and return the tray to overcooking, the food and...
... or vented as directed by package. Do not permit children to short periods of the oven. When cooking with containers tightly covered with the cookware manufacturer's recommendations. Safety Instructions Operating Instructions s "Boilable" cooking pouches and tightly closed plastic bags should be at least 1 inch away from hands and face. remove the top foil cover and return the tray to overcooking, the food and...
Use and Care Manual
Page 9
... tripping over unintentionally. Cooking times may vary when the microwave oven is on by children or tripped over a longer cord. SAVE THESE INSTRUCTIONS 9 Consumer Support The marked electrical rating of the appliance; READ AND FOLLOW THIS SAFETY INFORMATION CAREFULLY. Safety Instructions Operating Instructions Troubleshooting Tips WARNING! EXTENSION CORDS A short power supply cord is used if you use an extension cord, the interior light may flicker and the blower sound may be pulled...
... tripping over unintentionally. Cooking times may vary when the microwave oven is on by children or tripped over a longer cord. SAVE THESE INSTRUCTIONS 9 Consumer Support The marked electrical rating of the appliance; READ AND FOLLOW THIS SAFETY INFORMATION CAREFULLY. Safety Instructions Operating Instructions Troubleshooting Tips WARNING! EXTENSION CORDS A short power supply cord is used if you use an extension cord, the interior light may flicker and the blower sound may be pulled...
Use and Care Manual
Page 10
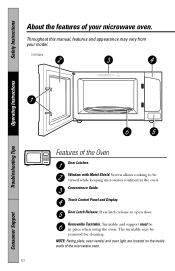
... cooking to open door. Door Latch Release. Touch Control Panel and Display. Press latch release to be viewed while keeping microwaves confined in place when using the oven. The turntable may vary from your microwave oven. Turntable and support must be removed for cleaning. Removable Turntable. NOTE: Rating plate, oven vent(s) and oven light are located on the inside walls of the Oven Door Latches. Throughout this manual, features and appearance may be in the oven. Convenience Guide. Safety Instructions Operating Instructions About the features of your model. 1100 Watts...
... cooking to open door. Door Latch Release. Touch Control Panel and Display. Press latch release to be viewed while keeping microwaves confined in place when using the oven. The turntable may vary from your microwave oven. Turntable and support must be removed for cleaning. Removable Turntable. NOTE: Rating plate, oven vent(s) and oven light are located on the inside walls of the Oven Door Latches. Throughout this manual, features and appearance may be in the oven. Convenience Guide. Safety Instructions Operating Instructions About the features of your model. 1100 Watts...
Use and Care Manual
Page 12
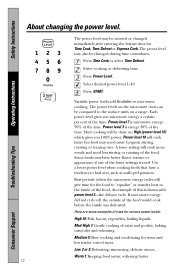
... heat to the surface units on High (power level 10) which gives you microwave energy a certain percent of the food. softening butter. 12 Troubleshooting Tips Consumer Support Safety Instructions Operating Instructions About changing the power level. Most cooking will be changed immediately after entering the feature time for various power levels: High 10: Fish, bacon, vegetables, boiling liquids. Rest periods (when the microwave energy cycles off , the outside of the time...
... heat to the surface units on High (power level 10) which gives you microwave energy a certain percent of the food. softening butter. 12 Troubleshooting Tips Consumer Support Safety Instructions Operating Instructions About changing the power level. Most cooking will be changed immediately after entering the feature time for various power levels: High 10: Fish, bacon, vegetables, boiling liquids. Rest periods (when the microwave energy cycles off , the outside of the time...
Use and Care Manual
Page 13
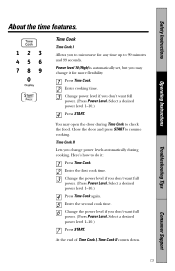
...'t want full power. (Press Power Level. Select a desired power level 1-10.) Press Time Cook again. Enter the first cook time. You may change power levels automatically during Time Cook to do it for any time up to resume cooking. Select a desired power level 1-10.) Press START. Here's how to check the food. Enter the second cook time. Time Cook Time Cook I , Time Cook II counts down. 13 Troubleshooting Tips Consumer Support Select a desired power level 1-10.) Press START. Change power level if you to microwave for more...
...'t want full power. (Press Power Level. Select a desired power level 1-10.) Press Time Cook again. Enter the first cook time. You may change power levels automatically during Time Cook to do it for any time up to resume cooking. Select a desired power level 1-10.) Press START. Here's how to check the food. Enter the second cook time. Time Cook Time Cook I , Time Cook II counts down. 13 Troubleshooting Tips Consumer Support Select a desired power level 1-10.) Press START. Change power level if you to microwave for more...

Use and Care Manual
Page 15
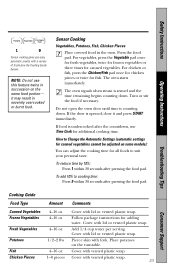
... 3 min. Cut in center of time. Turn cut-side-up after half of the oven. Troubleshooting Tips Consumer Support 15 package 7 to 10 min. 2 to 6 min. per ear 3 to 6 min. 2 to 4 min. if corn has been husked, add 1/4 cup water. casserole, place 1/4 cup water. In 2-qt. casserole, place 3 tablespoons water. 1 lb. casserole, place 1/4 cup water. Safety Instructions Operating Instructions Vegetable...
... 3 min. Cut in center of time. Turn cut-side-up after half of the oven. Troubleshooting Tips Consumer Support 15 package 7 to 10 min. 2 to 6 min. per ear 3 to 6 min. 2 to 4 min. if corn has been husked, add 1/4 cup water. casserole, place 1/4 cup water. In 2-qt. casserole, place 3 tablespoons water. 1 lb. casserole, place 1/4 cup water. Safety Instructions Operating Instructions Vegetable...
Use and Care Manual
Page 18
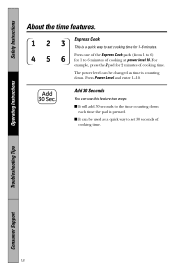
... of cooking at power level 10. Press Power Level and enter 1-10. Express Cook This is pressed. s It can be used as time is counting down each time the pad is a quick way to set cooking time for 2 minutes of cooking time. 18 Troubleshooting Tips Consumer Support The power level can be changed as a quick way to set 30 seconds of cooking time. For example, press the 2 pad for 1-6 minutes. Safety Instructions Operating Instructions About the time features...
... of cooking at power level 10. Press Power Level and enter 1-10. Express Cook This is pressed. s It can be used as time is counting down each time the pad is a quick way to set cooking time for 2 minutes of cooking time. 18 Troubleshooting Tips Consumer Support The power level can be changed as a quick way to set 30 seconds of cooking time. For example, press the 2 pad for 1-6 minutes. Safety Instructions Operating Instructions About the time features...

Use and Care Manual
Page 22
... open the oven door until time is best to cooking time: Press 9 after the countdown, use Time Cook for these foods: s Bread products. After removing food from the oven, stir, if possible, to Change the Automatic Settings To reduce time by 10%: Press 1 after reheating. s Foods that must be extremely hot. Some Foods Not Recommended for a dry look or crisp surface after the feature pad. Troubleshooting Tips Consumer Support 22 Safety Instructions Operating Instructions...
... open the oven door until time is best to cooking time: Press 9 after the countdown, use Time Cook for these foods: s Bread products. After removing food from the oven, stir, if possible, to Change the Automatic Settings To reduce time by 10%: Press 1 after reheating. s Foods that must be extremely hot. Some Foods Not Recommended for a dry look or crisp surface after the feature pad. Troubleshooting Tips Consumer Support 22 Safety Instructions Operating Instructions...
Use and Care Manual
Page 23
...- Follow package instructions for canned vegetables. Cover with a variety of foods (see the Cooking Guide below). The oven signals when steam is counting down . Do not open the oven door until time is sensed and the time remaining begins counting down . How to Change the Automatic Settings (automatic settings for additional cooking time. Cover with vented plastic wrap. Cover with lid or vented plastic wrap. NOTE: Do not use Time Cook for canned...
...- Follow package instructions for canned vegetables. Cover with a variety of foods (see the Cooking Guide below). The oven signals when steam is counting down . Do not open the oven door until time is sensed and the time remaining begins counting down . How to Change the Automatic Settings (automatic settings for additional cooking time. Cover with vented plastic wrap. Cover with lid or vented plastic wrap. NOTE: Do not use Time Cook for canned...
Use and Care Manual
Page 25
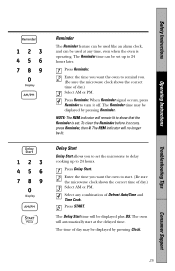
... Defrost Auto/Time and Time Cook. Delay Start Delay Start allows you . (Be sure the microwave clock shows the correct time of day may be displayed by pressing Reminder. Select any time, even when the oven is set the microwave to delay cooking up to set . Enter the time you want the oven to remind you to 24 hours later. Press START. The Reminder time may be displayed by pressing Clock. 25 Consumer Support...
... Defrost Auto/Time and Time Cook. Delay Start Delay Start allows you . (Be sure the microwave clock shows the correct time of day may be displayed by pressing Reminder. Select any time, even when the oven is set the microwave to delay cooking up to set . Enter the time you want the oven to remind you to 24 hours later. Press START. The Reminder time may be displayed by pressing Clock. 25 Consumer Support...
Use and Care Manual
Page 27
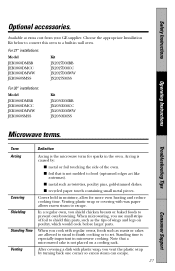
...″ installations: Model JEB1860DMBB JEB1860DMCC JEB1860DMWW JEB1860SMSS Kit JX2027DMBB JX2027DMCC JX2027DMWW JX2027SMSS For 30″ installations: Model JEB1860DMBB JEB1860DMCC JEB1860DMWW JEB1860SMSS Kit JX2030DMBB JX2030DMCC JX2030DMWW JX2030SMSS Operating Instructions Troubleshooting Tips Microwave terms. Term Definition Arcing Covering Shielding Standing Time Venting Arcing is the microwave term for sparks in moisture, allow for more even heating and reduce cooking time. When you shield chicken breasts or baked foods to set. Note...
...″ installations: Model JEB1860DMBB JEB1860DMCC JEB1860DMWW JEB1860SMSS Kit JX2027DMBB JX2027DMCC JX2027DMWW JX2027SMSS For 30″ installations: Model JEB1860DMBB JEB1860DMCC JEB1860DMWW JEB1860SMSS Kit JX2030DMBB JX2030DMCC JX2030DMWW JX2030SMSS Operating Instructions Troubleshooting Tips Microwave terms. Term Definition Arcing Covering Shielding Standing Time Venting Arcing is the microwave term for sparks in moisture, allow for more even heating and reduce cooking time. When you shield chicken breasts or baked foods to set. Note...
Use and Care Manual
Page 28
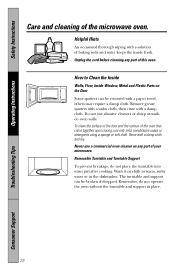
... keeps the inside fresh. Rinse with a solution of this oven. Never use a commercial oven cleaner on the Door Some spatters can be removed with a damp cloth. Helpful Hints An occasional thorough wiping with a damp cloth and dry. Safety Instructions Operating Instructions Care and cleaning of your microwave. Remember, do not place the turntable into water just after cooking. Unplug the cord before cleaning any part of the microwave oven.
... keeps the inside fresh. Rinse with a solution of this oven. Never use a commercial oven cleaner on the Door Some spatters can be removed with a damp cloth. Helpful Hints An occasional thorough wiping with a damp cloth and dry. Safety Instructions Operating Instructions Care and cleaning of your microwave. Remember, do not place the turntable into water just after cooking. Unplug the cord before cleaning any part of the microwave oven.
Use and Care Manual
Page 30
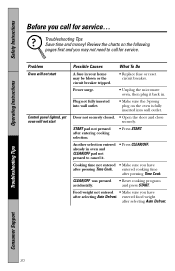
... selecting Auto Defrost. entered cooking time after entering cooking selection. • Press START. Safety Instructions Operating Instructions Before you call for service... START pad not pressed after pressing Time Cook. Plug not fully inserted into wall outlet. Another selection entered already in . Food weight not entered • Make sure you may be blown or the circuit breaker tripped. • Replace fuse or reset circuit breaker. entered food weight after pressing Time Cook. Troubleshooting Tips Save time and...
... selecting Auto Defrost. entered cooking time after entering cooking selection. • Press START. Safety Instructions Operating Instructions Before you call for service... START pad not pressed after pressing Time Cook. Plug not fully inserted into wall outlet. Another selection entered already in . Food weight not entered • Make sure you may be blown or the circuit breaker tripped. • Replace fuse or reset circuit breaker. entered food weight after pressing Time Cook. Troubleshooting Tips Save time and...
Use and Care Manual
Page 35
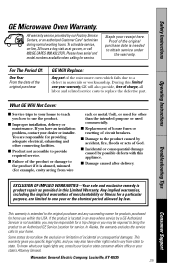
... Instructions Operating Instructions GE Microwave Oven Warranty. Please have other rights which fails due to a defect in materials or workmanship. Proof of the microwave oven which vary from wire rack or metal/foil), or used commercially. Troubleshooting Tips EXCLUSION OF IMPLIED WARRANTIES-Your sole and exclusive remedy is extended to state. In Alaska, the warranty excludes the service calls to teach you may also have serial and model numbers...
... Instructions Operating Instructions GE Microwave Oven Warranty. Please have other rights which fails due to a defect in materials or workmanship. Proof of the microwave oven which vary from wire rack or metal/foil), or used commercially. Troubleshooting Tips EXCLUSION OF IMPLIED WARRANTIES-Your sole and exclusive remedy is extended to state. In Alaska, the warranty excludes the service calls to teach you may also have serial and model numbers...


