Owners Manual
Page 1
Microwave Oven ge.com Safety Instructions 2-11 Operating Instructions Auto Feature 21 Care and Cleaning . . . . . .30, 31 Changing Power Level . . . . . .14 Features of Your Microwave Oven 12, 13 Microwave Terms 29 Other Features 26-28 Sensor Features 22-25 Time Features 15-20 Troubleshooting Tips . . . .32, 33 Things That Are Normal With Your Microwave Oven 33 Consumer Support Consumer Support . .Back Cover Warranty 35 Owner's Manual JE1460 Write the model and serial numbers here: Model Serial You can find them on a label inside of the oven. 3828W5A8486 49-40505 01-06 JR
Microwave Oven ge.com Safety Instructions 2-11 Operating Instructions Auto Feature 21 Care and Cleaning . . . . . .30, 31 Changing Power Level . . . . . .14 Features of Your Microwave Oven 12, 13 Microwave Terms 29 Other Features 26-28 Sensor Features 22-25 Time Features 15-20 Troubleshooting Tips . . . .32, 33 Things That Are Normal With Your Microwave Oven 33 Consumer Support Consumer Support . .Back Cover Warranty 35 Owner's Manual JE1460 Write the model and serial numbers here: Model Serial You can find them on a label inside of the oven. 3828W5A8486 49-40505 01-06 JR
Owners Manual
Page 2
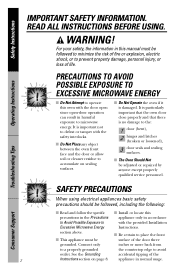
READ ALL INSTRUCTIONS BEFORE USING. It is particularly important that the oven door close properly and that there is important not to operate this manual must be adjusted or repaired by anyone except properly qualified service personnel. Connect only inches or more back from to a properly grounded the countertop edge to accumulate on page 8. I Be certain to place the front...
READ ALL INSTRUCTIONS BEFORE USING. It is particularly important that the oven door close properly and that there is important not to operate this manual must be adjusted or repaired by anyone except properly qualified service personnel. Connect only inches or more back from to a properly grounded the countertop edge to accumulate on page 8. I Be certain to place the front...
Owners Manual
Page 3
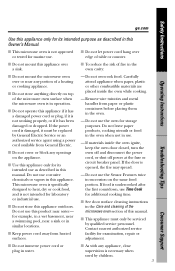
... same food portion. I This appliance must be serviced by children. 3 Consumer Support Do not use . - I Do not store this appliance. Do not use this manual. I As with any portion of table or counter. I Do not immerse power cord or I Do not operate this appliance over or near a sink or in water. Do not use . Remove wire twist-ties and metal handles from General Electric. I This microwave oven is opened, the...
... same food portion. I This appliance must be serviced by children. 3 Consumer Support Do not use . - I Do not store this appliance. Do not use this manual. I As with any portion of table or counter. I Do not immerse power cord or I Do not operate this appliance over or near a sink or in water. Do not use . Remove wire twist-ties and metal handles from General Electric. I This microwave oven is opened, the...
Owners Manual
Page 4
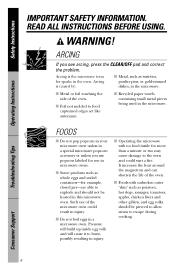
... INSTRUCTIONS BEFORE USING. Troubleshooting Tips Consumer Support 4 ARCING If you use popcorn labeled for example, closed jars-are able to explode and should be heated in injury. I Some products such as whole eggs and sealed containers-for use of the microwave oven could start a fire. I Metal or foil touching the side of the oven. Pressure will build up inside for sparks in injury. I Operating the microwave...
... INSTRUCTIONS BEFORE USING. Troubleshooting Tips Consumer Support 4 ARCING If you use popcorn labeled for example, closed jars-are able to explode and should be heated in injury. I Some products such as whole eggs and sealed containers-for use of the microwave oven could start a fire. I Metal or foil touching the side of the oven. Pressure will build up inside for sparks in injury. I Operating the microwave...

Owners Manual
Page 5
... resulting in glass jars, even with narrow necks. - I Don't defrost frozen beverages in the microwave oven for a short time before removing the container. - They could dehydrate and catch fire, causing damage to prevent scalding when warming formula. Safety Instructions Operating Instructions ge.com I Do not overcook potatoes. Use extreme care when inserting a spoon or other utensil into the container. Troubleshooting Tips Consumer Support 5 I Cook meat...
... resulting in glass jars, even with narrow necks. - I Don't defrost frozen beverages in the microwave oven for a short time before removing the container. - They could dehydrate and catch fire, causing damage to prevent scalding when warming formula. Safety Instructions Operating Instructions ge.com I Do not overcook potatoes. Use extreme care when inserting a spoon or other utensil into the container. Troubleshooting Tips Consumer Support 5 I Cook meat...
Owners Manual
Page 8
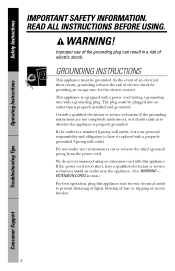
... be plugged into its own electrical outlet to have a qualified electrician or service technician install an outlet near the appliance. (See WARNING- If the outlet is a standard 2-prong wall outlet, it replaced with a grounding plug. Do not under any circumstances cut or remove the third (ground) prong from the power cord. READ ALL INSTRUCTIONS BEFORE USING. Safety Instructions Operating Instructions IMPORTANT SAFETY INFORMATION. GROUNDING...
... be plugged into its own electrical outlet to have a qualified electrician or service technician install an outlet near the appliance. (See WARNING- If the outlet is a standard 2-prong wall outlet, it replaced with a grounding plug. Do not under any circumstances cut or remove the third (ground) prong from the power cord. READ ALL INSTRUCTIONS BEFORE USING. Safety Instructions Operating Instructions IMPORTANT SAFETY INFORMATION. GROUNDING...

Owners Manual
Page 11
Safety Instructions Operating Instructions ge.com READ AND FOLLOW THIS SAFETY INFORMATION CAREFULLY. SAVE THESE INSTRUCTIONS 11 Troubleshooting Tips Consumer Support
Safety Instructions Operating Instructions ge.com READ AND FOLLOW THIS SAFETY INFORMATION CAREFULLY. SAVE THESE INSTRUCTIONS 11 Troubleshooting Tips Consumer Support
Owners Manual
Page 12
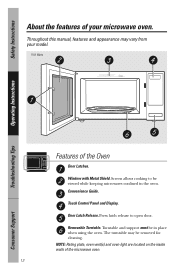
... Metal Shield. Touch Control Panel and Display. Turntable and support must be in the oven. NOTE: Rating plate, oven vent(s) and oven light are located on the inside walls of your model. 1150 Watts Features of the Oven Door Latches. Screen allows cooking to open door. The turntable may vary from your microwave oven. Safety Instructions Operating Instructions About the features of the microwave oven. 12 Troubleshooting Tips Consumer Support Convenience Guide. Door Latch Release. Press latch release to be removed for cleaning. Throughout this manual, features and...
... Metal Shield. Touch Control Panel and Display. Turntable and support must be in the oven. NOTE: Rating plate, oven vent(s) and oven light are located on the inside walls of your model. 1150 Watts Features of the Oven Door Latches. Screen allows cooking to open door. The turntable may vary from your microwave oven. Safety Instructions Operating Instructions About the features of the microwave oven. 12 Troubleshooting Tips Consumer Support Convenience Guide. Door Latch Release. Press latch release to be removed for cleaning. Throughout this manual, features and...
Owners Manual
Page 14
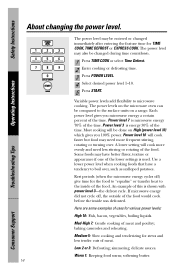
... TIME COOK, TIME DEFROST or EXPRESS COOK. baking casseroles and reheating. simmering; The power level may have a tendency to microwave cooking. Each power level gives you 100% power. Power level 7 is used. A lower setting will be compared to the inside was defrosted. Rest periods (when the microwave energy cycles off , the outside of this is energy 30% of the food. Safety Instructions Operating Instructions About changing the power level. The power levels on the microwave oven can be done on a range. Some foods...
... TIME COOK, TIME DEFROST or EXPRESS COOK. baking casseroles and reheating. simmering; The power level may have a tendency to microwave cooking. Each power level gives you 100% power. Power level 7 is used. A lower setting will be compared to the inside was defrosted. Rest periods (when the microwave energy cycles off , the outside of this is energy 30% of the food. Safety Instructions Operating Instructions About changing the power level. The power levels on the microwave oven can be done on a range. Some foods...
Owners Manual
Page 15
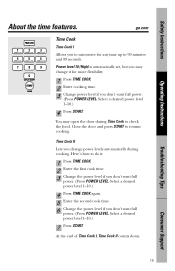
... change power levels automatically during Time Cook to do it for any time up to 99 minutes and 99 seconds. Troubleshooting Tips Consumer Support 15 Select a desired power level 1-10.) 4 Press START. Here's how to check the food. Safety Instructions Operating Instructions About the time features. ge.com Time Cook Time Cook I , Time Cook II counts down. Power level 10 (High) is automatically set, but you to resume cooking. At the end of Time Cook I Allows you may open the door...
... change power levels automatically during Time Cook to do it for any time up to 99 minutes and 99 seconds. Troubleshooting Tips Consumer Support 15 Select a desired power level 1-10.) 4 Press START. Here's how to check the food. Safety Instructions Operating Instructions About the time features. ge.com Time Cook Time Cook I , Time Cook II counts down. Power level 10 (High) is automatically set, but you to resume cooking. At the end of Time Cook I Allows you may open the door...
Owners Manual
Page 17
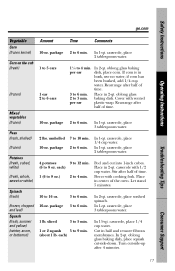
...remove fibrous membranes. Let stand 5 minutes. 10 to 4 min. casserole, place 3 tablespoons water. 1 lb. Cover with 1/2 cup water. unshelled 10-oz. casserole, place washed spinach. Rearrange after half of time. 3 to 6 min. 2 to 4 min. oblong glass baking dish. sliced 3 to 5 min. 1 or 2 squash 5 to 6 min. Turn cut.... In 1-qt. oblong glass baking dish, place squash cut -side-up after half of the oven. Pierce with cooking fork. oblong glass baking per ear Place in 2-qt. package 7 to 10 min. 2 to 6 min. In 1-qt. Place in husk, use no water; package 3 ...
...remove fibrous membranes. Let stand 5 minutes. 10 to 4 min. casserole, place 3 tablespoons water. 1 lb. Cover with 1/2 cup water. unshelled 10-oz. casserole, place washed spinach. Rearrange after half of time. 3 to 6 min. 2 to 4 min. oblong glass baking dish. sliced 3 to 5 min. 1 or 2 squash 5 to 6 min. Turn cut.... In 1-qt. oblong glass baking dish, place squash cut -side-up after half of the oven. Pierce with cooking fork. oblong glass baking per ear Place in 2-qt. package 7 to 10 min. 2 to 6 min. In 1-qt. Place in husk, use no water; package 3 ...
Owners Manual
Page 20
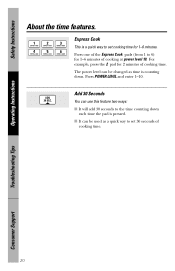
... to set 30 seconds of cooking at power level 10. For example, press the 2 pad for 2 minutes of the Express Cook pads (from 1 to set cooking time for 1-6 minutes of cooking time. 20 Troubleshooting Tips Consumer Support Safety Instructions Operating Instructions About the time features. Press one of cooking time. Add 30 Seconds You can use this feature two ways: I It can be used as time is a quick way to the time counting...
... to set 30 seconds of cooking at power level 10. For example, press the 2 pad for 2 minutes of the Express Cook pads (from 1 to set cooking time for 1-6 minutes of cooking time. 20 Troubleshooting Tips Consumer Support Safety Instructions Operating Instructions About the time features. Press one of cooking time. Add 30 Seconds You can use this feature two ways: I It can be used as time is a quick way to the time counting...
Owners Manual
Page 24
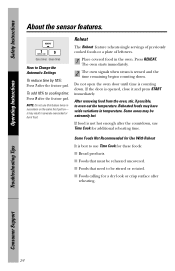
... wide variations in temperature. Troubleshooting Tips Consumer Support 24 Do not open the oven door until time is best to Change the Automatic Settings To reduce time by 10%: Press 1 after reheating. Some Foods Not Recommended for additional reheating time. Reheat The Reheat feature reheats single servings of previously cooked foods or a plate of leftovers. (less time) (more time) How to use Time Cook for Use With Reheat It is...
... wide variations in temperature. Troubleshooting Tips Consumer Support 24 Do not open the oven door until time is best to Change the Automatic Settings To reduce time by 10%: Press 1 after reheating. Some Foods Not Recommended for additional reheating time. Reheat The Reheat feature reheats single servings of previously cooked foods or a plate of leftovers. (less time) (more time) How to use Time Cook for Use With Reheat It is...
Owners Manual
Page 25
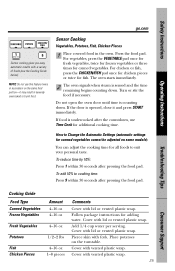
... begins counting down . Follow package instructions for all foods to Change the Automatic Settings (automatic settings for canned vegetables cannot be adjusted on some models): You can adjust the cooking time for adding water. The oven starts immediately. 2 The oven signals when steam is counting down . Cover with lid or vented plastic wrap. Press the food pad. Troubleshooting Tips Consumer Support Cooking Guide Food Type Canned Vegetables Frozen Vegetables...
... begins counting down . Follow package instructions for all foods to Change the Automatic Settings (automatic settings for canned vegetables cannot be adjusted on some models): You can adjust the cooking time for adding water. The oven starts immediately. 2 The oven signals when steam is counting down . Cover with lid or vented plastic wrap. Press the food pad. Troubleshooting Tips Consumer Support Cooking Guide Food Type Canned Vegetables Frozen Vegetables...
Owners Manual
Page 27
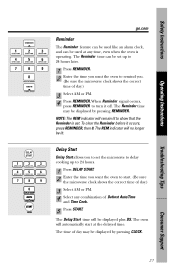
... displayed by pressing REMINDER. Safety Instructions Operating Instructions ge.com Reminder The Reminder feature can be used like an alarm clock, and can be set up to start at any combination of Defrost Auto/Time and Time Cook. 5 Press START. The REM indicator will automatically start . (Be sure the microwave clock shows the correct time of day.) 3 Select AM or PM. 4 Select any time, even when the oven is set the microwave to delay cooking...
... displayed by pressing REMINDER. Safety Instructions Operating Instructions ge.com Reminder The Reminder feature can be used like an alarm clock, and can be set up to start at any combination of Defrost Auto/Time and Time Cook. 5 Press START. The REM indicator will automatically start . (Be sure the microwave clock shows the correct time of day.) 3 Select AM or PM. 4 Select any time, even when the oven is set the microwave to delay cooking...
Owners Manual
Page 29
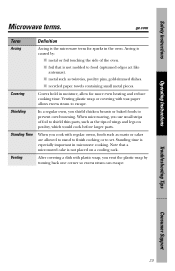
... would cook before larger parts. I recycled paper towels containing small metal pieces. Safety Instructions Operating Instructions Microwave terms. ge.com Term Definition Arcing Arcing is the microwave term for more even heating and reduce cooking time. Arcing is caused by turning back one corner so excess steam can escape. Venting plastic wrap or covering with plastic wrap, you shield chicken breasts or baked foods to set.
... would cook before larger parts. I recycled paper towels containing small metal pieces. Safety Instructions Operating Instructions Microwave terms. ge.com Term Definition Arcing Arcing is the microwave term for more even heating and reduce cooking time. Arcing is caused by turning back one corner so excess steam can escape. Venting plastic wrap or covering with plastic wrap, you shield chicken breasts or baked foods to set.

Owners Manual
Page 30
.... Safety Instructions Operating Instructions Care and cleaning of baking soda and water keeps the inside fresh. Never use a commercial oven cleaner on any part of this oven. Do not use only mild, nonabrasive soaps or detergents using a sponge or soft cloth. Remember, do not place the turntable into water just after cooking. To clean the surface of the door and the surface of your microwave. Removable Turntable and Turntable Support To...
.... Safety Instructions Operating Instructions Care and cleaning of baking soda and water keeps the inside fresh. Never use a commercial oven cleaner on any part of this oven. Do not use only mild, nonabrasive soaps or detergents using a sponge or soft cloth. Remember, do not place the turntable into water just after cooking. To clean the surface of the door and the surface of your microwave. Removable Turntable and Turntable Support To...

Owners Manual
Page 32
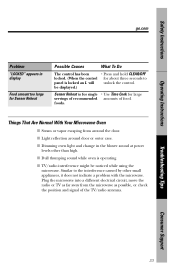
... display 32 Possible Causes What To Do A fuse in your home may not need to call for more time. Cooking time not entered • Make sure you have after selecting Auto Defrost. Food weight not entered • Make sure you have after pressing TIME COOK. Operating Instructions Troubleshooting Tips Problem Oven will not start Control panel lighted, yet oven will not start "SENSOR ERROR" appears on the following pages first and you call for service. entered cooking time...
... display 32 Possible Causes What To Do A fuse in your home may not need to call for more time. Cooking time not entered • Make sure you have after selecting Auto Defrost. Food weight not entered • Make sure you have after pressing TIME COOK. Operating Instructions Troubleshooting Tips Problem Oven will not start Control panel lighted, yet oven will not start "SENSOR ERROR" appears on the following pages first and you call for service. entered cooking time...
Owners Manual
Page 33
... microwave into a different electrical circuit, move the radio or TV as far away from around door or outer case. be noticed while using the microwave. Similar to panel is locked an L will unlock the control. Troubleshooting Tips Consumer Support 33 I Dull thumping sound while oven is for single • Use Time Cook for about three seconds to the interference caused by other than high. Safety Instructions Operating Instructions ge.com Problem "LOCKED...
... microwave into a different electrical circuit, move the radio or TV as far away from around door or outer case. be noticed while using the microwave. Similar to panel is locked an L will unlock the control. Troubleshooting Tips Consumer Support 33 I Dull thumping sound while oven is for single • Use Time Cook for about three seconds to the interference caused by other than high. Safety Instructions Operating Instructions ge.com Problem "LOCKED...
Owners Manual
Page 35
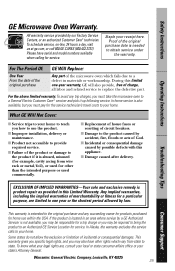
... authorized Customer Care® technician. Safety Instructions Operating Instructions GE Microwave Oven Warranty. To schedule service, on-line, 24 hours a day, visit us at ge.com, or call 800.GE.CARES (800.432.2737). Staple your home. For the above limited warranty: To avoid any succeeding owner for products purchased for the service technician's travel costs to obtain service under the warranty. I Replacement of house fuses or resetting of incidental...
... authorized Customer Care® technician. Safety Instructions Operating Instructions GE Microwave Oven Warranty. To schedule service, on-line, 24 hours a day, visit us at ge.com, or call 800.GE.CARES (800.432.2737). Staple your home. For the above limited warranty: To avoid any succeeding owner for products purchased for the service technician's travel costs to obtain service under the warranty. I Replacement of house fuses or resetting of incidental...

