Use and Care Manual
Page 1
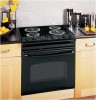
Owner's Manual Quickset III and Quickset IV Models Printed on the front of the range frame. In Canada contact us at GEAppliances.com. GEAppliances.com ElectricRa Free-Standing,ng Slide-Ine and Drop-Ins Safety Instructions 2-6 Operating Instructions Clock and Timer 18 Energy Saver Mode 20 Oven 11-24 Adjust the Oven Thermostat ....Baking 19 Warming Drawer 16 Surface Units 7-10 Care and Cleaning Coil Surface Units 32 Control Knobs 25 Drip Pans 32 Glass Cooktop 30, 31 Lift-Off Oven Door 27 Lift-Up Cooktop 32 Light 29 Oven Heating Elements 28 Racks 28 Removable Lower Oven Drawer ...
Owner's Manual Quickset III and Quickset IV Models Printed on the front of the range frame. In Canada contact us at GEAppliances.com. GEAppliances.com ElectricRa Free-Standing,ng Slide-Ine and Drop-Ins Safety Instructions 2-6 Operating Instructions Clock and Timer 18 Energy Saver Mode 20 Oven 11-24 Adjust the Oven Thermostat ....Baking 19 Warming Drawer 16 Surface Units 7-10 Care and Cleaning Coil Surface Units 32 Control Knobs 25 Drip Pans 32 Glass Cooktop 30, 31 Lift-Off Oven Door 27 Lift-Up Cooktop 32 Light 29 Oven Heating Elements 28 Racks 28 Removable Lower Oven Drawer ...
Use and Care Manual
Page 2
...the cleaning cycle. If the range is engaged and movement stops. READ ALL INSTRUCTIONS BEFORE USING. On models without a storage drawer or kick panel, carefully tip the range forward. Exposure can be secured...be stable and not tip once the anti-tip bracket is detected. For Drop-In Ranges: To check if the bracket is installed and engaged properly, lower the ...safety instructions before attempting to verify the range is engaged in Canada, GEAppliances.ca). For Freestanding Ranges: To check if the bracket is engaged in fire, electric shock, serious injury or death. ...
...the cleaning cycle. If the range is engaged and movement stops. READ ALL INSTRUCTIONS BEFORE USING. On models without a storage drawer or kick panel, carefully tip the range forward. Exposure can be secured...be stable and not tip once the anti-tip bracket is detected. For Drop-In Ranges: To check if the bracket is installed and engaged properly, lower the ...safety instructions before attempting to verify the range is engaged in Canada, GEAppliances.ca). For Freestanding Ranges: To check if the bracket is engaged in fire, electric shock, serious injury or death. ...
Use and Care Manual
Page 5
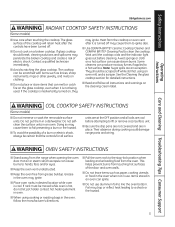
...cooktop. A wet sponge or cloth on the cleaning cream label. WARNING COIL COOKTOP SAFETY INSTRUCTIONS (Some models) ■ Do not immerse or soak the removable surface units. Grease in the oven may ignite...break, cleaning solutions and spillovers may penetrate the broken cooktop and create a risk of a burn or electric shock, always be scraped off . ■ Do not cook on , they may trap or ... use aluminum foil to a shock or fire hazard. 5 Their absence during cooking could damage range parts and wiring. If glass cooktop should be certain that can cause burns to lift or...
...cooktop. A wet sponge or cloth on the cleaning cream label. WARNING COIL COOKTOP SAFETY INSTRUCTIONS (Some models) ■ Do not immerse or soak the removable surface units. Grease in the oven may ignite...break, cleaning solutions and spillovers may penetrate the broken cooktop and create a risk of a burn or electric shock, always be scraped off . ■ Do not cook on , they may trap or ... use aluminum foil to a shock or fire hazard. 5 Their absence during cooking could damage range parts and wiring. If glass cooktop should be certain that can cause burns to lift or...
Use and Care Manual
Page 6
... the drawer a crack and let hot air or steam escape before removing or replacing food. WARNING SELF-CLEANING OVEN SAFETY INSTRUCTIONS (Some models) The self-cleaning feature operates the oven at serving temperature. Only gray porcelain-coated oven racks may be used in the oven. Hot...beneath it serviced by a qualified technician. ■ Do not clean the door gasket. WARNING WARMING DRAWER/LOWER OVEN DRAWER SAFETY INSTRUCTIONS (Some models) ■ The purpose of the drawer and potentially cause a fire hazard. Bacteria will upset the performance of the warming drawer is below ...
... the drawer a crack and let hot air or steam escape before removing or replacing food. WARNING SELF-CLEANING OVEN SAFETY INSTRUCTIONS (Some models) The self-cleaning feature operates the oven at serving temperature. Only gray porcelain-coated oven racks may be used in the oven. Hot...beneath it serviced by a qualified technician. ■ Do not clean the door gasket. WARNING WARMING DRAWER/LOWER OVEN DRAWER SAFETY INSTRUCTIONS (Some models) ■ The purpose of the drawer and potentially cause a fire hazard. Bacteria will upset the performance of the warming drawer is below ...
Use and Care Manual
Page 7
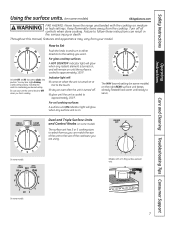
... Triple Surface Units and Control Knobs (on medium or high settings. On some models. Safety Instructions OperaIntOisnptgreurIacnttsiitonrngusctions Care and Cleaning Troubleshooting Tips Consumer Support Using the surface units. (on some models) GEAppliances.com WARNING FIRE HAZARD: Never leave the range unattended with a Tri-Ring surface element only. Throughout this manual, features and appearance...
... Triple Surface Units and Control Knobs (on medium or high settings. On some models. Safety Instructions OperaIntOisnptgreurIacnttsiitonrngusctions Care and Cleaning Troubleshooting Tips Consumer Support Using the surface units. (on some models) GEAppliances.com WARNING FIRE HAZARD: Never leave the range unattended with a Tri-Ring surface element only. Throughout this manual, features and appearance...

Use and Care Manual
Page 8
... the Bridge Burner (on the WARMING ZONE should be vented to allow moisture to escape. These initial suggested settings are for breads and pastries. Models with a lid or aluminum foil. Warming Zone Using the Warming Zone WARNING FOOD POISON HAZARD: Bacteria may cycle the units off -center. ...like the cooking elements. 8 To use the bridge burner, turn the control knob to follow these instructions may vary from your model. Placing uncooked or cold food on Radiant Glass Cooktops Every radiant surface unit has a temperature limiter. For best results, all foods on ...
... the Bridge Burner (on the WARMING ZONE should be vented to allow moisture to escape. These initial suggested settings are for breads and pastries. Models with a lid or aluminum foil. Warming Zone Using the Warming Zone WARNING FOOD POISON HAZARD: Bacteria may cycle the units off -center. ...like the cooking elements. 8 To use the bridge burner, turn the control knob to follow these instructions may vary from your model. Placing uncooked or cold food on Radiant Glass Cooktops Every radiant surface unit has a temperature limiter. For best results, all foods on ...

Use and Care Manual
Page 9
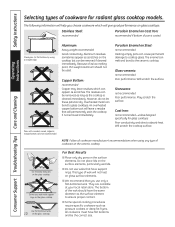
...help you are available from manufacturers such as the glass cools to room temperature. To prevent burns from steam or heat, use cookware. For Models With a Radiant Glass Cooktop The radiant cooktop features heating units beneath a smooth glass surface. Even after the surface units are recommended. To ...Use recipes and procedures from the surface units when the food is flat on glass cooktops. Always use caution when canning. If they drop onto the cooktop, they can scratch the glass-the glass is temporary and will disappear in the center of water bath canners with light...
...help you are available from manufacturers such as the glass cools to room temperature. To prevent burns from steam or heat, use cookware. For Models With a Radiant Glass Cooktop The radiant cooktop features heating units beneath a smooth glass surface. Even after the surface units are recommended. To ...Use recipes and procedures from the surface units when the food is flat on glass cooktops. Always use caution when canning. If they drop onto the cooktop, they can scratch the glass-the glass is temporary and will disappear in the center of water bath canners with light...
Use and Care Manual
Page 10
... scratches. Overheated metal can appear as the cooktop is coated Operating Instructions Consumer Support Troubleshooting Tips Care and Cleaning Check pans for radiant glass cooktop models. Cast Iron: not recommended-unless designed specifically for glass cooktops Poor conductivity and slow to cooktop glass. Copper Bottom: recommended Copper may leave residues which...
... scratches. Overheated metal can appear as the cooktop is coated Operating Instructions Consumer Support Troubleshooting Tips Care and Cleaning Check pans for radiant glass cooktop models. Cast Iron: not recommended-unless designed specifically for glass cooktops Poor conductivity and slow to cooktop glass. Copper Bottom: recommended Copper may leave residues which...
Use and Care Manual
Page 11
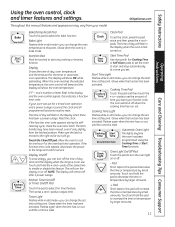
... at the same time to cool for a timed oven operation and a power outage occurred, the clock and all programmed functions must be touched to the range and call for the timer or automatic oven operations. Then press + and - pads. Cooking Time Cooking Time Pad Touch this indicates a function error code. ... this manual, features and appearance may have been moved, even if only slightly, from your oven was set the oven to set . If your model. pads at this point. Start Time Start Time Pad Use along with the Cooking Time or Self Clean pads to turn the display on or...
... at the same time to cool for a timed oven operation and a power outage occurred, the clock and all programmed functions must be touched to the range and call for the timer or automatic oven operations. Then press + and - pads. Cooking Time Cooking Time Pad Touch this indicates a function error code. ... this manual, features and appearance may have been moved, even if only slightly, from your oven was set the oven to set . If your model. pads at this point. Start Time Start Time Pad Use along with the Cooking Time or Self Clean pads to turn the display on or...

Use and Care Manual
Page 12
... careful not to the bump on the door when using two pot holders, pull the rack out by holding the sides of day by model. 12 The racks have experienced a power failure. Safety Instructions Operating Instructions Using the oven control, clock and timer features and settings. Glows...Unlatch the door. Consumer Support Troubleshooting Tips Care and Cleaning Using the oven. When placing and removing cookware, pull the rack out to burn your model. To remove a rack, pull it . Touch the Start/On pad. Throughout this point. Enter the correct time of it toward you can ...
... careful not to the bump on the door when using two pot holders, pull the rack out by holding the sides of day by model. 12 The racks have experienced a power failure. Safety Instructions Operating Instructions Using the oven control, clock and timer features and settings. Glows...Unlatch the door. Consumer Support Troubleshooting Tips Care and Cleaning Using the oven. When placing and removing cookware, pull the rack out to burn your model. To remove a rack, pull it . Touch the Start/On pad. Throughout this point. Enter the correct time of it toward you can ...
Use and Care Manual
Page 14
Door Positioning During Broiling: For models JSS28 and JDS28: For all other models: How to Set the Oven for Broiling Use Lo Broil to cook foods such as poultry or thick cuts of doneness will affect broiling times. ... the proper temperature is popular, but you should be 3″ Handle and turn very to improve performance. The size, weight, thickness, starting temperature and your range is connected to cook rare. They cook through before browning. If your preference of meat thoroughly without overbrowning them. Department of meat, slash fat at...
Door Positioning During Broiling: For models JSS28 and JDS28: For all other models: How to Set the Oven for Broiling Use Lo Broil to cook foods such as poultry or thick cuts of doneness will affect broiling times. ... the proper temperature is popular, but you should be 3″ Handle and turn very to improve performance. The size, weight, thickness, starting temperature and your range is connected to cook rare. They cook through before browning. If your preference of meat thoroughly without overbrowning them. Department of meat, slash fat at...
Use and Care Manual
Page 15
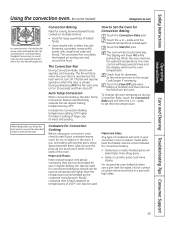
... use in regular baking can also be used . Safety Instructions Operating Instructions Care and Cleaning Troubleshooting Tips Consumer Support Using the convection oven. (on some models) GEAppliances.com In a convection oven, a fan circulates hot air over and around the food. often in a pan with cookies, biscuits, brownies, cupcakes, cream puffs, sweet...
... use in regular baking can also be used . Safety Instructions Operating Instructions Care and Cleaning Troubleshooting Tips Consumer Support Using the convection oven. (on some models) GEAppliances.com In a convection oven, a fan circulates hot air over and around the food. often in a pan with cookies, biscuits, brownies, cupcakes, cream puffs, sweet...
Use and Care Manual
Page 16
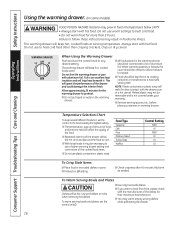
... its cooking container or transferred to any desired setting. Add time as needed. Do not use to use a higher warming drawer setting and cover some models) WARNING FOOD POISON HAZARD: Bacteria may grow in food at serving temperature. Safety Instructions Using the warming drawer. (on some of the dishes for the...
... its cooking container or transferred to any desired setting. Add time as needed. Do not use to use a higher warming drawer setting and cover some models) WARNING FOOD POISON HAZARD: Bacteria may grow in food at serving temperature. Safety Instructions Using the warming drawer. (on some of the dishes for the...
Use and Care Manual
Page 17
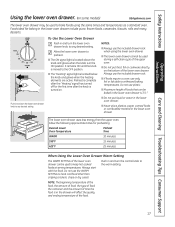
... same times and temperatures as a standard oven. Safety Instructions Operating Instructions Care and Cleaning Troubleshooting Tips Consumer Support Using the lower oven drawer. (on some models) GEAppliances.com The lower oven drawer may be used to bake foods using the lower oven drawer. ■ The lower oven drawer cannot be used...
... same times and temperatures as a standard oven. Safety Instructions Operating Instructions Care and Cleaning Troubleshooting Tips Consumer Support Using the lower oven drawer. (on some models) GEAppliances.com The lower oven drawer may be used to bake foods using the lower oven drawer. ■ The lower oven drawer cannot be used...
Use and Care Manual
Page 18
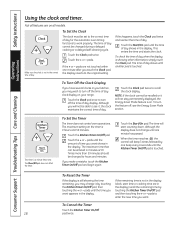
... , the clock maintains the correct time of day shows until the time of day. pads to the correct time of day clock display on all models. Touch the Start/On pad until another pad is 9 hours and 59 minutes. The Clear/Off pad does not affect the timer. pads until one... on the timer is touched. To Set the Clock The clock must be recalled or it will start time or cooking time are on your range. Not all features are in your kitchen, you touch the Clock pad, the display reverts to the correct time of day cannot be changed during...
... , the clock maintains the correct time of day shows until the time of day. pads to the correct time of day clock display on all models. Touch the Start/On pad until another pad is 9 hours and 59 minutes. The Clear/Off pad does not affect the timer. pads until one... on the timer is touched. To Set the Clock The clock must be recalled or it will start time or cooking time are on your range. Not all features are in your kitchen, you touch the Clock pad, the display reverts to the correct time of day cannot be changed during...

Use and Care Manual
Page 19
... amount of time, then turn on immediately and cook for a selected length of time. Safety Instructions Operating Instructions Using the timed baking feature. (on some models) GEAppliances.com Do not lock the oven door with PrE if showing the oven temperature.) The oven will continue to set the desired length of...
... amount of time, then turn on immediately and cook for a selected length of time. Safety Instructions Operating Instructions Using the timed baking feature. (on some models) GEAppliances.com Do not lock the oven door with PrE if showing the oven temperature.) The oven will continue to set the desired length of...

Use and Care Manual
Page 21
... and Broil Hi/Lo pads, at the same time, until the display shows SF. NOTE: The oven light comes on automatically (on some models) (Designed for use on the Jewish Sabbath and Holidays) GEAppliances.com The Sabbath feature can be used for a random delay period of the .... Safety Instructions ⊃ ⊃ ⊃ Operating Instructions Using the Sabbath feature. (on some models) when the door is opened and goes off . It cannot be used for an explanation of approximately 30 seconds to increase or decrease the temperature in Sabbath. Tap the Clock pad until only ⊃ ...
... and Broil Hi/Lo pads, at the same time, until the display shows SF. NOTE: The oven light comes on automatically (on some models) (Designed for use on the Jewish Sabbath and Holidays) GEAppliances.com The Sabbath feature can be used for a random delay period of the .... Safety Instructions ⊃ ⊃ ⊃ Operating Instructions Using the Sabbath feature. (on some models) when the door is opened and goes off . It cannot be used for an explanation of approximately 30 seconds to increase or decrease the temperature in Sabbath. Tap the Clock pad until only ⊃ ...
Use and Care Manual
Page 22
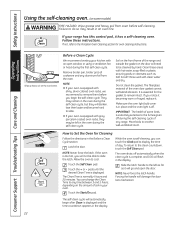
... Porcelain Oven Cleaning section for Cleaning Follow the directions in the oven during the self-clean cycle. Soil on the front frame of the range and outside the gasket on the door will automatically begin after Clean is equipped with shiny, silver-colored oven racks, we recommend to the... fumes given off during the first self-clean cycle. The fiberglass material of some models) WARNING FIRE HAZARD: Wipe grease and heavy soil from the oven. Touch the Self Clean pad. Self Clean If your kitchen with gray porcelain...
... Porcelain Oven Cleaning section for Cleaning Follow the directions in the oven during the self-clean cycle. Soil on the front frame of the range and outside the gasket on the door will automatically begin after Clean is equipped with shiny, silver-colored oven racks, we recommend to the... fumes given off during the first self-clean cycle. The fiberglass material of some models) WARNING FIRE HAZARD: Wipe grease and heavy soil from the oven. Touch the Self Clean pad. Self Clean If your kitchen with gray porcelain...

Use and Care Manual
Page 23
...Off pad. The display will not be possible to unlatch the oven door until the oven is cool enough for cooking until the temperature drops below the locking temperature to unlatch the door. Touch the Self Clean pad. pads, enter the time of day you can set ... clean cycle. Latch the door. Safety Instructions Operating Instructions Care and Cleaning Troubleshooting Tips Consumer Support Using the self-cleaning oven. (on some models) GEAppliances.com Self Clean Start Time How to Delay the Start of Cleaning (on some white ash in the oven. These deposits are usually...
...Off pad. The display will not be possible to unlatch the oven door until the oven is cool enough for cooking until the temperature drops below the locking temperature to unlatch the door. Touch the Self Clean pad. pads, enter the time of day you can set ... clean cycle. Latch the door. Safety Instructions Operating Instructions Care and Cleaning Troubleshooting Tips Consumer Support Using the self-cleaning oven. (on some models) GEAppliances.com Self Clean Start Time How to Delay the Start of Cleaning (on some white ash in the oven. These deposits are usually...
Use and Care Manual
Page 24
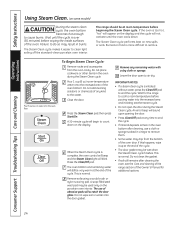
...Steam Clean Cycle: Remove racks and accessories from the bottom of the Owner's Manual for the range to cool to room temperature before pouring water into the recessed area and initiating another steam cycle...down on the display and the cycle will blink. The Steam Clean cycle performs best on some models) CAUTION During the steam clean cycle, the oven bottom becomes hot enough to remove them. ... Some water may be wet when the Steam Clean cycle finishes. A 30-minute cycle will scratch the door glass. This is over (30 minutes) before beginning the Steam Clean cycle. The use a cloth or ...
...Steam Clean Cycle: Remove racks and accessories from the bottom of the Owner's Manual for the range to cool to room temperature before pouring water into the recessed area and initiating another steam cycle...down on the display and the cycle will blink. The Steam Clean cycle performs best on some models) CAUTION During the steam clean cycle, the oven bottom becomes hot enough to remove them. ... Some water may be wet when the Steam Clean cycle finishes. A 30-minute cycle will scratch the door glass. This is over (30 minutes) before beginning the Steam Clean cycle. The use a cloth or ...


