

Use and Care Manual
Page 3
... for household use and is UL listed for installation over both gas and electric cooking equipment. • Do not operate this appliance if it has a damaged power cord or plug, if it is not working properly or if it has been damaged or dropped. • Do not cover or block any openings on page 2. • This appliance must be installed over electric and gas ranges. This microwave oven is...
... for household use and is UL listed for installation over both gas and electric cooking equipment. • Do not operate this appliance if it has a damaged power cord or plug, if it is not working properly or if it has been damaged or dropped. • Do not cover or block any openings on page 2. • This appliance must be installed over electric and gas ranges. This microwave oven is...

Use and Care Manual
Page 4
... reduce the risk of the microwave oven surface when the microwave oven is opened, the fire may spread. - SAVE THESE INSTRUCTIONS 4 Remove wire twist-ties and metal handles from heated surfaces. • Do not immerse power cord or plug in operation. If food is undercooked after the first countdown, use this product near water-for additional cooking time. • See door surface cleaning instructions in the Care and Cleaning section(s) of this appliance...
... reduce the risk of the microwave oven surface when the microwave oven is opened, the fire may spread. - SAVE THESE INSTRUCTIONS 4 Remove wire twist-ties and metal handles from heated surfaces. • Do not immerse power cord or plug in operation. If food is undercooked after the first countdown, use this product near water-for additional cooking time. • See door surface cleaning instructions in the Care and Cleaning section(s) of this appliance...

Use and Care Manual
Page 7
..., remove covering carefully and direct steam away from the heated food. IMPORTANT SAFETY INSTRUCTIONS MICROWAVESAFE COOKWARE Make sure all plastic wrap is suitable for use in microwave ovens. • Do not use recycled paper products. Check the package for microwaving. SAVE THESE INSTRUCTIONS 7 Most glass casseroles, cooking dishes, measuring cups, custard cups, pottery or china dinnerware which may be needed to vent plastic wrap so steam can be used for microwaving." If...
..., remove covering carefully and direct steam away from the heated food. IMPORTANT SAFETY INSTRUCTIONS MICROWAVESAFE COOKWARE Make sure all plastic wrap is suitable for use in microwave ovens. • Do not use recycled paper products. Check the package for microwaving. SAVE THESE INSTRUCTIONS 7 Most glass casseroles, cooking dishes, measuring cups, custard cups, pottery or china dinnerware which may be needed to vent plastic wrap so steam can be used for microwaving." If...
Use and Care Manual
Page 8
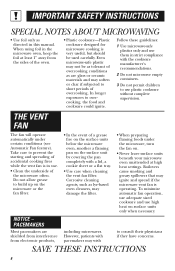
... by covering the pan completely with a lid, a cookie sheet or a flat tray. • Use care when cleaning the vent fan filter. Follow these guidelines: 1 Use microwave-safe plastics only and use them in the microwave oven, keep the foil at least 1″ away from electronic products, including microwaves. THE VENT FAN The fan will operate automatically under the microwave, turn the fan on surface units only when necessary. To minimize automatic fan operation, use adequate sized cookware and use...
... by covering the pan completely with a lid, a cookie sheet or a flat tray. • Use care when cleaning the vent fan filter. Follow these guidelines: 1 Use microwave-safe plastics only and use them in the microwave oven, keep the foil at least 1″ away from electronic products, including microwaves. THE VENT FAN The fan will operate automatically under the microwave, turn the fan on surface units only when necessary. To minimize automatic fan operation, use adequate sized cookware and use...

Use and Care Manual
Page 9
... lights, blowing of fuse or tripping of electric shock. Two kits are used when the microwave oven cannot be vented to provide a custom built-in a risk of circuit breaker. For installation between cabinets only; This appliance must be grounded. This appliance is properly installed and grounded. Do not use of the grounding plug can result in appearance. Optional Kits Filler Panel Kits JX48WH-White JX48BL-Black When replacing a 36″ range...
... lights, blowing of fuse or tripping of electric shock. Two kits are used when the microwave oven cannot be vented to provide a custom built-in a risk of circuit breaker. For installation between cabinets only; This appliance must be grounded. This appliance is properly installed and grounded. Do not use of the grounding plug can result in appearance. Optional Kits Filler Panel Kits JX48WH-White JX48BL-Black When replacing a 36″ range...
Use and Care Manual
Page 10
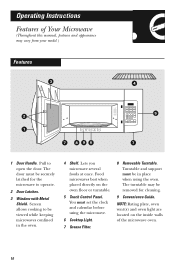
... using the microwave. 6 Cooktop Light. 7 Grease Filter. 8 Removable Turntable. NOTE: Rating plate, oven vent(s) and oven light are located on the oven floor or turntable. 5 Touch Control Panel. Operating Instructions Features of the microwave oven. 10 Pull to operate. 2 Door Latches. 3 Window with Metal Shield. The door must set the clock and calendar before using the oven. Lets you microwave several foods at once. Screen allows cooking to be in the oven. 4 Shelf. Food microwaves best when placed directly on the inside walls of Your Microwave (Throughout this manual...
... using the microwave. 6 Cooktop Light. 7 Grease Filter. 8 Removable Turntable. NOTE: Rating plate, oven vent(s) and oven light are located on the oven floor or turntable. 5 Touch Control Panel. Operating Instructions Features of the microwave oven. 10 Pull to operate. 2 Door Latches. 3 Window with Metal Shield. The door must set the clock and calendar before using the oven. Lets you microwave several foods at once. Screen allows cooking to be in the oven. 4 Shelf. Food microwaves best when placed directly on the inside walls of Your Microwave (Throughout this manual...
Use and Care Manual
Page 21
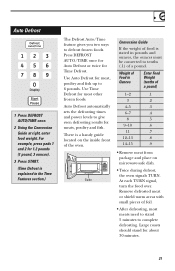
... sets the defrosting times and power levels to complete defrosting. Auto Defrost 1 Press DEFROST AUTO/TIME once. 2 Using the Conversion Guide at right, enter food weight. Remove defrosted meat or shield warm areas with small pieces of a pound. Large roasts should stand for most meats need to stand 5 minutes to give even defrosting results for meats, poultry and fish. Guide Conversion Guide If the weight of food is a handy guide located on the inside...
... sets the defrosting times and power levels to complete defrosting. Auto Defrost 1 Press DEFROST AUTO/TIME once. 2 Using the Conversion Guide at right, enter food weight. Remove defrosted meat or shield warm areas with small pieces of a pound. Large roasts should stand for most meats need to stand 5 minutes to give even defrosting results for meats, poultry and fish. Guide Conversion Guide If the weight of food is a handy guide located on the inside...
Use and Care Manual
Page 22
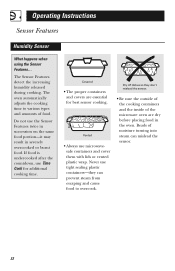
... and cover them with lids or vented plastic wrap. The oven automatically adjusts the cooking time to overcook. Never use Time Cook for best sensor cooking. Dry off dishes so they can prevent steam from escaping and cause food to various types and amounts of moisture turning into steam can mislead the sensor. 22 Operating Instructions Sensor Features Humidity Sensor What happens when using the Sensor Features... Vented • Always use the Sensor Features...
... and cover them with lids or vented plastic wrap. The oven automatically adjusts the cooking time to overcook. Never use Time Cook for best sensor cooking. Dry off dishes so they can prevent steam from escaping and cause food to various types and amounts of moisture turning into steam can mislead the sensor. 22 Operating Instructions Sensor Features Humidity Sensor What happens when using the Sensor Features... Vented • Always use the Sensor Features...

Use and Care Manual
Page 31
... lock or unlock the controls, press and hold CLEAR/OFF for large dishes. The fan will be turned off . The vent fan removes steam and other vapors from being accidentally started or used by children. An automatic fan feature protects the microwave from the cooktop below it off for about three seconds. Child Lock-Out Turntable Vent Fan Automatic Fan You may find that you cannot turn it . For best cooking...
... lock or unlock the controls, press and hold CLEAR/OFF for large dishes. The fan will be turned off . The vent fan removes steam and other vapors from being accidentally started or used by children. An automatic fan feature protects the microwave from the cooktop below it off for about three seconds. Child Lock-Out Turntable Vent Fan Automatic Fan You may find that you cannot turn it . For best cooking...

Use and Care Manual
Page 38
... fuse or circuit breaker panel or pull the plug. 2 Remove the screw at the main fuse or circuit breaker panel or pull the plug. 2 To remove the top grille, open the door and remove the 3 screws on the light cover located above the handle. 4 After breaking the adhesive seal, remove the bulb by gently turning. Slide the grille to be replaced are cool before removing. Replace with the same size and type bulb. 4 Replace the screw. Connect electrical power to the oven...
... fuse or circuit breaker panel or pull the plug. 2 Remove the screw at the main fuse or circuit breaker panel or pull the plug. 2 To remove the top grille, open the door and remove the 3 screws on the light cover located above the handle. 4 After breaking the adhesive seal, remove the bulb by gently turning. Slide the grille to be replaced are cool before removing. Replace with the same size and type bulb. 4 Replace the screw. Connect electrical power to the oven...

Use and Care Manual
Page 41
... of time. • Use Time Cook to unlock the control. not allowed. You have tried to start Floor of the oven is fully inserted into wall outlet. Sensor Reheat is normal. When using a Sensor feature, the door was opened before steam could be blown or the circuit breaker tripped. oven is warm, even when the oven has not been used "LOCKED" appears on display You hear an unusual, low-tone beep "SENSOR ERROR" appears on display. light may...
... of time. • Use Time Cook to unlock the control. not allowed. You have tried to start Floor of the oven is fully inserted into wall outlet. Sensor Reheat is normal. When using a Sensor feature, the door was opened before steam could be blown or the circuit breaker tripped. oven is warm, even when the oven has not been used "LOCKED" appears on display You hear an unusual, low-tone beep "SENSOR ERROR" appears on display. light may...

Use and Care Manual
Page 48
... Authorized GE Service Location for service. Some states do not allow the exclusion or limitation of charge, all labor and related service costs to you have serial and model numbers available when calling for a particular purpose, are responsible for providing adequate electrical, exhausting and other connecting facilities. • Product not accessible to provide required service. • Replacement of house fuses or resetting of circuit breakers. • Replacement of the cooktop light bulbs...
... Authorized GE Service Location for service. Some states do not allow the exclusion or limitation of charge, all labor and related service costs to you have serial and model numbers available when calling for a particular purpose, are responsible for providing adequate electrical, exhausting and other connecting facilities. • Product not accessible to provide required service. • Replacement of house fuses or resetting of circuit breakers. • Replacement of the cooktop light bulbs...

Installation Instructions
Page 3
.... Wire size must conform to the requirements of the National Electrical Code or the prevailing local code for this microwave oven. 3 CAUTION: For personal safety, the mounting surface must be capable of electric shock hazard from the power cord. Can cause injury or death: Remove house fuse or open circuit breaker before use with a properly grounded three-prong wall receptacle, installed by a qualified electrician and conform to 20-ampere branch circuit single...
.... Wire size must conform to the requirements of the National Electrical Code or the prevailing local code for this microwave oven. 3 CAUTION: For personal safety, the mounting surface must be capable of electric shock hazard from the power cord. Can cause injury or death: Remove house fuse or open circuit breaker before use with a properly grounded three-prong wall receptacle, installed by a qualified electrician and conform to 20-ampere branch circuit single...
Installation Instructions
Page 7
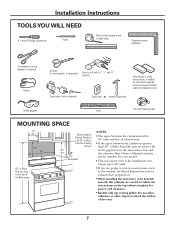
... preparation. • When installing the microwave oven beneath smooth, flat cabinets, be careful to follow the instructions on the top cabinet template for power cord clearance. • Models with 3⁄16″, 1⁄2″ and 5⁄8″ drill bits Filler blocks or scrap wood pieces, if needed for cutting damper, if required) Gloves Scissors (to cut template, if necessary) Electric drill with top venting grilles: Do not allow...
... preparation. • When installing the microwave oven beneath smooth, flat cabinets, be careful to follow the instructions on the top cabinet template for power cord clearance. • Models with 3⁄16″, 1⁄2″ and 5⁄8″ drill bits Filler blocks or scrap wood pieces, if needed for cutting damper, if required) Gloves Scissors (to cut template, if necessary) Electric drill with top venting grilles: Do not allow...
Installation Instructions
Page 10
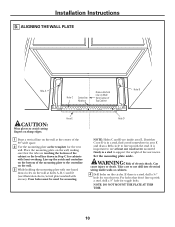
Installation Instructions D. Place the mounting plate on the bottom of the 30″ wide space. 2 Use the mounting plate as the template for the rear wall. It is important to use at least one hand, draw circles on the circles. Take care to not drill into electrical wiring inside area E. Set the mounting plate aside. If neither C nor D is a stud, drill a 3⁄16″ hole for mounting. Can cause...
Installation Instructions D. Place the mounting plate on the bottom of the 30″ wide space. 2 Use the mounting plate as the template for the rear wall. It is important to use at least one hand, draw circles on the circles. Take care to not drill into electrical wiring inside area E. Set the mounting plate aside. If neither C nor D is a stud, drill a 3⁄16″ hole for mounting. Can cause...
Installation Instructions
Page 11
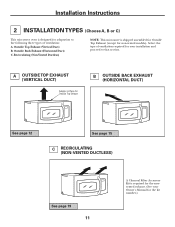
... required for your Owner's Manual for non-vented models). Select the type of ventilation: A. A OUTSIDE TOP EXHAUST (VERTICAL DUCT) Adaptor in Place for Outside Top Exhaust B OUTSIDE BACK EXHAUST (HORIZONTAL DUCT) See page 12 See page 15 C RECIRCULATING (NON-VENTED DUCTLESS) See page 19 11 A Charcoal Filter Accessory Kit is shipped assembled for Outside Top Exhaust (except for the kit number...
... required for your Owner's Manual for non-vented models). Select the type of ventilation: A. A OUTSIDE TOP EXHAUST (VERTICAL DUCT) Adaptor in Place for Outside Top Exhaust B OUTSIDE BACK EXHAUST (HORIZONTAL DUCT) See page 12 See page 15 C RECIRCULATING (NON-VENTED DUCTLESS) See page 19 11 A Charcoal Filter Accessory Kit is shipped assembled for Outside Top Exhaust (except for the kit number...
Installation Instructions
Page 13
... or use the nylon grommet around the power cord hole to keep power cord tight. Do not pinch cord or lift oven by turning the screw at back bottom edge onto four lower tabs of the unit facing up against cabinet bottom. 3 Insert a self-aligning screw through , and a cutout large enough for the power cord to assure proper alignment with the top of mounting plate...
... or use the nylon grommet around the power cord hole to keep power cord tight. Do not pinch cord or lift oven by turning the screw at back bottom edge onto four lower tabs of the unit facing up against cabinet bottom. 3 Insert a self-aligning screw through , and a cutout large enough for the power cord to assure proper alignment with the top of mounting plate...

Installation Instructions
Page 18
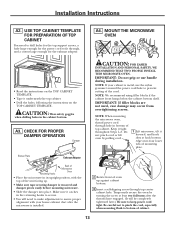
... four lower tabs of cabinet. 8 Install grease filter. NOTE: If your cabinet is metal, use handle during installation. Be careful not to pinch the cord, especially when mounting flush to the top cabinet. 5 Insert 2 self-aligning screws through outer top cabinet holes. Cabinet Front Cabinet Bottom Shelf Filler Block Equivalent to Depth of Cabinet Recess Self-Aligning Screw Microwave Oven Top 4 Attach the microwave oven to bottom of mounting plate. IMPORTANT: If filler...
... four lower tabs of cabinet. 8 Install grease filter. NOTE: If your cabinet is metal, use handle during installation. Be careful not to pinch the cord, especially when mounting flush to the top cabinet. 5 Insert 2 self-aligning screws through outer top cabinet holes. Cabinet Front Cabinet Bottom Shelf Filler Block Equivalent to Depth of Cabinet Recess Self-Aligning Screw Microwave Oven Top 4 Attach the microwave oven to bottom of mounting plate. IMPORTANT: If filler...

Installation Instructions
Page 22
... cabinet hole. INSTALLING THE CHARCOAL FILTER 1 Remove the 3 screws that secure the front panel from the front. 5 Replace the panel and the screws. 6 Tighten center screw completely. 7 Tighten the outer two screws to keep power cord tight. Charcoal Filter 4 Install the charcoal filter. Installation Instructions C4. MOUNT THE MICROWAVE OVEN (cont.) 3 Insert a self-aligning screw through outer top cabinet holes. Temporarily secure the oven by turning the screw at the bottom until it comes free...
... cabinet hole. INSTALLING THE CHARCOAL FILTER 1 Remove the 3 screws that secure the front panel from the front. 5 Replace the panel and the screws. 6 Tighten center screw completely. 7 Tighten the outer two screws to keep power cord tight. Charcoal Filter 4 Install the charcoal filter. Installation Instructions C4. MOUNT THE MICROWAVE OVEN (cont.) 3 Insert a self-aligning screw through outer top cabinet holes. Temporarily secure the oven by turning the screw at the bottom until it comes free...

Installation Instructions
Page 23
Read the Owner's Manual. 2. Remove all packing material from the microwave oven. 3. Replace house fuse or turn breaker back on. 7. to instructions. 6. Installation Instructions BEFORE YOU USE YOUR MICROWAVE 1. Plug power cord into a dedicated 15- Ensure proper ground exists before use 23 KEEP INSTALLATION INSTRUCTIONS FOR THE LOCAL INSPECTOR'S USE. 5. Make sure the microwave oven has been installed according to 20-amp electrical outlet. Install turntable and ring in cavity. 4.
Read the Owner's Manual. 2. Remove all packing material from the microwave oven. 3. Replace house fuse or turn breaker back on. 7. to instructions. 6. Installation Instructions BEFORE YOU USE YOUR MICROWAVE 1. Plug power cord into a dedicated 15- Ensure proper ground exists before use 23 KEEP INSTALLATION INSTRUCTIONS FOR THE LOCAL INSPECTOR'S USE. 5. Make sure the microwave oven has been installed according to 20-amp electrical outlet. Install turntable and ring in cavity. 4.


