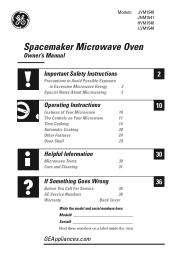
Use and Care Manual
Page 1
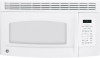
... Automatic Cooking 20 Other Features 24 Oven Shelf 29 Helpful Information 30 Microwave Terms 30 Care and Cleaning 31 If Something Goes Wrong 36 Before You Call For Service 36 GE Service Numbers 38 Warranty Back Cover Write the model and serial numbers here: Model Serial Find these numbers on a label inside the oven.
... Automatic Cooking 20 Other Features 24 Oven Shelf 29 Helpful Information 30 Microwave Terms 30 Care and Cleaning 31 If Something Goes Wrong 36 Before You Call For Service 36 GE Service Numbers 38 Warranty Back Cover Write the model and serial numbers here: Model Serial Find these numbers on a label inside the oven.
Use and Care Manual
Page 10
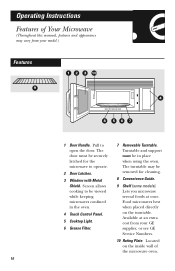
.... 7 Removable Turntable. The turntable may vary from your model.) Features 1 2 3 10 9 4 8 567 1 Door Handle. Located on the turntable. Screen allows cooking to be removed for the microwave to open the door. Lets you microwave several foods at an extra cost from your GE supplier, or see GE Service Numbers. 10 Rating Plate. Available at once...
.... 7 Removable Turntable. The turntable may vary from your model.) Features 1 2 3 10 9 4 8 567 1 Door Handle. Located on the turntable. Screen allows cooking to be removed for the microwave to open the door. Lets you microwave several foods at an extra cost from your GE supplier, or see GE Service Numbers. 10 Rating Plate. Available at once...
Use and Care Manual
Page 11
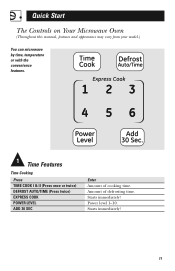
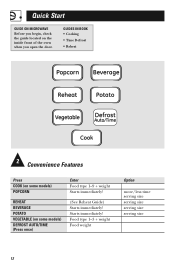
Starts immediately! Power level 1-10. Starts immediately! 11 Quick Start The Controls on Your Microwave Oven (Throughout this manual, features and appearance may vary from your model.) You can microwave by time, temperature or with the convenience features. 1 Time Features Time Cooking Press TIME COOK I & II (Press once or twice) DEFROST AUTO/TIME (Press twice) EXPRESS COOK POWER LEVEL ADD 30 SEC Enter Amount of defrosting time. Amount of cooking time.
Starts immediately! Power level 1-10. Starts immediately! 11 Quick Start The Controls on Your Microwave Oven (Throughout this manual, features and appearance may vary from your model.) You can microwave by time, temperature or with the convenience features. 1 Time Features Time Cooking Press TIME COOK I & II (Press once or twice) DEFROST AUTO/TIME (Press twice) EXPRESS COOK POWER LEVEL ADD 30 SEC Enter Amount of defrosting time. Amount of cooking time.
Use and Care Manual
Page 12
Food type 1-3 + weight Food weight Option more/less time serving size serving size serving size serving size 12 Starts immediately! GUIDES IN BOOK • Cooking • Time Defrost • Reheat 2 Convenience Features Press COOK (on some models) POPCORN REHEAT BEVERAGE POTATO VEGETABLE (on the inside front of the oven when you open the door. Quick Start GUIDE ON MICROWAVE Before you begin, check the guide located on some models) DEFROST AUTO/TIME (Press once) Enter Food type 1-9 + weight Starts immediately! (See Reheat Guide) Starts immediately!
Food type 1-3 + weight Food weight Option more/less time serving size serving size serving size serving size 12 Starts immediately! GUIDES IN BOOK • Cooking • Time Defrost • Reheat 2 Convenience Features Press COOK (on some models) POPCORN REHEAT BEVERAGE POTATO VEGETABLE (on the inside front of the oven when you open the door. Quick Start GUIDE ON MICROWAVE Before you begin, check the guide located on some models) DEFROST AUTO/TIME (Press once) Enter Food type 1-9 + weight Starts immediately! (See Reheat Guide) Starts immediately!
Use and Care Manual
Page 20
...). 3 Enter weight in ounces. 4 Press START. Layer strips on oven floor or turntable. Operating Instructions Convenience Features Cook (On some models) The Cook feature automatically sets the cooking times and power levels for adding water. Cover with vented plastic wrap or wax paper. Pierce ... a plate, 4 to 16 oz. Use oblong, square or round dish. Drain and stir at signal. Add 2 tablespoons water for microwaving. Use microwave-safe casserole or bowl. Use oblong, square or round dish. Cover with vented plastic wrap. Use round casserole dish. Cover with lid or...
...). 3 Enter weight in ounces. 4 Press START. Layer strips on oven floor or turntable. Operating Instructions Convenience Features Cook (On some models) The Cook feature automatically sets the cooking times and power levels for adding water. Cover with vented plastic wrap or wax paper. Pierce ... a plate, 4 to 16 oz. Use oblong, square or round dish. Drain and stir at signal. Add 2 tablespoons water for microwaving. Use microwave-safe casserole or bowl. Use oblong, square or round dish. Cover with vented plastic wrap. Use round casserole dish. Cover with lid or...
Use and Care Manual
Page 21
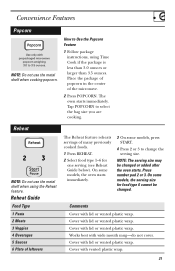
... Plate of leftovers The Reheat feature reheats servings of the microwave. 2 Press POPCORN. Press number pad 2 or 3. Cover with vented plastic wrap. 21 The oven starts immediately. On some models, the oven starts immediately. 3 On some models, the serving size for one serving (see Reheat Guide ...Use the Popcorn Feature 1 Follow package instructions, using the Reheat feature. How to change the serving size. Comments Cover with prepackaged microwave popcorn weighing 3.0 to select the bag size you are cooking. Reheat NOTE: Do not use the metal shelf when cooking popcorn....
... Plate of leftovers The Reheat feature reheats servings of the microwave. 2 Press POPCORN. Press number pad 2 or 3. Cover with vented plastic wrap. 21 The oven starts immediately. On some models, the oven starts immediately. 3 On some models, the serving size for one serving (see Reheat Guide ...Use the Popcorn Feature 1 Follow package instructions, using the Reheat feature. How to change the serving size. Comments Cover with prepackaged microwave popcorn weighing 3.0 to select the bag size you are cooking. Reheat NOTE: Do not use the metal shelf when cooking popcorn....
Use and Care Manual
Page 24
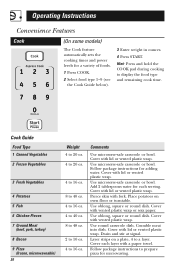
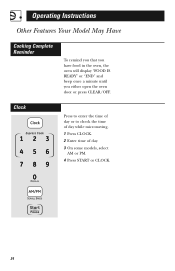
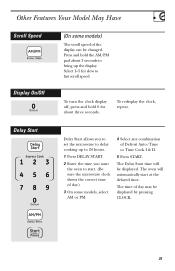
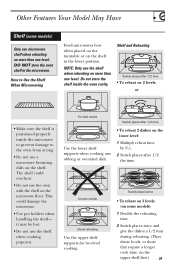
Operating Instructions Other Features Your Model May Have Cooking Complete Reminder To remind you that you have food in the oven, the oven will display "FOOD IS READY" or "END" and beep once a minute until you either open the oven door or press CLEAR/OFF. Clock Press to enter the time of day or to check the time of day while microwaving. 1 Press CLOCK. 2 Enter time of day. 3 On some models, select AM or PM. 4 Press START or CLOCK. 24
Operating Instructions Other Features Your Model May Have Cooking Complete Reminder To remind you that you have food in the oven, the oven will display "FOOD IS READY" or "END" and beep once a minute until you either open the oven door or press CLEAR/OFF. Clock Press to enter the time of day or to check the time of day while microwaving. 1 Press CLOCK. 2 Enter time of day. 3 On some models, select AM or PM. 4 Press START or CLOCK. 24
Use and Care Manual
Page 25
... some models, select AM or PM. 4 Select any combination of Defrost Auto/Time or Time Cook I & II. 5 Press START. Display On/Off To turn the clock display off, press and hold the AM/PM pad about three seconds. The Delay Start time will automatically start . (Be sure the microwave clock ...shows the correct time of day.) 3 On some models) The scroll speed of the display can be displayed by pressing CLOCK. 25 To redisplay the clock, repeat.
... some models, select AM or PM. 4 Select any combination of Defrost Auto/Time or Time Cook I & II. 5 Press START. Display On/Off To turn the clock display off, press and hold the AM/PM pad about three seconds. The Delay Start time will automatically start . (Be sure the microwave clock ...shows the correct time of day.) 3 On some models) The scroll speed of the display can be displayed by pressing CLOCK. 25 To redisplay the clock, repeat.
Use and Care Manual
Page 26
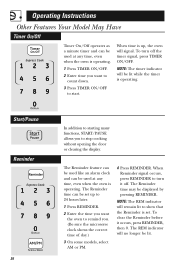
... operating. Start/Pause Reminder 26 In addition to starting many functions, START/PAUSE allows you to remind you. (Be sure the microwave clock shows the correct time of day.) 3 On some models, select AM or PM. 4 Press REMINDER. The Reminder feature can be used like an alarm clock and can be used... opening the door or clearing the display. To turn it occurs, press REMINDER, then 0. The Reminder time can be set . Operating Instructions Other Features Your Model May Have Timer On/Off Timer On/Off operates as a minute timer and can be used at any time, even when the oven is set...
... operating. Start/Pause Reminder 26 In addition to starting many functions, START/PAUSE allows you to remind you. (Be sure the microwave clock shows the correct time of day.) 3 On some models, select AM or PM. 4 Press REMINDER. The Reminder feature can be used like an alarm clock and can be used... opening the door or clearing the display. To turn it occurs, press REMINDER, then 0. The Reminder time can be set . Operating Instructions Other Features Your Model May Have Timer On/Off Timer On/Off operates as a minute timer and can be used at any time, even when the oven is set...
Use and Care Manual
Page 27
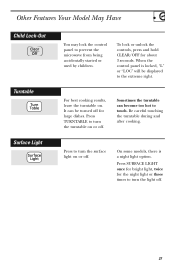
...the controls, press and hold CLEAR/OFF for large dishes. It can become too hot to turn the light off for about 3 seconds. On some models, there is locked, "L" or "LOC" will be turned off . 27 Press SURFACE LIGHT once for bright light, twice for the night light or...careful touching the turntable during and after cooking. When the control panel is a night light option. Press to the extreme right. Other Features Your Model May Have Child Lock-Out Turntable Surface Light You may lock the control panel to turn the surface light on . Press TURNTABLE to prevent the...
...the controls, press and hold CLEAR/OFF for large dishes. It can become too hot to turn the light off for about 3 seconds. On some models, there is locked, "L" or "LOC" will be turned off . 27 Press SURFACE LIGHT once for bright light, twice for the night light or...careful touching the turntable during and after cooking. When the control panel is a night light option. Press to the extreme right. Other Features Your Model May Have Child Lock-Out Turntable Surface Light You may lock the control panel to turn the surface light on . Press TURNTABLE to prevent the...
Use and Care Manual
Page 28
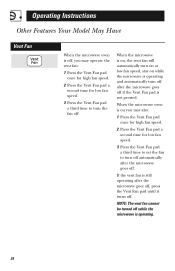
... off if the Vent Fan pad is operating. 28 If the vent fan is still operating after the microwave goes off. When the microwave is on, the vent fan will automatically turn on at low fan speed, stay on you may also: 1 Press the Vent Fan pad once for ... speed. 3 Press the Vent Fan pad a third time to turn off automatically after the microwave goes off, press the Vent Fan pad until it turns off. Operating Instructions Other Features Your Model May Have Vent Fan When the microwave oven is off, you may operate the vent fan: 1 Press the Vent Fan pad...
... off if the Vent Fan pad is operating. 28 If the vent fan is still operating after the microwave goes off. When the microwave is on, the vent fan will automatically turn on at low fan speed, stay on you may also: 1 Press the Vent Fan pad once for ... speed. 3 Press the Vent Fan pad a third time to turn off automatically after the microwave goes off, press the Vent Fan pad until it turns off. Operating Instructions Other Features Your Model May Have Vent Fan When the microwave oven is off, you may operate the vent fan: 1 Press the Vent Fan pad...
Use and Care Manual
Page 29
...use the shelf when cooking popcorn. Shelf and Reheating Switch places after 1/2 time. How to the oven from arcing. • Do not use a microwave browning dish on the shelf. For best results Switch places after 1/2 time. • To reheat on 2 levels or • Make sure the ...Switch places after 1/2 the time. Switch places twice • To reheat on 3 levels (on some models) Only use the oven with the shelf on the microwave floor. The shelf could damage the microwave. • Use pot holders when handling the shelf- Use the lower shelf supports when cooking one level....
...use the shelf when cooking popcorn. Shelf and Reheating Switch places after 1/2 time. How to the oven from arcing. • Do not use a microwave browning dish on the shelf. For best results Switch places after 1/2 time. • To reheat on 2 levels or • Make sure the ...Switch places after 1/2 the time. Switch places twice • To reheat on 3 levels (on some models) Only use the oven with the shelf on the microwave floor. The shelf could damage the microwave. • Use pot holders when handling the shelf- Use the lower shelf supports when cooking one level....
Use and Care Manual
Page 32
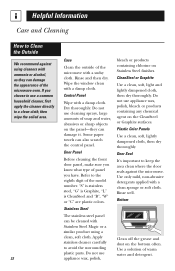
...surfaces. Use only mild, non-abrasive detergents applied with a damp cloth. Use a solution of the model number. Helpful Information Care and Cleaning How to Clean the Outside We recommend against the microwave. If you have. Control Panel Wipe with a sudsy cloth. Do not use a common household cleaner,...Panels Use a clean, soft, lightly dampened cloth, then dry thoroughly. Door Seal It's important to use cleaning sprays, large amounts of the microwave oven. Bottom Clean off the grease and dust on the panel-they can damage it. Refer to avoid the surrounding plastic parts. "S" is ...
...surfaces. Use only mild, non-abrasive detergents applied with a damp cloth. Use a solution of the model number. Helpful Information Care and Cleaning How to Clean the Outside We recommend against the microwave. If you have. Control Panel Wipe with a sudsy cloth. Do not use a common household cleaner,...Panels Use a clean, soft, lightly dampened cloth, then dry thoroughly. Door Seal It's important to use cleaning sprays, large amounts of the microwave oven. Bottom Clean off the grease and dust on the panel-they can damage it. Refer to avoid the surrounding plastic parts. "S" is ...
Use and Care Manual
Page 34
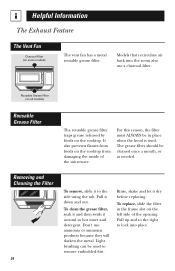
... before replacing. Light brushing can be used . To replace, slide the filter in place when the hood is used to the side using the tab. Models that recirculate air back into place. Pull up and to the right to lock into the room also use ammonia or ammonia products because they... the inside of the opening. Rinse, shake and let it down and out. It also prevents flames from foods on the left side of the microwave. For this reason, the filter must ALWAYS be cleaned once a month, or as needed. To clean the grease filter, soak it and then swish it...
... before replacing. Light brushing can be used . To replace, slide the filter in place when the hood is used to the side using the tab. Models that recirculate air back into place. Pull up and to the right to lock into the room also use ammonia or ammonia products because they... the inside of the opening. Rinse, shake and let it down and out. It also prevents flames from foods on the left side of the microwave. For this reason, the filter must ALWAYS be cleaned once a month, or as needed. To clean the grease filter, soak it and then swish it...
Use and Care Manual
Page 40
... you may be required to bring the product to the original purchaser and any part in the microwave oven Service Centers or by law. Any implied warranties, including the implied warranties of merchantability or ...affairs office or your home. This warranty is not available, you may be provided by our Factory GE will provide, free of the product or damage to the product if it is needed to a... gives you specific legal rights, and you may not apply to you have serial and model numbers available when calling for a trip charge or you how to state. What Is Covered LIMITED ONE...
... you may be required to bring the product to the original purchaser and any part in the microwave oven Service Centers or by law. Any implied warranties, including the implied warranties of merchantability or ...affairs office or your home. This warranty is not available, you may be provided by our Factory GE will provide, free of the product or damage to the product if it is needed to a... gives you specific legal rights, and you may not apply to you have serial and model numbers available when calling for a trip charge or you how to state. What Is Covered LIMITED ONE...


