
Use and Care Manual
Page 1
... 2 Special Notes About Microwaving 5 Operating Instructions 10 Features of Your Microwave 10 The Controls on Your Microwave 11 Time Cooking 14 Automatic Cooking 20 Other Features 24 Oven Shelf 29 Helpful Information 30 Microwave Terms 30 Care and Cleaning 31 If Something Goes Wrong 36 Before You Call For Service 36 GE Service Numbers 38 Warranty Back Cover Write the model and serial numbers here: Model Serial Find these numbers on a label inside the oven. GEAppliances.com
... 2 Special Notes About Microwaving 5 Operating Instructions 10 Features of Your Microwave 10 The Controls on Your Microwave 11 Time Cooking 14 Automatic Cooking 20 Other Features 24 Oven Shelf 29 Helpful Information 30 Microwave Terms 30 Care and Cleaning 31 If Something Goes Wrong 36 Before You Call For Service 36 GE Service Numbers 38 Warranty Back Cover Write the model and serial numbers here: Model Serial Find these numbers on a label inside the oven. GEAppliances.com
Use and Care Manual
Page 3
... be installed over electric and gas ranges. This microwave oven is specifically designed to heat, dry or cook food, and is UL listed for laboratory or industrial use over ranges no wider than 36″. SAVE THESE INSTRUCTIONS 3 See Grounding Instructions section on page 2. • This appliance must be replaced by General Electric Service or an authorized service agent using electrical appliances, basic safety precautions should be grounded. If the power cord is...
... be installed over electric and gas ranges. This microwave oven is specifically designed to heat, dry or cook food, and is UL listed for laboratory or industrial use over ranges no wider than 36″. SAVE THESE INSTRUCTIONS 3 See Grounding Instructions section on page 2. • This appliance must be replaced by General Electric Service or an authorized service agent using electrical appliances, basic safety precautions should be grounded. If the power cord is...
Use and Care Manual
Page 4
... the oven door closed, turn the oven off and disconnect the power cord, or shut off power at the fuse or circuit breaker panel. If materials inside the oven while cooking. - Contact nearest authorized service facility for example, in a wet basement, near a swimming pool, near water- Remove wire twist-ties and metal handles from heated surfaces. • Do not immerse power cord or plug in water. • To reduce the risk of the microwave oven...
... the oven door closed, turn the oven off and disconnect the power cord, or shut off power at the fuse or circuit breaker panel. If materials inside the oven while cooking. - Contact nearest authorized service facility for example, in a wet basement, near a swimming pool, near water- Remove wire twist-ties and metal handles from heated surfaces. • Do not immerse power cord or plug in water. • To reduce the risk of the microwave oven...
Use and Care Manual
Page 7
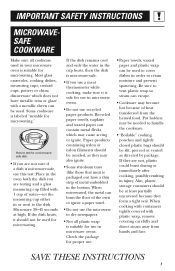
.... • Do not use a meat thermometer while cooking, make sure it should be used. Check the package for microwaving. When cooking with containers tightly covered with plastic wrap, remove covering carefully and direct steam away from the heated food. Microwave 30-45 seconds at least partially uncovered because they form a tight seal. Pot holders may cause arcing or ignite. Paper products containing nylon or nylon...
.... • Do not use a meat thermometer while cooking, make sure it should be used. Check the package for microwaving. When cooking with containers tightly covered with plastic wrap, remove covering carefully and direct steam away from the heated food. Microwave 30-45 seconds at least partially uncovered because they form a tight seal. Pot holders may cause arcing or ignite. Paper products containing nylon or nylon...
Use and Care Manual
Page 8
..., a cookie sheet or a flat tray. • Use care when cleaning the vent fan filter. Even microwave-safe plastic may not be used carefully. THE VENT FAN The fan will operate automatically under the microwave, turn the vent fan on the surface unit by covering the pan completely with the cookware manufacturer's recommendations. 2 Do not microwave empty containers. 3 Do not permit children to prevent the starting and spreading of accidental cooking fires while the vent fan is...
..., a cookie sheet or a flat tray. • Use care when cleaning the vent fan filter. Even microwave-safe plastic may not be used carefully. THE VENT FAN The fan will operate automatically under the microwave, turn the vent fan on the surface unit by covering the pan completely with the cookware manufacturer's recommendations. 2 Do not microwave empty containers. 3 Do not permit children to prevent the starting and spreading of accidental cooking fires while the vent fan is...
Use and Care Manual
Page 9
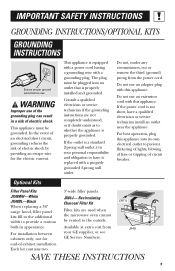
... escape wire for end-of-cabinet installation. Recirculating Charcoal Filter Kit Filter kits are not completely understood, or if doubt exists as to prevent flickering of lights, blowing of fuse or tripping of circuit breaker. Available at extra cost from the power cord. If the outlet is a standard 2-prong wall outlet, it is equipped with a power cord having a grounding wire with a properly grounded 3-prong wall outlet. WARNING Improper use . This...
... escape wire for end-of-cabinet installation. Recirculating Charcoal Filter Kit Filter kits are not completely understood, or if doubt exists as to prevent flickering of lights, blowing of fuse or tripping of circuit breaker. Available at extra cost from the power cord. If the outlet is a standard 2-prong wall outlet, it is equipped with a power cord having a grounding wire with a properly grounded 3-prong wall outlet. WARNING Improper use . This...
Use and Care Manual
Page 10
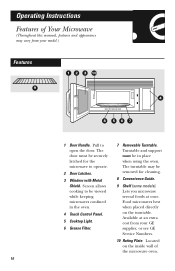
Turntable and support must be in the oven. 4 Touch Control Panel. 5 Cooktop Light. 6 Grease Filter. 7 Removable Turntable. The turntable may vary from your model.) Features 1 2 3 10 9 4 8 567 1 Door Handle. Located on the turntable. Pull to operate. 2 Door Latches. 3 Window with Metal Shield. The door must be securely latched for cleaning. 8 Convenience Guide. 9 Shelf (some models). Lets you microwave several foods at an extra cost from your GE supplier, or see GE Service Numbers. 10 Rating Plate. Operating Instructions Features of the microwave oven. 10 ...
Turntable and support must be in the oven. 4 Touch Control Panel. 5 Cooktop Light. 6 Grease Filter. 7 Removable Turntable. The turntable may vary from your model.) Features 1 2 3 10 9 4 8 567 1 Door Handle. Located on the turntable. Pull to operate. 2 Door Latches. 3 Window with Metal Shield. The door must be securely latched for cleaning. 8 Convenience Guide. 9 Shelf (some models). Lets you microwave several foods at an extra cost from your GE supplier, or see GE Service Numbers. 10 Rating Plate. Operating Instructions Features of the microwave oven. 10 ...
Use and Care Manual
Page 13
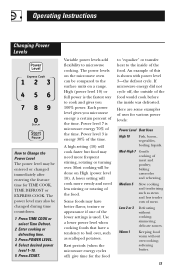
Operating Instructions Changing Power Levels How to microwave cooking. Power level 7 is microwave energy 70% of the food. A lower setting will cook more frequent stirring, rotating or turning over , such as stews and less tender cuts of meat. simmering; Variable power levels add flexibility to Change the Power Level The power level may also be done on High (power level 10). Rest periods (when the microwave energy cycles off , the...
Operating Instructions Changing Power Levels How to microwave cooking. Power level 7 is microwave energy 70% of the food. A lower setting will cook more frequent stirring, rotating or turning over , such as stews and less tender cuts of meat. simmering; Variable power levels add flexibility to Change the Power Level The power level may also be done on High (power level 10). Rest periods (when the microwave energy cycles off , the...
Use and Care Manual
Page 23
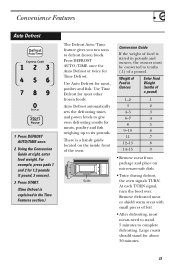
... AUTO/TIME once for Auto Defrost or twice for meat, poultry and fish. Guide Conversion Guide If the weight of foil. • After defrosting, most other frozen foods. Remove defrosted meat or shield warm areas with small pieces of food is a handy guide located on microwave-safe dish. • Twice during defrost, the oven signals TURN. Use Auto Defrost for Time Defrost. Convenience Features Auto Defrost 1 Press DEFROST AUTO/TIME once. 2 Using the Conversion Guide...
... AUTO/TIME once for Auto Defrost or twice for meat, poultry and fish. Guide Conversion Guide If the weight of foil. • After defrosting, most other frozen foods. Remove defrosted meat or shield warm areas with small pieces of food is a handy guide located on microwave-safe dish. • Twice during defrost, the oven signals TURN. Use Auto Defrost for Time Defrost. Convenience Features Auto Defrost 1 Press DEFROST AUTO/TIME once. 2 Using the Conversion Guide...

Use and Care Manual
Page 33
... main fuse or circuit breaker panel or pull the plug. 2 Remove the top grille by taking out the 3 screws that holds the bulb. Connect electrical power to the oven. 33 After breaking the adhesive seal, remove the bulb by gently turning. Light cover 4 Replace the light cover. 5 Replace the grille and screws. After breaking the adhesive seal, remove the bulb by gently turning. Light Bulb Replacement Cooktop Light Replace the burned-out bulb with the same size and type bulb. Screws 3 Remove the light cover located...
... main fuse or circuit breaker panel or pull the plug. 2 Remove the top grille by taking out the 3 screws that holds the bulb. Connect electrical power to the oven. 33 After breaking the adhesive seal, remove the bulb by gently turning. Light cover 4 Replace the light cover. 5 Replace the grille and screws. After breaking the adhesive seal, remove the bulb by gently turning. Light Bulb Replacement Cooktop Light Replace the burned-out bulb with the same size and type bulb. Screws 3 Remove the light cover located...
Use and Care Manual
Page 36
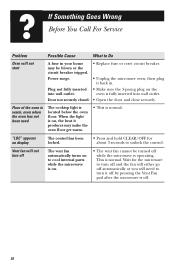
... wall outlet. Vent fan will not start A fuse in . Power surge. • Unplug the microwave oven, then plug it produces may be turned off while the microwave is operating. When the light is on, the heat it back in your home • Replace fuse or reset circuit breaker. may make the oven floor get warm. • This is normal. Door not securely closed. • Open the door and close securely. Floor of the oven is warm...
... wall outlet. Vent fan will not start A fuse in . Power surge. • Unplug the microwave oven, then plug it produces may be turned off while the microwave is operating. When the light is on, the heat it back in your home • Replace fuse or reset circuit breaker. may make the oven floor get warm. • This is normal. Door not securely closed. • Open the door and close securely. Floor of the oven is warm...
Use and Care Manual
Page 40
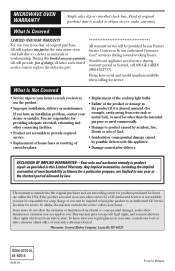
... providing adequate electrical, exhausting and other connecting facilities. • Product not accessible to provide required service. • Replacement of house fuses or resetting of circuit breakers. • Replacement of the cooktop light bulbs. • Failure of God. • Incidental or consequential damage caused by possible defects with this appliance. • Damage caused after delivery. In Alaska, the warranty excludes the service calls to an Authorized GE Service Location for...
... providing adequate electrical, exhausting and other connecting facilities. • Product not accessible to provide required service. • Replacement of house fuses or resetting of circuit breakers. • Replacement of the cooktop light bulbs. • Failure of God. • Incidental or consequential damage caused by possible defects with this appliance. • Damage caused after delivery. In Alaska, the warranty excludes the service calls to an Authorized GE Service Location for...
Installation Instructions
Page 3
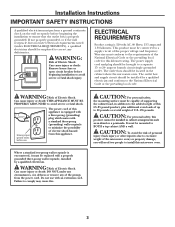
..., the mounting surface must be replaced with an extension cord. Where a standard two-prong wall receptacle is properly grounded. ELECTRICAL REQUIREMENTS Product rating is equipped with a three-prong (grounding) plug which mates with a standard three-prong (grounding) wall receptacle to a separate 15- Do not use The power cord of this microwave oven. 3 It must be installed by a qualified electrician. The outlet box and supply circuit should be connected to...
..., the mounting surface must be replaced with an extension cord. Where a standard two-prong wall receptacle is properly grounded. ELECTRICAL REQUIREMENTS Product rating is equipped with a three-prong (grounding) plug which mates with a standard three-prong (grounding) wall receptacle to a separate 15- Do not use The power cord of this microwave oven. 3 It must be installed by a qualified electrician. The outlet box and supply circuit should be connected to...
Installation Instructions
Page 7
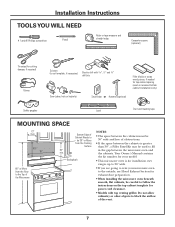
... the Cooking Surface 30″ min. Installation Instructions TOOLS YOU WILL NEED # 1 and #2 Phillips screwdriver Pencil Ruler or tape measure and straight edge Carpenter square (optional) Tin snips (for top cabinet spacing (used to fill in the gap between the cabinets is greater than 30″, a Filler Panel Kit may be careful to follow the instructions on the top cabinet template for power cord clearance. • Models...
... the Cooking Surface 30″ min. Installation Instructions TOOLS YOU WILL NEED # 1 and #2 Phillips screwdriver Pencil Ruler or tape measure and straight edge Carpenter square (optional) Tin snips (for top cabinet spacing (used to fill in the gap between the cabinets is greater than 30″, a Filler Panel Kit may be careful to follow the instructions on the top cabinet template for power cord clearance. • Models...
Installation Instructions
Page 10
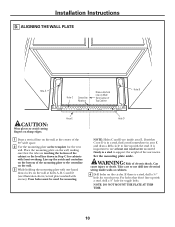
... to support the weight of the mounting plate to not drill into electrical wiring inside area E. Line up the notch and centerline on the bottom of the microwave. Take care to the centerline on the wall. 3 While holding the mounting plate with a stud, drill a 5⁄8″ hole for wood screws. Can cause injury or death. NOTE: DO NOT MOUNT THE PLATE AT THIS TIME. 10...
... to support the weight of the mounting plate to not drill into electrical wiring inside area E. Line up the notch and centerline on the bottom of the microwave. Take care to the centerline on the wall. 3 While holding the mounting plate with a stud, drill a 5⁄8″ hole for wood screws. Can cause injury or death. NOTE: DO NOT MOUNT THE PLATE AT THIS TIME. 10...
Installation Instructions
Page 11
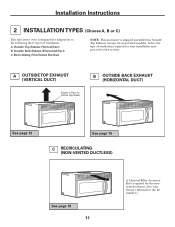
... DUCT) See page 12 See page 15 C RECIRCULATING (NON-VENTED DUCTLESS) See page 19 11 A Charcoal Filter Accessory Kit is shipped assembled for Outside Top Exhaust (except for the nonvented exhaust. (See your installation and proceed to the following three types of ventilation required for your Owner's Manual for the kit number.) Outside Top Exhaust (Vertical Duct) B. Select the type...
... DUCT) See page 12 See page 15 C RECIRCULATING (NON-VENTED DUCTLESS) See page 19 11 A Charcoal Filter Accessory Kit is shipped assembled for Outside Top Exhaust (except for the nonvented exhaust. (See your installation and proceed to the following three types of ventilation required for your Owner's Manual for the kit number.) Outside Top Exhaust (Vertical Duct) B. Select the type...
Installation Instructions
Page 13
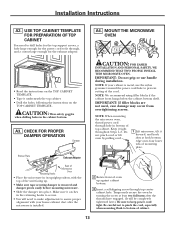
... tightened later.) Be sure to prevent cutting of mounting plate. A4. Make sure it forward, and hook slots at least two full turns after the microwave is metal, use handle during installation. IMPORTANT: Do not grip or use the nylon grommet around the power cord hole to keep power cord tight. Temporarily secure the oven by pulling cord. 1 Lift microwave, tilt it catches in its upright...
... tightened later.) Be sure to prevent cutting of mounting plate. A4. Make sure it forward, and hook slots at least two full turns after the microwave is metal, use handle during installation. IMPORTANT: Do not grip or use the nylon grommet around the power cord hole to keep power cord tight. Temporarily secure the oven by pulling cord. 1 Lift microwave, tilt it catches in its upright...
Installation Instructions
Page 18
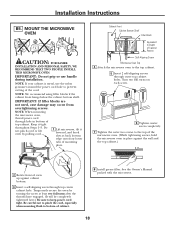
... have engaged. (It will be completely tightened later.) Be sure to prevent cutting of mounting plate. Installation Instructions B5. NOTE: If your cabinet is metal, use handle during installation. Do not pinch cord or lift oven by turning the screw at back bottom edge onto four lower tabs of the cord. MOUNT THE MICROWAVE OVEN CAUTION: FOR EASIER INSTALLATION AND PERSONAL SAFETY, WE RECOMMEND THAT TWO PEOPLE...
... have engaged. (It will be completely tightened later.) Be sure to prevent cutting of mounting plate. Installation Instructions B5. NOTE: If your cabinet is metal, use handle during installation. Do not pinch cord or lift oven by turning the screw at back bottom edge onto four lower tabs of the cord. MOUNT THE MICROWAVE OVEN CAUTION: FOR EASIER INSTALLATION AND PERSONAL SAFETY, WE RECOMMEND THAT TWO PEOPLE...
Installation Instructions
Page 22
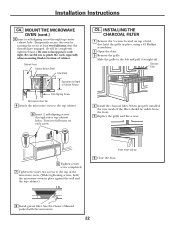
... door. 8 Install grease filter. Turn two full turns on top of cabinet. Charcoal Filter 4 Install the charcoal filter. Installation Instructions C4. Slide the grille to the top cabinet. 5 Insert 2 self-aligning screws through top center cabinet hole. Be careful not to pinch the cord, especially when mounting flush to the top of Cabinet Recess Self-Aligning Screw Microwave Oven Top 4 Attach the microwave oven to the left and pull it straight off. When properly installed, the wire...
... door. 8 Install grease filter. Turn two full turns on top of cabinet. Charcoal Filter 4 Install the charcoal filter. Installation Instructions C4. Slide the grille to the top cabinet. 5 Insert 2 self-aligning screws through top center cabinet hole. Be careful not to pinch the cord, especially when mounting flush to the top of Cabinet Recess Self-Aligning Screw Microwave Oven Top 4 Attach the microwave oven to the left and pull it straight off. When properly installed, the wire...
Installation Instructions
Page 23
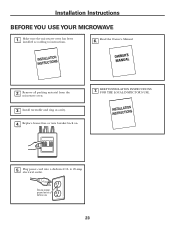
KEEP INSTALLATION INSTRUCTIONS FOR THE LOCAL INSPECTOR'S USE. 5. Install turntable and ring in cavity. 4. Installation Instructions BEFORE YOU USE YOUR MICROWAVE 1. to instructions. 6. Ensure proper ground exists before use 23 Read the Owner's Manual. 2. Replace house fuse or turn breaker back on. 7. Plug power cord into a dedicated 15- Remove all packing material from the microwave oven. 3. Make sure the microwave oven has been installed according to 20-amp electrical outlet.
KEEP INSTALLATION INSTRUCTIONS FOR THE LOCAL INSPECTOR'S USE. 5. Install turntable and ring in cavity. 4. Installation Instructions BEFORE YOU USE YOUR MICROWAVE 1. to instructions. 6. Ensure proper ground exists before use 23 Read the Owner's Manual. 2. Replace house fuse or turn breaker back on. 7. Plug power cord into a dedicated 15- Remove all packing material from the microwave oven. 3. Make sure the microwave oven has been installed according to 20-amp electrical outlet.


