Use and Care Manual
Page 1
...the left side, near the top of the refrigerator compartment. Note to Consumer - Note to Installer - Nota al consumidor - Asegúrese de dejar estas instrucciones con el consumidor. Nota al instalador - Note au consommateur - Refr Top-Freezer igerators GEAppliances.com Safety Instructions 2-4...estas instrucciones para referencia futura. 197D7733P001 49-60505-2 04-09 JR Be sure to Install the Refrigerator 12 Reversing the Door Swing . . . .21-25 Water Line Installation 17-21 Troubleshooting Tips 26-29 Normal Operating Sounds 26 Consumer Support Consumer Support . . . . ....
...the left side, near the top of the refrigerator compartment. Note to Consumer - Note to Installer - Nota al consumidor - Asegúrese de dejar estas instrucciones con el consumidor. Nota al instalador - Note au consommateur - Refr Top-Freezer igerators GEAppliances.com Safety Instructions 2-4...estas instrucciones para referencia futura. 197D7733P001 49-60505-2 04-09 JR Be sure to Install the Refrigerator 12 Reversing the Door Swing . . . .21-25 Water Line Installation 17-21 Troubleshooting Tips 26-29 Normal Operating Sounds 26 Consumer Support Consumer Support . . . . ....
Use and Care Manual
Page 2
... is plugged in the refrigerator. Use this appliance only for its intended purpose as described in this or any servicing be properly installed and located in the vicinity of this Owner's Manual. Be careful closing doors when children are in the freezer compartment when hands are... USING. Skin may stick to these extremely cold surfaces. ■ Do not store or use gasoline or other appliance. ■ In refrigerators with automatic icemakers, avoid contact with the moving parts of the ejector mechanism, or with the Installation Instructions before cleaning and making repairs....
... is plugged in the refrigerator. Use this appliance only for its intended purpose as described in this or any servicing be properly installed and located in the vicinity of this Owner's Manual. Be careful closing doors when children are in the freezer compartment when hands are... USING. Skin may stick to these extremely cold surfaces. ■ Do not store or use gasoline or other appliance. ■ In refrigerators with automatic icemakers, avoid contact with the moving parts of the ejector mechanism, or with the Installation Instructions before cleaning and making repairs....

Use and Care Manual
Page 3
Safety Instructions Operating Instructions Installation Instructions Troubleshooting Tips Consumer Support GEAppliances.com DANGER! Before You Throw Away Your Old Refrigerator or Freezer: Refrigerants All refrigeration products contain refrigerants, which under certain conditions, we strongly recommend against the use an extension cord, it is absolutely necessary that it be removed prior to product disposal. ...
Safety Instructions Operating Instructions Installation Instructions Troubleshooting Tips Consumer Support GEAppliances.com DANGER! Before You Throw Away Your Old Refrigerator or Freezer: Refrigerants All refrigeration products contain refrigerants, which under certain conditions, we strongly recommend against the use an extension cord, it is absolutely necessary that it be removed prior to product disposal. ...
Use and Care Manual
Page 4
...house wiring circuits which could cause a fire hazard from the wall, be careful not to make sure the outlet is your refrigerator by a qualified electrician to roll over or damage the power cord. Never unplug your personal responsibility and obligation to minimize the...be plugged into its own individual electrical outlet which mates with a properly grounded 3-prong wall outlet. SAVE THESE INSTRUCTIONS 4 When moving the refrigerator away from overheated wires. For personal safety, this appliance is equipped with a 3-prong (grounding) plug which has a voltage rating that...
...house wiring circuits which could cause a fire hazard from the wall, be careful not to make sure the outlet is your refrigerator by a qualified electrician to roll over or damage the power cord. Never unplug your personal responsibility and obligation to minimize the...be plugged into its own individual electrical outlet which mates with a properly grounded 3-prong wall outlet. SAVE THESE INSTRUCTIONS 4 When moving the refrigerator away from overheated wires. For personal safety, this appliance is equipped with a 3-prong (grounding) plug which has a voltage rating that...
Use and Care Manual
Page 5
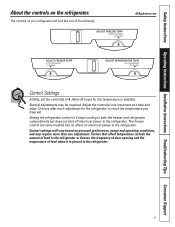
...(s) at a time and allow 12 hours after each adjustment for the temperature to stabilize. Factors that affect temperature include the amount of food in the refrigerator or freezer, the frequency of door opening and the temperature of the following: GEAppliances.com 4 4 4 Control Settings Initially, set . Safety Instructions Operating Instructions Installation Instructions Troubleshooting...
...(s) at a time and allow 12 hours after each adjustment for the temperature to stabilize. Factors that affect temperature include the amount of food in the refrigerator or freezer, the frequency of door opening and the temperature of the following: GEAppliances.com 4 4 4 Control Settings Initially, set . Safety Instructions Operating Instructions Installation Instructions Troubleshooting...
Use and Care Manual
Page 6
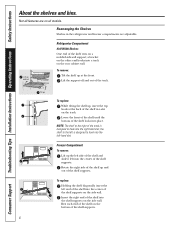
... the shelf supports on the rear cabinet wall. Tilt up To replace: While tilting the shelf up at the back of the shelf in the refrigerator and freezer compartments are on the bottom of the shelf supports. Insert the right end of the shelf into the center of the shelf supports. 6 a ...bracket on the other end hooks into the center of the track. To remove: Tilt the shelf up , insert the top hook at the front. Consumer Support ...
... the shelf supports on the rear cabinet wall. Tilt up To replace: While tilting the shelf up at the back of the shelf in the refrigerator and freezer compartments are on the bottom of the shelf supports. Insert the right end of the shelf into the center of the shelf supports. 6 a ...bracket on the other end hooks into the center of the track. To remove: Tilt the shelf up , insert the top hook at the front. Consumer Support ...
Use and Care Manual
Page 8
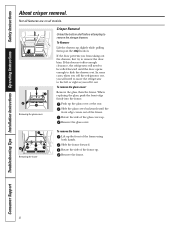
...side of the frame up the front of the frame. If this does not offer enough clearance, the refrigerator will need to be rolled forward until the front edge comes out of the frame using both hands.... the bottom shelf before attempting to the left or right as you will need to move the refrigerator to remove the storage drawers. To Remove: Lift the drawers up the glass cover at the rear. ...In some cases, when you roll the refrigerator out, you roll it out. Removing the frame To remove the frame: Lift up . Push up slightly...
...side of the frame up the front of the frame. If this does not offer enough clearance, the refrigerator will need to be rolled forward until the front edge comes out of the frame using both hands.... the bottom shelf before attempting to the left or right as you will need to move the refrigerator to remove the storage drawers. To Remove: Lift the drawers up the glass cover at the rear. ...In some cases, when you roll the refrigerator out, you roll it out. Removing the frame To remove the frame: Lift up . Push up slightly...
Use and Care Manual
Page 9
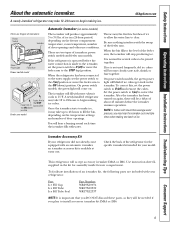
... Part Number WR29X10074 WR17X12339 WR17X12337 NOTE: It is important that you may take 12 to 24 hours to 31⁄2 lbs. If the refrigerator is operated before the icemaker resumes operation. To correct this, set the power switch to restart the icemaker. Safety Instructions Operating Instructions Installation ...the ON (down ) position Feeler arm model Automatic Icemaker (on ) to the I (on some models) The icemaker will come equipped with your refrigerator did not already come on the freezer compartment temperature, room temperature, number of ice in (up ) position.
... Part Number WR29X10074 WR17X12339 WR17X12337 NOTE: It is important that you may take 12 to 24 hours to 31⁄2 lbs. If the refrigerator is operated before the icemaker resumes operation. To correct this, set the power switch to restart the icemaker. Safety Instructions Operating Instructions Installation ...the ON (down ) position Feeler arm model Automatic Icemaker (on ) to the I (on some models) The icemaker will come equipped with your refrigerator did not already come on the freezer compartment temperature, room temperature, number of ice in (up ) position.
Use and Care Manual
Page 10
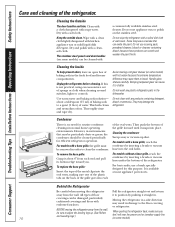
...result in the fresh food and freezer compartments. Unplug the refrigerator before cleaning. This both cleans and neutralizes odors. Handle glass shelves carefully. Do not wash any products containing detergent, bleach or ammonia. Behind the Refrigerator Be careful when moving the refrigerator away from the wall. Cleaning ...Do not clean with a clean, soft cloth. However, in normal home operating environments. To replace the base grille: Insert the tops of the metal clips into the oval vents, making sure one of the plastic tabs on the stainless steel. All types of sponge...
...result in the fresh food and freezer compartments. Unplug the refrigerator before cleaning. This both cleans and neutralizes odors. Handle glass shelves carefully. Do not wash any products containing detergent, bleach or ammonia. Behind the Refrigerator Be careful when moving the refrigerator away from the wall. Cleaning ...Do not clean with a clean, soft cloth. However, in normal home operating environments. To replace the base grille: Insert the tops of the metal clips into the oval vents, making sure one of the plastic tabs on the stainless steel. All types of sponge...
Use and Care Manual
Page 11
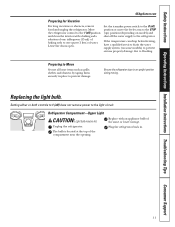
...Replacing the light bulb. Plug the refrigerator back in an upright position during moving. Setting either ...water supply to prevent damage. Move the refrigerator control to the 1 (off ) position ...light circuit. Be sure the refrigerator stays in . 11 Set the icemaker power switch ...appliance bulb of water. Refrigerator Compartment-Upper Light CAUTION: Light bulb may be hot. Unplug the refrigerator. Replace with a baking...taping them securely in place to the refrigerator. Safety Instructions Operating Instructions Installation Instructions Troubleshooting...
...Replacing the light bulb. Plug the refrigerator back in an upright position during moving. Setting either ...water supply to prevent damage. Move the refrigerator control to the 1 (off ) position ...light circuit. Be sure the refrigerator stays in . 11 Set the icemaker power switch ...appliance bulb of water. Refrigerator Compartment-Upper Light CAUTION: Light bulb may be hot. Unplug the refrigerator. Replace with a baking...taping them securely in place to the refrigerator. Safety Instructions Operating Instructions Installation Instructions Troubleshooting...
Use and Care Manual
Page 12
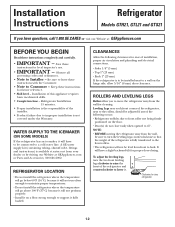
...circulation and plumbing and electrical connections. • Sides 1/8″ (3 mm) • Top 1″ (25 mm) • Back 1″ (25 mm) If the refrigerator is fully transferred to the front rollers. • The refrigerator will have a slight backward tilt for proper door-closing. Save these instructions for future ... raise the front of the following clearances for ease of the refrigerator, next to the rollers, should be installed next to a wall on the hinge side, allow you have questions, call 1.800.GE.CARES or visit our Website at GEAppliances.com or Parts and Accessories...
...circulation and plumbing and electrical connections. • Sides 1/8″ (3 mm) • Top 1″ (25 mm) • Back 1″ (25 mm) If the refrigerator is fully transferred to the front rollers. • The refrigerator will have a slight backward tilt for proper door-closing. Save these instructions for future ... raise the front of the following clearances for ease of the refrigerator, next to the rollers, should be installed next to a wall on the hinge side, allow you have questions, call 1.800.GE.CARES or visit our Website at GEAppliances.com or Parts and Accessories...
Use and Care Manual
Page 13
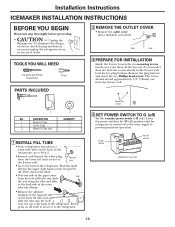
... extend approximately 1/2″ (13mm) out from its electrical outlet. To eliminate the danger of electric shock during installation, you must unplug the refrigerator from the freezer wall. 1 Mounting screws 2 NO. Then discard the label. • Peel one side of the paper away Seal from the lower left...the adhesive backing on the opposite side of the water fill tube seal and slide the tube into the hole near the top at the back of the freezer wall. Remove the plug buttons and insert the two Phillips head screws. Power Switch Hole for two plug buttons. DESCRIPTION...
... extend approximately 1/2″ (13mm) out from its electrical outlet. To eliminate the danger of electric shock during installation, you must unplug the refrigerator from the freezer wall. 1 Mounting screws 2 NO. Then discard the label. • Peel one side of the paper away Seal from the lower left...the adhesive backing on the opposite side of the water fill tube seal and slide the tube into the hole near the top at the back of the freezer wall. Remove the plug buttons and insert the two Phillips head screws. Power Switch Hole for two plug buttons. DESCRIPTION...
Use and Care Manual
Page 14
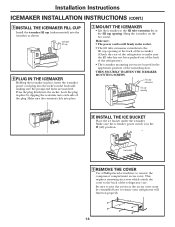
... power cord plug into the socket on the two screws. Ice bucket 9 REMOVE THE COVER Use a Phillips head screwdriver to the back of the refrigerator). • The icemaker mounting screws are matched. Make sure: • The power cord is in the uppermost position of the plug. THEN SECURELY...ICEMAKER FILL CUP Install the icemaker fill cup (side-mounted) into the icemaker as the access cover must be reinstalled later to ensure your refrigerator will function properly. 14 Icemaker fill cup 6 PLUG IN THE ICEMAKER Holding the icemaker in place by clipping the restraints onto each side ...
... power cord plug into the socket on the two screws. Ice bucket 9 REMOVE THE COVER Use a Phillips head screwdriver to the back of the refrigerator). • The icemaker mounting screws are matched. Make sure: • The power cord is in the uppermost position of the plug. THEN SECURELY...ICEMAKER FILL CUP Install the icemaker fill cup (side-mounted) into the icemaker as the access cover must be reinstalled later to ensure your refrigerator will function properly. 14 Icemaker fill cup 6 PLUG IN THE ICEMAKER Holding the icemaker in place by clipping the restraints onto each side ...
Use and Care Manual
Page 15
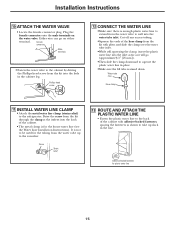
... • Locate the female connector plug. Either wire can go (approximately 1″ [25 mm]). • Then slide the clamp downward to take up to the refrigerator. Screw Strain relief 13 ROUTE AND ATTACH THE PLASTIC WATER LINE • Fasten the plastic water line to the back of the hose clamp from...
... • Locate the female connector plug. Either wire can go (approximately 1″ [25 mm]). • Then slide the clamp downward to take up to the refrigerator. Screw Strain relief 13 ROUTE AND ATTACH THE PLASTIC WATER LINE • Fasten the plastic water line to the back of the hose clamp from...
Use and Care Manual
Page 16
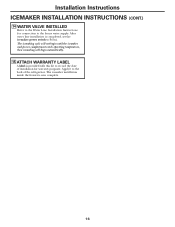
... to the Water Line Installation Instructions for warranty purposes. The icemaker installation inside the freezer is completed, set the icemaker power switch to record the date of the refrigerator. The icemaking cycle will not begin until the icemaker and freezer compartment reach operating temperature, then icemaking will begin automatically. 15 ATTACH WARRANTY LABEL...
... to the Water Line Installation Instructions for warranty purposes. The icemaker installation inside the freezer is completed, set the icemaker power switch to record the date of the refrigerator. The icemaking cycle will not begin until the icemaker and freezer compartment reach operating temperature, then icemaking will begin automatically. 15 ATTACH WARRANTY LABEL...
Use and Care Manual
Page 17
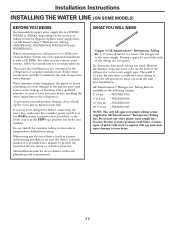
... line, make sure the icemaker power switch is in GE SmartConnect™ Refrigerator Tubing kits. WHAT YOU WILL NEED • Copper or GE SmartConnect™ Refrigerator Tubing kit, 1/4″ outer diameter to connect the refrigerator to water leakage or flooding. Then add 8′ ... water supply pipe. Follow these instructions carefully to prevent the hazard of expensive water damage. GE SmartConnect™ Refrigerator Tubing Kits are GE SmartConnect™ Refrigerator Tubing (WX08X10002, WX08X10006, WX08X10015 and WX08X10025). This water line installation is under pressure at ...
... line, make sure the icemaker power switch is in GE SmartConnect™ Refrigerator Tubing kits. WHAT YOU WILL NEED • Copper or GE SmartConnect™ Refrigerator Tubing kit, 1/4″ outer diameter to connect the refrigerator to water leakage or flooding. Then add 8′ ... water supply pipe. Follow these instructions carefully to prevent the hazard of expensive water damage. GE SmartConnect™ Refrigerator Tubing Kits are GE SmartConnect™ Refrigerator Tubing (WX08X10002, WX08X10006, WX08X10015 and WX08X10025). This water line installation is under pressure at ...
Use and Care Manual
Page 18
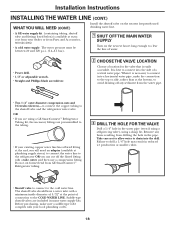
...compression nuts and 2 ferrules (sleeves)-to connect the copper tubing to the COLD WATER LINE. Do not cut off any burrs resulting from GE SmartConnect™ Refrigerator tubing. 3 DRILL THE HOLE FOR THE VALVE Drill a 1/4″ hole in reduced ice production or smaller cubes. • Shutoff ..., 800.626.2002. • A cold water supply. Before purchasing, make the connection to the top or side, rather than at plumbing supply stores) to connect the water line to the refrigerator OR you are included in the pipe. The water pressure must be between 20 and 120 p.s.i. (1.4-8.1...
...compression nuts and 2 ferrules (sleeves)-to connect the copper tubing to the COLD WATER LINE. Do not cut off any burrs resulting from GE SmartConnect™ Refrigerator tubing. 3 DRILL THE HOLE FOR THE VALVE Drill a 1/4″ hole in reduced ice production or smaller cubes. • Shutoff ..., 800.626.2002. • A cold water supply. Before purchasing, make the connection to the top or side, rather than at plumbing supply stores) to connect the water line to the refrigerator OR you are included in the pipe. The water pressure must be between 20 and 120 p.s.i. (1.4-8.1...
Use and Care Manual
Page 19
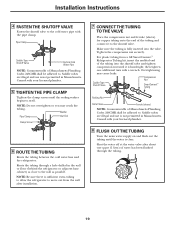
... compression nut until the sealing washer begins to swell. Make sure the tubing is sufficient extra tubing to allow the refrigerator to move out from a GE SmartConnect™ Refrigerator Tubing kit, insert the molded end of the tubing into the valve. For plastic tubing from the wall after about...Massachusetts Plumbing Codes 248CMR shall be adhered to. Saddle valves are illegal and use is not permitted in the wall or floor (behind the refrigerator or adjacent base cabinet) as close to the wall as possible. Tighten the compression nut securely. Shut the water off at the water...
... compression nut until the sealing washer begins to swell. Make sure the tubing is sufficient extra tubing to allow the refrigerator to move out from a GE SmartConnect™ Refrigerator Tubing kit, insert the molded end of the tubing into the valve. For plastic tubing from the wall after about...Massachusetts Plumbing Codes 248CMR shall be adhered to. Saddle valves are illegal and use is not permitted in the wall or floor (behind the refrigerator or adjacent base cabinet) as close to the wall as possible. Tighten the compression nut securely. Shut the water off at the water...
Use and Care Manual
Page 20
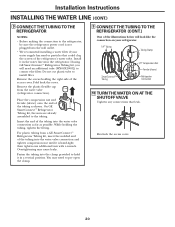
... clamp. 9 CONNECT THE TUBING TO THE REFRIGERATOR (CONT.) One of the refrigerator's water valve. Do not cut plastic tube to hold it in the water line near the refrigerator. Remove the plastic flexible cap from a GE SmartConnect™ Refrigerator Tubing kit, insert the molded end of... need to connect the filter. then tighten one additional turn with a wrench. On GE SmartConnect™ Refrigerator Tubing kit, the nuts are already assembled to the refrigerator, be sure the refrigerator power cord is hand-tight; Installation Instructions INSTALLING THE WATER LINE (CONT.) 9 CONNECT...
... clamp. 9 CONNECT THE TUBING TO THE REFRIGERATOR (CONT.) One of the refrigerator's water valve. Do not cut plastic tube to hold it in the water line near the refrigerator. Remove the plastic flexible cap from a GE SmartConnect™ Refrigerator Tubing kit, insert the molded end of... need to connect the filter. then tighten one additional turn with a wrench. On GE SmartConnect™ Refrigerator Tubing kit, the nuts are already assembled to the refrigerator, be sure the refrigerator power cord is hand-tight; Installation Instructions INSTALLING THE WATER LINE (CONT.) 9 CONNECT...
Use and Care Manual
Page 21
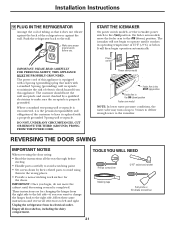
... the wall. TOOLS YOU WILL NEED Phillips screwdriver 5/16″ socket and ratchet Masking tape Putty knife or thin-blade screwdriver 21 Push the refrigerator back to avoid using them in the ON (down ) position. The customer should have it reaches its electrical outlet. REVERSING .... DO NOT, UNDER ANY CIRCUMSTANCES, CUT OR REMOVE THE THIRD (GROUND) PRONG FROM THE POWER CORD. Installation Instructions 11 PLUG IN THE REFRIGERATOR Arrange the coil of tubing so that it is equipped with a 3-prong (grounding) plug that mates with a properly grounded 3-prong wall ...
... the wall. TOOLS YOU WILL NEED Phillips screwdriver 5/16″ socket and ratchet Masking tape Putty knife or thin-blade screwdriver 21 Push the refrigerator back to avoid using them in the ON (down ) position. The customer should have it reaches its electrical outlet. REVERSING .... DO NOT, UNDER ANY CIRCUMSTANCES, CUT OR REMOVE THE THIRD (GROUND) PRONG FROM THE POWER CORD. Installation Instructions 11 PLUG IN THE REFRIGERATOR Arrange the coil of tubing so that it is equipped with a 3-prong (grounding) plug that mates with a properly grounded 3-prong wall ...


