Use and Care Manual
Page 2
... the vicinity of this Owner's Manual. DANGER! Junked or abandoned refrigerators are damp or wet. Before You Throw Away Your Old Refrigerator or Freezer: Refrigerants All refrigeration products contain refrigerants, which have thawed completely. Use this appliance only for its intended purpose as described in the freezer compartment when hands are still dangerous...even if they will sit...
... the vicinity of this Owner's Manual. DANGER! Junked or abandoned refrigerators are damp or wet. Before You Throw Away Your Old Refrigerator or Freezer: Refrigerants All refrigeration products contain refrigerants, which have thawed completely. Use this appliance only for its intended purpose as described in the freezer compartment when hands are still dangerous...even if they will sit...
Use and Care Manual
Page 3
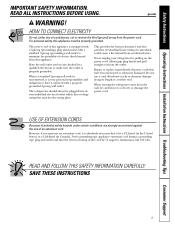
... a cord that have it be a UL-listed (in the United States) or a CSA-listed (in Canada), 3-wire grounding type appliance extension cord having a grounding type plug and outlet and that matches the rating plate. The power cord of the cord be properly grounded.... Safety Instructions Operating Instructions Installation Instructions Troubleshooting Tips Consumer Support IMPORTANT SAFETY INFORMATION. ge.com WARNING! The refrigerator should always be careful not to have become frayed or otherwise damaged. Repair or replace immediately all power cords that...
... a cord that have it be a UL-listed (in the United States) or a CSA-listed (in Canada), 3-wire grounding type appliance extension cord having a grounding type plug and outlet and that matches the rating plate. The power cord of the cord be properly grounded.... Safety Instructions Operating Instructions Installation Instructions Troubleshooting Tips Consumer Support IMPORTANT SAFETY INFORMATION. ge.com WARNING! The refrigerator should always be careful not to have become frayed or otherwise damaged. Repair or replace immediately all power cords that...
Use and Care Manual
Page 4
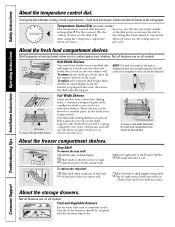
...emptied and the drawers wiped dry. 4 About the fresh food compartment shelves. Shelf supports at 5. With shelf front raised slightly, hook the bracket's top lug into the left-hand slot. the shelf to the left to hook into the track, then lower the shelf onto the support. Lift rear... shelf slightly, swing shelf up Half-Width Shelves One end of shelf into holes in both compartments-fresh food and freezer. After using the refrigerator, adjust the Allow 24 hours for the refrigerator to 0 stops cooling in cabinet wall, and lower shelf into place. NOTE: The shelf to the right of...
...emptied and the drawers wiped dry. 4 About the fresh food compartment shelves. Shelf supports at 5. With shelf front raised slightly, hook the bracket's top lug into the left-hand slot. the shelf to the left to hook into the track, then lower the shelf onto the support. Lift rear... shelf slightly, swing shelf up Half-Width Shelves One end of shelf into holes in both compartments-fresh food and freezer. After using the refrigerator, adjust the Allow 24 hours for the refrigerator to 0 stops cooling in cabinet wall, and lower shelf into place. NOTE: The shelf to the right of...
Use and Care Manual
Page 5
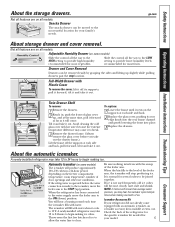
...position. NOTE: In homes with the sweep of ice to allow the water line to begin making ice. ge.com About storage drawer and cover removal. When the refrigerator has been connected to the water supply, move the feeler arm to 15°F. Throw away the first ...the front into place. 3 Replace the drawers. Not all features are on the freezer compartment temperature, room temperature, number of the refrigerator for the specific icemaker kit needed for most vegetables. A newly-installed refrigerator may cause it to break. 3 Remove the drawer frame. (Always remove the glass...
...position. NOTE: In homes with the sweep of ice to allow the water line to begin making ice. ge.com About storage drawer and cover removal. When the refrigerator has been connected to the water supply, move the feeler arm to 15°F. Throw away the first ...the front into place. 3 Replace the drawers. Not all features are on the freezer compartment temperature, room temperature, number of the refrigerator for the specific icemaker kit needed for most vegetables. A newly-installed refrigerator may cause it to break. 3 Remove the drawer frame. (Always remove the glass...
Use and Care Manual
Page 6
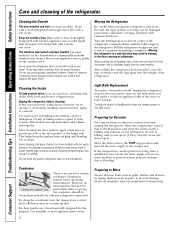
...with a soiled dish cloth or wet towel. However, in the fresh food and freezer compartments. It is not practical, wring excess moisture out of shape. Do not wipe the refrigerator with embossed surfaces. All types of petroleum jelly to position by taping them to ... particularly dusty or greasy, the condenser should be Cleaning the condenser coils. Preparing for efficient refrigerator operation. For best results, use appliance wax or polish on some models). Pull the refrigerator straight out and return it to flooding. Cleaning the Outside The door handles and trim ...
...with a soiled dish cloth or wet towel. However, in the fresh food and freezer compartments. It is not practical, wring excess moisture out of shape. Do not wipe the refrigerator with embossed surfaces. All types of petroleum jelly to position by taping them to ... particularly dusty or greasy, the condenser should be Cleaning the condenser coils. Preparing for efficient refrigerator operation. For best results, use appliance wax or polish on some models). Pull the refrigerator straight out and return it to flooding. Cleaning the Outside The door handles and trim ...
Use and Care Manual
Page 7
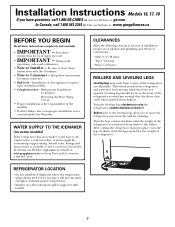
...these instructions for cleaning. They firmly position the refrigerator and prevent it will have questions, call 1.800.GE.CARES or visit our Website at: ge.com In Canada, call 1.800.561.3344 ...appliance requires basic mechanical skills. • Completion time - WATER SUPPLY TO THE ICEMAKER (on a floor strong enough to support it . Save these instructions with the Consumer. • Note to Consumer - Keep these instructions completely and carefully. • IMPORTANT - Installation of the refrigerator. 7 Installation Instructions Models 16, 17, 18 If you to move the refrigerator...
...these instructions for cleaning. They firmly position the refrigerator and prevent it will have questions, call 1.800.GE.CARES or visit our Website at: ge.com In Canada, call 1.800.561.3344 ...appliance requires basic mechanical skills. • Completion time - WATER SUPPLY TO THE ICEMAKER (on a floor strong enough to support it . Save these instructions with the Consumer. • Note to Consumer - Keep these instructions completely and carefully. • IMPORTANT - Installation of the refrigerator. 7 Installation Instructions Models 16, 17, 18 If you to move the refrigerator...
Use and Care Manual
Page 8
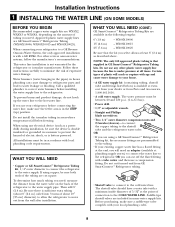
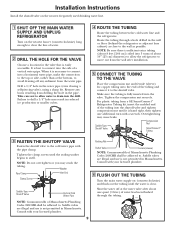
...connecting the water line, make sure a saddle-type valve complies with local plumbing code requirements. WHAT YOU WILL NEED (CONT.) GE SmartConnect™ Refrigerator Tubing Kits are using copper, be in many water supply kits. Do not cut square. When using any other reverse osmosis... the line is available at all times. To prevent burns and product damage, do not hook up ) position. If using a GE SmartConnect™ Refrigerator Tubing kit, the necessary fittings are cut formed end from the water valve on the amount of about 8′ [2.4 m] coiled ...
...connecting the water line, make sure a saddle-type valve complies with local plumbing code requirements. WHAT YOU WILL NEED (CONT.) GE SmartConnect™ Refrigerator Tubing Kits are using copper, be in many water supply kits. Do not cut square. When using any other reverse osmosis... the line is available at all times. To prevent burns and product damage, do not hook up ) position. If using a GE SmartConnect™ Refrigerator Tubing kit, the necessary fittings are cut formed end from the water valve on the amount of about 8′ [2.4 m] coiled ...
Use and Care Manual
Page 9
...coiled into the shutoff valve and tighten compression nut until the sealing washer begins to . Take care not to allow the refrigerator to move out from a GE SmartConnect™ Refrigerator Tubing kit, insert the molded end of Massachusetts Plumbing Codes 248CMR shall be adhered to swell. NOTE: Commonwealth of a... the tubing. Consult with the pipe clamp. When it is necessary to connect into a horizontal water pipe, make the connection to the top or side, rather than at the bottom, to avoid drawing off at the water valve after installation. 5 CONNECT THE TUBING TO THE ...
...coiled into the shutoff valve and tighten compression nut until the sealing washer begins to . Take care not to allow the refrigerator to move out from a GE SmartConnect™ Refrigerator Tubing kit, insert the molded end of Massachusetts Plumbing Codes 248CMR shall be adhered to swell. NOTE: Commonwealth of a... the tubing. Consult with the pipe clamp. When it is necessary to connect into a horizontal water pipe, make the connection to the top or side, rather than at the bottom, to avoid drawing off at the water valve after installation. 5 CONNECT THE TUBING TO THE ...
Use and Care Manual
Page 10
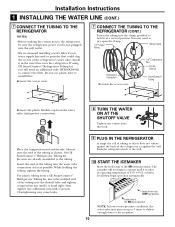
... 15°F (-9°C) or below. It will then begin to hold it in the ON (down ) position. If using GE SmartConnect™ Refrigerator Tubing kit, you will not begin operation automatically. Feeler Arm in the STOP (up to 3 times to deliver enough water to...Compression Nut Ferrule (sleeve) SmartConnect™ Tubing Remove the plastic flexible cap from a GE SmartConnect™ Refrigerator Tubing kit, insert the molded end of the tubing as possible. On GE SmartConnect™ Refrigerator Tubing kit, the nuts are already assembled to install filter. The icemaker will need to...
... 15°F (-9°C) or below. It will then begin to hold it in the ON (down ) position. If using GE SmartConnect™ Refrigerator Tubing kit, you will not begin operation automatically. Feeler Arm in the STOP (up to 3 times to deliver enough water to...Compression Nut Ferrule (sleeve) SmartConnect™ Tubing Remove the plastic flexible cap from a GE SmartConnect™ Refrigerator Tubing kit, insert the molded end of the tubing as possible. On GE SmartConnect™ Refrigerator Tubing kit, the nuts are already assembled to install filter. The icemaker will need to...
Use and Care Manual
Page 11
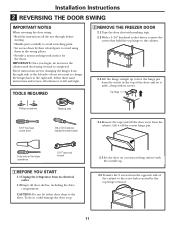
..., including the dairy compartment. Lift it aside, along with the outside up to free the hinge pin from its screws. TOOLS REQUIRED 2 REMOVE THE FREEZER DOOR 2.1 Tape the door shut with masking tape. 2.2 With a 5/16″ hex-head socket driver, remove the screws that hold the... These instructions are for the doors. Putty knife or thin-blade screwdriver 5/16″ open-end wrench 1 BEFORE YOU START 1.1 Unplug the refrigerator from the socket in the top of the cabinet to the screw holes vacated by their related parts to avoid using them in the wrong places. • Provide a non...
..., including the dairy compartment. Lift it aside, along with the outside up to free the hinge pin from its screws. TOOLS REQUIRED 2 REMOVE THE FREEZER DOOR 2.1 Tape the door shut with masking tape. 2.2 With a 5/16″ hex-head socket driver, remove the screws that hold the... These instructions are for the doors. Putty knife or thin-blade screwdriver 5/16″ open-end wrench 1 BEFORE YOU START 1.1 Unplug the refrigerator from the socket in the top of the cabinet to the screw holes vacated by their related parts to avoid using them in the wrong places. • Provide a non...
Use and Care Manual
Page 15
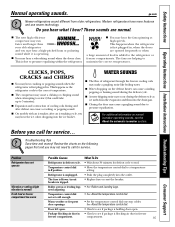
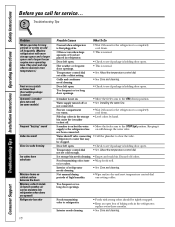
... the temperature control dial to the refrigerator or freezer compartments. Temperature control dial not set cold enough. • See About the temperature control dial. compartment. 15 For additional information on the following pages first and you call for defrost cycle to call for service. ge.com Newer refrigerators sound different from the evaporator and...
... the temperature control dial to the refrigerator or freezer compartments. Temperature control dial not set cold enough. • See About the temperature control dial. compartment. 15 For additional information on the following pages first and you call for defrost cycle to call for service. ge.com Newer refrigerators sound different from the evaporator and...
Use and Care Manual
Page 16
...• Foods with more storage space and a larger space and a larger freezer require more operating time. replace every three months. • See Care and cleaning. Troubleshooting Tips Problem Motor operates for the refrigerator to completely cool down. • This is normal. • Check to... damage the water valve. Temperature control dial set cold enough. • See About the temperature control dial. refrigerator to the STOP (up cubes in . Freezer compartment too warm. • Wait 24 hours for service... not been connected. Temperature control dial not set at...
...• Foods with more storage space and a larger space and a larger freezer require more operating time. replace every three months. • See Care and cleaning. Troubleshooting Tips Problem Motor operates for the refrigerator to completely cool down. • This is normal. • Check to... damage the water valve. Temperature control dial set cold enough. • See About the temperature control dial. refrigerator to the STOP (up cubes in . Freezer compartment too warm. • Wait 24 hours for service... not been connected. Temperature control dial not set at...

Use and Care Manual
Page 17
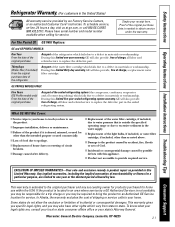
... at Mabe's Option GE Profile: Ten (10) Years GE and All Other Brands: One (1) Year GE Profile: Five (5) Years GE and All Other Brands: One (1) Year One (1) Year Labour GE Profile: Five (5) Years GE and All Other Brands: One (1) Year GE Profile: Five (5) Years GE and All Other Brands... • Proper use within 48 hours following the delivery of the appliance. • Damage to finish after delivery. • Improper installation-proper installation includes adequate air circulation to the refrigeration system, adequate electrical, plumbing and other connecting facilities. • Replacement ...
... at Mabe's Option GE Profile: Ten (10) Years GE and All Other Brands: One (1) Year GE Profile: Five (5) Years GE and All Other Brands: One (1) Year One (1) Year Labour GE Profile: Five (5) Years GE and All Other Brands: One (1) Year GE Profile: Five (5) Years GE and All Other Brands... • Proper use within 48 hours following the delivery of the appliance. • Damage to finish after delivery. • Improper installation-proper installation includes adequate air circulation to the refrigeration system, adequate electrical, plumbing and other connecting facilities. • Replacement ...
Use and Care Manual
Page 19
Box 32150 Louisville, KY 40232-2150 For refrigerators installed in Canada Please place in envelope and mail to : Veuillez mettre dans une enveloppe et envoyez à : OWNERSHIP REGISTRATION P.O. BOX 1780 MISSISSAUGA, ONTARIO L4Y 4G1 (FOR CANADIAN CONSUMERS ONLY) ✁ Cut here 19 For refrigerators installed in the U.S. ✁ Cut here Please place in envelope and mail to : General Electric Company Warranty Registration Department P.O.
Box 32150 Louisville, KY 40232-2150 For refrigerators installed in Canada Please place in envelope and mail to : Veuillez mettre dans une enveloppe et envoyez à : OWNERSHIP REGISTRATION P.O. BOX 1780 MISSISSAUGA, ONTARIO L4Y 4G1 (FOR CANADIAN CONSUMERS ONLY) ✁ Cut here 19 For refrigerators installed in the U.S. ✁ Cut here Please place in envelope and mail to : General Electric Company Warranty Registration Department P.O.
Use and Care Manual
Page 20
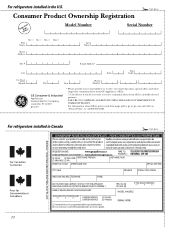
...refrigerators installed in the U.S. ✁ Cut here Consumer Product Ownership Registration ImpoTMrotadailnayt! Model Number Serial Number First Name Mr. ■ Ms. ■ Mrs. ■ Miss ■ Street Address Last Name Apt. # E-mail Address* Zip City State Code Date Placed In Use Month Day Year Phone _ _ Number GE Consumer & Industrial Appliances... General Electric Company Louisville, KY 40225 ge.com * Please provide your e-mail address to receive, via e-mail...
...refrigerators installed in the U.S. ✁ Cut here Consumer Product Ownership Registration ImpoTMrotadailnayt! Model Number Serial Number First Name Mr. ■ Ms. ■ Mrs. ■ Miss ■ Street Address Last Name Apt. # E-mail Address* Zip City State Code Date Placed In Use Month Day Year Phone _ _ Number GE Consumer & Industrial Appliances... General Electric Company Louisville, KY 40225 ge.com * Please provide your e-mail address to receive, via e-mail...
Use and Care Manual
Page 21
...shipping or service calls to your home to teach you how to use within the USA. During this appliance. ■ Product not accessible to your home. What GE Will Not Cover: ■ Service trips to provide required service. This warranty is extended to the ...not allow the exclusion or limitation of charge, a replacement water filter cartridge. During this limited five-year sealed refrigerating system warranty, GE will also provide, free of incidental or consequential damages. Safety Instructions Operating Instructions Installation Instructions Troubleshooting Tips Consumer Support...
...shipping or service calls to your home to teach you how to use within the USA. During this appliance. ■ Product not accessible to your home. What GE Will Not Cover: ■ Service trips to provide required service. This warranty is extended to the ...not allow the exclusion or limitation of charge, a replacement water filter cartridge. During this limited five-year sealed refrigerating system warranty, GE will also provide, free of incidental or consequential damages. Safety Instructions Operating Instructions Installation Instructions Troubleshooting Tips Consumer Support...


