Use and Care Manual
Page 2
... Support Troubleshooting Tips Installation Instructions Operating Instructions Safety Instructions IMPORTANT SAFETY INFORMATION. Use this appliance only for "just a few days." clearances between the doors and between the doors and cabinet are not problems of the ejector mechanism, or with the Installation Instructions before cleaning and making repairs. Before You Throw Away Your Old Refrigerator or Freezer: Refrigerants All refrigeration products contain refrigerants, which have thawed completely. WARNING! Be careful closing doors when children are getting...
... Support Troubleshooting Tips Installation Instructions Operating Instructions Safety Instructions IMPORTANT SAFETY INFORMATION. Use this appliance only for "just a few days." clearances between the doors and between the doors and cabinet are not problems of the ejector mechanism, or with the Installation Instructions before cleaning and making repairs. Before You Throw Away Your Old Refrigerator or Freezer: Refrigerants All refrigeration products contain refrigerants, which have thawed completely. WARNING! Be careful closing doors when children are getting...
Use and Care Manual
Page 3
... its length or at either end. Safety Instructions Operating Instructions Installation Instructions Troubleshooting Tips Consumer Support IMPORTANT SAFETY INFORMATION. READ ALL INSTRUCTIONS BEFORE USING. For personal safety, this appliance must use of this appliance. The power cord of an extension cord. The refrigerator should always be properly grounded. Always grip plug firmly and pull straight out from overheated wires. Repair or replace immediately all power cords that matches the...
... its length or at either end. Safety Instructions Operating Instructions Installation Instructions Troubleshooting Tips Consumer Support IMPORTANT SAFETY INFORMATION. READ ALL INSTRUCTIONS BEFORE USING. For personal safety, this appliance must use of this appliance. The power cord of an extension cord. The refrigerator should always be properly grounded. Always grip plug firmly and pull straight out from overheated wires. Repair or replace immediately all power cords that matches the...
Use and Care Manual
Page 4
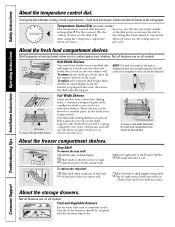
... replace the step shelf: 1 With shelf tilted as shown, fit left side of shelf slightly, swing shelf up at front, then off power to 0 stops cooling in the middle of the refrigerator and will stop -locks. Consumer Support Troubleshooting Tips Installation Instructions Operating Instructions Safety Instructions About the temperature control dial. Lift rear Pull forward and down To remove a full-width shelf when the fresh food compartment door cannot be emptied and the drawers...
... replace the step shelf: 1 With shelf tilted as shown, fit left side of shelf slightly, swing shelf up at front, then off power to 0 stops cooling in the middle of the refrigerator and will stop -locks. Consumer Support Troubleshooting Tips Installation Instructions Operating Instructions Safety Instructions About the temperature control dial. Lift rear Pull forward and down To remove a full-width shelf when the fresh food compartment door cannot be emptied and the drawers...
Use and Care Manual
Page 5
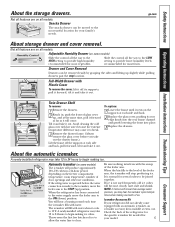
... not used frequently, old ice cubes will hear a buzzing sound each side and back. 2 Replace the glass cover, pushing its supports, pull it forward, tilt it and take it out. ge.com About storage drawer and cover removal. You will become cloudy, taste stale and shrink. Not all features are on some models) The icemaker will stop location. When the refrigerator has been connected to the water supply...
... not used frequently, old ice cubes will hear a buzzing sound each side and back. 2 Replace the glass cover, pushing its supports, pull it forward, tilt it and take it out. ge.com About storage drawer and cover removal. You will become cloudy, taste stale and shrink. Not all features are on some models) The icemaker will stop location. When the refrigerator has been connected to the water supply...
Use and Care Manual
Page 6
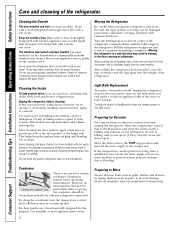
... Installation Instructions Operating Instructions Safety Instructions Care and cleaning of sponge or cloth when cleaning around switches, lights or controls. Dry and polish with soapy water. If this purpose. This both cleans and neutralizes odors. Handle glass shelves carefully. Moving the Refrigerator Be careful when moving . Leave the doors open box of the refrigerator. Sweep away or vacuum up ) position and shut off the water supply to flooding. Be sure the refrigerator stays in . Do not use appliance...
... Installation Instructions Operating Instructions Safety Instructions Care and cleaning of sponge or cloth when cleaning around switches, lights or controls. Dry and polish with soapy water. If this purpose. This both cleans and neutralizes odors. Handle glass shelves carefully. Moving the Refrigerator Be careful when moving . Leave the doors open box of the refrigerator. Sweep away or vacuum up ) position and shut off the water supply to flooding. Be sure the refrigerator stays in . Do not use appliance...
Use and Care Manual
Page 7
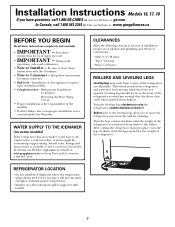
... the rollers. After rolling the refrigerator back into place, turn the legs clockwise until the weight of the refrigerator are opened about halfway. WATER SUPPLY TO THE ICEMAKER (on a floor strong enough to Consumer - A water supply kit (containing copper tubing, shutoff valve, fittings and instructions) is not covered under the Warranty. Save these instructions for future reference. • Skill level - Installation of the installer. • Product failure due to...
... the rollers. After rolling the refrigerator back into place, turn the legs clockwise until the weight of the refrigerator are opened about halfway. WATER SUPPLY TO THE ICEMAKER (on a floor strong enough to Consumer - A water supply kit (containing copper tubing, shutoff valve, fittings and instructions) is not covered under the Warranty. Save these instructions for future reference. • Skill level - Installation of the installer. • Product failure due to...
Use and Care Manual
Page 8
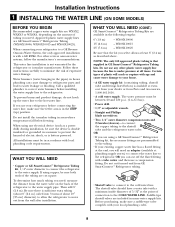
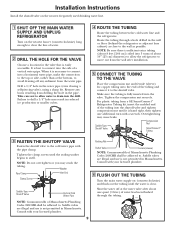
... warranted by the refrigerator or icemaker manufacturer. Installation Instructions 1 INSTALLING THE WATER LINE (ON SOME MODELS) BEFORE YOU BEGIN Recommended copper water supply kits are included in many water supply kits. Follow these instructions carefully to move out from Parts and Accessories, 1.800.661.1616. • A cold water supply. Saddle-type shutoff valves are WX8X2, WX8X3 or WX8X4, depending on the back of connection to the hot water line. WX08X10015 - When using a GE SmartConnect™ Refrigerator Tubing kit, the necessary...
... warranted by the refrigerator or icemaker manufacturer. Installation Instructions 1 INSTALLING THE WATER LINE (ON SOME MODELS) BEFORE YOU BEGIN Recommended copper water supply kits are included in many water supply kits. Follow these instructions carefully to move out from Parts and Accessories, 1.800.661.1616. • A cold water supply. Saddle-type shutoff valves are WX8X2, WX8X3 or WX8X4, depending on the back of connection to the hot water line. WX08X10015 - When using a GE SmartConnect™ Refrigerator Tubing kit, the necessary...
Use and Care Manual
Page 9
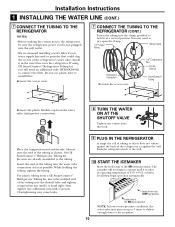
... the cold water line and the refrigerator. Take care not to allow the refrigerator to move out from a GE SmartConnect™ Refrigerator Tubing kit, insert the molded end of the tubing into a horizontal water pipe, make the connection to the top or side, rather than at the water valve after installation. 5 CONNECT THE TUBING TO THE VALVE Place the compression nut and ferrule (sleeve) for the valve that is sufficient extra tubing (about 8 feet...
... the cold water line and the refrigerator. Take care not to allow the refrigerator to move out from a GE SmartConnect™ Refrigerator Tubing kit, insert the molded end of the tubing into a horizontal water pipe, make the connection to the top or side, rather than at the water valve after installation. 5 CONNECT THE TUBING TO THE VALVE Place the compression nut and ferrule (sleeve) for the valve that is sufficient extra tubing (about 8 feet...
Use and Care Manual
Page 10
... If using GE SmartConnect™ Refrigerator Tubing kit, you will not begin operation automatically. For plastic tubing from the water valve (refrigerator connection). 8 TURN THE WATER ON AT THE SHUTOFF VALVE Tighten any connections that it is not plugged into the shutoff valve and tighten compression nut until it reaches its operating temperature of the tubing as possible. The icemaker will need to pry open the clamp. 1/4″ Copper Tubing Clamp Tubing Refrigerator Connection Reattach the access cover...
... If using GE SmartConnect™ Refrigerator Tubing kit, you will not begin operation automatically. For plastic tubing from the water valve (refrigerator connection). 8 TURN THE WATER ON AT THE SHUTOFF VALVE Tighten any connections that it is not plugged into the shutoff valve and tighten compression nut until it reaches its operating temperature of the tubing as possible. The icemaker will need to pry open the clamp. 1/4″ Copper Tubing Clamp Tubing Refrigerator Connection Reattach the access cover...
Use and Care Manual
Page 11
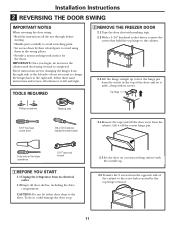
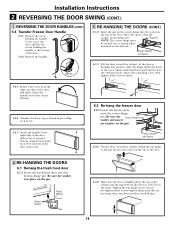
...; open-end wrench 1 BEFORE YOU START 1.1 Unplug the refrigerator from the cabinet. Installation Instructions 2 REVERSING THE DOOR SWING IMPORTANT NOTES When reversing the door swing: • Read the instructions all references to left side-if you begin, do so could damage the door stop. 2.5 Set the door on a non-scratching surface with its electrical outlet. 1.2 Empty all door shelves, including the dairy compartment. These instructions are for changing the hinges...
...; open-end wrench 1 BEFORE YOU START 1.1 Unplug the refrigerator from the cabinet. Installation Instructions 2 REVERSING THE DOOR SWING IMPORTANT NOTES When reversing the door swing: • Read the instructions all references to left side-if you begin, do so could damage the door stop. 2.5 Set the door on a non-scratching surface with its electrical outlet. 1.2 Empty all door shelves, including the dairy compartment. These instructions are for changing the hinges...
Use and Care Manual
Page 12
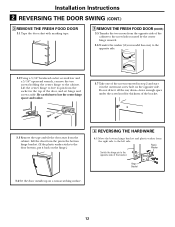
... Washer Switch the hinge pin to the left side. Be careful not to the cabinet. Installation Instructions 2 REVERSING THE DOOR SWING (CONT.) 3 REMOVE THE FRESH FOOD DOOR 3.1 Tape the door shut with masking tape. 3 REMOVE THE FRESH FOOD DOOR (CONT.) 3.5 Transfer the two screws from the opposite side of the cabinet to the screw holes vacated by the center hinge removal. 3.6 Transfer the washer (if your model...
... Washer Switch the hinge pin to the left side. Be careful not to the cabinet. Installation Instructions 2 REVERSING THE DOOR SWING (CONT.) 3 REMOVE THE FRESH FOOD DOOR 3.1 Tape the door shut with masking tape. 3 REMOVE THE FRESH FOOD DOOR (CONT.) 3.5 Transfer the two screws from the opposite side of the cabinet to the screw holes vacated by the center hinge removal. 3.6 Transfer the washer (if your model...

Use and Care Manual
Page 13
... screw underneath. Plug Button Installing the hinge on the opposite side. Screws for correct installation. 5.1.5 Pull the plug button from the right side to the right side of cabinet. Installing the hinge on the opposite side. 5 REVERSING THE DOOR HANDLES 5.1 Transfer fresh food door handle 5.1.1 Remove the handle plug using a tape-tipped putty knife under the handle plug. 5.3.2 Reinstall the handle plug. 13 NOTES: • Some hinges have four holes. Top 5.2 Transfer door stop 5.2.1 Move the...
... screw underneath. Plug Button Installing the hinge on the opposite side. Screws for correct installation. 5.1.5 Pull the plug button from the right side to the right side of cabinet. Installing the hinge on the opposite side. 5 REVERSING THE DOOR HANDLES 5.1 Transfer fresh food door handle 5.1.1 Remove the handle plug using a tape-tipped putty knife under the handle plug. 5.3.2 Reinstall the handle plug. 13 NOTES: • Some hinges have four holes. Top 5.2 Transfer door stop 5.2.1 Move the...
Use and Care Manual
Page 14
... the door stop screws. 6.2 Re-hang the freezer door 6.2.1 Lower the freezer door onto the center hinge pin. Installation Instructions 2 REVERSING THE DOOR SWING (CONT.) 5 REVERSING THE DOOR HANDLES (CONT.) 5.4 Transfer Freezer Door Handle 5.4.1 Remove the screw TToOpP holding the handle to the top of the door and the two screws holding the handle to the right edge of the door with screws at top and bottom, using bottom holes vacated by removal of the door stop as...
... the door stop screws. 6.2 Re-hang the freezer door 6.2.1 Lower the freezer door onto the center hinge pin. Installation Instructions 2 REVERSING THE DOOR SWING (CONT.) 5 REVERSING THE DOOR HANDLES (CONT.) 5.4 Transfer Freezer Door Handle 5.4.1 Remove the screw TToOpP holding the handle to the top of the door and the two screws holding the handle to the right edge of the door with screws at top and bottom, using bottom holes vacated by removal of the door stop as...
Use and Care Manual
Page 15
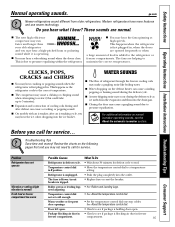
... the ice cubes dropping into the outlet. Troubleshooting Tips Save time and money! Refrigerator is first plugged in. need to the refrigerator or freezer compartments. See About the temperature control dial. Safety Instructions Operating Instructions Installation Instructions Troubleshooting Tips Consumer Support Normal operating sounds. For additional information on the defrost heater can cause a sizzling, popping or buzzing sound during the defrost cycle. ■ A water dripping noise may occur during and after defrost can...
... the ice cubes dropping into the outlet. Troubleshooting Tips Save time and money! Refrigerator is first plugged in. need to the refrigerator or freezer compartments. See About the temperature control dial. Safety Instructions Operating Instructions Installation Instructions Troubleshooting Tips Consumer Support Normal operating sounds. For additional information on the defrost heater can cause a sizzling, popping or buzzing sound during the defrost cycle. ■ A water dripping noise may occur during and after defrost can...
Use and Care Manual
Page 16
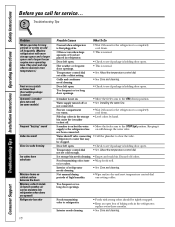
... warm. • Wait 24 hours for service... bin cause the icemaker to completely cool down ) position. not been connected. Discard old cubes. Interior needs cleaning. • Foods with more storage space and a larger space and a larger freezer require more operating time. Icemaker is holding door open . Ice storage bin needs cleaning. • Empty and wash bin. Interior of high humidity. • Wipe surface dry and reset temperature control dial one setting colder. Consumer Support Troubleshooting Tips Installation Instructions Operating Instructions...
... warm. • Wait 24 hours for service... bin cause the icemaker to completely cool down ) position. not been connected. Discard old cubes. Interior needs cleaning. • Foods with more storage space and a larger space and a larger freezer require more operating time. Icemaker is holding door open . Ice storage bin needs cleaning. • Empty and wash bin. Interior of high humidity. • Wipe surface dry and reset temperature control dial one setting colder. Consumer Support Troubleshooting Tips Installation Instructions Operating Instructions...

Use and Care Manual
Page 17
... Mabe Service Agent. This warranty is covered Compressor Sealed System (including evaporator, condenser tubing and refrigerant) All Other Parts How Long Warranted (From Date of Sale. EXCLUSION OF IMPLIED WARRANTIES-Your sole and exclusive remedy is available coast to an adequate and proper utility service. Please have serial number and model number available when calling for service. Mabe Service is product repair as listed in the owner's manual, proper setting of...
... Mabe Service Agent. This warranty is covered Compressor Sealed System (including evaporator, condenser tubing and refrigerant) All Other Parts How Long Warranted (From Date of Sale. EXCLUSION OF IMPLIED WARRANTIES-Your sole and exclusive remedy is available coast to an adequate and proper utility service. Please have serial number and model number available when calling for service. Mabe Service is product repair as listed in the owner's manual, proper setting of...
Use and Care Manual
Page 18
... household use • Your satisfaction is 800 GE CARES (800.432.2737). 3 Read your Owner's Manual carefully. It contains information you will help you did not get a registration card with your product, detach and return the form on appliances and home electronics that your new appliance properly. Our service number is our goal. Model Number Serial Number Important: If you operate your product is for products installed in...
... household use • Your satisfaction is 800 GE CARES (800.432.2737). 3 Read your Owner's Manual carefully. It contains information you will help you did not get a registration card with your product, detach and return the form on appliances and home electronics that your new appliance properly. Our service number is our goal. Model Number Serial Number Important: If you operate your product is for products installed in...
Use and Care Manual
Page 20
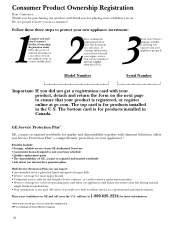
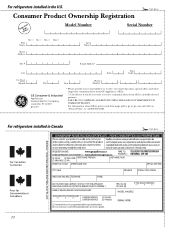
... NOT DIMINISH YOUR WARRANTY RIGHTS. For refrigerators installed in the U.S. ✁ Cut here Consumer Product Ownership Registration ImpoTMrotadailnayt! Model Number Serial Number First Name Mr. ■ Ms. ■ Mrs. ■ Miss ■ Street Address Last Name Apt. # E-mail Address* Zip City State Code Date Placed In Use Month Day Year Phone _ _ Number GE Consumer & Industrial Appliances General Electric Company Louisville, KY 40225 ge.com * Please...
... NOT DIMINISH YOUR WARRANTY RIGHTS. For refrigerators installed in the U.S. ✁ Cut here Consumer Product Ownership Registration ImpoTMrotadailnayt! Model Number Serial Number First Name Mr. ■ Ms. ■ Mrs. ■ Miss ■ Street Address Last Name Apt. # E-mail Address* Zip City State Code Date Placed In Use Month Day Year Phone _ _ Number GE Consumer & Industrial Appliances General Electric Company Louisville, KY 40225 ge.com * Please...
Use and Care Manual
Page 21
... for service. Warrantor: General Electric Company. What GE Will Not Cover: ■ Service trips to replace the defective part in the sealed refrigerating system. Thirty Days (Water filter, if included) From the original purchase date of the refrigerator Any part of the sealed refrigerating system (the compressor, condenser, evaporator and all labor and related service to your home. Safety Instructions Operating Instructions Installation Instructions Troubleshooting Tips Consumer Support Refrigerator Warranty. (For customers in the United States) All warranty service...
... for service. Warrantor: General Electric Company. What GE Will Not Cover: ■ Service trips to replace the defective part in the sealed refrigerating system. Thirty Days (Water filter, if included) From the original purchase date of the refrigerator Any part of the sealed refrigerating system (the compressor, condenser, evaporator and all labor and related service to your home. Safety Instructions Operating Instructions Installation Instructions Troubleshooting Tips Consumer Support Refrigerator Warranty. (For customers in the United States) All warranty service...

Use and Care Manual
Page 64
... there after your new appliance on Recycled Paper Customers in this manual cover procedures to qualified service personnel. For greater convenience and faster service, you receive from your warranty, should be exercised, since improper servicing may also mail in the pre-printed registration card included in effect. Try the GE Appliances Website 24 hours a day, any day of your door. Get on our...
... there after your new appliance on Recycled Paper Customers in this manual cover procedures to qualified service personnel. For greater convenience and faster service, you receive from your warranty, should be exercised, since improper servicing may also mail in the pre-printed registration card included in effect. Try the GE Appliances Website 24 hours a day, any day of your door. Get on our...

