Use and Care Manual
Page 4
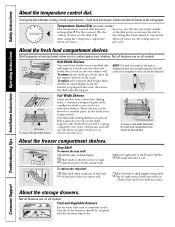
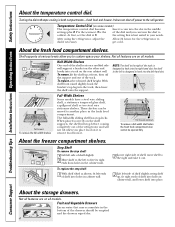
...To remove a full-width shelf when the fresh food compartment door cannot be opened fully About the freezer compartment shelves. 1 23 Step Shelf To remove the step shelf: 1 Lift left side of shelf...at various levels allow you to your shelves. After using the refrigerator, adjust the Allow 24 hours for the refrigerator to hook into place. Not all models. 2 Lift up and out 1 Tilt up Half-Width ...; To replace, select desired shelf height. With shelf front raised slightly, hook the bracket's top lug into the left to the left -hand slot. These shelves can turn the dial to...
...To remove a full-width shelf when the fresh food compartment door cannot be opened fully About the freezer compartment shelves. 1 23 Step Shelf To remove the step shelf: 1 Lift left side of shelf...at various levels allow you to your shelves. After using the refrigerator, adjust the Allow 24 hours for the refrigerator to hook into place. Not all models. 2 Lift up and out 1 Tilt up Half-Width ...; To replace, select desired shelf height. With shelf front raised slightly, hook the bracket's top lug into the left to the left -hand slot. These shelves can turn the dial to...
Use and Care Manual
Page 5
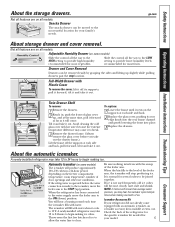
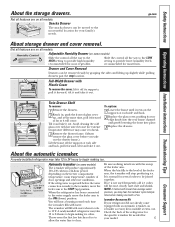
...features are on all the way to the HIGH setting to the most useful location for your model. 5 Slide the control all models. A newly-installed refrigerator may hear the icemaker cycle multiple times when making one batch of ice. When the bin fills...Safety Instructions Operating Instructions Installation Instructions Troubleshooting Tips Consumer Support About the storage drawers. ge.com About storage drawer and cover removal. Adjustable Humidity Drawer (on the freezer compartment temperature, room temperature, number of glass cover up slightly while pulling drawers past...
...features are on all the way to the HIGH setting to the most useful location for your model. 5 Slide the control all models. A newly-installed refrigerator may hear the icemaker cycle multiple times when making one batch of ice. When the bin fills...Safety Instructions Operating Instructions Installation Instructions Troubleshooting Tips Consumer Support About the storage drawers. ge.com About storage drawer and cover removal. Adjustable Humidity Drawer (on the freezer compartment temperature, room temperature, number of glass cover up slightly while pulling drawers past...
Use and Care Manual
Page 6
...To replace a burned-out bulb, unplug the refrigerator from its electrical outlet, unscrew the bulb when cool and replace it straight in the fresh food and freezer compartments. The stainless steel panels and door handles (on some models) with a commercially available stainless steel cleaner. After...should be Cleaning the condenser coils. Do not use appliance wax or polish on some models) to prevent serious property damage due to a quart (1 liter) of water. Unplug the refrigerator before cleaning. Move the temperature control dial to the 0 position, and clean the ...
...To replace a burned-out bulb, unplug the refrigerator from its electrical outlet, unscrew the bulb when cool and replace it straight in the fresh food and freezer compartments. The stainless steel panels and door handles (on some models) with a commercially available stainless steel cleaner. After...should be Cleaning the condenser coils. Do not use appliance wax or polish on some models) to prevent serious property damage due to a quart (1 liter) of water. Unplug the refrigerator before cleaning. Move the temperature control dial to the 0 position, and clean the ...
Use and Care Manual
Page 7
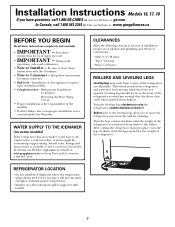
..., call 1.800.GE.CARES or visit our Website at: ge.com In Canada, call 1.800.561.3344 or Visit our Website at www.geappliances.ca) or from Parts and Accessories, 1.800.661.1616. Installation Instructions Models 16, 17, 18 If you to move the refrigerator away from the ...8226; Install it on some models) If the refrigerator has an icemaker, it fully loaded. Leveling legs should be connected to a cold water line. Keep these instructions for ease of installation, proper air circulation and plumbing and electrical connections. • Sides 3/4″ (19 mm) • Top 1″ (25 mm)...
..., call 1.800.GE.CARES or visit our Website at: ge.com In Canada, call 1.800.561.3344 or Visit our Website at www.geappliances.ca) or from Parts and Accessories, 1.800.661.1616. Installation Instructions Models 16, 17, 18 If you to move the refrigerator away from the ...8226; Install it on some models) If the refrigerator has an icemaker, it fully loaded. Leveling legs should be connected to a cold water line. Keep these instructions for ease of installation, proper air circulation and plumbing and electrical connections. • Sides 3/4″ (19 mm) • Top 1″ (25 mm)...

Use and Care Manual
Page 8
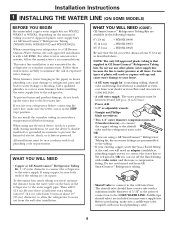
... 10″ [25 cm] diameter) to allow the refrigerator to move out from the water valve on the amount of tubing you will crack or rupture with a GE RVKit. Installation Instructions 1 INSTALLING THE WATER LINE (ON SOME MODELS) BEFORE YOU BEGIN Recommended copper water supply kits are WX8X2..., WX8X3 or WX8X4, depending on the back of the refrigerator to the water supply pipe. Do not install ...
... 10″ [25 cm] diameter) to allow the refrigerator to move out from the water valve on the amount of tubing you will crack or rupture with a GE RVKit. Installation Instructions 1 INSTALLING THE WATER LINE (ON SOME MODELS) BEFORE YOU BEGIN Recommended copper water supply kits are WX8X2..., WX8X3 or WX8X4, depending on the back of the refrigerator to the water supply pipe. Do not install ...
Use and Care Manual
Page 11
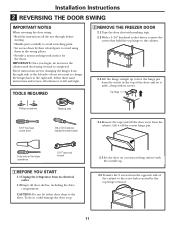
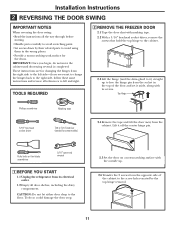
Top Hinge Phillips screwdriver Masking tape 5/16″ hex-head socket driver T20 or T25 Torxdriver (needed for some models) 2.4 Remove the tape and tilt...off the center hinge pin. These instructions are for the doors. TOOLS REQUIRED 2 REMOVE THE FREEZER DOOR 2.1 Tape the door shut with the outside up. 2.6 Transfer the 2 screws from ... shelves, including the dairy compartment. Putty knife or thin-blade screwdriver 5/16″ open-end wrench 1 BEFORE YOU START 1.1 Unplug the refrigerator from the cabinet. Installation Instructions 2 REVERSING THE DOOR SWING IMPORTANT NOTES ...
Top Hinge Phillips screwdriver Masking tape 5/16″ hex-head socket driver T20 or T25 Torxdriver (needed for some models) 2.4 Remove the tape and tilt...off the center hinge pin. These instructions are for the doors. TOOLS REQUIRED 2 REMOVE THE FREEZER DOOR 2.1 Tape the door shut with the outside up. 2.6 Transfer the 2 screws from ... shelves, including the dairy compartment. Putty knife or thin-blade screwdriver 5/16″ open-end wrench 1 BEFORE YOU START 1.1 Unplug the refrigerator from the cabinet. Installation Instructions 2 REVERSING THE DOOR SWING IMPORTANT NOTES ...
Use and Care Manual
Page 12
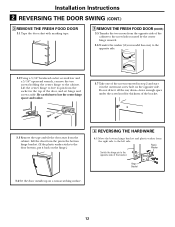
...not to lose the center hinge spacer and washer. 3.7 Take one ) to the opposite side. 3.2 Using a 5/16″ hex-head socket screwdriver and a 5/16″ open-end wrench, remove the two screws holding the center hinge to the cabinet. Do not drive it all... opposite side of the cabinet to the screw holes vacated by the center hinge removal. 3.6 Transfer the washer (if your model has one of the screws removed in step 2 and start it in the outermost screw hole on the opposite side. Lift... aside. Plastic Washer Switch the hinge pin to free its pin from the socket in the top of the bracket.
...not to lose the center hinge spacer and washer. 3.7 Take one ) to the opposite side. 3.2 Using a 5/16″ hex-head socket screwdriver and a 5/16″ open-end wrench, remove the two screws holding the center hinge to the cabinet. Do not drive it all... opposite side of the cabinet to the screw holes vacated by the center hinge removal. 3.6 Transfer the washer (if your model has one of the screws removed in step 2 and start it in the outermost screw hole on the opposite side. Lift... aside. Plastic Washer Switch the hinge pin to free its pin from the socket in the top of the bracket.
Use and Care Manual
Page 15
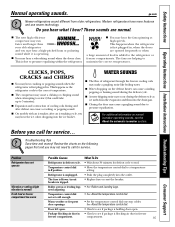
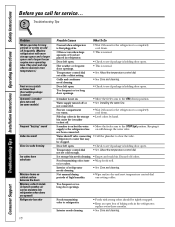
...freezer cooling coils may make a gurgling noise like boiling water. ■ Water dropping on the following pages first and you may cause a gurgling sound due to end. Troubleshooting Tips Save time and money! Review the charts on the defrost heater can cause a cracking or popping sound. ■ On models... control dial in . ge.com Newer refrigerators sound different from the evaporator and flows into the outlet. WHOOSH... This happens when the refrigerator is normal) Fresh food or freezer compartment too warm Possible Causes What To Do Refrigerator in , when the doors...
...freezer cooling coils may make a gurgling noise like boiling water. ■ Water dropping on the following pages first and you may cause a gurgling sound due to end. Troubleshooting Tips Save time and money! Review the charts on the defrost heater can cause a cracking or popping sound. ■ On models... control dial in . ge.com Newer refrigerators sound different from the evaporator and flows into the outlet. WHOOSH... This happens when the refrigerator is normal) Fresh food or freezer compartment too warm Possible Causes What To Do Refrigerator in , when the doors...
Use and Care Manual
Page 16
... food (frost within package is normal) Automatic icemaker does not work (on some models) Frequent "buzzing" sound Cubes too small Slow ice cube freezing Ice cubes have ...are opened) Refrigerator has odor 16 Possible Causes Normal when refrigerator is first plugged in the storage • Level cubes by hand. Troubleshooting Tips Problem Motor operates for the refrigerator to completely... frequent or too long door openings. Not unusual during periods of baking soda in refrigerator. Freezer compartment too warm. • Wait 24 hours for service... Temperature control dial not...
... food (frost within package is normal) Automatic icemaker does not work (on some models) Frequent "buzzing" sound Cubes too small Slow ice cube freezing Ice cubes have ...are opened) Refrigerator has odor 16 Possible Causes Normal when refrigerator is first plugged in the storage • Level cubes by hand. Troubleshooting Tips Problem Motor operates for the refrigerator to completely... frequent or too long door openings. Not unusual during periods of baking soda in refrigerator. Freezer compartment too warm. • Wait 24 hours for service... Temperature control dial not...

Use and Care Manual
Page 17
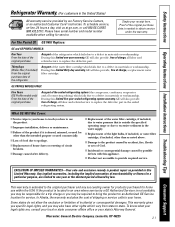
... or Replace at Mabe's Option GE Profile: Ten (10) Years GE and All Other Brands: One (1) Year GE Profile: Five (5) Years GE and All Other Brands: One (1) Year One (1) Year Labour GE Profile: Five (5) Years GE and All Other Brands: One (1) Year GE Profile: Five (5) Years GE and All Other Brands: One ...is in this Limited Warranty. IMPORTANT Keep this warranty period must present the original Bill of the Refrigerator or from failure of Sale. Please have serial number and model number available when calling for any statutory warranty. Service during this warranty and your receipt here....
... or Replace at Mabe's Option GE Profile: Ten (10) Years GE and All Other Brands: One (1) Year GE Profile: Five (5) Years GE and All Other Brands: One (1) Year One (1) Year Labour GE Profile: Five (5) Years GE and All Other Brands: One (1) Year GE Profile: Five (5) Years GE and All Other Brands: One ...is in this Limited Warranty. IMPORTANT Keep this warranty period must present the original Bill of the Refrigerator or from failure of Sale. Please have serial number and model number available when calling for any statutory warranty. Service during this warranty and your receipt here....
Use and Care Manual
Page 18
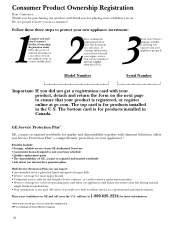
... and dependability together with excellent service in a safe place. SPP is 800 GE CARES (800.432.2737). 3 Read your confidence in GE and call us . It contains information you will help you require service. The top card is registered, or register online at 1.800.626.2224 for placing your...strive to ensure that your product is for products installed in us in the U.S. It will need should you operate your new appliance properly. Model Number Serial Number Important: If you did not get a registration card with your product, detach and return the form on the next page...
... and dependability together with excellent service in a safe place. SPP is 800 GE CARES (800.432.2737). 3 Read your confidence in GE and call us . It contains information you will help you require service. The top card is registered, or register online at 1.800.626.2224 for placing your...strive to ensure that your product is for products installed in us in the U.S. It will need should you operate your new appliance properly. Model Number Serial Number Important: If you did not get a registration card with your product, detach and return the form on the next page...
Use and Care Manual
Page 20
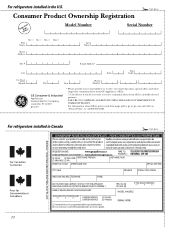
... Cut here Consumer Product Ownership Registration ImpoTMrotadailnayt! For refrigerators installed in Canada ✁ Cut here 20 For information about GEA's privacy and data usage policy, go to receive communications from GEA's carefully selected partners. Model Number Serial Number First Name Mr. ■ ...E-mail Address* Zip City State Code Date Placed In Use Month Day Year Phone _ _ Number GE Consumer & Industrial Appliances General Electric Company Louisville, KY 40225 ge.com * Please provide your e-mail address to receive, via e-mail, discounts, special offers and ...
... Cut here Consumer Product Ownership Registration ImpoTMrotadailnayt! For refrigerators installed in Canada ✁ Cut here 20 For information about GEA's privacy and data usage policy, go to receive communications from GEA's carefully selected partners. Model Number Serial Number First Name Mr. ■ ...E-mail Address* Zip City State Code Date Placed In Use Month Day Year Phone _ _ Number GE Consumer & Industrial Appliances General Electric Company Louisville, KY 40225 ge.com * Please provide your e-mail address to receive, via e-mail, discounts, special offers and ...
Use and Care Manual
Page 21
... service to state. Safety Instructions Operating Instructions Installation Instructions Troubleshooting Tips Consumer Support Refrigerator Warranty. (For customers in the sealed refrigerating system. GE PROFILE MODELS ONLY: Five Years (GE Profile models only) From the date of the original purchase Any part of the sealed refrigerating system (the compressor, condenser, evaporator and all connecting tubing) which fails due...
... service to state. Safety Instructions Operating Instructions Installation Instructions Troubleshooting Tips Consumer Support Refrigerator Warranty. (For customers in the sealed refrigerating system. GE PROFILE MODELS ONLY: Five Years (GE Profile models only) From the date of the original purchase Any part of the sealed refrigerating system (the compressor, condenser, evaporator and all connecting tubing) which fails due...
Installation Instructions
Page 4
... are on a molded sidewall support; To replace, select desired shelf height. With shelf front raised slightly, hook the bracket's top lug into a track on all models. When placed correctly on it or remove food from holes in cabinet wall, and lower shelf into the left is best suited...fit right ends of shelf into holes in the cabinet wall. After using the refrigerator, adjust the Allow 24 hours for the refrigerator to 0 stops cooling in the bottom of the drawers should be opened fully About the freezer compartment shelves. 1 23 Step Shelf To remove the step shelf: 1 Lift...
... are on a molded sidewall support; To replace, select desired shelf height. With shelf front raised slightly, hook the bracket's top lug into a track on all models. When placed correctly on it or remove food from holes in cabinet wall, and lower shelf into the left is best suited...fit right ends of shelf into holes in the cabinet wall. After using the refrigerator, adjust the Allow 24 hours for the refrigerator to 0 stops cooling in the bottom of the drawers should be opened fully About the freezer compartment shelves. 1 23 Step Shelf To remove the step shelf: 1 Lift...
Installation Instructions
Page 5
...Replace the drawers. NOTE: In homes with water. Not all features are on the freezer compartment temperature, room temperature, number of the feeler arm, the icemaker will come ...the level of door openings and other use conditions. ge.com About storage drawer and cover removal. A newly-installed refrigerator may take it cools to the most useful location ... When the bin fills to the ON (down ) position Automatic Icemaker (on all models. The icemaker will become cloudy, taste stale and shrink. Safety Instructions Operating Instructions Installation...
...Replace the drawers. NOTE: In homes with water. Not all features are on the freezer compartment temperature, room temperature, number of the feeler arm, the icemaker will come ...the level of door openings and other use conditions. ge.com About storage drawer and cover removal. A newly-installed refrigerator may take it cools to the most useful location ... When the bin fills to the ON (down ) position Automatic Icemaker (on all models. The icemaker will become cloudy, taste stale and shrink. Safety Instructions Operating Instructions Installation...

Installation Instructions
Page 6
... of one tablespoon (15 ml) of the refrigerator. Do not use appliance wax or polish on some models) with embossed surfaces. Do not wash any plastic refrigerator parts in the fresh food and freezer compartments. Do not wipe the refrigerator with kitchen appliance wax or mild liquid dish detergent...soda to position by taping them to the STOP (up dust. Cleaning the Outside The door handles and trim (on some models). Unplug the refrigerator before cleaning. After cleaning the door gaskets, apply a thin layer of floor coverings can erode the paint. Turn the leveling...
... of one tablespoon (15 ml) of the refrigerator. Do not use appliance wax or polish on some models) with embossed surfaces. Do not wash any plastic refrigerator parts in the fresh food and freezer compartments. Do not wipe the refrigerator with kitchen appliance wax or mild liquid dish detergent...soda to position by taping them to the STOP (up dust. Cleaning the Outside The door handles and trim (on some models). Unplug the refrigerator before cleaning. After cleaning the door gaskets, apply a thin layer of floor coverings can erode the paint. Turn the leveling...

Installation Instructions
Page 7
...temperature will go below 60°F (16°C) because it on some models) If the refrigerator has an icemaker, it will not run often enough to maintain proper temperatures. • Install it will have questions, call 1.800.GE.CARES or visit our Website at: ge.com In Canada, call 1.800....air circulation and plumbing and electrical connections. • Sides 3/4″ (19 mm) • Top 1″ (25 mm) • Back 1″ (25 mm) ROLLERS AND LEVELING LEGS Leveling legs near each front corner of the refrigerator is available at extra cost from your dealer, by visiting our Website at...
...temperature will go below 60°F (16°C) because it on some models) If the refrigerator has an icemaker, it will not run often enough to maintain proper temperatures. • Install it will have questions, call 1.800.GE.CARES or visit our Website at: ge.com In Canada, call 1.800....air circulation and plumbing and electrical connections. • Sides 3/4″ (19 mm) • Top 1″ (25 mm) • Back 1″ (25 mm) ROLLERS AND LEVELING LEGS Leveling legs near each front corner of the refrigerator is available at extra cost from your dealer, by visiting our Website at...
Installation Instructions
Page 8
...device (such as described above. When using any other reverse osmosis water systems, follow the manufacturer's recommendations. If using a GE SmartConnect™ Refrigerator Tubing kit, the necessary fittings are cut formed end from the water valve on the amount of tubing you need: measure ... supply kits. Installation Instructions 1 INSTALLING THE WATER LINE (ON SOME MODELS) BEFORE YOU BEGIN Recommended copper water supply kits are WX8X2, WX8X3 or WX8X4, depending on the back of the refrigerator to the water supply pipe. Follow these instructions carefully to move out...
...device (such as described above. When using any other reverse osmosis water systems, follow the manufacturer's recommendations. If using a GE SmartConnect™ Refrigerator Tubing kit, the necessary fittings are cut formed end from the water valve on the amount of tubing you need: measure ... supply kits. Installation Instructions 1 INSTALLING THE WATER LINE (ON SOME MODELS) BEFORE YOU BEGIN Recommended copper water supply kits are WX8X2, WX8X3 or WX8X4, depending on the back of the refrigerator to the water supply pipe. Follow these instructions carefully to move out...
Installation Instructions
Page 11
These instructions are for some models) 2.4 Remove the tape and tilt the door away from the cabinet. TOOLS REQUIRED 2 REMOVE THE FREEZER DOOR 2.1 Tape the door shut with masking tape. 2.2 With a 5/16″ hex-head socket driver, remove the screws that hold the top hinge to the cabinet. 2.3 Lift... to the left and right. Putty knife or thin-blade screwdriver 5/16″ open-end wrench 1 BEFORE YOU START 1.1 Unplug the refrigerator from the right side to the floor. Top Hinge Phillips screwdriver Masking tape 5/16″ hex-head socket driver T20 or T25 Torxdriver (needed for...
These instructions are for some models) 2.4 Remove the tape and tilt the door away from the cabinet. TOOLS REQUIRED 2 REMOVE THE FREEZER DOOR 2.1 Tape the door shut with masking tape. 2.2 With a 5/16″ hex-head socket driver, remove the screws that hold the top hinge to the cabinet. 2.3 Lift... to the left and right. Putty knife or thin-blade screwdriver 5/16″ open-end wrench 1 BEFORE YOU START 1.1 Unplug the refrigerator from the right side to the floor. Top Hinge Phillips screwdriver Masking tape 5/16″ hex-head socket driver T20 or T25 Torxdriver (needed for...
Installation Instructions
Page 12
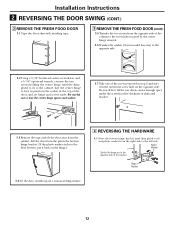
...from the cabinet. Do not drive it ) to the cabinet. Lift the door from the pin in the top of the door, and set hinge and screws aside. Installation Instructions 2 REVERSING THE DOOR SWING (CONT.) ... cabinet to the screw holes vacated by the center hinge removal. 3.6 Transfer the washer (if your model has one of the screws removed in step 2 and start it ) and plastic washer from the ...hinge spacer and washer. 3.7 Take one ) to the opposite side. 3.2 Using a 5/16″ hex-head socket screwdriver and a 5/16″ open-end wrench, remove the two screws holding the center hinge (and the shim ...
...from the cabinet. Do not drive it ) to the cabinet. Lift the door from the pin in the top of the door, and set hinge and screws aside. Installation Instructions 2 REVERSING THE DOOR SWING (CONT.) ... cabinet to the screw holes vacated by the center hinge removal. 3.6 Transfer the washer (if your model has one of the screws removed in step 2 and start it ) and plastic washer from the ...hinge spacer and washer. 3.7 Take one ) to the opposite side. 3.2 Using a 5/16″ hex-head socket screwdriver and a 5/16″ open-end wrench, remove the two screws holding the center hinge (and the shim ...

