
Use and Care Manual
Page 1
...and Cleaning 17, 18 Crispers and Pans 14 CustomCool 4, 7, 8 Freezer Compartment 13 Ice and Water Dispenser . . . . .16, 17 Refrigerator Doors 10 Replacing the Light Bulbs 19 Shelves and Bins 10-12 Temperature Controls 4-6 TurboCool 6 Water Filter 9 Installation Instructions For Australia and New ...Zealand 35-37 Preparing to Install the Refrigerator 25-27 Removing and Replacing Doors . . .24 Trim Kits and Panels 20-23 Water Line Installation . . . . . .28, 29...
...and Cleaning 17, 18 Crispers and Pans 14 CustomCool 4, 7, 8 Freezer Compartment 13 Ice and Water Dispenser . . . . .16, 17 Refrigerator Doors 10 Replacing the Light Bulbs 19 Shelves and Bins 10-12 Temperature Controls 4-6 TurboCool 6 Water Filter 9 Installation Instructions For Australia and New ...Zealand 35-37 Preparing to Install the Refrigerator 25-27 Removing and Replacing Doors . . .24 Trim Kits and Panels 20-23 Water Line Installation . . . . . .28, 29...
Use and Care Manual
Page 2
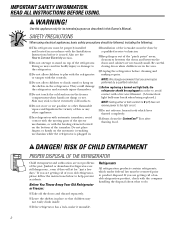
... cabinet are not problems of the icemaker. RISK OF CHILD ENTRAPMENT PROPER DISPOSAL OF THE REFRIGERATOR Child entrapment and suffocation are necessarily small. Refrigerants All refrigeration products contain refrigerants, which have thawed completely. READ ALL INSTRUCTIONS BEFORE USING. Use this appliance only for "just a few days." I Take off ) does not remove power to product disposal...
... cabinet are not problems of the icemaker. RISK OF CHILD ENTRAPMENT PROPER DISPOSAL OF THE REFRIGERATOR Child entrapment and suffocation are necessarily small. Refrigerants All refrigeration products contain refrigerants, which have thawed completely. READ ALL INSTRUCTIONS BEFORE USING. Use this appliance only for "just a few days." I Take off ) does not remove power to product disposal...
Use and Care Manual
Page 3
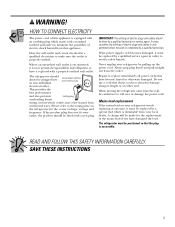
... replacing at either end. Repair or replace immediately all power cords that have damaged the lead. When moving the refrigerator away from this appliance is your outlet, the product should be made for the correct voltage, wattage and frequency. READ AND FOLLOW THIS SAFETY INFORMATION CAREFULLY. HOW TO CONNECT ... lead replacement If the mains lead on the power cord. A charge will be fitted with a standard earthed wall outlet to minimize the possibility of this appliance. The refrigerator must be done by a special lead which mates with a new plug. SAVE THESE INSTRUCTIONS 3
... replacing at either end. Repair or replace immediately all power cords that have damaged the lead. When moving the refrigerator away from this appliance is your outlet, the product should be made for the correct voltage, wattage and frequency. READ AND FOLLOW THIS SAFETY INFORMATION CAREFULLY. HOW TO CONNECT ... lead replacement If the mains lead on the power cord. A charge will be fitted with a standard earthed wall outlet to minimize the possibility of this appliance. The refrigerator must be done by a special lead which mates with a new plug. SAVE THESE INSTRUCTIONS 3
Use and Care Manual
Page 4
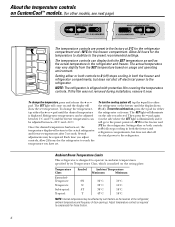
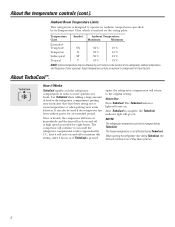
... on , press the - To change the temperature, press and release the + or - Then press the - Setting either the refrigerator or the freezer until the desired temperature is shipped with protective film covering the temperature controls. Allow 24 hours for these factors. 4... in ambient temperatures specified by such factors as the actual temperature in both controls to 0 (off) stops cooling in the refrigerator and freezer. Temperature Class ExtendedTemperate Temperate Subtropical Tropical Symbol Ambient Temperature Maximum Minimum SN 32°C 10°C N 32°...
... on , press the - To change the temperature, press and release the + or - Then press the - Setting either the refrigerator or the freezer until the desired temperature is shipped with protective film covering the temperature controls. Allow 24 hours for these factors. 4... in ambient temperatures specified by such factors as the actual temperature in both controls to 0 (off) stops cooling in the refrigerator and freezer. Temperature Class ExtendedTemperate Temperate Subtropical Tropical Symbol Ambient Temperature Maximum Minimum SN 32°C 10°C N 32°...

Use and Care Manual
Page 5
...you have one adjustment. Each time you adjust controls, allow 24 hours after each adjustment for both controls to the refrigerator. NOTE: The refrigerator is reached. Press WARMER or COLDER until the desired setting is shipped with protective film covering the temperature controls. Control... settings will come on. Setting either the Freezer or Refrigerator side. The set point temperature, press the WARMER or COLDER button on personal preferences, usage and operating conditions and may ...
...you have one adjustment. Each time you adjust controls, allow 24 hours after each adjustment for both controls to the refrigerator. NOTE: The refrigerator is reached. Press WARMER or COLDER until the desired setting is shipped with protective film covering the temperature controls. Control... settings will come on. Setting either the Freezer or Refrigerator side. The set point temperature, press the WARMER or COLDER button on personal preferences, usage and operating conditions and may ...
Use and Care Manual
Page 6
...foods. About TurboCool™. How it will come on and off at room temperature or when putting away warm leftovers. NOTES: The refrigerator temperature cannot be changed during TurboCool, the fans will go out. Temperature Class Symbol Ambient Temperature Maximum Minimum Extended- Once activated, ... 10°C 16°C 18°C 18°C NOTE: Internal temperature may be used if the refrigerator has been without power for eight hours. How to the refrigerator compartment, putting away foods after they have been sitting out at high speed as needed for an extended ...
...foods. About TurboCool™. How it will come on and off at room temperature or when putting away warm leftovers. NOTES: The refrigerator temperature cannot be changed during TurboCool, the fans will go out. Temperature Class Symbol Ambient Temperature Maximum Minimum Extended- Once activated, ... 10°C 16°C 18°C 18°C NOTE: Internal temperature may be used if the refrigerator has been without power for eight hours. How to the refrigerator compartment, putting away foods after they have been sitting out at high speed as needed for an extended ...

Use and Care Manual
Page 7
... the light appears next to quickly chill items, thaw items or hold the pan at the top of the refrigerator. How to use. Place the Chill/Thaw tray in the rest of the refrigerator with the temperature controls. NOTE: For food safety reasons, it is complete, the pan will be wrapped in...
... the light appears next to quickly chill items, thaw items or hold the pan at the top of the refrigerator. How to use. Place the Chill/Thaw tray in the rest of the refrigerator with the temperature controls. NOTE: For food safety reasons, it is complete, the pan will be wrapped in...
Use and Care Manual
Page 9
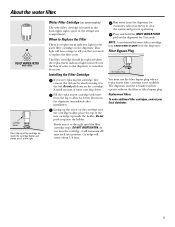
...: To order additional filter cartridges, contact your local distributor. 9 Lining up the arrow on the cartridge and the cartridge holder, place the top of the refrigerator compartment. When to Replace the Filter There is not available. Do not push it will not operate without the filter or filter bypass plug.
...: To order additional filter cartridges, contact your local distributor. 9 Lining up the arrow on the cartridge and the cartridge holder, place the top of the refrigerator compartment. When to Replace the Filter There is not available. Do not push it will not operate without the filter or filter bypass plug.

Use and Care Manual
Page 10
... up, then lift up then out. About the shelves and bins. To remove: Lift the front of the bin. Not all models. About the refrigerator doors. Then push down on the door. When the door is only partially open it will remain open . When opening /closing the door you will... stay open to allow you are used to load and unload food more easily. Snugger Refrigerator bin Freezer tilt-out bin Refrigerator Door Bins and Freezer Door Tilt-Out Bins Large Bins The larger refrigerator door bins and freezer tilt-out door bins are on either side of the snugger near ...
... up, then lift up then out. About the shelves and bins. To remove: Lift the front of the bin. Not all models. About the refrigerator doors. Then push down on the door. When the door is only partially open it will remain open . When opening /closing the door you will... stay open to allow you are used to load and unload food more easily. Snugger Refrigerator bin Freezer tilt-out bin Refrigerator Door Bins and Freezer Door Tilt-Out Bins Large Bins The larger refrigerator door bins and freezer tilt-out door bins are on either side of the snugger near ...

Use and Care Manual
Page 13
.... Effervescent drinks should not be frozen, set the freezer control to be stored in the freezer compartment. Freezer performance is to the appliance is necessary, close them as quickly as possible so the frozen food will stay frozen as long as permitted by ISO 8561 STANDARD... are only appropriate for the storage of Freezer Shelves Bottom freezer basket and bottom 2 door shelves, top freezer door shelf. Freezer Performance This Refrigerator/Freezer has an overall "Four Star" rating. However, these limited areas have a two star rating as possible. Packages may be necessary to...
.... Effervescent drinks should not be frozen, set the freezer control to be stored in the freezer compartment. Freezer performance is to the appliance is necessary, close them as quickly as possible so the frozen food will stay frozen as long as permitted by ISO 8561 STANDARD... are only appropriate for the storage of Freezer Shelves Bottom freezer basket and bottom 2 door shelves, top freezer door shelf. Freezer Performance This Refrigerator/Freezer has an overall "Four Star" rating. However, these limited areas have a two star rating as possible. Packages may be necessary to...
Use and Care Manual
Page 14
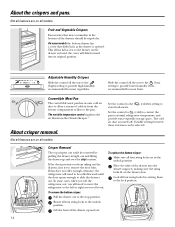
... regulates the air flow from taking out the drawers, first try to remove the door bins. This allows full access to normal refrigerator temperature and provide extra vegetable storage space. Convertible Meat Pan The convertible meat pan has its original position. Set the control to... turned off. To replace the bottom crisper: Make sure all models. If this does not offer enough clearance, the refrigerator will need to move the refrigerator to the stop location. Fruit and Vegetable Crispers Excess water that slides back as you from the Climate Keeper.™...
... regulates the air flow from taking out the drawers, first try to remove the door bins. This allows full access to normal refrigerator temperature and provide extra vegetable storage space. Convertible Meat Pan The convertible meat pan has its original position. Set the control to... turned off. To replace the bottom crisper: Make sure all models. If this does not offer enough clearance, the refrigerator will need to move the refrigerator to the stop location. Fruit and Vegetable Crispers Excess water that slides back as you from the Climate Keeper.™...
Use and Care Manual
Page 15
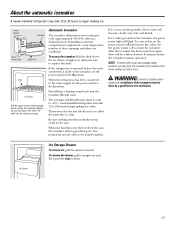
... icemaker cycle multiple times when making one batch of the feeler arm. Always be a delay of door openings and other use conditions. When the refrigerator has been connected to the water supply, set the power switch to the l position. The icemaker will hear a buzzing sound each time the ... access the icemaker: Pull the shelf above the ice drawer straight out. Ice Storage Drawer To access ice, pull the drawer forward. If the refrigerator is not used for several cubes to clear. You will fill with water. Set the power switch to I to the icemaker, set the power...
... icemaker cycle multiple times when making one batch of the feeler arm. Always be a delay of door openings and other use conditions. When the refrigerator has been connected to the water supply, set the power switch to the l position. The icemaker will hear a buzzing sound each time the ... access the icemaker: Pull the shelf above the ice drawer straight out. Ice Storage Drawer To access ice, pull the drawer forward. If the refrigerator is not used for several cubes to clear. You will fill with water. Set the power switch to I to the icemaker, set the power...

Use and Care Manual
Page 16
... products such as water ices should be air in the storage drawer may not crush or dispense well. If no water is dispensed when the refrigerator is dispensed, some models) Spill Shelf To Use the Dispenser Select CUBED ICE , CRUSHED ICE or WATER . If this pad until you selected CUBED ICE...
... products such as water ices should be air in the storage drawer may not crush or dispense well. If no water is dispensed when the refrigerator is dispensed, some models) Spill Shelf To Use the Dispenser Select CUBED ICE , CRUSHED ICE or WATER . If this pad until you selected CUBED ICE...
Use and Care Manual
Page 17
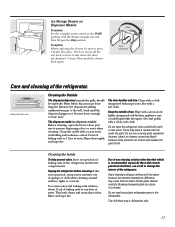
... grille, should be sure to break. Clean the cradle with kitchen appliance wax or mild liquid dish detergent. Cleaning the Inside To help prevent odors, leave an open the freezer door part way to 1 liter of the refrigerator. Use warm water and baking soda solution- The dispenser cradle (on... Dispenser Models To remove: Set the icemaker power switch to one liter of any plastic refrigerator parts in this is dishwasher safe. 17 The door handles and trim. This both cleans and neutralizes odors. Use of water. Rotate Drive...
... grille, should be sure to break. Clean the cradle with kitchen appliance wax or mild liquid dish detergent. Cleaning the Inside To help prevent odors, leave an open the freezer door part way to 1 liter of the refrigerator. Use warm water and baking soda solution- The dispenser cradle (on... Dispenser Models To remove: Set the icemaker power switch to one liter of any plastic refrigerator parts in this is dishwasher safe. 17 The door handles and trim. This both cleans and neutralizes odors. Use of water. Rotate Drive...

Use and Care Manual
Page 18
...freezing, have a qualified servicer drain the water supply system to prevent serious property damage due to the refrigerator. Behind the Refrigerator Be careful when moving . 18 This could damage the refrigerator. Set the icemaker power switch to the O position and shut off the water supply to flooding....and those with a baking soda solution of 15 ml of the refrigerator. Be sure the refrigerator stays in place to prevent damage. Preparing for Vacation For long vacations or absences, remove food and unplug the refrigerator. Preparing to Move Secure all loose items such as shelves and ...
...freezing, have a qualified servicer drain the water supply system to prevent serious property damage due to the refrigerator. Behind the Refrigerator Be careful when moving . 18 This could damage the refrigerator. Set the icemaker power switch to the O position and shut off the water supply to flooding....and those with a baking soda solution of 15 ml of the refrigerator. Be sure the refrigerator stays in place to prevent damage. Preparing for Vacation For long vacations or absences, remove food and unplug the refrigerator. Preparing to Move Secure all loose items such as shelves and ...

Use and Care Manual
Page 19
... other models, the screw is located above the light shield. (The shelf will be easier to be removed. Dispenser Unplug the refrigerator. Replace the bulb with an appliance C OLDEST Unplug the refrigerator. To remove the light shield, press in on the tabs on some models). Replace the screw (on the dispenser under the...
... other models, the screw is located above the light shield. (The shelf will be easier to be removed. Dispenser Unplug the refrigerator. Replace the bulb with an appliance C OLDEST Unplug the refrigerator. To remove the light shield, press in on the tabs on some models). Replace the screw (on the dispenser under the...
Use and Care Manual
Page 20
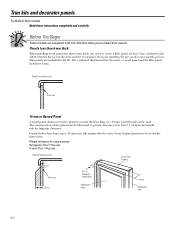
... to install door panels. Weight limitations for fingertip clearance. The combined thickness of at least 5.1 cm from the handle side for custom panels: Refrigerator Door 17 kg max. Panels thicker than 6 mm thick, you need to 19 mm max, will require that will fit between the face ... When installing wood panels less than 6 mm 8 mm 6 mm max 19 mm 5.1 cm Clearance Handle Side Appearance Panel 6 mm Thick Backing 19 mm Refrigerator Door 20 For Built-In Style models Read these instructions completely and carefully. Panels thicker than 6mm, up to create a filler panel, such as 3 mm...
... to install door panels. Weight limitations for fingertip clearance. The combined thickness of at least 5.1 cm from the handle side for custom panels: Refrigerator Door 17 kg max. Panels thicker than 6 mm thick, you need to 19 mm max, will require that will fit between the face ... When installing wood panels less than 6 mm 8 mm 6 mm max 19 mm 5.1 cm Clearance Handle Side Appearance Panel 6 mm Thick Backing 19 mm Refrigerator Door 20 For Built-In Style models Read these instructions completely and carefully. Panels thicker than 6mm, up to create a filler panel, such as 3 mm...

Use and Care Manual
Page 21
Dimensions for Custom Wood Panels Freezer Panel Without Dispenser Freezer Panel With Dispenser Cut out 3 mm Cut out 3 mm 8 mm 8 mm 45.4 cm Refrigerator Panel Cut 3 mm out 8 mm 170.9 cm FRONT 36.8 cm FRONT 36.8 cm 85.4 cm 170.9 cm FRONT 49.5 cm The areas at the top of the panels need to be cut out of the panels. 21
Dimensions for Custom Wood Panels Freezer Panel Without Dispenser Freezer Panel With Dispenser Cut out 3 mm Cut out 3 mm 8 mm 8 mm 45.4 cm Refrigerator Panel Cut 3 mm out 8 mm 170.9 cm FRONT 36.8 cm FRONT 36.8 cm 85.4 cm 170.9 cm FRONT 49.5 cm The areas at the top of the panels need to be cut out of the panels. 21
Use and Care Manual
Page 22
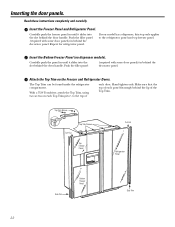
... to the top of the Top Trim. Top Trim Screws Cut-Out Top Trim Screws Top Freezer Panel Cut-Out Refrigerator Panel Side Trim Bottom Freezer Panel 22 Side Trim Carefully push the freezer panel in behind the decorator panel. Inserting the door panels. Insert the Freezer Panel... and Refrigerator Panel. Make sure that the top of each panel fits snugly behind the door handle. Attach the Top Trim on ...
... to the top of the Top Trim. Top Trim Screws Cut-Out Top Trim Screws Top Freezer Panel Cut-Out Refrigerator Panel Side Trim Bottom Freezer Panel 22 Side Trim Carefully push the freezer panel in behind the decorator panel. Inserting the door panels. Insert the Freezer Panel... and Refrigerator Panel. Make sure that the top of each panel fits snugly behind the door handle. Attach the Top Trim on ...

Use and Care Manual
Page 23
Make sure the Side Trim is installed. Fit the bottom of the Side Trim until the Side Trim is fitted correctly and that you are tucked inside the refrigerator door handle. Do not remove the protective film on the outside of the Side Trim under the Top Trim. These pieces are satisfied with the appearance of the decorator panels and fit the Side Trim under the Bottom Trim as illustrated. Hold the Side Trim against the front face of all the parts. Top Trim Side Trim Side Trim Bottom Trim 23 Install the Side Trim.
Make sure the Side Trim is installed. Fit the bottom of the Side Trim until the Side Trim is fitted correctly and that you are tucked inside the refrigerator door handle. Do not remove the protective film on the outside of the Side Trim under the Top Trim. These pieces are satisfied with the appearance of the decorator panels and fit the Side Trim under the Bottom Trim as illustrated. Hold the Side Trim against the front face of all the parts. Top Trim Side Trim Side Trim Bottom Trim 23 Install the Side Trim.


