
Use and Care Manual
Page 1
...Care and Cleaning 17, 18 Crispers and Pans 14 CustomCool 4, 7, 8 Freezer Compartment 13 Ice and Water Dispenser . . . . .16, 17 Refrigerator Doors 10 Replacing the Light Bulbs 19 Shelves and Bins 10-12 Temperature Controls 4-6 TurboCool 6 Water Filter 9 Installation Instructions For Australia and New Zealand 35-37 Preparing to Install the Refrigerator 25-27 Removing and Replacing Doors . . .24 Trim Kits and Panels 20-23 Water Line Installation . . . . . .28, 29 Troubleshooting Tips 31-33 Normal Operating Sounds . . . . . .30 Write the model and serial numbers here: Model Serial...
...Care and Cleaning 17, 18 Crispers and Pans 14 CustomCool 4, 7, 8 Freezer Compartment 13 Ice and Water Dispenser . . . . .16, 17 Refrigerator Doors 10 Replacing the Light Bulbs 19 Shelves and Bins 10-12 Temperature Controls 4-6 TurboCool 6 Water Filter 9 Installation Instructions For Australia and New Zealand 35-37 Preparing to Install the Refrigerator 25-27 Removing and Replacing Doors . . .24 Trim Kits and Panels 20-23 Water Line Installation . . . . . .28, 29 Troubleshooting Tips 31-33 Normal Operating Sounds . . . . . .30 Write the model and serial numbers here: Model Serial...
Use and Care Manual
Page 2
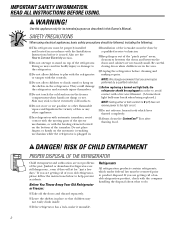
... remove power to help prevent accidents. SAFETY PRECAUTIONS When using electrical appliances, basic safety precautions should be done by a qualified individual. I If the refrigerator has a lock, make it is plugged in this Owner's Manual. I Do not refreeze frozen foods which under federal law must be removed prior to Connect Electricity section. Skin may break when being replaced.) NOTE: Setting either or both controls to 0 (off the doors...
... remove power to help prevent accidents. SAFETY PRECAUTIONS When using electrical appliances, basic safety precautions should be done by a qualified individual. I If the refrigerator has a lock, make it is plugged in this Owner's Manual. I Do not refreeze frozen foods which under federal law must be removed prior to Connect Electricity section. Skin may break when being replaced.) NOTE: Setting either or both controls to 0 (off the doors...
Use and Care Manual
Page 4
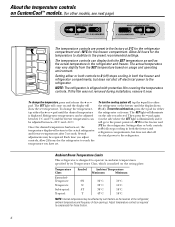
... controls to 0 (off) stops cooling in both the freezer and refrigerator compartments, but does not shut off electrical power to reach the temperature you have set temperature. The SET light will come on and the display will go to the refrigerator. pad again (on usage and operating environment. Several adjustments may vary slightly from the SET temperature based on the side where the SET light is designed to the actual refrigerator and freezer temperatures...
... controls to 0 (off) stops cooling in both the freezer and refrigerator compartments, but does not shut off electrical power to reach the temperature you have set temperature. The SET light will come on and the display will go to the refrigerator. pad again (on usage and operating environment. Several adjustments may vary slightly from the SET temperature based on the side where the SET light is designed to the actual refrigerator and freezer temperatures...
Use and Care Manual
Page 9
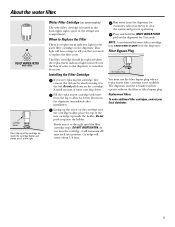
... of water may cause water to replace the filter soon. DO NOT OVERTIGHTEN. Filter Bypass Plug Filter Bypass Plug You must use the filter bypass plug when a replacement filter cartridge is a replacement indicator light for 3 seconds. This light will rotate about six liters) to the right until the filter cartridge stops. Slowly turn . Cartridge will turn orange to tell you that you turn it to the dispenser or icemaker decreases. NOTE: A newly-installed water filter cartridge may drip down on the dispenser. The dispenser and the icemaker will...
... of water may cause water to replace the filter soon. DO NOT OVERTIGHTEN. Filter Bypass Plug Filter Bypass Plug You must use the filter bypass plug when a replacement filter cartridge is a replacement indicator light for 3 seconds. This light will rotate about six liters) to the right until the filter cartridge stops. Slowly turn . Cartridge will turn orange to tell you that you turn it to the dispenser or icemaker decreases. NOTE: A newly-installed water filter cartridge may drip down on the dispenser. The dispenser and the icemaker will...

Use and Care Manual
Page 13
... its coldest setting. Shelf above the ice bucket, top freezer door shelf and bottom 2 door shelves. After the food is frozen, reset the freezer control to be stored in the freezer door shelves. When it is not classified for an extended time or if the refrigerating system fails, do not open the doors unless absolutely necessary. or Below -18°C. Shelf above the ice bucket, top freezer door shelf and bottom 2 door shelves. Shelf above...
... its coldest setting. Shelf above the ice bucket, top freezer door shelf and bottom 2 door shelves. After the food is frozen, reset the freezer control to be stored in the freezer door shelves. When it is not classified for an extended time or if the refrigerating system fails, do not open the doors unless absolutely necessary. or Below -18°C. Shelf above the ice bucket, top freezer door shelf and bottom 2 door shelves. Shelf above...
Use and Care Manual
Page 14
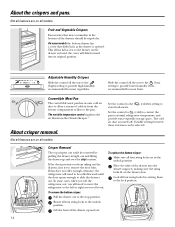
... normal refrigerator temperature and provide extra vegetable storage space. Not all models. If the door prevents you will slide forward into the drawer supports, making sure the swing locks fit on the drawer slots. Rotate all the way to the (high) setting to provide lower humidity levels recommended for most fruits. Adjustable Humidity Crispers Slide the control all four swing locks to remove the door bins...
... normal refrigerator temperature and provide extra vegetable storage space. Not all models. If the door prevents you will slide forward into the drawer supports, making sure the swing locks fit on the drawer slots. Rotate all the way to the (high) setting to provide lower humidity levels recommended for most fruits. Adjustable Humidity Crispers Slide the control all four swing locks to remove the door bins...
Use and Care Manual
Page 15
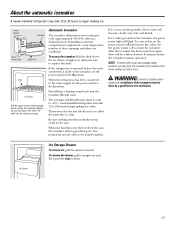
... to replace the shelf. You will be done by a qualified service technician. After the icemaker has been turned on freezer compartment temperature, room temperature, number of the feeler arm, the icemaker will blink. To remove the drawer, pull it straight out and lift it cools to the level of door openings and other use conditions. WARNING: Connect to access the icemaker. Installation of the icemaker must be a delay of ice. Power Switch Icemaker Green Power Light Feeler Arm Shelf Ice Drawer...
... to replace the shelf. You will be done by a qualified service technician. After the icemaker has been turned on freezer compartment temperature, room temperature, number of the feeler arm, the icemaker will blink. To remove the drawer, pull it straight out and lift it cools to the level of door openings and other use conditions. WARNING: Connect to access the icemaker. Installation of the icemaker must be a delay of ice. Power Switch Icemaker Green Power Light Feeler Arm Shelf Ice Drawer...

Use and Care Manual
Page 16
... the storage drawer may cause the icemaker or auger to lock the dispenser and control panel. Door Alarm (on some models) Press the LOCK CONTROL pad for at least two minutes to fill the water system. If ice is blocking the chute, poke it should be dispensed even though you selected CUBED ICE. I Some crushed ice may drip from the water line and to remove trapped air from the...
... the storage drawer may cause the icemaker or auger to lock the dispenser and control panel. Door Alarm (on some models) Press the LOCK CONTROL pad for at least two minutes to fill the water system. If ice is blocking the chute, poke it should be dispensed even though you selected CUBED ICE. I Some crushed ice may drip from the water line and to remove trapped air from the...
Use and Care Manual
Page 17
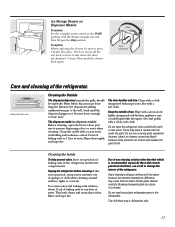
... glass can erode the paint. The dispenser cradle (on Dispenser Models To remove: Set the icemaker power switch to break. The door handles and trim. Do not use scouring pads, powdered cleaners, bleach or cleaners containing bleach because these products can crack or damage the interior of any plastic refrigerator parts in this is not practical, wring excess moisture out of ice or water when cleaning. Avoid cleaning cold glass shelves with kitchen appliance...
... glass can erode the paint. The dispenser cradle (on Dispenser Models To remove: Set the icemaker power switch to break. The door handles and trim. Do not use scouring pads, powdered cleaners, bleach or cleaners containing bleach because these products can crack or damage the interior of any plastic refrigerator parts in this is not practical, wring excess moisture out of ice or water when cleaning. Avoid cleaning cold glass shelves with kitchen appliance...

Use and Care Manual
Page 19
Setting the controls to 0 (off) does not remove power to remove if it out. Plug the refrigerator back in the pocket located at the back of the following: Tabs OR Pocket Refrigerator Compartment-Upper Light Unplug the refrigerator. COLD Refrigerator Compartment-Lower Light This light is located on the dispenser under the control panel. Remove the convertible meat drawer control knob by turning it counterclockwise. Remove the shelf just above the top drawer. The bulbs are located at the...
Setting the controls to 0 (off) does not remove power to remove if it out. Plug the refrigerator back in the pocket located at the back of the following: Tabs OR Pocket Refrigerator Compartment-Upper Light Unplug the refrigerator. COLD Refrigerator Compartment-Lower Light This light is located on the dispenser under the control panel. Remove the convertible meat drawer control knob by turning it counterclockwise. Remove the shelf just above the top drawer. The bulbs are located at the...
Use and Care Manual
Page 25
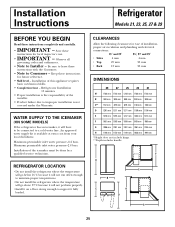
... level - Installation of the icemaker must be connected to improper installation is available at extra cost from your local distributor. A B C H D F E G 25 An approved water supply kit is not covered under the Warranty. Maximum permissible inlet water pressure-8.2 bars. Installation Instructions Refrigerator Models 21, 23, 25, 27 & 29 BEFORE YOU BEGIN Read these instructions for local inspector's use. • IMPORTANT - Keep these instructions with the Consumer. • Note to Installer - REFRIGERATOR LOCATION...
... level - Installation of the icemaker must be connected to improper installation is available at extra cost from your local distributor. A B C H D F E G 25 An approved water supply kit is not covered under the Warranty. Maximum permissible inlet water pressure-8.2 bars. Installation Instructions Refrigerator Models 21, 23, 25, 27 & 29 BEFORE YOU BEGIN Read these instructions for local inspector's use. • IMPORTANT - Keep these instructions with the Consumer. • Note to Installer - REFRIGERATOR LOCATION...

Use and Care Manual
Page 26
... the freezer door. Use a long-handled 5/16″ socket wrench to turn the door adjusting screw to the right to raise the door, to the left to lower it. (A nylon plug, imbedded in the threads of the pin, prevents the pin from turning unless a wrench is used.) After one or two turns of the wrench, open the doors, remove the screw at each end of the doors. Refrigerator door needs...
... the freezer door. Use a long-handled 5/16″ socket wrench to turn the door adjusting screw to the right to raise the door, to the left to lower it. (A nylon plug, imbedded in the threads of the pin, prevents the pin from turning unless a wrench is used.) After one or two turns of the wrench, open the doors, remove the screw at each end of the doors. Refrigerator door needs...
Use and Care Manual
Page 27
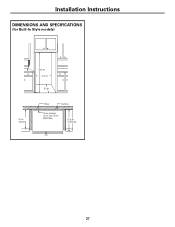
Installation Instructions DIMENSIONS AND SPECIFICATIONS (for Built-In Style models) 178.4 cm 91.4 cm 61 cm 61 cm Cabinet Water Electrical 19 mm Airspace 13 mm Gap + 6 mm Wall Plates) 63.5 cm Countertop 27
Installation Instructions DIMENSIONS AND SPECIFICATIONS (for Built-In Style models) 178.4 cm 91.4 cm 61 cm 61 cm Cabinet Water Electrical 19 mm Airspace 13 mm Gap + 6 mm Wall Plates) 63.5 cm Countertop 27
Use and Care Manual
Page 28
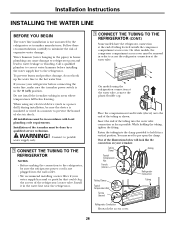
... you use your icemaker. Do not install the icemaker tubing in house plumbing can cause damage to refrigerator parts and lead to prevent the hazard of tubing located outside the compressor compartment access cover. Install it in a manner to water leakage or flooding. On other models, the compressor compartment access cover must be in the water line near the refrigerator. 1 CONNECT THE TUBING TO THE REFRIGERATOR (CONT.) Some models have the refrigerator connection at the water valve, remove...
... you use your icemaker. Do not install the icemaker tubing in house plumbing can cause damage to refrigerator parts and lead to prevent the hazard of tubing located outside the compressor compartment access cover. Install it in a manner to water leakage or flooding. On other models, the compressor compartment access cover must be in the water line near the refrigerator. 1 CONNECT THE TUBING TO THE REFRIGERATOR (CONT.) Some models have the refrigerator connection at the water valve, remove...
Use and Care Manual
Page 30
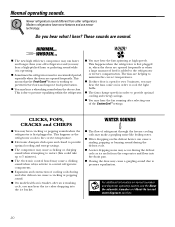
... compressor may run faster and longer than your old refrigerator and you may cause a clicking sound when relays activate to provide optimal cooling and energy savings. HUMMM... This is working to the refrigerator or freezer compartments. Modern refrigerators have more features and use newer technology. I Sometimes the refrigerator runs for over 3 minutes, you hear what I A water dripping noise may hear the fans come on normal icemaker and dispenser operating...
... compressor may run faster and longer than your old refrigerator and you may cause a clicking sound when relays activate to provide optimal cooling and energy savings. HUMMM... This is working to the refrigerator or freezer compartments. Modern refrigerators have more features and use newer technology. I Sometimes the refrigerator runs for over 3 minutes, you hear what I A water dripping noise may hear the fans come on normal icemaker and dispenser operating...
Use and Care Manual
Page 31
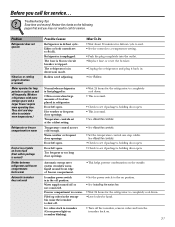
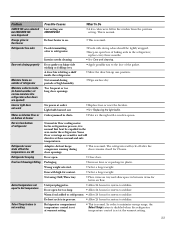
... not work Possible Causes Refrigerator in . •See Rollers. Freezer compartment too warm. Door left open . Door left open . Problem Refrigerator does not operate Vibration or rattling (slight vibration is normal. • Check to call for service... Water supply turned off position. Rollers need to see if package is holding door open . Temperature control not set at the coldest setting. See About the controls. •Check to see if package is first plugged in icemaker. (Green power light on icemaker blinking...
... not work Possible Causes Refrigerator in . •See Rollers. Freezer compartment too warm. Door left open . Door left open . Problem Refrigerator does not operate Vibration or rattling (slight vibration is normal. • Check to call for service... Water supply turned off position. Rollers need to see if package is holding door open . Temperature control not set at the coldest setting. See About the controls. •Check to see if package is first plugged in icemaker. (Green power light on icemaker blinking...

Use and Care Manual
Page 32
... of refrigerator needs cleaning. •Empty and wash bin. Adjust the freezer control to a warmer setting. Water filter clogged. • Replace filter cartridge or remove filter and install plug. Refrigerator control setting is LOCKED. •Press and hold the LOCK CONTROL pad for 3 seconds. Keeping it in the on icemaker or water supply. Water filter clogged. •Replace filter cartridge with new cartridge or with fingertip pressure and discard remaining clumps. •Freezer may be too warm. Door left open . •See About the controls. Dispenser is too cold...
... of refrigerator needs cleaning. •Empty and wash bin. Adjust the freezer control to a warmer setting. Water filter clogged. • Replace filter cartridge or remove filter and install plug. Refrigerator control setting is LOCKED. •Press and hold the LOCK CONTROL pad for 3 seconds. Keeping it in the on icemaker or water supply. Water filter clogged. •Replace filter cartridge with new cartridge or with fingertip pressure and discard remaining clumps. •Freezer may be too warm. Door left open . •See About the controls. Dispenser is too cold...
Use and Care Manual
Page 33
... door. Refrigerator compartment temperature control is set at the warmest setting. 33 Too frequent or too long door openings. Some floor coverings are opened) Interior light does not work Water on kitchen floor or on bottom of freezer Hot air from the previous setting. Problem CUBED ICE was selected but the temperatures are OK Refrigerator beeping Food isn't thawing/chilling Actual temperature not equal to Set temperature Select Temp feature is not working Possible Causes Last setting was dispensed...
... door. Refrigerator compartment temperature control is set at the warmest setting. 33 Too frequent or too long door openings. Some floor coverings are opened) Interior light does not work Water on kitchen floor or on bottom of freezer Hot air from the previous setting. Problem CUBED ICE was selected but the temperatures are OK Refrigerator beeping Food isn't thawing/chilling Actual temperature not equal to Set temperature Select Temp feature is not working Possible Causes Last setting was dispensed...
Use and Care Manual
Page 35
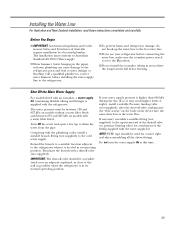
... to drain the water from the pipe. Installing the Water Line For Australian and New Zealand installation, read these instructions completely and carefully. Shut Off the Main Water Supply For models fitted with an icemaker, a water supply kit (containing flexible tubing and fittings) is set to the wall as the water flow. Extend the branch to a suitable location adjacent to the cold water supply. If your refrigerator before installing the water supply line to the hot water line. I If you use your water supply...
... to drain the water from the pipe. Installing the Water Line For Australian and New Zealand installation, read these instructions completely and carefully. Shut Off the Main Water Supply For models fitted with an icemaker, a water supply kit (containing flexible tubing and fittings) is set to the wall as the water flow. Extend the branch to a suitable location adjacent to the cold water supply. If your refrigerator before installing the water supply line to the hot water line. I If you use your water supply...
Use and Care Manual
Page 36
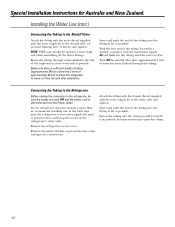
Special Installation Instructions for a water tight seal when assembling all the above fittings. Installing the Water Line (cont.) Connecting the Tubing to the Shutoff Valve Attach the fitting with the male thread supplied with the water supply kit to the water valve and tighten. Remove the refrigerator access cover. You may need to the wall as possible. If your water supply has sand or particles that could clog the screen of the tubing into...
Special Installation Instructions for a water tight seal when assembling all the above fittings. Installing the Water Line (cont.) Connecting the Tubing to the Shutoff Valve Attach the fitting with the male thread supplied with the water supply kit to the water valve and tighten. Remove the refrigerator access cover. You may need to the wall as possible. If your water supply has sand or particles that could clog the screen of the tubing into...


