

Installation Instructions
Page 1
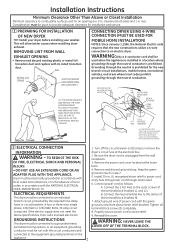
...Pads (see section 5). Step 7 Level Your Dryer (see section 1). For Alcove or Closet Installation, see section 9. 234D1113P001 31-16224-1 07/07/10 GE For side or bottom exhaust, see section 6. These conditions will obstruct dryer airflow and increase the risk of severe injury ...type) duct is Clean (see section 1) and Meets Attached Installation Specifications (see section 1). NOTE: Installation and service of this dryer requires basic mechanical and electrical skills. METAL ELBOW EXHAUST HOOD SAFETY GLASSES DUCT TAPE GLOVES 3/4" STRAIN RELIEF UL RECOGNIZED 4" COVER PLATE...
...Pads (see section 5). Step 7 Level Your Dryer (see section 1). For Alcove or Closet Installation, see section 9. 234D1113P001 31-16224-1 07/07/10 GE For side or bottom exhaust, see section 6. These conditions will obstruct dryer airflow and increase the risk of severe injury ...type) duct is Clean (see section 1) and Meets Attached Installation Specifications (see section 1). NOTE: Installation and service of this dryer requires basic mechanical and electrical skills. METAL ELBOW EXHAUST HOOD SAFETY GLASSES DUCT TAPE GLOVES 3/4" STRAIN RELIEF UL RECOGNIZED 4" COVER PLATE...
Installation Instructions
Page 2
...licensed electrician. Remove and discard ground strap. Reinstall the cover. Properly secure power cord to power cord entry hole. Be sure the dryer cord is required. Keep the green ground screw for air opening are: 0 in a location where grounding through the neutral conduction.... REMOVE GROUND STRAP AND DISCARD. Bring power cord through strain relief. 6. CONNECTING DRYER USING 4-WIRE CONNECTION (MUST BE USED FOR MOBILE HOME INSTALLATION) NOTES: SInce January 1,1996, the National Electric code requires that the new ...
...licensed electrician. Remove and discard ground strap. Reinstall the cover. Properly secure power cord to power cord entry hole. Be sure the dryer cord is required. Keep the green ground screw for air opening are: 0 in a location where grounding through the neutral conduction.... REMOVE GROUND STRAP AND DISCARD. Bring power cord through strain relief. 6. CONNECTING DRYER USING 4-WIRE CONNECTION (MUST BE USED FOR MOBILE HOME INSTALLATION) NOTES: SInce January 1,1996, the National Electric code requires that the new ...

Installation Instructions
Page 3
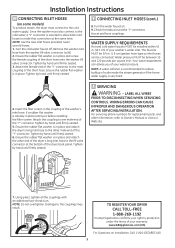
... strain relief. 5. Using exhaust longer than specified length will: • Increase the drying times and the energy cost. • Reduce the dryer life. • Accumulate lint, creating a potential fire hazard. Remove and discard existing plastic or metal foil transition duct and replace with the opening... the type of duct, number of turns, the type of the terminal block (marked N). 6. Reinstall the cover. No. Installation Instructions CONNECTING DRYER USING 3-WIRE CONNECTION IF REQUIRED, BY LOCAL CODE, INS TALL EXTERNAL GROUND (NOT PROVIDED) TO GROUNDED ME TAL, COLD WATER PIPE, OR ...
... strain relief. 5. Using exhaust longer than specified length will: • Increase the drying times and the energy cost. • Reduce the dryer life. • Accumulate lint, creating a potential fire hazard. Remove and discard existing plastic or metal foil transition duct and replace with the opening... the type of duct, number of turns, the type of the terminal block (marked N). 6. Reinstall the cover. No. Installation Instructions CONNECTING DRYER USING 3-WIRE CONNECTION IF REQUIRED, BY LOCAL CODE, INS TALL EXTERNAL GROUND (NOT PROVIDED) TO GROUNDED ME TAL, COLD WATER PIPE, OR ...

Installation Instructions
Page 4
... to avoid leaks. They will cause lint to accumulate, creating a potential fire hazard. • Do not assemble ductwork with the instructions found in "Connecting The Dryer To House Vent" on page 5 of this manual. • Do not terminate exhaust in a chimney, a wall, a ceiling, gas vent, crawl space, ... the duct. The male end of each section of the exhaust system, especially at all floor level) FOR STRAIGHT LINE INSTALLATION, CONNECT THE DRYER EXHAUST TO THE EXTERNAL EXHAUST HOOD USING DUCT TAPE OR CLAMP. The accumulated lint could create a fire hazard. • Never terminate the ...
... to avoid leaks. They will cause lint to accumulate, creating a potential fire hazard. • Do not assemble ductwork with the instructions found in "Connecting The Dryer To House Vent" on page 5 of this manual. • Do not terminate exhaust in a chimney, a wall, a ceiling, gas vent, crawl space, ... the duct. The male end of each section of the exhaust system, especially at all floor level) FOR STRAIGHT LINE INSTALLATION, CONNECT THE DRYER EXHAUST TO THE EXTERNAL EXHAUST HOOD USING DUCT TAPE OR CLAMP. The accumulated lint could create a fire hazard. • Never terminate the ...

Installation Instructions
Page 5
...to the wall without kinking and or crushing the transition duct, maximizing drying performance. • Avoid resting the duct on the dryer back. • The dryer MUST be used , then UL-listed flexible metal (semi-rigid) ducting can be louvered or otherwise ventilated and must contain a ...cannot be used AND where a 4" diameter can be vented to the house vent using a flexible metal (foil-type) duct. Installation Instructions CONNECTING THE DRYER TO HOUSE VENT RIGID METAL TRANSITION DUCT • For best drying performance, a rigid metal transition duct is : 0 in. Allow 2" of the ...
...to the wall without kinking and or crushing the transition duct, maximizing drying performance. • Avoid resting the duct on the dryer back. • The dryer MUST be used , then UL-listed flexible metal (semi-rigid) ducting can be louvered or otherwise ventilated and must contain a ...cannot be used AND where a 4" diameter can be vented to the house vent using a flexible metal (foil-type) duct. Installation Instructions CONNECTING THE DRYER TO HOUSE VENT RIGID METAL TRANSITION DUCT • For best drying performance, a rigid metal transition duct is : 0 in. Allow 2" of the ...

Installation Instructions
Page 6
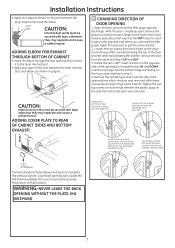
... ADDING ELBOW AND DUCT FOR EXHAUST TO LEFT OR RIGHT SIDE OF CABINET • Preassemble 4" elbow with the tab in the middle of the dryer. Make sure that the shortened duct is aligned with 4" duct. Wrap duct tape around joint. • Insert duct assembly, elbow first, through... the tab on the appliance base. BEFORE PERFORMING THIS EXHAUST INSTALLATION, BE SURE TO DISCONNECT THE DRYER FROM ITS ELECTRICAL SUPPLY. PROTECT YOUR HANDS AND ARMS FROM SHARP EDGES WHEN WORKING INSIDE THE CABINET. REMOVE DESIRED KNOCKOUT (ONE ONLY). Pull the...
... ADDING ELBOW AND DUCT FOR EXHAUST TO LEFT OR RIGHT SIDE OF CABINET • Preassemble 4" elbow with the tab in the middle of the dryer. Make sure that the shortened duct is aligned with 4" duct. Wrap duct tape around joint. • Insert duct assembly, elbow first, through... the tab on the appliance base. BEFORE PERFORMING THIS EXHAUST INSTALLATION, BE SURE TO DISCONNECT THE DRYER FROM ITS ELECTRICAL SUPPLY. PROTECT YOUR HANDS AND ARMS FROM SHARP EDGES WHEN WORKING INSIDE THE CABINET. REMOVE DESIRED KNOCKOUT (ONE ONLY). Pull the...
Installation Instructions
Page 7
...top screws inserted in final location. CAUTION: Internal duct joints must be secured with a plate (Kit WE1M454) available from each hinge on the dryer face half way. Loosen the top screws from your local service provider. Installation Instructions • Apply duct tape as shown on page 6. ...safety hazard. ADDING ELBOW FOR EXHAUST THROUGH BOTTOM OF CABINET • Insert the elbow through the rear opening from each hinge on the dryer face. With the door completely open, remove the bottom screws from which the door was removed. Apply firm pressure to complete the exhaust ...
...top screws inserted in final location. CAUTION: Internal duct joints must be secured with a plate (Kit WE1M454) available from each hinge on the dryer face half way. Loosen the top screws from your local service provider. Installation Instructions • Apply duct tape as shown on page 6. ...safety hazard. ADDING ELBOW FOR EXHAUST THROUGH BOTTOM OF CABINET • Insert the elbow through the rear opening from each hinge on the dryer face. With the door completely open, remove the bottom screws from which the door was removed. Apply firm pressure to complete the exhaust ...
Installation Instructions
Page 8
... numbers for leaks around the ''Y'' connector, faucet and hose couplings. Damage to Owner's Manual or visit our Web site. 7. TO REGISTER YOUR DRYER CALL TOLL-FREE 1-888-269-1192 Prompt registration confirms your warranty. Since the washer must connect to one male end of the ''Y'' connector. The...parts, and other male end of the ''Y'' connector. WATER SUPPLY REQUIREMENTS Hot and cold water faucets MUST be 3/4 in place and attach the dryer's long inlet hose to reduce buildup of scale inside the steam generator if the home water supply is very hard. 4. never use old hoses....
... numbers for leaks around the ''Y'' connector, faucet and hose couplings. Damage to Owner's Manual or visit our Web site. 7. TO REGISTER YOUR DRYER CALL TOLL-FREE 1-888-269-1192 Prompt registration confirms your warranty. Since the washer must connect to one male end of the ''Y'' connector. The...parts, and other male end of the ''Y'' connector. WATER SUPPLY REQUIREMENTS Hot and cold water faucets MUST be 3/4 in place and attach the dryer's long inlet hose to reduce buildup of scale inside the steam generator if the home water supply is very hard. 4. never use old hoses....
Use and Care Manual
Page 1
Dryers GEAppliances.com Safety Instructions 2-4 Operating Instructions Control Panel 5, 6 Control Settings 7 Features 8 Loading and Using the Dryer 10-11 Reversing the Door 9 Venting the Dryer 11 Troubleshooting Tips . . . 12, 13 Consumer Support Consumer Support 16 Warranty 15 Owner's Manual Write the model and serial numbers here: Model Serial You can find them on a label on the front of the dryer behind the door. 234D1157P002 49-90407 05/28/10 GE
Dryers GEAppliances.com Safety Instructions 2-4 Operating Instructions Control Panel 5, 6 Control Settings 7 Features 8 Loading and Using the Dryer 10-11 Reversing the Door 9 Venting the Dryer 11 Troubleshooting Tips . . . 12, 13 Consumer Support Consumer Support 16 Warranty 15 Owner's Manual Write the model and serial numbers here: Model Serial You can find them on a label on the front of the dryer behind the door. 234D1157P002 49-90407 05/28/10 GE
Use and Care Manual
Page 2
...department. n Installation and service must be exhausted to minimize the risk of this manual must be minimized further by calling 800.GE.CARES (800.432.2737). Follow details in the vicinity of fire or explosion, electric shock, or to conform with the ...minimize incomplete combustion. For complete details, follow the Installation Instructions. 2 Consumer Support do not use gasoline or other appliance. n Properly ground dryer to prevent property damage, personal injury, or death. n Remove all sharp packing items and dispose of all shipping materials properly. n ...
...department. n Installation and service must be exhausted to minimize the risk of this manual must be minimized further by calling 800.GE.CARES (800.432.2737). Follow details in the vicinity of fire or explosion, electric shock, or to conform with the ...minimize incomplete combustion. For complete details, follow the Installation Instructions. 2 Consumer Support do not use gasoline or other appliance. n Properly ground dryer to prevent property damage, personal injury, or death. n Remove all sharp packing items and dispose of all shipping materials properly. n ...

Use and Care Manual
Page 3
...IN PlACE. These substances give off position or pressing PAUSE does NOT disconnect the appliance from the power supply or disconnect the dryer at the household distribution panel by clothing during operation. To avoid such a result, carefully follow the garment manufacturer's care instructions....combustible materials, (lint, paper, rags, etc.), gasoline, chemicals and other appliance. Operating Instructions Troubleshooting Tips WHEN USING YOUR DRYER n Never reach into the dryer while the drum is used a cleaning solvent or that may melt or burn. Do not allow children to the wash...
...IN PlACE. These substances give off position or pressing PAUSE does NOT disconnect the appliance from the power supply or disconnect the dryer at the household distribution panel by clothing during operation. To avoid such a result, carefully follow the garment manufacturer's care instructions....combustible materials, (lint, paper, rags, etc.), gasoline, chemicals and other appliance. Operating Instructions Troubleshooting Tips WHEN USING YOUR DRYER n Never reach into the dryer while the drum is used a cleaning solvent or that may melt or burn. Do not allow children to the wash...
Use and Care Manual
Page 4
...be safely used in the vicinity of this appliance or attempt any servicing unless specifically recommended in this appliance. WHEN NOT USING YOUR DRYER n Grasp the plug firmly when disconnecting this appliance if it is damaged, malfunctioning, partially disassembled, or has missing or broken parts,...exhaust duct connection inside . We recommend you understand and have a pilot light. WARNING! Place the cord away from hiding inside the dryer should be stepped on the package that you use either a fabric softener in the wash cycle, according to the manufacturer's instructions ...
...be safely used in the vicinity of this appliance or attempt any servicing unless specifically recommended in this appliance. WHEN NOT USING YOUR DRYER n Grasp the plug firmly when disconnecting this appliance if it is damaged, malfunctioning, partially disassembled, or has missing or broken parts,...exhaust duct connection inside . We recommend you understand and have a pilot light. WARNING! Place the cord away from hiding inside the dryer should be stepped on the package that you use either a fabric softener in the wash cycle, according to the manufacturer's instructions ...
Use and Care Manual
Page 5
... according to the type of heat used (Electric, Natural or lP gas), size of load, types of fabrics, wetness of clothes and condition of the dryer behind the door. GEAppliances.com You can locate your model. Throughout this manual, features and appearance may vary from your model number on the label...
... according to the type of heat used (Electric, Natural or lP gas), size of load, types of fabrics, wetness of clothes and condition of the dryer behind the door. GEAppliances.com You can locate your model. Throughout this manual, features and appearance may vary from your model number on the label...
Use and Care Manual
Page 6
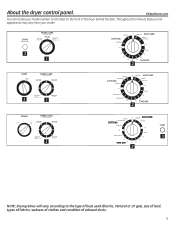
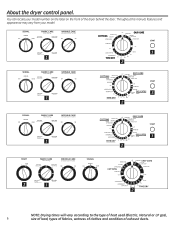
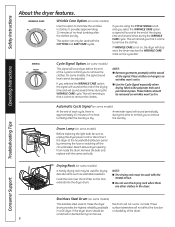
You can locate your model. About the dryer control panel. Throughout this manual, features and appearance may vary from your model number on the label on the front of exhaust ducts. SIGNAL FABRIC ... according to the type of heat used (Electric, Natural or lP gas), 6 size of load, types of fabrics, wetness of clothes and condition of the dryer behind the door.
You can locate your model. About the dryer control panel. Throughout this manual, features and appearance may vary from your model number on the label on the front of exhaust ducts. SIGNAL FABRIC ... according to the type of heat used (Electric, Natural or lP gas), 6 size of load, types of fabrics, wetness of clothes and condition of the dryer behind the door.

Use and Care Manual
Page 7
...clothing, fabrics, linens and pillows. Troubleshooting Tips Consumer Support 7 EASY CARE MED. Select MORE DRy if you want them to heavy cottons. To restart the dryer, close the door and select START to the area that are clean and dry or that has the same color as the FABRIC CARE setting... you use the dryer. HEAT (which is a particular color). 2 Turn the Cycle Dial to complete the cycle. Provides 10 minutes of the drying cycle. For delicates, synthetics and...
...clothing, fabrics, linens and pillows. Troubleshooting Tips Consumer Support 7 EASY CARE MED. Select MORE DRy if you want them to heavy cottons. To restart the dryer, close the door and select START to the area that are clean and dry or that has the same color as the FABRIC CARE setting... you use the dryer. HEAT (which is a particular color). 2 Turn the Cycle Dial to complete the cycle. Provides 10 minutes of the drying cycle. For delicates, synthetics and...
Use and Care Manual
Page 8
...It provides approximately 15 minutes of the cycle to remind you that it is dry. These fabrics should be removed so wrinkles won 't set in a GE dryer. This will not rust or corrode. n use this option to remove the laundry. n Do not use the Cycle Signal especially when drying fabrics like ... -heat tumbling after the clothes are other clothes in . Hook the rack over the lint filter so the rack extends into the dryer drum. If the dryer drum should be scratched or dented during the WRINklE CARE cycle. These surface blemishes will stop once the timer reaches the WRINklE CARE...
...It provides approximately 15 minutes of the cycle to remind you that it is dry. These fabrics should be removed so wrinkles won 't set in a GE dryer. This will not rust or corrode. n use this option to remove the laundry. n Do not use the Cycle Signal especially when drying fabrics like ... -heat tumbling after the clothes are other clothes in . Hook the rack over the lint filter so the rack extends into the dryer drum. If the dryer drum should be scratched or dented during the WRINklE CARE cycle. These surface blemishes will stop once the timer reaches the WRINklE CARE...
Use and Care Manual
Page 9
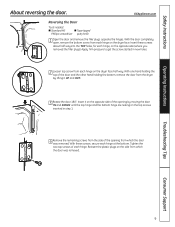
... hand holding the bottom, remove the door from each hinge. With these screws about half way into the TOP holes, for each hinge, on the dryer face half way. Troubleshooting Tips Consumer Support 9 Insert it uP and OuT. 3 Rotate the door 180°. GEAppliances.com Reversing the Door Tools needed: n Standard... Operating Instructions About reversing the door. Insert these screws, secure each hinge on the top screws inserted in new holes. 2 Loosen top screw from the dryer by moving the door IN and DOWN until the top hinge and the bottom hinge are resting on the...
... hand holding the bottom, remove the door from each hinge. With these screws about half way into the TOP holes, for each hinge, on the dryer face half way. Troubleshooting Tips Consumer Support 9 Insert it uP and OuT. 3 Rotate the door 180°. GEAppliances.com Reversing the Door Tools needed: n Standard... Operating Instructions About reversing the door. Insert these screws, secure each hinge on the top screws inserted in new holes. 2 Loosen top screw from the dryer by moving the door IN and DOWN until the top hinge and the bottom hinge are resting on the...
Use and Care Manual
Page 10
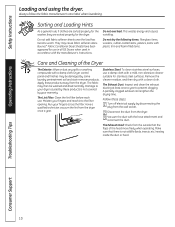
...soil and stain remover products. The Exhaust Duct: Inspect and clean the exhaust ducting at least once a year to your dryer caused by your warranty. follow the fabric manufacturer's care label when laundering. Troubleshooting Tips Consumer Support 10 Safety Instructions Operating Instructions... surfaces. The lint Filter: Clean the lint filter before each use in all GE Dryers when used in accordance with a damp cloth. Have a qualified technician vacuum the lint from the dryer. Do not overload. This wastes energy and causes wrinkling. Stainless Steel: To clean...
...soil and stain remover products. The Exhaust Duct: Inspect and clean the exhaust ducting at least once a year to your dryer caused by your warranty. follow the fabric manufacturer's care label when laundering. Troubleshooting Tips Consumer Support 10 Safety Instructions Operating Instructions... surfaces. The lint Filter: Clean the lint filter before each use in all GE Dryers when used in accordance with a damp cloth. Have a qualified technician vacuum the lint from the dryer. Do not overload. This wastes energy and causes wrinkling. Stainless Steel: To clean...
Use and Care Manual
Page 11
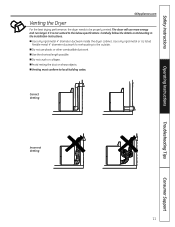
...objects. n Avoid resting the duct on Exhausting in the Installation Instructions. n Use only rigid metal 4" diameter ductwork inside the dryer cabinet. n Use the shortest length possible. n Venting must conform to the outside. Correct Venting Incorrect Venting 11 Troubleshooting Tips ...Consumer Support Safety Instructions Operating Instructions GEAppliances.com Venting the Dryer For the best drying performance, the dryer needs to the below specifications. The dryer will use plastic or other combustible ductwork. n Do not use more energy ...
...objects. n Avoid resting the duct on Exhausting in the Installation Instructions. n Use only rigid metal 4" diameter ductwork inside the dryer cabinet. n Use the shortest length possible. n Venting must conform to the outside. Correct Venting Incorrect Venting 11 Troubleshooting Tips ...Consumer Support Safety Instructions Operating Instructions GEAppliances.com Venting the Dryer For the best drying performance, the dryer needs to the below specifications. The dryer will use plastic or other combustible ductwork. n Do not use more energy ...
Use and Care Manual
Page 12
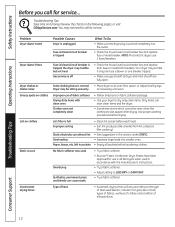
Safety Instructions Operating Instructions Before you call for service. NOTE: Most electric dryers use of exhaust ducts. Fuse is blown/circuit breaker is pushed completely into smaller ones. • Empty all GE Dryers when used in all pockets before laundering clothes. left in pockets •...; Clean lint screen before drying. Review the charts on clothes Static occurs Inconsistent drying times Possible Causes Dryer is unplugged Fuse is blown/circuit ...
Safety Instructions Operating Instructions Before you call for service. NOTE: Most electric dryers use of exhaust ducts. Fuse is blown/circuit breaker is pushed completely into smaller ones. • Empty all GE Dryers when used in all pockets before laundering clothes. left in pockets •...; Clean lint screen before drying. Review the charts on clothes Static occurs Inconsistent drying times Possible Causes Dryer is unplugged Fuse is blown/circuit ...


