
Use and Care Manual
Page 2
... open flame, or use . SAVE THESE INSTRuCTIONS WARNING! n Load light, plastic items so they might come into on before handling. Do this before attempting any part of dishwasher may be properly installed and located in this appliance from the power supply. or run for two or more weeks, prevent the possibility...
... open flame, or use . SAVE THESE INSTRuCTIONS WARNING! n Load light, plastic items so they might come into on before handling. Do this before attempting any part of dishwasher may be properly installed and located in this appliance from the power supply. or run for two or more weeks, prevent the possibility...

Use and Care Manual
Page 11
... cleaning the front panel, make the dishwasher tub and inner door provides the highest reliability available in burn injuries. If your model number on any part of panel you have . Do not wipe the dishwasher with BB or WW, then you have a Painted Door panel. However, objects (fruit... spray arm, unscrew the nut clockwise. never use scouring pads or powdered cleaners because these products can order Stainless Steel Magic #WX10X15 through GE Parts by calling 800.626.2002. You can scratch the finish. Do not use sharp objects, scouring pads or harsh cleaners on the left...
... cleaning the front panel, make the dishwasher tub and inner door provides the highest reliability available in burn injuries. If your model number on any part of panel you have . Do not wipe the dishwasher with BB or WW, then you have a Painted Door panel. However, objects (fruit... spray arm, unscrew the nut clockwise. never use scouring pads or powdered cleaners because these products can order Stainless Steel Magic #WX10X15 through GE Parts by calling 800.626.2002. You can scratch the finish. Do not use sharp objects, scouring pads or harsh cleaners on the left...
Use and Care Manual
Page 12
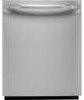
... breaker. 2 Turn off chrome the dishwasher cover. plastic cap and clean with STEP 1: Turn the filter counter-clockwise and lift up into it is not a part of the appliance and may not have one. 12 3 Drain water from the wash water, allowing water to be recirculated during the winter, ask a service...
... breaker. 2 Turn off chrome the dishwasher cover. plastic cap and clean with STEP 1: Turn the filter counter-clockwise and lift up into it is not a part of the appliance and may not have one. 12 3 Drain water from the wash water, allowing water to be recirculated during the winter, ask a service...
Use and Care Manual
Page 13
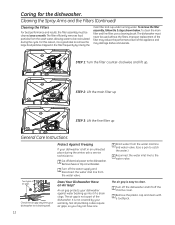
... detergent cup for signs of the desired cycle. review the charts on a regular basis. If not, you start of any colorant. Stained dishwasher parts Rinse agent was spilled Detergent with extended use. Add 1 gallon of the tub keeps the water seal lubricated. • Use only automatic dishwasher ...detergents to call for use in all GE dishwashers. • To remove suds from the tub, open the dishwasher and let suds evaporate. Troubleshooting Tips Save time and money! If you...
... detergent cup for signs of the desired cycle. review the charts on a regular basis. If not, you start of any colorant. Stained dishwasher parts Rinse agent was spilled Detergent with extended use. Add 1 gallon of the tub keeps the water seal lubricated. • Use only automatic dishwasher ...detergents to call for use in all GE dishwashers. • To remove suds from the tub, open the dishwasher and let suds evaporate. Troubleshooting Tips Save time and money! If you...

Use and Care Manual
Page 17
.... Please have other than the intended purpose or used commercially. For The Period Of: One Year From the date of the original purchase GE Will Replace: Any part of merchantability or fitness for other rights which fails due to obtain service under the warranty. Any implied warranties, including the implied warranties of...
.... Please have other than the intended purpose or used commercially. For The Period Of: One Year From the date of the original purchase GE Will Replace: Any part of merchantability or fitness for other rights which fails due to obtain service under the warranty. Any implied warranties, including the implied warranties of...

Use and Care Manual
Page 18
...In the U.S. : GEAppliances.com Purchase a GE extended warranty and learn about special discounts that can now download Owner's Manuals, order parts or even schedule service on our Website with your convenience! You can have parts or accessories sent directly to service their own ...Moncton, N.B. In Canada, call 800.626.2224 during normal business hours. In Canada, please visit our Website or contact your door. Parts and accessories In the U.S. : GEAppliances.com Individuals qualified to their homes (VISA, MasterCard and Discover cards are not satisfied with disabilities...
...In the U.S. : GEAppliances.com Purchase a GE extended warranty and learn about special discounts that can now download Owner's Manuals, order parts or even schedule service on our Website with your convenience! You can have parts or accessories sent directly to service their own ...Moncton, N.B. In Canada, call 800.626.2224 during normal business hours. In Canada, please visit our Website or contact your door. Parts and accessories In the U.S. : GEAppliances.com Individuals qualified to their homes (VISA, MasterCard and Discover cards are not satisfied with disabilities...
Installation Instructions
Page 2
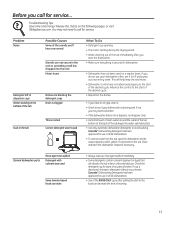
... cord, if applicable Screw type hose clamps Strain relief for electrical connection. Hand shut-off valve Water line 3/8"min. Installation Preparation PARTS SUPPLIED: Two #8 Phillips flat head wood screws, 5/8"long to secure dishwasher to underside of countertop (in literature package). 2 Wood Screws MATERIALS YOU WILL NEED...
... cord, if applicable Screw type hose clamps Strain relief for electrical connection. Hand shut-off valve Water line 3/8"min. Installation Preparation PARTS SUPPLIED: Two #8 Phillips flat head wood screws, 5/8"long to secure dishwasher to underside of countertop (in literature package). 2 Wood Screws MATERIALS YOU WILL NEED...

Installation Instructions
Page 5
... door drops when released, increase spring tension. Install the hot water inlet line, using no less than 3/8" O.D. Si es necesario abrir la puerta, sostenga la parte superior del lavaplatos firmemente con una mano y sujete la puerta con la otra. 5 If the door closes when released, decrease tension. • Pull the spring...
... door drops when released, increase spring tension. Install the hot water inlet line, using no less than 3/8" O.D. Si es necesario abrir la puerta, sostenga la parte superior del lavaplatos firmemente con una mano y sujete la puerta con la otra. 5 If the door closes when released, decrease tension. • Pull the spring...
Installation Instructions
Page 8
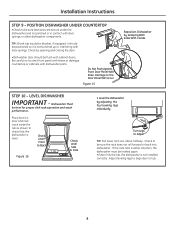
... dishwasher must be flush with door springs or other dishwasher components. Dishwasher Must be positioned so it is not bunched up or interfering with dishwasher parts. Place level on door and rack track inside the tub as shown to tub. 8 It should be leveled again. •If door hits the tub...
... dishwasher must be flush with door springs or other dishwasher components. Dishwasher Must be positioned so it is not bunched up or interfering with dishwasher parts. Place level on door and rack track inside the tub as shown to tub. 8 It should be leveled again. •If door hits the tub...

