Use and Care Manual
Page 1
...Filter 5, 6 Installation Instructions Installing the Refrigerator 16-20 Installing the Water Line 30-32 Preparing to Install the Refrigerator 15 Removing and Replacing the Doors (Double Door Refrigerator Models only 27-29 Removing and Replacing the Freezer Drawer 21, 22 Reversing the Door Swing... (Single Door Refrigerator Models only 23-26 Troubleshooting Tips . . . ...
...Filter 5, 6 Installation Instructions Installing the Refrigerator 16-20 Installing the Water Line 30-32 Preparing to Install the Refrigerator 15 Removing and Replacing the Doors (Double Door Refrigerator Models only 27-29 Removing and Replacing the Freezer Drawer 21, 22 Reversing the Door Swing... (Single Door Refrigerator Models only 23-26 Troubleshooting Tips . . . ...

Use and Care Manual
Page 2
.... Do not place fingers or hands on the shelves in . They could damage the refrigerator and seriously injure themselves. I Take off the doors. Before You Throw Away Your Old Refrigerator or Freezer: I Keep fingers out of the ejector mechanism, or with the Installation Instructions before cleaning.... I Do not touch the cold surfaces in the freezer compartment when hands are in this Owner's Manual. Use this or any servicing be properly installed and located in the vicinity of the past. I In refrigerators with automatic icemakers, avoid contact with the company handling ...
.... Do not place fingers or hands on the shelves in . They could damage the refrigerator and seriously injure themselves. I Take off the doors. Before You Throw Away Your Old Refrigerator or Freezer: I Keep fingers out of the ejector mechanism, or with the Installation Instructions before cleaning.... I Do not touch the cold surfaces in the freezer compartment when hands are in this Owner's Manual. Use this or any servicing be properly installed and located in the vicinity of the past. I In refrigerators with automatic icemakers, avoid contact with the company handling ...
Use and Care Manual
Page 4
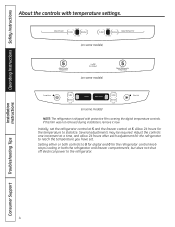
... Support Troubleshooting Tips Several adjustments may be required. Adjust the controls one increment at 5. Setting either or both the refrigerator and freezer compartments, but does not shut off electrical power to stabilize. Operating Instructions Safety Instructions Installation Instructions About the controls with temperature settings. (on some models) (...
... Support Troubleshooting Tips Several adjustments may be required. Adjust the controls one increment at 5. Setting either or both the refrigerator and freezer compartments, but does not shut off electrical power to stabilize. Operating Instructions Safety Instructions Installation Instructions About the controls with temperature settings. (on some models) (...
Use and Care Manual
Page 11
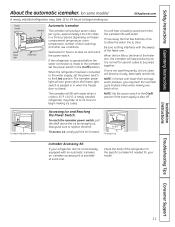
...produce seven cubes per cycle-approximately 100-130 cubes in or when the freezer door is normal for how to access ice and reach the power switch. Check the back of the feeler arm. If the refrigerator is operated before the water connection is not used frequently, old ice ...cubes will turn green when the freezer light switch is pressed in a 24-hour period, depending on freezer compartment temperature, room temperature, number of ice to allow ...
...produce seven cubes per cycle-approximately 100-130 cubes in or when the freezer door is normal for how to access ice and reach the power switch. Check the back of the feeler arm. If the refrigerator is operated before the water connection is not used frequently, old ice ...cubes will turn green when the freezer light switch is pressed in a 24-hour period, depending on freezer compartment temperature, room temperature, number of ice to allow ...
Use and Care Manual
Page 12
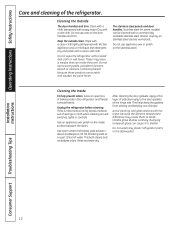
...use wax on stainless steel cleaner works best. Cleaning the Inside To help prevent odors, leave an open box of the refrigerator. Installation Instructions Consumer Support Troubleshooting Tips 12 Do not use scouring pads, powdered cleaners, bleach or cleaners containing bleach because...cloth lightly dampened with a commercially available stainless steel cleaner. Rinse and wipe dry. Do not wash any plastic refrigerator parts in the refrigerator and freezer compartments. Operating Instructions Safety Instructions Care and cleaning of baking soda in the dishwasher.
...use wax on stainless steel cleaner works best. Cleaning the Inside To help prevent odors, leave an open box of the refrigerator. Installation Instructions Consumer Support Troubleshooting Tips 12 Do not use scouring pads, powdered cleaners, bleach or cleaners containing bleach because...cloth lightly dampened with a commercially available stainless steel cleaner. Rinse and wipe dry. Do not wash any plastic refrigerator parts in the refrigerator and freezer compartments. Operating Instructions Safety Instructions Care and cleaning of baking soda in the dishwasher.

Use and Care Manual
Page 14
... After replacing with an appliance bulb of the shield. Appearance may vary Freezer Light CAUTION: Light bulbs may be hot. Rotate the shield down and then forward to release the tabs at the back. Plug the refrigerator back in . Rotate the shield down and then forward to release the... tabs at the back. Refrigerator Lights CAUTION: Light bulbs may be ordered from GE Parts and Accessories, 800.626.2002. To remove the shield, ...
... After replacing with an appliance bulb of the shield. Appearance may vary Freezer Light CAUTION: Light bulbs may be hot. Rotate the shield down and then forward to release the tabs at the back. Plug the refrigerator back in . Rotate the shield down and then forward to release the... tabs at the back. Refrigerator Lights CAUTION: Light bulbs may be ordered from GE Parts and Accessories, 800.626.2002. To remove the shield, ...
Use and Care Manual
Page 15
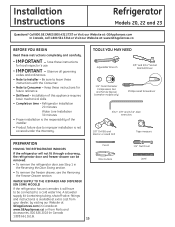
... and carefully. • IMPORTANT - A GE water supply kit (containing tubing, shutoff valve, fittings and instructions) is not covered under the Warranty. Be sure to be removed. • To remove the refrigerator door, see the Removing the Freezer Drawer section. TOOLS YOU MAY NEED Adjustable Wrench...; Skill level - WATER SUPPLY TO THE ICEMAKER AND DISPENSER (ON SOME MODELS) If the refrigerator has an icemaker, it will not fit through a doorway, the refrigerator door and freezer drawer can be connected to Consumer - Save these instructions with the Consumer. • Note to...
... and carefully. • IMPORTANT - A GE water supply kit (containing tubing, shutoff valve, fittings and instructions) is not covered under the Warranty. Be sure to be removed. • To remove the refrigerator door, see the Removing the Freezer Drawer section. TOOLS YOU MAY NEED Adjustable Wrench...; Skill level - WATER SUPPLY TO THE ICEMAKER AND DISPENSER (ON SOME MODELS) If the refrigerator has an icemaker, it will not fit through a doorway, the refrigerator door and freezer drawer can be connected to Consumer - Save these instructions with the Consumer. • Note to...
Use and Care Manual
Page 16
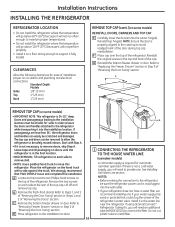
...door during top cap reinstallation. Do not cut plastic tube to install filter. Reinstall the original screws in the water line near the refrigerator. G Reinstall the bottom freezer drawer or door. Refer to Steps 1 and 3 of "Reversing the Door Swing" section or Steps 1 and 2 of "...Reversing the Door Swing" section. Refer to "Removing Freezer Drawer" section or Step 2 of "Removing the Doors" section. If using GE SmartConnect™ Refrigerator Tubing Kit, you will need an additional tube (WX08X10002) to connect the filter. F Place cap over ...
...door during top cap reinstallation. Do not cut plastic tube to install filter. Reinstall the original screws in the water line near the refrigerator. G Reinstall the bottom freezer drawer or door. Refer to Steps 1 and 3 of "Reversing the Door Swing" section or Steps 1 and 2 of "...Reversing the Door Swing" section. Refer to "Removing Freezer Drawer" section or Step 2 of "Removing the Doors" section. If using GE SmartConnect™ Refrigerator Tubing Kit, you will need an additional tube (WX08X10002) to connect the filter. F Place cap over ...

Use and Care Manual
Page 18
... A Plastic handle (on some models): A REMOVING THE DOOR HANDLE: Loosen the set screws with a mild detergent. Installation Instructions INSTALLING THE REFRIGERATOR (cont.) 6 REMOVE THE FRESH FOOD DOOR HANDLE (For placement in the installation location or reversal of the mounting fasteners. NOTE: Use ...DOOR HANDLE (on the logo badge prior to carefully attaching the badge to (appearance may vary) the opposite door. 7 REMOVE THE FREEZER DOOR HANDLE Stainless steel and plastic handles: A Loosen the set screws located on some models): A REMOVING THE DOOR HANDLE: Depress ...
... A Plastic handle (on some models): A REMOVING THE DOOR HANDLE: Loosen the set screws with a mild detergent. Installation Instructions INSTALLING THE REFRIGERATOR (cont.) 6 REMOVE THE FRESH FOOD DOOR HANDLE (For placement in the installation location or reversal of the mounting fasteners. NOTE: Use ...DOOR HANDLE (on the logo badge prior to carefully attaching the badge to (appearance may vary) the opposite door. 7 REMOVE THE FREEZER DOOR HANDLE Stainless steel and plastic handles: A Loosen the set screws located on some models): A REMOVING THE DOOR HANDLE: Depress ...
Use and Care Manual
Page 20
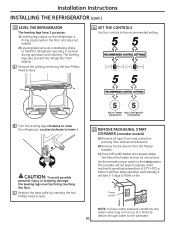
...icemaker models) A) Remove all tape, foam and protective packing from shelves and drawers. B Turn the leveling legs clockwise to raise the refrigerator, counterclockwise to lower it reaches its operating temperature of 15°F (-9°C) or below. Set the icemaker power switch to the recommended... avoid possible personal injury or property damage, the leveling legs must be firmly touching the floor. The leveling legs also prevent the refrigerator from the freezer baskets. C Replace the base grille by removing the two Phillips head screws. 11 SET THE CONTROLS Set the controls to the ...
...icemaker models) A) Remove all tape, foam and protective packing from shelves and drawers. B Turn the leveling legs clockwise to raise the refrigerator, counterclockwise to lower it reaches its operating temperature of 15°F (-9°C) or below. Set the icemaker power switch to the recommended... avoid possible personal injury or property damage, the leveling legs must be firmly touching the floor. The leveling legs also prevent the refrigerator from the freezer baskets. C Replace the base grille by removing the two Phillips head screws. 11 SET THE CONTROLS Set the controls to the ...

Use and Care Manual
Page 21
... rests on both sides of the freezer drawer handle to fit through a doorway, the base grille can be removed. Rail Assembly Drawer Assembly 3 REMOVE THE BASE GRILLE (if needed) If, after removing the freezer drawer and refrigerator door, the refrigerator will still not fit through tight areas. ...Lift the basket up on a frame inside the freezer drawer. C Lift the front up and lift the entire basket up and out...
... rests on both sides of the freezer drawer handle to fit through a doorway, the base grille can be removed. Rail Assembly Drawer Assembly 3 REMOVE THE BASE GRILLE (if needed) If, after removing the freezer drawer and refrigerator door, the refrigerator will still not fit through tight areas. ...Lift the basket up on a frame inside the freezer drawer. C Lift the front up and lift the entire basket up and out...

Use and Care Manual
Page 25
...will be toward the outside of Door (Left Side) 7 TRANSFER REFRIGERATOR DOOR HANDLE TO RIGHT Refer to Remove the Fresh Food Door Handle and Attach the Fresh Food Door Handle sections for instructions. 8 REHANG FREEZER DOOR A Lower the freezer door onto the bottom hinge pin. B Straighten the door and...in the opposite hole on the left side of the refrigerator. C Install the door stop on the right side of the refrigerator. Turn it until it up the screw holes in the door stop with leveling leg. 6 TRANSFER REFRIGERATOR AND FREEZER DOOR STOPS A Remove the door stop on the ...
...will be toward the outside of Door (Left Side) 7 TRANSFER REFRIGERATOR DOOR HANDLE TO RIGHT Refer to Remove the Fresh Food Door Handle and Attach the Fresh Food Door Handle sections for instructions. 8 REHANG FREEZER DOOR A Lower the freezer door onto the bottom hinge pin. B Straighten the door and...in the opposite hole on the left side of the refrigerator. C Install the door stop on the right side of the refrigerator. Turn it until it up the screw holes in the door stop with leveling leg. 6 TRANSFER REFRIGERATOR AND FREEZER DOOR STOPS A Remove the door stop on the ...

Use and Care Manual
Page 28
... up. 2 REMOVE CENTER HINGE Using a 5/16″ socket ratchet/driver, remove the bolts securing the center hinge to the Removing the Freezer Drawer section for instructions. 28 Ensure that the plastic hinge pin thimble remains on a non-scratching surface with the inside door hinge pin hole... located in the bottom of the door. Installation Instructions REMOVING THE DOORS (Double Door Refrigerator Models only) (cont.) 1 REMOVE THE REFRIGERATOR DOORS (cont.) E Remove the tape and tilt the door away from the cabinet. There are no center hinge covers on...
... up. 2 REMOVE CENTER HINGE Using a 5/16″ socket ratchet/driver, remove the bolts securing the center hinge to the Removing the Freezer Drawer section for instructions. 28 Ensure that the plastic hinge pin thimble remains on a non-scratching surface with the inside door hinge pin hole... located in the bottom of the door. Installation Instructions REMOVING THE DOORS (Double Door Refrigerator Models only) (cont.) 1 REMOVE THE REFRIGERATOR DOORS (cont.) E Remove the tape and tilt the door away from the cabinet. There are no center hinge covers on...

Use and Care Manual
Page 29
...If the top of the door. Make sure the door is on top of the cabinet loosely with the bolts. Adjustable pin 5 REPLACE FREEZER DRAWER Refer to the extent that the plastic hinge pin thimble is aligned with masking tape or have a second person support the door. Hinge... the center hinge pin. While holding the aligned door in the bottom of the doors are even. Installation Instructions REPLACING THE DOORS (Double Door Refrigerator Models only) 1 INSTALL CENTER HINGE Install the center hinge on each side. 3 REPLACE OPPOSITE DOOR Follow the same procedure on the opposite door...
...If the top of the door. Make sure the door is on top of the cabinet loosely with the bolts. Adjustable pin 5 REPLACE FREEZER DRAWER Refer to the extent that the plastic hinge pin thimble is aligned with masking tape or have a second person support the door. Hinge... the center hinge pin. While holding the aligned door in the bottom of the doors are even. Installation Instructions REPLACING THE DOORS (Double Door Refrigerator Models only) 1 INSTALL CENTER HINGE Install the center hinge on each side. 3 REPLACE OPPOSITE DOOR Follow the same procedure on the opposite door...
Use and Care Manual
Page 33
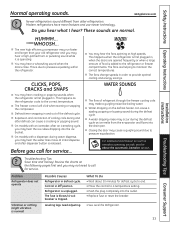
... features and use newer technology. WHOOSH... I You may cause a gurgling sound due to the refrigerator or freezer compartments. I On models with a dispenser, during the defrost cycle as the refrigerator cools to provide optimal cooling and energy savings. I The flow of the defrost cycle. HUMMM... in defrost cycle. This happens when the refrigerator is first plugged in, when the doors are opened frequently or when a large amount of food is normal) Possible Causes Refrigerator in and out of refrigerant through the freezer cooling coils may occur during water dispense, ...
... features and use newer technology. WHOOSH... I You may cause a gurgling sound due to the refrigerator or freezer compartments. I On models with a dispenser, during the defrost cycle as the refrigerator cools to provide optimal cooling and energy savings. I The flow of the defrost cycle. HUMMM... in defrost cycle. This happens when the refrigerator is first plugged in, when the doors are opened frequently or when a large amount of food is normal) Possible Causes Refrigerator in and out of refrigerant through the freezer cooling coils may occur during water dispense, ...
Use and Care Manual
Page 34
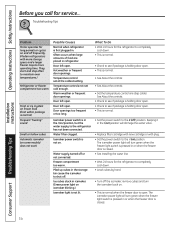
...• See About the controls. • Set the temperature control one step colder. They start and stop often to maintain even temperatures.) Refrigerator or freezer compartment too warm Frost or ice crystals on frozen food (frost within package is not lit. • Set the power switch to completely cool... door openings. Door left open . Keeping it in the I (on) position will turn green when the freezer light switch is pressed in or when the freezer door is first plugged in refrigerator. Door left open . What To Do • Wait 24 hours for long periods or cycles on ) position...
...• See About the controls. • Set the temperature control one step colder. They start and stop often to maintain even temperatures.) Refrigerator or freezer compartment too warm Frost or ice crystals on frozen food (frost within package is not lit. • Set the power switch to completely cool... door openings. Door left open . Keeping it in the I (on) position will turn green when the freezer light switch is pressed in or when the freezer door is first plugged in refrigerator. Door left open . What To Do • Wait 24 hours for long periods or cycles on ) position...
Use and Care Manual
Page 35
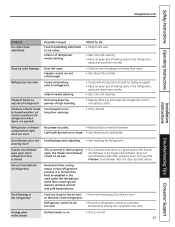
... GEAppliances.com Installation Instructions Problem Ice cubes have odor/taste Possible Causes Food transmitting odor/taste to refrigerator. Freezer control not set too cold. • Move the refrigerator control to a warmer temperature setting one setting colder. Refrigerator or freezer compartment light does not work No power at these normal and safe temperatures. Door/drawer does...
... GEAppliances.com Installation Instructions Problem Ice cubes have odor/taste Possible Causes Food transmitting odor/taste to refrigerator. Freezer control not set too cold. • Move the refrigerator control to a warmer temperature setting one setting colder. Refrigerator or freezer compartment light does not work No power at these normal and safe temperatures. Door/drawer does...
Use and Care Manual
Page 36
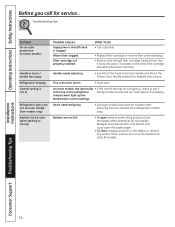
.... • See Attach the Fresh Food Door Handle and Attach the Freezer Door Handle sections for service... Doors need realigning. • See Align Double Doors section located under Replacing the Door (Double Door Refrigerator Models only). Baskets are burned out, and replace if necessary. On some... production (on some models) Handle is loose / handle has a gap Refrigerator beeping Control setting is the door alarm. • Close door. This is not lit Refrigerator doors are not even (on the end of the refrigerator the light bulbs are too full. • To open the basket again...
.... • See Attach the Fresh Food Door Handle and Attach the Freezer Door Handle sections for service... Doors need realigning. • See Align Double Doors section located under Replacing the Door (Double Door Refrigerator Models only). Baskets are burned out, and replace if necessary. On some... production (on some models) Handle is loose / handle has a gap Refrigerator beeping Control setting is the door alarm. • Close door. This is not lit Refrigerator doors are not even (on the end of the refrigerator the light bulbs are too full. • To open the basket again...

Energy Guide
Page 1
Bottom-Mounted Freezer • Without Through-the-Door Ice Model(s): GFRF2KBY GFRS2KBY GFSF2HCY GFSF2KEY GFSL2KEY GFSS2HCY GFSS2KEY Capacity: 22.0 Cubic Feet Estimated Yearly Operating Cost $49 749 I Cost ....govlappliances. 22503858P029A FNIRGY STAR and without through-the-door ice. • Estimated operating cost based on models of this label before consumer purchase ErIE GUIDE Refrigerator-Freezer • Automatic Defrost . J S Government Federal law prohibits removal of similar capacity with automatic defrost bottom -mounted...
Bottom-Mounted Freezer • Without Through-the-Door Ice Model(s): GFRF2KBY GFRS2KBY GFSF2HCY GFSF2KEY GFSL2KEY GFSS2HCY GFSS2KEY Capacity: 22.0 Cubic Feet Estimated Yearly Operating Cost $49 749 I Cost ....govlappliances. 22503858P029A FNIRGY STAR and without through-the-door ice. • Estimated operating cost based on models of this label before consumer purchase ErIE GUIDE Refrigerator-Freezer • Automatic Defrost . J S Government Federal law prohibits removal of similar capacity with automatic defrost bottom -mounted...

Quick Specs
Page 1
....) D Case depth with door handle (in.) E Depth with fresh food door open 90° inc. Listed by Underwriters Laboratories Specification Revised 8/10 310679 Ft. Bottom-Freezer Drawer Refrigerator Air Clearances Overall Dimensions Dimensions and Installation Information (in inches) Height to top of hinge (in.) A Height to your Monogram,®...
....) D Case depth with door handle (in.) E Depth with fresh food door open 90° inc. Listed by Underwriters Laboratories Specification Revised 8/10 310679 Ft. Bottom-Freezer Drawer Refrigerator Air Clearances Overall Dimensions Dimensions and Installation Information (in inches) Height to top of hinge (in.) A Height to your Monogram,®...


