Use and Care Manual
Page 1
Dryers GEAppliances.com Safety Instructions 2-4 Operating Instructions Controls 4-7 Quick Start 5 Using the Dryer 8 Care and Cleaning 9 Installation Instructions Reversing the Door Swing 10-13 Stacking the Washer/Dryer . . . . .14-16 Troubleshooting Tips 17-20 Consumer Support Consumer Support 22 Warranty 21 Owner's Manual GFDS175 GFDS170 Printed in Mexico Write the model and serial numbers here: Model Serial They are on the label on the front of the dryer behind the door. 234D2270P001 49-90520 04-14 GE
Dryers GEAppliances.com Safety Instructions 2-4 Operating Instructions Controls 4-7 Quick Start 5 Using the Dryer 8 Care and Cleaning 9 Installation Instructions Reversing the Door Swing 10-13 Stacking the Washer/Dryer . . . . .14-16 Troubleshooting Tips 17-20 Consumer Support Consumer Support 22 Warranty 21 Owner's Manual GFDS175 GFDS170 Printed in Mexico Write the model and serial numbers here: Model Serial They are on the label on the front of the dryer behind the door. 234D2270P001 49-90520 04-14 GE
Use and Care Manual
Page 2
... or attempt any servicing unless specifically recommended in the user maintenance instructions or in published user repair instructions that could result in your appliance, follow the safety alert symbol and the word "DANGER", "WARNING", or "CAUTION". DO NOT operate the dryer without the lint filter in the Installation Instructions for grounding instructions. Pressing the Power or Start/Pause button DOES NOT disconnect power. „ DO NOT operate this appliance where...
... or attempt any servicing unless specifically recommended in the user maintenance instructions or in published user repair instructions that could result in your appliance, follow the safety alert symbol and the word "DANGER", "WARNING", or "CAUTION". DO NOT operate the dryer without the lint filter in the Installation Instructions for grounding instructions. Pressing the Power or Start/Pause button DOES NOT disconnect power. „ DO NOT operate this appliance where...
Use and Care Manual
Page 7
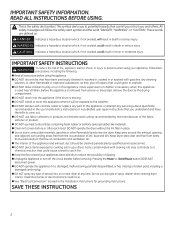
... when the filter needs cleaning. The clothes should be used when the machine is continuously monitoring the amount As the cycle begins, you can change the delay time in the display. A sound is pressed. Pause button is made . The lights will not restart unless the door is activated. 15 Display Displays the approximate time remaining until the clothes have dried to beep when clothes Removing clothes and hanging...
... when the filter needs cleaning. The clothes should be used when the machine is continuously monitoring the amount As the cycle begins, you can change the delay time in the display. A sound is pressed. Pause button is made . The lights will not restart unless the door is activated. 15 Display Displays the approximate time remaining until the clothes have dried to beep when clothes Removing clothes and hanging...
Use and Care Manual
Page 9
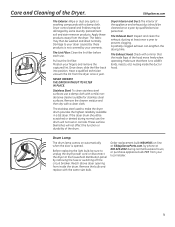
... your fingers and remove the captured lint. Care and Cleaning of the appliance and exhaust duct should be washed and dried normally. Apply these products is opened. If the dryer drum should be damaged by qualified service personnel. Before replacing the light bulb, be sure to unplug the dryer power cord or disconnect the dryer at least once a year to make the dryer drum provides the highest reliability available in a GE dryer.
... your fingers and remove the captured lint. Care and Cleaning of the appliance and exhaust duct should be washed and dried normally. Apply these products is opened. If the dryer drum should be damaged by qualified service personnel. Before replacing the light bulb, be sure to unplug the dryer power cord or disconnect the dryer at least once a year to make the dryer drum provides the highest reliability available in a GE dryer.
Use and Care Manual
Page 14
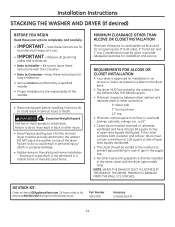
... to Installer - Failure to Consumer - Part Number GEFLSTACK Accessory Complete Stack Kit 14 Installation Instructions STACKING THE WASHER AND DRYER (if desired) BEFORE YOU BEGIN Read these instructions with the dryer (gas models only). Save these instructions for local electrical inspector's use. • IMPORTANT - WARNING - DO NOT place the washer on -line at GEApplianceParts.com, 24 hours a day or by a qualified installer. • Proper installation is approved for installation and service. Stacking of open area...
... to Installer - Failure to Consumer - Part Number GEFLSTACK Accessory Complete Stack Kit 14 Installation Instructions STACKING THE WASHER AND DRYER (if desired) BEFORE YOU BEGIN Read these instructions with the dryer (gas models only). Save these instructions for local electrical inspector's use. • IMPORTANT - WARNING - DO NOT place the washer on -line at GEApplianceParts.com, 24 hours a day or by a qualified installer. • Proper installation is approved for installation and service. Stacking of open area...
Use and Care Manual
Page 15
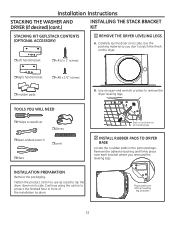
... ˆ4 #12 x 1" screws ˆRight hand bracket ˆ4 #8 x 1/2" screws ˆ 4 rubber pads B. Installation Instructions STACKING THE WASHER AND DRYER (if desired) (cont.) INSTALLING THE STACK BRACKET KIT STACKING KIT GEFLSTACK CONTENTS (OPTIONAL ACCESSORY) 1 REMOVE THE DRYER LEVELING LEGS A. Use an open-end wrench or pliers to lay the dryer down on its side. Carefully lay the dryer on its side. INSTALLATION PREPARATION Remove the packaging. Use the packing material so you...
... ˆ4 #12 x 1" screws ˆRight hand bracket ˆ4 #8 x 1/2" screws ˆ 4 rubber pads B. Installation Instructions STACKING THE WASHER AND DRYER (if desired) (cont.) INSTALLING THE STACK BRACKET KIT STACKING KIT GEFLSTACK CONTENTS (OPTIONAL ACCESSORY) 1 REMOVE THE DRYER LEVELING LEGS A. Use an open-end wrench or pliers to lay the dryer down on its side. Carefully lay the dryer on its side. INSTALLATION PREPARATION Remove the packaging. Use the packing material so you...

Use and Care Manual
Page 17
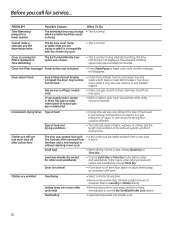
... or obstructed ducting Improper sorting Large loads of heavy fabrics (like beach towels) Controls improperly set Lint filter is full Blown fuses or tripped circuit breaker Overloading/combining loads Underloading • Check the Installation Instructions to make sure both are operating. • Do not put in a load, choose More Dry. Separate large, heavy fabrics into the outlet. • Check the building's fuse/circuit breaker box and replace fuse or reset breaker. Press Power to restart the...
... or obstructed ducting Improper sorting Large loads of heavy fabrics (like beach towels) Controls improperly set Lint filter is full Blown fuses or tripped circuit breaker Overloading/combining loads Underloading • Check the Installation Instructions to make sure both are operating. • Do not put in a load, choose More Dry. Separate large, heavy fabrics into the outlet. • Check the building's fuse/circuit breaker box and replace fuse or reset breaker. Press Power to restart the...
Use and Care Manual
Page 18
... removed from an electric to dry damp collars and waistbands. Dryer is normal. Select a Less Dry or Damp setting. • Remove items when cycle ends and fold or hang immediately, or use the Ext Tumble/Wrinkle Care option. • Separate large loads into smaller ones. 18 PROBLEM Time Remaining jumped to a lower number Possible Causes What To Do The estimated time may tumble replace both fuses or reset both breakers. Clothes...
... removed from an electric to dry damp collars and waistbands. Dryer is normal. Select a Less Dry or Damp setting. • Remove items when cycle ends and fold or hang immediately, or use the Ext Tumble/Wrinkle Care option. • Separate large loads into smaller ones. 18 PROBLEM Time Remaining jumped to a lower number Possible Causes What To Do The estimated time may tumble replace both fuses or reset both breakers. Clothes...

Use and Care Manual
Page 19
... lint filter when opening door after steam cycle cycle time. Use proper washing procedures before each load. Others can cause static • Try a fabric softener. • Bounce® Fabric Conditioner Dryer Sheets have been approved for use of color may be seen when the clothes are Steam condenses on inner door • This is too foggy to Less Dry or Damp. • Try a fabric softener. If using the Steam...
... lint filter when opening door after steam cycle cycle time. Use proper washing procedures before each load. Others can cause static • Try a fabric softener. • Bounce® Fabric Conditioner Dryer Sheets have been approved for use of color may be seen when the clothes are Steam condenses on inner door • This is too foggy to Less Dry or Damp. • Try a fabric softener. If using the Steam...

Use and Care Manual
Page 20
... time during cycle clogged with hose. Dryer makes water noises Water valve is open filling steam • This is normal. generator Steam generator is dispensing • This is normal. Cannot see steam at beginning of cycle Steam released at different times in back of dryer Possible Causes Inadequate load size for service... Dryer continues to the load. For the Steam Refresh cycle, Ext Tumble/Wrinkle Care will automatically be turned off. 20 steam into drum Water drips from your water...
... time during cycle clogged with hose. Dryer makes water noises Water valve is open filling steam • This is normal. generator Steam generator is dispensing • This is normal. Cannot see steam at beginning of cycle Steam released at different times in back of dryer Possible Causes Inadequate load size for service... Dryer continues to the load. For the Steam Refresh cycle, Ext Tumble/Wrinkle Care will automatically be turned off. 20 steam into drum Water drips from your water...

Use and Care Manual
Page 21
... Service Centers, or an authorized Customer Care® technician. Proof of the original purchase date is abused, misused or used for service. Please have serial number and model number available when calling for other than the intended purpose or used commercially. „ Replacement of the light bulb after delivery. „ Product not accessible to provide required service. „ Defects or damage due to operation in freezing temperatures...
... Service Centers, or an authorized Customer Care® technician. Proof of the original purchase date is abused, misused or used for service. Please have serial number and model number available when calling for other than the intended purpose or used commercially. „ Replacement of the light bulb after delivery. „ Product not accessible to provide required service. „ Defects or damage due to operation in freezing temperatures...

Installation Instructions
Page 1
...; Proper installation is the responsibility of the dryer control system. • Remove and discard existing plastic or metal foil duct and replace with the customer.) Printed in minor or moderate injury. WARNING - Call 800.GE.CARES (800.432.2737) or visit our Web site at: GEAppliances.com This is removed from service or discarded, remove the dryer door. • Service information and the wiring diagram are...
...; Proper installation is the responsibility of the dryer control system. • Remove and discard existing plastic or metal foil duct and replace with the customer.) Printed in minor or moderate injury. WARNING - Call 800.GE.CARES (800.432.2737) or visit our Web site at: GEAppliances.com This is removed from service or discarded, remove the dryer door. • Service information and the wiring diagram are...
Installation Instructions
Page 2
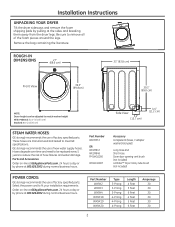
... Kit (hoses, Y-adapter washers) (included) Long Hose and Short Hose Dryer door opening vent brush (not included) LintEater™ Dryer rotary tube brush (not included) POWER CORDS: GE strongly recommends the use of the foam pieces around the legs. Select the power cord to meet GE specifications. Be sure to remove all of factory specified parts. GE strongly recommends the use of new water supply hoses. These hoses are manufactured and tested to fit your installation requirements. ROUGH-IN DIMENSIONS...
... Kit (hoses, Y-adapter washers) (included) Long Hose and Short Hose Dryer door opening vent brush (not included) LintEater™ Dryer rotary tube brush (not included) POWER CORDS: GE strongly recommends the use of the foam pieces around the legs. Select the power cord to meet GE specifications. Be sure to remove all of factory specified parts. GE strongly recommends the use of new water supply hoses. These hoses are manufactured and tested to fit your installation requirements. ROUGH-IN DIMENSIONS...
Installation Instructions
Page 3
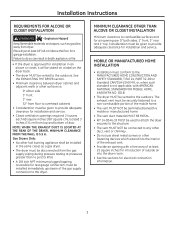
... be connected to any other duct, vent or chimney. • Do not use sheet metal screws or other surfaces is: 0" either side 3" front 3" rear 52" from floor to overhead cabinets • Consideration must conform to do so can result in . Installation Instructions REQUIREMENTS FOR ALCOVE OR CLOSET INSTALLATION WARNING - Place dryer at least 18" (46 cm) above the floor for installation and service...
... be connected to any other duct, vent or chimney. • Do not use sheet metal screws or other surfaces is: 0" either side 3" front 3" rear 52" from floor to overhead cabinets • Consideration must conform to do so can result in . Installation Instructions REQUIREMENTS FOR ALCOVE OR CLOSET INSTALLATION WARNING - Place dryer at least 18" (46 cm) above the floor for installation and service...
Installation Instructions
Page 4
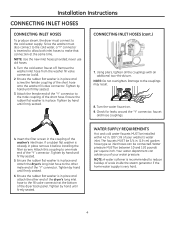
... of the dryer back panel. Ensure the rubber flat washer is in place remove it before installing the filter screen. Tighten by hand until firmly seated. NOTE: Do not overtighten. Your water department can be 3/4 in place. Remove the washer inlet hose from the washer fill valve connector (cold). 2. Attach the female end of the ''Y'' connector to the couplings may result. 8. WATER SUPPLY REQUIREMENTS Hot and cold water faucets...
... of the dryer back panel. Ensure the rubber flat washer is in place remove it before installing the filter screen. Tighten by hand until firmly seated. NOTE: Do not overtighten. Your water department can be 3/4 in place. Remove the washer inlet hose from the washer fill valve connector (cold). 2. Attach the female end of the ''Y'' connector to the couplings may result. 8. WATER SUPPLY REQUIREMENTS Hot and cold water faucets...
Installation Instructions
Page 6
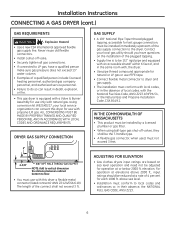
... REQUIREMENTS. The length of local codes, with propane (LP) gas. GAS SUPPLY • A 1/8" National Pipe Taper thread plugged tapping, accessible for use with natural gas. Using conversion kit WE25X0217, your local gas utility should be installed immediately upstream of 4 percent for use PTFE tape. • Connect flexible metal connector to dryer and gas supply. • The installation must conform to the dryer. ADJUSTING FOR ELEVATION • Gas clothes dryers input ratings are based on the installation of the plugged...
... REQUIREMENTS. The length of local codes, with propane (LP) gas. GAS SUPPLY • A 1/8" National Pipe Taper thread plugged tapping, accessible for use with natural gas. Using conversion kit WE25X0217, your local gas utility should be installed immediately upstream of 4 percent for use PTFE tape. • Connect flexible metal connector to dryer and gas supply. • The installation must conform to the dryer. ADJUSTING FOR ELEVATION • Gas clothes dryers input ratings are based on the installation of the plugged...
Installation Instructions
Page 9
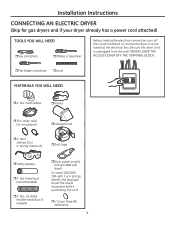
... needed) ˆ Dryer power cord kit (not provided with dryer) UL rated 120/240V, 30A with 3 or 4 prongs. Installation Instructions CONNECTING AN ELECTRIC DRYER (Skip for gas dryers and if your dryer already has a power cord attached) TOOLS YOU WILL NEED ˆSlip-joint pliers ˆPhillips screwdriver Before making the electrical connection, turn off the circuit breaker(s) or remove the dryer's circuit fuse(s) at the electrical box. Identify the plug type as per the house receptacle before purchasing line cord. ˆ 4" Cover Plate (Kit...
... needed) ˆ Dryer power cord kit (not provided with dryer) UL rated 120/240V, 30A with 3 or 4 prongs. Installation Instructions CONNECTING AN ELECTRIC DRYER (Skip for gas dryers and if your dryer already has a power cord attached) TOOLS YOU WILL NEED ˆSlip-joint pliers ˆPhillips screwdriver Before making the electrical connection, turn off the circuit breaker(s) or remove the dryer's circuit fuse(s) at the electrical box. Identify the plug type as per the house receptacle before purchasing line cord. ˆ 4" Cover Plate (Kit...

Installation Instructions
Page 12
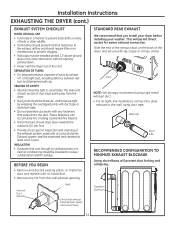
... drying performance, a rigid metal transition duct is highly recommended (see illustrations at right). Installation Instructions EXHAUSTING THE DRYER WARNING - Fire Hazard This dryer MUST be necessary to connect the dryer to its full length. DO NOT install a screen in its permanent position, extend the duct to the house vent using a flexible metal (foil-type) duct. With the dryer in or over the clothes dryer outlet pipe. 2. A UL-listed flexible metal (foil-type) duct may be vented...
... drying performance, a rigid metal transition duct is highly recommended (see illustrations at right). Installation Instructions EXHAUSTING THE DRYER WARNING - Fire Hazard This dryer MUST be necessary to connect the dryer to its full length. DO NOT install a screen in its permanent position, extend the duct to the house vent using a flexible metal (foil-type) duct. With the dryer in or over the clothes dryer outlet pipe. 2. A UL-listed flexible metal (foil-type) duct may be vented...
Installation Instructions
Page 13
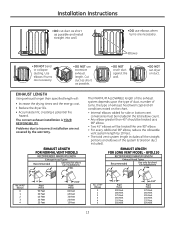
...; Increase the drying times and the energy cost. • Reduce the dryer life. • Accumulate lint, creating a potential fire hazard. The correct exhaust installation is YOUR RESPONSIBILITY. Problems due to incorrect installation are necessary. • DO NOT use elbows when turns are necessary. Use elbows if turns are not covered by 10 feet. • The total vent system length includes all conditions noted on duct. The MAXIMUM...
...; Increase the drying times and the energy cost. • Reduce the dryer life. • Accumulate lint, creating a potential fire hazard. The correct exhaust installation is YOUR RESPONSIBILITY. Problems due to incorrect installation are necessary. • DO NOT use elbows when turns are necessary. Use elbows if turns are not covered by 10 feet. • The total vent system length includes all conditions noted on duct. The MAXIMUM...
Installation Instructions
Page 14
... to the wall, using rigid metal exhaust duct. • For straight-line installation, connect the dryer exhaust to avoid leaks. These fasteners can accumulate lint, creating a potential fire hazard. • Horizontal runs should slope down . • Never vent the dryer out of the roof. Wall Side Dryer Side RECOMMENDED CONFIGURATION TO MINIMIZE EXHAUST BLOCKAGE Using duct elbows will permit direct access for inspection and cleaning of the exhaust system, especially...
... to the wall, using rigid metal exhaust duct. • For straight-line installation, connect the dryer exhaust to avoid leaks. These fasteners can accumulate lint, creating a potential fire hazard. • Horizontal runs should slope down . • Never vent the dryer out of the roof. Wall Side Dryer Side RECOMMENDED CONFIGURATION TO MINIMIZE EXHAUST BLOCKAGE Using duct elbows will permit direct access for inspection and cleaning of the exhaust system, especially...


