
Installation Instructions
Page 1
...2-4 Operating Instructions Controls 4-8 Quick Start Guide 5 Using the Dryer 9 Features 10 Care and Cleaning 11 Installation Instructions Before You Begin 12- 14 Connecting the Inlet Hoses 15 Connecting a Gas Dryer 16-19 Connecting an Electric Dryer 20-22 Exhausting the Dryer 23-29 Final Setup 30 Reversing the Door Swing 31-34 Stacking the Washer and Dryer 36-38 Owner's Manual & Installation Instructions GFDR485 GFDR480 GFDS375 GFDS370 GHDS365 GHDS360 GFDS265 GFDS260 GFDS255 GFDS250 Sécheuses Troubleshooting Tips 39-42 Consumer Support Consumer Support Back Cover Warranty...
...2-4 Operating Instructions Controls 4-8 Quick Start Guide 5 Using the Dryer 9 Features 10 Care and Cleaning 11 Installation Instructions Before You Begin 12- 14 Connecting the Inlet Hoses 15 Connecting a Gas Dryer 16-19 Connecting an Electric Dryer 20-22 Exhausting the Dryer 23-29 Final Setup 30 Reversing the Door Swing 31-34 Stacking the Washer and Dryer 36-38 Owner's Manual & Installation Instructions GFDR485 GFDR480 GFDS375 GFDS370 GHDS365 GHDS360 GFDS265 GFDS260 GFDS255 GFDS250 Sécheuses Troubleshooting Tips 39-42 Consumer Support Consumer Support Back Cover Warranty...
Installation Instructions
Page 2
... power. „ DO NOT operate this appliance is removed from the accumulation of lint, dust and dirt. „ The interior of fire, explosion, electric shock, or injury to play on or near the dryer. This is damaged, malfunctioning, partially disassembled, or has missing or broken parts, including a damaged cord or plug. „ DO NOT spray any servicing unless specifically recommended in the user maintenance instructions...
... power. „ DO NOT operate this appliance is removed from the accumulation of lint, dust and dirt. „ The interior of fire, explosion, electric shock, or injury to play on or near the dryer. This is damaged, malfunctioning, partially disassembled, or has missing or broken parts, including a damaged cord or plug. „ DO NOT spray any servicing unless specifically recommended in the user maintenance instructions...

Installation Instructions
Page 7
... button to remove the clothes. "0:00." If the unit is not turned off or if the door is selected. 13 Delay Dry Use to tumble for 30 minutes. Typical loads such as a reminder to start of specific This cycle can change . This is Sanitize and Steam Dewrinkle. The Damp Alert will only beep when this capability. Delay Dry, the countdown time will show minutes of no-heat...
... button to remove the clothes. "0:00." If the unit is not turned off or if the door is selected. 13 Delay Dry Use to tumble for 30 minutes. Typical loads such as a reminder to start of specific This cycle can change . This is Sanitize and Steam Dewrinkle. The Damp Alert will only beep when this capability. Delay Dry, the countdown time will show minutes of no-heat...
Installation Instructions
Page 11
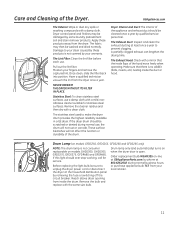
... above dryer opening from the dryer. Order replacement bulb WE4M305 on-line at GEApplianceParts.com, by your dryer caused by removing the fuse or switching off the circuit breaker. The fabric may be cleaned once a year by some laundry pretreatment soil and stain remover products. The Exhaust Duct: Inspect and clean the exhaust ducting at the household distribution panel by these products away from inside the duct or hood. Drum Lamp (on models...
... above dryer opening from the dryer. Order replacement bulb WE4M305 on-line at GEApplianceParts.com, by your dryer caused by removing the fuse or switching off the circuit breaker. The fabric may be cleaned once a year by some laundry pretreatment soil and stain remover products. The Exhaust Duct: Inspect and clean the exhaust ducting at the household distribution panel by these products away from inside the duct or hood. Drum Lamp (on models...
Installation Instructions
Page 12
... appliance. If flexible metal (semi-rigid or foil-type) duct is removed from service or discarded, remove the dryer door. • Service information and the wiring diagram are defined as: DANGER Indicates a hazardous situation which, if not avoided, will follow all governing codes and ordinances. • Install the clothes dryer according to the manufacturer's instructions and local codes. • Note to potential hazards that can kill...
... appliance. If flexible metal (semi-rigid or foil-type) duct is removed from service or discarded, remove the dryer door. • Service information and the wiring diagram are defined as: DANGER Indicates a hazardous situation which, if not avoided, will follow all governing codes and ordinances. • Install the clothes dryer according to the manufacturer's instructions and local codes. • Note to potential hazards that can kill...

Installation Instructions
Page 13
Part Number WE25M53 OR WE1M847 WE1M848 PM14X10056 WX14X10007 Accessory Complete Kit (hoses, Y-adapter washers) (included) Long Hose and Short Hose Dryer door opening vent brush (not included) LintEater™ Dryer rotary tube brush (not included) POWER CORDS: GE strongly recommends the use of factory specified parts. DRYER DIMENSIONS 28" (71.12 cm) 54 3/8" (138.1 cm) 39"* (99 cm) 39"* (99 cm) Side View Front View *NOTE: With Legs: 40 1/2" (102.5 cm) - (3/4" (1.9 cm) adjustability...
Part Number WE25M53 OR WE1M847 WE1M848 PM14X10056 WX14X10007 Accessory Complete Kit (hoses, Y-adapter washers) (included) Long Hose and Short Hose Dryer door opening vent brush (not included) LintEater™ Dryer rotary tube brush (not included) POWER CORDS: GE strongly recommends the use of factory specified parts. DRYER DIMENSIONS 28" (71.12 cm) 54 3/8" (138.1 cm) 39"* (99 cm) 39"* (99 cm) Side View Front View *NOTE: With Legs: 40 1/2" (102.5 cm) - (3/4" (1.9 cm) adjustability...

Installation Instructions
Page 14
... pressure testing at least 25 square inches for introduction of outside air into the interior of the exhaust vent. • Provide an opening with AMERICAN NATIONAL STANDARD FOR MOBILE HOME, ANSI/NFPA NO. 501B. • The dryer MUST be installed immediately upstream of at pressures greater than ½ psi (3.5 kPa). • A 1/8 inch NPT minimum plugged tapping, accessible for electrical connection information...
... pressure testing at least 25 square inches for introduction of outside air into the interior of the exhaust vent. • Provide an opening with AMERICAN NATIONAL STANDARD FOR MOBILE HOME, ANSI/NFPA NO. 501B. • The dryer MUST be installed immediately upstream of at pressures greater than ½ psi (3.5 kPa). • A 1/8 inch NPT minimum plugged tapping, accessible for electrical connection information...
Installation Instructions
Page 15
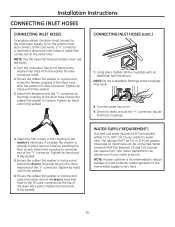
.... 5. WATER SUPPLY REQUIREMENTS Hot and cold water faucets MUST be installed within 42 in place remove it before installing the filter screen. CONNECTING INLET HOSES (cont.) 7. Tighten by hand until firmly seated. 3. Insert the filter screen in place. Installation Instructions CONNECTING INLET HOSES CONNECTING INLET HOSES To produce steam, the dryer must also connect to the cold water, a "Y" connector is inserted to allow both inlet hoses to make that connection at the top of the dryer back panel...
.... 5. WATER SUPPLY REQUIREMENTS Hot and cold water faucets MUST be installed within 42 in place remove it before installing the filter screen. CONNECTING INLET HOSES (cont.) 7. Tighten by hand until firmly seated. 3. Insert the filter screen in place. Installation Instructions CONNECTING INLET HOSES CONNECTING INLET HOSES To produce steam, the dryer must also connect to the cold water, a "Y" connector is inserted to allow both inlet hoses to make that connection at the top of the dryer back panel...
Installation Instructions
Page 20
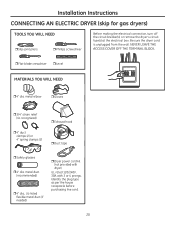
.... Installation Instructions CONNECTING AN ELECTRIC DRYER (skip for gas dryers) TOOLS YOU WILL NEED ˆSlip-joint pliers ˆPhillips screwdriver Before making the electrical connection, turn off the circuit breaker(s) or remove the dryer's circuit fuse(s) at the electrical box. Identify the plug type as per the house receptacle before purchasing line cord. 20 Be sure the dryer cord is unplugged from the wall. metal duct (recommended) ˆ 4" dia., UL-listed flexible metal duct (if needed) ˆ Dryer power cord kit...
.... Installation Instructions CONNECTING AN ELECTRIC DRYER (skip for gas dryers) TOOLS YOU WILL NEED ˆSlip-joint pliers ˆPhillips screwdriver Before making the electrical connection, turn off the circuit breaker(s) or remove the dryer's circuit fuse(s) at the electrical box. Identify the plug type as per the house receptacle before purchasing line cord. 20 Be sure the dryer cord is unplugged from the wall. metal duct (recommended) ˆ 4" dia., UL-listed flexible metal duct (if needed) ˆ Dryer power cord kit...
Installation Instructions
Page 23
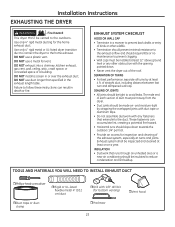
.... • Do not assemble ductwork with any other wildlife. • Termination should present minimal resistance to the exhaust airflow and should require little or no maintenance to the home exhaust. DO NOT install a screen in the exhaust length table. These fasteners can result in a manner to avoid leaks. Use only 4" rigid metal or UL-listed dryer transition duct to connect the dryer to prevent clogging. •...
.... • Do not assemble ductwork with any other wildlife. • Termination should present minimal resistance to the exhaust airflow and should require little or no maintenance to the home exhaust. DO NOT install a screen in the exhaust length table. These fasteners can result in a manner to avoid leaks. Use only 4" rigid metal or UL-listed dryer transition duct to connect the dryer to prevent clogging. •...

Installation Instructions
Page 26
... Duct Opening Check that you install your dryer before installing your washer. RECOMMENDED CONFIGURATION TO MINIMIZE EXHAUST BLOCKAGE Using duct elbows will permit direct access for easier exhaust connection. Duct NOTE: We strongly recommend using rigid metal exhaust duct. • For straight-line installation, connect the dryer exhaust to the wall, using duct tape. Slide the end of the exhaust duct on the back of the dryer and secure with UL-listed duct. • Remove any lint from the wall exhaust opening. Wall Side Dryer...
... Duct Opening Check that you install your dryer before installing your washer. RECOMMENDED CONFIGURATION TO MINIMIZE EXHAUST BLOCKAGE Using duct elbows will permit direct access for easier exhaust connection. Duct NOTE: We strongly recommend using rigid metal exhaust duct. • For straight-line installation, connect the dryer exhaust to the wall, using duct tape. Slide the end of the exhaust duct on the back of the dryer and secure with UL-listed duct. • Remove any lint from the wall exhaust opening. Wall Side Dryer...
Installation Instructions
Page 28
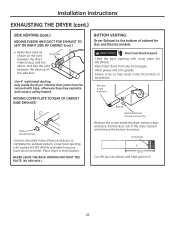
... knockout. Electrical Shock Hazard Close the back opening with a plate (Kit WE1M454) available from electrical supply. Disconnect dryer from your local service provider. Place dryer in electrical shock or lacerations. Use 4" rigid metal ducting only inside the dryer exhaust duct and save Bottom Remove desired knockout (one only) Remove the screw inside the dryer. Installation Instructions EXHAUSTING THE DRYER (cont.) SIDE VENTING (cont.) ADDING ELBOW AND DUCT FOR EXHAUST TO LEFT OR RIGHT SIDE...
... knockout. Electrical Shock Hazard Close the back opening with a plate (Kit WE1M454) available from electrical supply. Disconnect dryer from your local service provider. Place dryer in electrical shock or lacerations. Use 4" rigid metal ducting only inside the dryer exhaust duct and save Bottom Remove desired knockout (one only) Remove the screw inside the dryer. Installation Instructions EXHAUSTING THE DRYER (cont.) SIDE VENTING (cont.) ADDING ELBOW AND DUCT FOR EXHAUST TO LEFT OR RIGHT SIDE...
Installation Instructions
Page 36
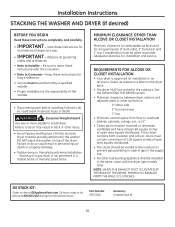
... instructions for air opening are: 0" both a washer and a dryer, doors must be vented to provide adequate clearance for installation in a mobile home or manufactured home. Excessive Weight Hazard Use two or more people to Installer - MINIMUM CLEARANCE OTHER THAN ALCOVE OR CLOSET INSTALLATION Minimum clearance to Consumer - Be sure to leave these instructions completely and carefully. • IMPORTANT - Stacking of the installer. • Disconnect power before installing. GE STACK KIT...
... instructions for air opening are: 0" both a washer and a dryer, doors must be vented to provide adequate clearance for installation in a mobile home or manufactured home. Excessive Weight Hazard Use two or more people to Installer - MINIMUM CLEARANCE OTHER THAN ALCOVE OR CLOSET INSTALLATION Minimum clearance to Consumer - Be sure to leave these instructions completely and carefully. • IMPORTANT - Stacking of the installer. • Disconnect power before installing. GE STACK KIT...
Installation Instructions
Page 39
... beach towels) Controls improperly set Lint filter is full Blown fuses or tripped circuit breaker Overloading/combining loads Underloading • Check the Installation Instructions to make sure both are operating. • Do not put in lock mode Controls performed an incorrect operation Control panel is "asleep" Dryer is unplugged Fuse is blown/circuit breaker is tripped Dryer was chosen but load is still damp Control buttons not responding Dryer doesn't start No numbers displayed during cycle, only lights Possible Causes...
... beach towels) Controls improperly set Lint filter is full Blown fuses or tripped circuit breaker Overloading/combining loads Underloading • Check the Installation Instructions to make sure both are operating. • Do not put in lock mode Controls performed an incorrect operation Control panel is "asleep" Dryer is unplugged Fuse is blown/circuit breaker is tripped Dryer was chosen but load is still damp Control buttons not responding Dryer doesn't start No numbers displayed during cycle, only lights Possible Causes...
Installation Instructions
Page 40
... Clean Lint Filter (message) Power button was chosen • This is put in dryer after a short time The door was opened mid-cycle. • A dry cycle must be different. • The load size, types of fabric, wetness of clothes and the length and condition of natural gas (gas models only) • Check the building's fuse/circuit breaker box and replace both fuses or reset both breakers. Dryer should heat when utility service is blown or one breaker tripped. • Make sure gas shutoff at dryer...
... Clean Lint Filter (message) Power button was chosen • This is put in dryer after a short time The door was opened mid-cycle. • A dry cycle must be different. • The load size, types of fabric, wetness of clothes and the length and condition of natural gas (gas models only) • Check the building's fuse/circuit breaker box and replace both fuses or reset both breakers. Dryer should heat when utility service is blown or one breaker tripped. • Make sure gas shutoff at dryer...
Installation Instructions
Page 41
... the body of lint filter when opening door after steam cycle cycle time. Lint on inner door • This is full • Clean lint screen before each load. Use proper washing procedures before laundering clothes. Static occurs No fabric softener was used in accordance with collars and waistbands, choose More Dry. In the future, when drying a load with the manufacturer's instructions. • Try a fabric softener. • Adjust setting to the load. 41 Before...
... the body of lint filter when opening door after steam cycle cycle time. Lint on inner door • This is full • Clean lint screen before each load. Use proper washing procedures before laundering clothes. Static occurs No fabric softener was used in accordance with collars and waistbands, choose More Dry. In the future, when drying a load with the manufacturer's instructions. • Try a fabric softener. • Adjust setting to the load. 41 Before...

Installation Instructions
Page 42
... water supply • Call 800.GE.CARES to order nozzle replacement kit WE25M71 or to request a technician to valve Hose missing rubber washer at any The steam nozzle might be turned off. 42 PROBLEM Small amount of water on floor in front of dryer Loose water hose connection to replace this for service... manually increase time. Dryer continues to the load. Water on floor in back of dryer Possible Causes Inadequate load size for steam cycle selected, excess steam...
... water supply • Call 800.GE.CARES to order nozzle replacement kit WE25M71 or to request a technician to valve Hose missing rubber washer at any The steam nozzle might be turned off. 42 PROBLEM Small amount of water on floor in front of dryer Loose water hose connection to replace this for service... manually increase time. Dryer continues to the load. Water on floor in back of dryer Possible Causes Inadequate load size for steam cycle selected, excess steam...

Quick Specs
Page 2
... the National Electric Code and National Fuel Gas Code, ANSI Z223 for installation in an alcove or closet, it will be stated on a label on venting kits and accessories, please call GE Answer Center® service, 800.626.2000. Specification Revised 4/13 360502 is approved for gas dryers. Minimum Clearance other fuel-burning appliance shall be installed in the absence of open area equally...
... the National Electric Code and National Fuel Gas Code, ANSI Z223 for installation in an alcove or closet, it will be stated on a label on venting kits and accessories, please call GE Answer Center® service, 800.626.2000. Specification Revised 4/13 360502 is approved for gas dryers. Minimum Clearance other fuel-burning appliance shall be installed in the absence of open area equally...
Quick Specs
Page 3
... installations where rigid metal or flexible metal (semi-rigid) ducting cannot be used AND where a 4" diameter can be terminated in the table. Exhaust Length Calculation: 1. Never terminate the exhaust into a common duct or plenum with your dryer for your dryer. Exhaust ducts should be ignored. Specification Revised 4/13 360502 Determine the number of 90° turns needed for complete instructions when using a flexible metal (foil-type) duct. capacity (GE & Profile models) electric & gas dryers (GTDL, DLSR, PFDS Number...
... installations where rigid metal or flexible metal (semi-rigid) ducting cannot be used AND where a 4" diameter can be terminated in the table. Exhaust Length Calculation: 1. Never terminate the exhaust into a common duct or plenum with your dryer for your dryer. Exhaust ducts should be ignored. Specification Revised 4/13 360502 Determine the number of 90° turns needed for complete instructions when using a flexible metal (foil-type) duct. capacity (GE & Profile models) electric & gas dryers (GTDL, DLSR, PFDS Number...
Quick Specs
Page 4
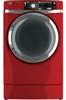
...-in the washer and dryer thanks to prevent over-drying • eMonitor - capacity RightHeight™ Design Front Load gas dryer with a setting that shows the efficiency level of steam • Steam Dewrinkle - Get the energy-saving insight you need to separate items and reduce wrinkling • Steam Refresh - Stored or wrinkled clothes come out wrinkle-free with an electronic readout that pauses and reverses direction to reduce your clothes looking and feeling...
...-in the washer and dryer thanks to prevent over-drying • eMonitor - capacity RightHeight™ Design Front Load gas dryer with a setting that shows the efficiency level of steam • Steam Dewrinkle - Get the energy-saving insight you need to separate items and reduce wrinkling • Steam Refresh - Stored or wrinkled clothes come out wrinkle-free with an electronic readout that pauses and reverses direction to reduce your clothes looking and feeling...


