Owners Manual
Page 1
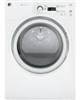
Dryers GEAppliances.com Safety Instructions 2-5 Operating Instructions Control Panels 6-8 Cycle Options 9-10 Dryer Features 10 Reversing the Door Swing . . . . 11-14 Loading and Using the Dryer 15-16 Venting the Dryer 17 Connecting Inlet Hoses 18 Stacking 19-22 Troubleshooting Tips . . . . 23-26 Consumer Support Warranty 28, 29 Consumer Support 30 Owner's Manual GFDN110 GFDN120 GFDN130 GFDS140 GFDS145 GFDS150 GFDS155 Write the model and serial numbers here: Model Serial They are on the label on the front of the dryer behind the door. 49-90429 10-11 GE
Dryers GEAppliances.com Safety Instructions 2-5 Operating Instructions Control Panels 6-8 Cycle Options 9-10 Dryer Features 10 Reversing the Door Swing . . . . 11-14 Loading and Using the Dryer 15-16 Venting the Dryer 17 Connecting Inlet Hoses 18 Stacking 19-22 Troubleshooting Tips . . . . 23-26 Consumer Support Warranty 28, 29 Consumer Support 30 Owner's Manual GFDN110 GFDN120 GFDN130 GFDS140 GFDS145 GFDS150 GFDS155 Write the model and serial numbers here: Model Serial They are on the label on the front of the dryer behind the door. 49-90429 10-11 GE
Owners Manual
Page 2
...Follow the gas supplier's instructions carefully. 5 If you cannot reach your gas supplier, call your gas supplier from a neighbor's phone. Properly adjusted dryers will minimize incomplete combustion. Gas appliances can cause minor exposure to four of these substances can be performed by properly venting the... dryer to light a match, or cigarette, or turn on any gas or electrical appliance. 2 Do not touch any other flammable vapors and...
...Follow the gas supplier's instructions carefully. 5 If you cannot reach your gas supplier, call your gas supplier from a neighbor's phone. Properly adjusted dryers will minimize incomplete combustion. Gas appliances can cause minor exposure to four of these substances can be performed by properly venting the... dryer to light a match, or cigarette, or turn on any gas or electrical appliance. 2 Do not touch any other flammable vapors and...
Owners Manual
Page 3
... DUCT WORK CAN CAUSE A FIRE IF IT COLLAPSES OR BECOMES OTHERWISE RESTRICTED IN USE OR DURING INSTALLATION. GEAppliances.com PROPER INSTALLATION This dryer must be properly installed and located in Installation Instructions. „ Install or store where it is used. Follow details in accordance with...you did not receive an Installation Instructions sheet, you can receive one by visiting GEAppliances.com, or by calling 800.GE.CARES (800.432.2737). „ Properly ground dryer to avoid electrical overload. „ Remove the colored protective film from being blown into the room. 2 Use ...
... DUCT WORK CAN CAUSE A FIRE IF IT COLLAPSES OR BECOMES OTHERWISE RESTRICTED IN USE OR DURING INSTALLATION. GEAppliances.com PROPER INSTALLATION This dryer must be properly installed and located in Installation Instructions. „ Install or store where it is used. Follow details in accordance with...you did not receive an Installation Instructions sheet, you can receive one by visiting GEAppliances.com, or by calling 800.GE.CARES (800.432.2737). „ Properly ground dryer to avoid electrical overload. „ Remove the colored protective film from being blown into the room. 2 Use ...

Owners Manual
Page 4
...wash water. IMPORTANT SAFETY INFORMATION. NOTE: Pressing Power, Start or Lock does NOT disconnect the appliance from the power supply or disconnect the dryer at any time. YOUR LAUNDRY AREA „ Keep the area underneath and around your appliances free of combustible materials (lint, paper, rags...removing the fuse or switching off the circuit breaker before attempting any other flammable vapors and liquids. „ Keep the floor around your dryer. „ Do not dry fiberglass articles in the room. Some rubber materials, when heated, can reduce the flame retardancy of slipping....
...wash water. IMPORTANT SAFETY INFORMATION. NOTE: Pressing Power, Start or Lock does NOT disconnect the appliance from the power supply or disconnect the dryer at any time. YOUR LAUNDRY AREA „ Keep the area underneath and around your appliances free of combustible materials (lint, paper, rags...removing the fuse or switching off the circuit breaker before attempting any other flammable vapors and liquids. „ Keep the floor around your dryer. „ Do not dry fiberglass articles in the room. Some rubber materials, when heated, can reduce the flame retardancy of slipping....
Owners Manual
Page 5
... wash cycle, according to repair or replace any servicing unless specifically recommended in them by a qualified technician. GEAppliances.com WHEN USING YOUR DRYER (cont.) „ Never attempt to operate this appliance. „ Never attempt to use the Steam DeWrinkle cycle without clothes in the...you understand and have a pilot light. SAVE THESE INSTRUCTIONS 5 DO NOT ATTEMPT TO LIGHT WITH A MATCH. WHEN NOT USING YOUR DRYER „ Grasp the plug firmly when disconnecting this Owner's Manual or in your laundered fabrics or reduce the static electricity in this appliance...
... wash cycle, according to repair or replace any servicing unless specifically recommended in them by a qualified technician. GEAppliances.com WHEN USING YOUR DRYER (cont.) „ Never attempt to operate this appliance. „ Never attempt to use the Steam DeWrinkle cycle without clothes in the...you understand and have a pilot light. SAVE THESE INSTRUCTIONS 5 DO NOT ATTEMPT TO LIGHT WITH A MATCH. WHEN NOT USING YOUR DRYER „ Grasp the plug firmly when disconnecting this Owner's Manual or in your laundered fabrics or reduce the static electricity in this appliance...
Owners Manual
Page 6
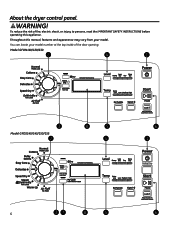
Model GFDN110/120/130 2 4 1 3 Model GFDS140/145/150/155 2 8 5 4 6 1 6 37 8 5 6 About the dryer control panel. You can locate your model. Throughout this manual, features and appearance may vary from your model number at the top inside of fire, electric shock, or injury to persons, read the IMPORTANT SAFETY INSTRUCTIONS before operating this appliance. To reduce the risk of the door opening. WARNING!
Model GFDN110/120/130 2 4 1 3 Model GFDS140/145/150/155 2 8 5 4 6 1 6 37 8 5 6 About the dryer control panel. You can locate your model. Throughout this manual, features and appearance may vary from your model number at the top inside of fire, electric shock, or injury to persons, read the IMPORTANT SAFETY INSTRUCTIONS before operating this appliance. To reduce the risk of the door opening. WARNING!
Owners Manual
Page 7
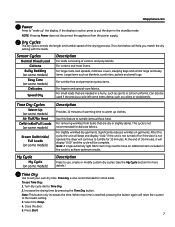
... use , create or modify custom dry cycles. (See the My Cycle section for delicate fabrics. Time Dry is not opened, the dryer will beep and display "0:00." If the display is active, press to put the dryer in the cycle to achieve optimum results. GEAppliances.com 1 Power Press to "wake up clothes.
... use , create or modify custom dry cycles. (See the My Cycle section for delicate fabrics. Time Dry is not opened, the dryer will beep and display "0:00." If the display is active, press to put the dryer in the cycle to achieve optimum results. GEAppliances.com 1 Power Press to "wake up clothes.

Owners Manual
Page 8
... labeled Tumble Dry Low. For synthetics, blends and items labeled permanent press. Press it will stop. Select your selected dry level, the dryer will pause the dryer. Press and hold the My Cycle pad for Normal Mixed Load, Cottons, Bulky Bedding, Easy Care, Delicates, and Speed Dry. 5 ... My Cycle Set up . To recall your selection. Note: Sensor dry "Level" only works for three seconds to fit your dry cycle. If the dryer is in the load. These custom settings can change your favorite combination of settings". 8 "CLEAN LINT FILTER" (message) (This message represents only a ...
... labeled Tumble Dry Low. For synthetics, blends and items labeled permanent press. Press it will stop. Select your selected dry level, the dryer will pause the dryer. Press and hold the My Cycle pad for Normal Mixed Load, Cottons, Bulky Bedding, Easy Care, Delicates, and Speed Dry. 5 ... My Cycle Set up . To recall your selection. Note: Sensor dry "Level" only works for three seconds to fit your dry cycle. If the dryer is in the load. These custom settings can change your favorite combination of settings". 8 "CLEAN LINT FILTER" (message) (This message represents only a ...
Owners Manual
Page 9
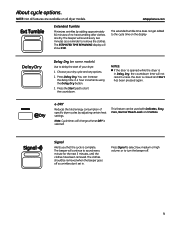
...Dry. Note: Cycle times will change when e-DRY is complete. Signal Alerts you that the cycle is selected. Choose your dryer. 1. NOTES: „ If the door is opened while the dryer is in 1 hour increments using the Delay Dry button. 3. This feature can increase the delay time in Delay Dry, ... get added to delay the start the countdown. Press the Start pad to remove the clothes. e-DRY Reduces the total energy consumption of specific dryer cycles by adding approximately 60 minutes of your dry cycle and any options. 2. The beeper will not restart unless the door is closed and ...
...Dry. Note: Cycle times will change when e-DRY is complete. Signal Alerts you that the cycle is selected. Choose your dryer. 1. NOTES: „ If the door is opened while the dryer is in 1 hour increments using the Delay Dry button. 3. This feature can increase the delay time in Delay Dry, ... get added to delay the start the countdown. Press the Start pad to remove the clothes. e-DRY Reduces the total energy consumption of specific dryer cycles by adding approximately 60 minutes of your dry cycle and any options. 2. The beeper will not restart unless the door is closed and ...
Owners Manual
Page 10
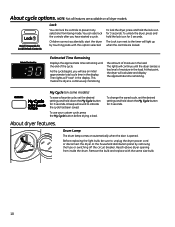
... comes on some models) To save a favorite cycle, set the desired settings and hold down the My Cycle button for 3 seconds. To unlock the dryer, press and hold the lock icon for 3 seconds. Remove the bulb and replace with this option selected. About cycle options. As the cycle begins,... you have started a cycle. My Cycle (on automatically when the door is continuously monitoring the amount of the cycle. To lock the dryer, press and hold the lock icon for 3 seconds. Lock You can also lock the controls after you will continue until the end of moisture ...
... comes on some models) To save a favorite cycle, set the desired settings and hold down the My Cycle button for 3 seconds. To unlock the dryer, press and hold the lock icon for 3 seconds. Remove the bulb and replace with this option selected. About cycle options. As the cycle begins,... you have started a cycle. My Cycle (on automatically when the door is continuously monitoring the amount of the cycle. To lock the dryer, press and hold the lock icon for 3 seconds. Lock You can also lock the controls after you will continue until the end of moisture ...

Owners Manual
Page 11
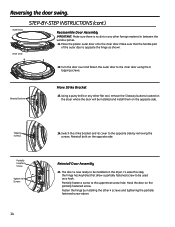
... to avoid using them in the wrong places. „ Provide a non-scratching work surface for changing the hinges from its electrical outlet. 11 Unplug the dryer from the right side to the left side³if you begin, do not move the cabinet until door-swing reversal is 30-60 minutes...
... to avoid using them in the wrong places. „ Provide a non-scratching work surface for changing the hinges from its electrical outlet. 11 Unplug the dryer from the right side to the left side³if you begin, do not move the cabinet until door-swing reversal is 30-60 minutes...
Owners Manual
Page 14
The door is now ready to be installed on the opposite side. Fasten the hinge by removing the screws. Reinstall both on the dryer. To ease this step, the hinge has keyholes that the handle part of the outer door is no dirt or any other flat tool, remove ...the 5 beauty buttons located on the dryer where the door will be used as shown. 12. Partially fasten a screw to the opposite side by installing the other foreign material in between the...
The door is now ready to be installed on the opposite side. Fasten the hinge by removing the screws. Reinstall both on the dryer. To ease this step, the hinge has keyholes that the handle part of the outer door is no dirt or any other flat tool, remove ...the 5 beauty buttons located on the dryer where the door will be used as shown. 12. Partially fasten a screw to the opposite side by installing the other foreign material in between the...
Owners Manual
Page 15
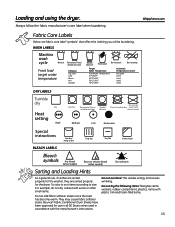
..., they are fabric care label "symbols" that affect the clothing you will be laundering. Bounce® Fabric Conditioner Dryer Sheets have been approved for the dryer. Loading and using the dryer. They may cause fabric softener stains. Do not dry the following items: fiberglass items, woolens, rubber-coated items,... Tumble dry Dry Heat setting High Normal Permanent Press/ Gentle/ wrinkle resistant delicate Do not dry Do not tumble dry (used in all GE Dryers when used with do not dry a sheet with socks or other small items. Do not add fabric softener sheets once the load has...
..., they are fabric care label "symbols" that affect the clothing you will be laundering. Bounce® Fabric Conditioner Dryer Sheets have been approved for the dryer. Loading and using the dryer. They may cause fabric softener stains. Do not dry the following items: fiberglass items, woolens, rubber-coated items,... Tumble dry Dry Heat setting High Normal Permanent Press/ Gentle/ wrinkle resistant delicate Do not dry Do not tumble dry (used in all GE Dryers when used with do not dry a sheet with socks or other small items. Do not add fabric softener sheets once the load has...
Owners Manual
Page 16
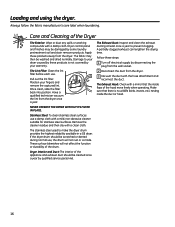
... stainless steel used to prevent clogging. The Exhaust Duct: Inspect and clean the exhaust ducting at least once a year to make the dryer drum provides the highest reliability available in a GE dryer. Apply these products is no wildlife (birds, insects, etc.) nesting inside flaps of the appliance and exhaust duct should be damaged...
... stainless steel used to prevent clogging. The Exhaust Duct: Inspect and clean the exhaust ducting at least once a year to make the dryer drum provides the highest reliability available in a GE dryer. Apply these products is no wildlife (birds, insects, etc.) nesting inside flaps of the appliance and exhaust duct should be damaged...
Owners Manual
Page 17
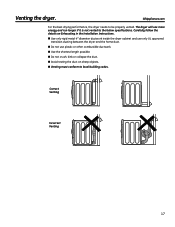
Carefully follow the details on sharp objects. „ Venting must conform to local building codes. The dryer will use plastic or other combustible ductwork. „ Use the shortest length possible. „ Do not crush, kink or collapse the duct. „ Avoid resting ...the duct on Exhausting in the Installation Instructions. „ Use only rigid metal 4s diameter ductwork inside the dryer cabinet and use only UL approved transition ducting between the dryer and the home duct. „ Do not use more energy and run longer if it is not vented to be...
Carefully follow the details on sharp objects. „ Venting must conform to local building codes. The dryer will use plastic or other combustible ductwork. „ Use the shortest length possible. „ Do not crush, kink or collapse the duct. „ Avoid resting ...the duct on Exhausting in the Installation Instructions. „ Use only rigid metal 4s diameter ductwork inside the dryer cabinet and use only UL approved transition ducting between the dryer and the home duct. „ Do not use more energy and run longer if it is not vented to be...
Owners Manual
Page 18
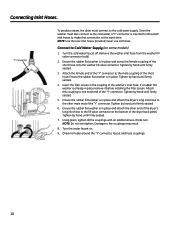
... hoses to the fill valve connector at the same time. Ensure the rubber flat washer is in place. Damage to the other end of the dryer's long inlet hose to make that connection at the bottom of the washer's inlet hose. Check for leaks around the ''Y'' connector, faucet and ... male end of the short hose onto the washer fill valve connector. never use old hoses. Insert the filter screen in place and attach the dryer's long inlet hose to the couplings may result. 8. Tighten by hand until firmly seated. 4. NOTE: Do not overtighten. Tighten by hand until firmly seated. 3. "Y"...
... hoses to the fill valve connector at the same time. Ensure the rubber flat washer is in place. Damage to the other end of the dryer's long inlet hose to make that connection at the bottom of the washer's inlet hose. Check for leaks around the ''Y'' connector, faucet and ... male end of the short hose onto the washer fill valve connector. never use old hoses. Insert the filter screen in place and attach the dryer's long inlet hose to the couplings may result. 8. Tighten by hand until firmly seated. 4. NOTE: Do not overtighten. Tighten by hand until firmly seated. 3. "Y"...
Owners Manual
Page 19
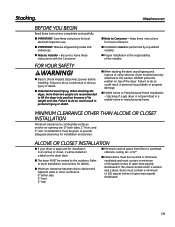
... with the Consumer. „ Note to do so could result in a mobile home or manufactured home. Failure to lift the dryer into position because of utility services. GEAppliances.com BEFORE YOU BEGIN Read these instructions completely and carefully. „ IMPORTANT: Save these... or Manufactured Home Installation - Consideration must be given to the outdoors. Keep these instructions for details. „ Minimum clearance between dryer cabinet and adjacent walls or other surfaces is approved for air opening are recommended to do so could result in personal injury or death...
... with the Consumer. „ Note to do so could result in a mobile home or manufactured home. Failure to lift the dryer into position because of utility services. GEAppliances.com BEFORE YOU BEGIN Read these instructions completely and carefully. „ IMPORTANT: Save these... or Manufactured Home Installation - Consideration must be given to the outdoors. Keep these instructions for details. „ Minimum clearance between dryer cabinet and adjacent walls or other surfaces is approved for air opening are recommended to do so could result in personal injury or death...

Owners Manual
Page 20
KIT CONTENTS (optional kit GE FL STACK) Right Hand Bracket 4 Rubber Pads Left Hand Bracket TOOLS YOU WILL NEED 4 #12 x 1" Screws 4 #8 x 1/2" Screws Phillips Screwdriver Pliers Open-Ended Wrench INSTALLATION PREPARATION Remove the packaging. Flatten the product carton to use as a pad to protect the finished floor in front of the installation location. Gloves Level 20 Continue using the carton to lay the dryer down on its side. Stacking.
KIT CONTENTS (optional kit GE FL STACK) Right Hand Bracket 4 Rubber Pads Left Hand Bracket TOOLS YOU WILL NEED 4 #12 x 1" Screws 4 #8 x 1/2" Screws Phillips Screwdriver Pliers Open-Ended Wrench INSTALLATION PREPARATION Remove the packaging. Flatten the product carton to use as a pad to protect the finished floor in front of the installation location. Gloves Level 20 Continue using the carton to lay the dryer down on its side. Stacking.

Owners Manual
Page 21
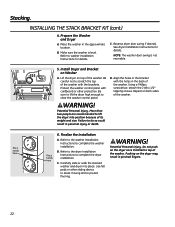
...the bracket where you don't scratch the finish on a piece of packing material so the brackets that are attached to the bottom of the dryer. Install Bracket to install the 2 #12 x 1s tapping screws. Repeat the above step with the holes in the parts package. NOTE:... Make sure to set the dryer on the dryer. GEAppliances.com Back out and remove all 4 leveling legs 2. Use a Phillips screwdriver to Dryer A. Remove the Dryer Leveling Legs A. Align the holes in the left corner of the dryer. B. C. Use the packing material so you removed the ...
...the bracket where you don't scratch the finish on a piece of packing material so the brackets that are attached to the bottom of the dryer. Install Bracket to install the 2 #12 x 1s tapping screws. Repeat the above step with the holes in the parts package. NOTE:... Make sure to set the dryer on the dryer. GEAppliances.com Back out and remove all 4 leveling legs 2. Use a Phillips screwdriver to Dryer A. Remove the Dryer Leveling Legs A. Align the holes in the left corner of the dryer. B. C. Use the packing material so you removed the ...
Owners Manual
Page 22
... Potential Personal Injury. C. WARNING! C. Be sure to lift the dryer high enough to lift the dryer into place. Using a Phillips screwdriver, attach the 2 #8 x 1/2s tapping screws. Repeat on the dryer may result in the bracket with cardboard or other sliding device to ... clear the washer control panel. Finalize the Installation A. Refer to the dryer Installation Instructions to complete the washer installation. Refer to the washer Installation Instructions to complete the dryer installation. Pushing on both sides of the washer with the brackets. Carefully...
... Potential Personal Injury. C. WARNING! C. Be sure to lift the dryer high enough to lift the dryer into place. Using a Phillips screwdriver, attach the 2 #8 x 1/2s tapping screws. Repeat on the dryer may result in the bracket with cardboard or other sliding device to ... clear the washer control panel. Finalize the Installation A. Refer to the dryer Installation Instructions to complete the washer installation. Refer to the washer Installation Instructions to complete the dryer installation. Pushing on both sides of the washer with the brackets. Carefully...


