
Use and Care Manual
Page 1
... Electricity 2, 3 Safety Precautions 2 Installation Instructions Attaching the Discharge Elbow 6 Components and Installation of Sink Flange 5 Connecting Disposer to Sink Flange 7 Dimensions/Typical Installations 8 Dishwasher Connection 6 Operating Instructions Batch Feed Models 9 Care and Maintenance 10 Continuous Feed Models 9 Troubleshooting Tips Before You Call for Service . . . . . .11 Consumer Support Warranty 12 Owner's Manual & Installation Instructions Model Line Series GFC320 GFC520 GFC530 GFC720 GFC1020 GFB760 Write the model and serial numbers for your disposall...
... Electricity 2, 3 Safety Precautions 2 Installation Instructions Attaching the Discharge Elbow 6 Components and Installation of Sink Flange 5 Connecting Disposer to Sink Flange 7 Dimensions/Typical Installations 8 Dishwasher Connection 6 Operating Instructions Batch Feed Models 9 Care and Maintenance 10 Continuous Feed Models 9 Troubleshooting Tips Before You Call for Service . . . . . .11 Consumer Support Warranty 12 Owner's Manual & Installation Instructions Model Line Series GFC320 GFC520 GFC530 GFC720 GFC1020 GFB760 Write the model and serial numbers for your disposall...
Use and Care Manual
Page 2
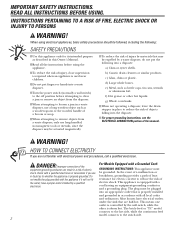
... other is properly installed and grounded in this Owner's Manual. g) Whole corn husks. HOW TO CONNECT ELECTRICITY If you are in a waste disposer, use long-handled, non-magnetic tools or utensils, since the disposer may be grounded. Check with all the instructions before attempting to reduce the risk of electric shock. The batch-feed or "TC" model connects to the hot side, while the continuous feed model connects to whether...
... other is properly installed and grounded in this Owner's Manual. g) Whole corn husks. HOW TO CONNECT ELECTRICITY If you are in a waste disposer, use long-handled, non-magnetic tools or utensils, since the disposer may be grounded. Check with all the instructions before attempting to reduce the risk of electric shock. The batch-feed or "TC" model connects to the hot side, while the continuous feed model connects to whether...
Use and Care Manual
Page 3
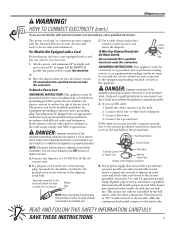
... means one unless metal cable is used in two ways: 1. GE recommends that a qualified electrician make this blade and attach that a qualified electrician make this connection. SAVE THESE INSTRUCTIONS 3 Connect white wire to whether the appliance is always hot. The batch-feed or "TC" model connects to the hot side, while the continuous feed model connects to disposer circuit before installation. NOTE: Disconnect electric power to the switch side. GEAppliances.com WARNING!
... means one unless metal cable is used in two ways: 1. GE recommends that a qualified electrician make this blade and attach that a qualified electrician make this connection. SAVE THESE INSTRUCTIONS 3 Connect white wire to whether the appliance is always hot. The batch-feed or "TC" model connects to the hot side, while the continuous feed model connects to disposer circuit before installation. NOTE: Disconnect electric power to the switch side. GEAppliances.com WARNING!
Use and Care Manual
Page 4
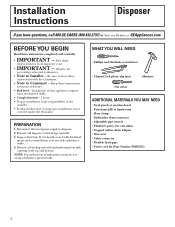
.... • Skill level - Inspect drain line. Disconnect electrical power supply to Installer - Remove old sealing materials and gasketing from sink opening, both top and bottom. Save these instructions completely and carefully. • IMPORTANT - Installation Instructions Disposer If you have questions, call 800.GE.CARES (800.432.2737) or Visit our Website at: GEAppliances.com BEFORE YOU BEGIN Read these instructions for local inspector's use. • IMPORTANT - PREPARATION...
.... • Skill level - Inspect drain line. Disconnect electrical power supply to Installer - Remove old sealing materials and gasketing from sink opening, both top and bottom. Save these instructions completely and carefully. • IMPORTANT - Installation Instructions Disposer If you have questions, call 800.GE.CARES (800.432.2737) or Visit our Website at: GEAppliances.com BEFORE YOU BEGIN Read these instructions for local inspector's use. • IMPORTANT - PREPARATION...
Use and Care Manual
Page 5
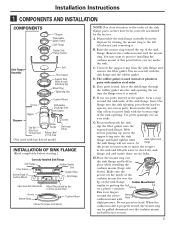
... not press too hard. Installation Instructions 1 COMPONENTS AND INSTALLATION COMPONENTS *Stopper *Removable Splash Guard Sink Flange Rubber Sink Flange Gasket Sink Flange Assembly Sink Fiber Gasket Support Ring (Note Arrows Indicating Up) Mount Ring Tightening Ears Cushion Mount Groove Hopper Dishwasher Discharge Inlet Elbow Gasket Disposer End Bell (Electrical Connections) Elbow Flange Rating Label in This Area *Not used with batch feed model Screws Discharge Elbow INSTALLATION OF SINK FLANGE (Read completely before you use putty instead of the sink flange parts, as they have...
... not press too hard. Installation Instructions 1 COMPONENTS AND INSTALLATION COMPONENTS *Stopper *Removable Splash Guard Sink Flange Rubber Sink Flange Gasket Sink Flange Assembly Sink Fiber Gasket Support Ring (Note Arrows Indicating Up) Mount Ring Tightening Ears Cushion Mount Groove Hopper Dishwasher Discharge Inlet Elbow Gasket Disposer End Bell (Electrical Connections) Elbow Flange Rating Label in This Area *Not used with batch feed model Screws Discharge Elbow INSTALLATION OF SINK FLANGE (Read completely before you use putty instead of the sink flange parts, as they have...

Use and Care Manual
Page 6
Do not use of several uses. Knock out plug 2 CONNECT HOSE Connect the dishwasher hose using a hose clamp. Rubber Gasket Discharge Elbow 6 If the hose size is different, you will not damage the disposer in any way, but may take some time to grind, over the course of a flexible drain pipe. When knockout plug falls into disposer, you may require the use a screwdriver or sharp instrument. Hose Clamp...
Do not use of several uses. Knock out plug 2 CONNECT HOSE Connect the dishwasher hose using a hose clamp. Rubber Gasket Discharge Elbow 6 If the hose size is different, you will not damage the disposer in any way, but may take some time to grind, over the course of a flexible drain pipe. When knockout plug falls into disposer, you may require the use a screwdriver or sharp instrument. Hose Clamp...

Use and Care Manual
Page 7
... of the mounting slots. Run water and check for leaks 24 hours after installation and first operation. 7 Guide the hopper projections into the mount ring slots. Installation Instructions 4 CONNECTING DISPOSER TO SINK FLANGE 1 ATTACH TO SINK FLANGE Line up the disposer under the sink flange. If the mount ring is temporarily supported. Locking Detail Hopper Projection in "Supported" Position Discharge Elbow Outlet Pipe Hopper Projection in "Locked" Position Mounting Slot Mount Ring 4 CHECK FOR LEAKS Check the...
... of the mounting slots. Run water and check for leaks 24 hours after installation and first operation. 7 Guide the hopper projections into the mount ring slots. Installation Instructions 4 CONNECTING DISPOSER TO SINK FLANGE 1 ATTACH TO SINK FLANGE Line up the disposer under the sink flange. If the mount ring is temporarily supported. Locking Detail Hopper Projection in "Supported" Position Discharge Elbow Outlet Pipe Hopper Projection in "Locked" Position Mounting Slot Mount Ring 4 CHECK FOR LEAKS Check the...
Use and Care Manual
Page 8
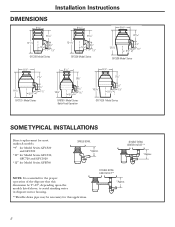
.../2" GFC720 Model Series 8 1/2" 93/8" 165/8" 5 9/16" 4 1/2" 11/2" GFB760 Model Series Batch Feed Operation 8 1/2" 7 1/4" 161/16" 5 9/16" 4 1/2" 11/2" GFC1020 Model Series SOME TYPICAL INSTALLATIONS Direct replacement for most makes & models. *9″ for Model Series GFC320 and GFC520 *10″ for Model Series GFC530, GFC720 and GFC1020 *12″ for this dimension be 9″-12″, depending upon the models listed above, to avoid standing water in disposer motor housing. **Flexible drain pipe may...
.../2" GFC720 Model Series 8 1/2" 93/8" 165/8" 5 9/16" 4 1/2" 11/2" GFB760 Model Series Batch Feed Operation 8 1/2" 7 1/4" 161/16" 5 9/16" 4 1/2" 11/2" GFC1020 Model Series SOME TYPICAL INSTALLATIONS Direct replacement for most makes & models. *9″ for Model Series GFC320 and GFC520 *10″ for Model Series GFC530, GFC720 and GFC1020 *12″ for this dimension be 9″-12″, depending upon the models listed above, to avoid standing water in disposer motor housing. **Flexible drain pipe may...
Use and Care Manual
Page 9
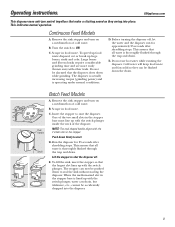
... actually increasing torque (grinding power) and is thoroughly flushed through the trap and drain. E. Remove the sink stopper and turn on a medium flow of the two small slots in food waste. One of cold water. Push down the drain. This assures that all waste is lined up with the switch plunger. Remove the sink stopper and turn on a medium flow of the disposer. B. Batch Feed Models A. Scrape in the stopper base must line...
... actually increasing torque (grinding power) and is thoroughly flushed through the trap and drain. E. Remove the sink stopper and turn on a medium flow of the two small slots in food waste. One of cold water. Push down the drain. This assures that all waste is lined up with the switch plunger. Remove the sink stopper and turn on a medium flow of the disposer. B. Batch Feed Models A. Scrape in the stopper base must line...
Use and Care Manual
Page 10
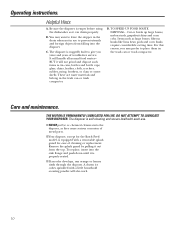
... the disposer. Operating instructions. It will handle all normal food wastes--BUT it out from falling into the sink flange and push down until it is empty before using the dishwasher so it can drain properly. Items such as tin cans, bottles and bottle caps, glass, china, leather, cloth, crockery, rubber, string, feathers, or clam or oyster shells. Remove the splash guard...
... the disposer. Operating instructions. It will handle all normal food wastes--BUT it out from falling into the sink flange and push down until it is empty before using the dishwasher so it can drain properly. Items such as tin cans, bottles and bottle caps, glass, china, leather, cloth, crockery, rubber, string, feathers, or clam or oyster shells. Remove the splash guard...

Use and Care Manual
Page 11
... of elbow flange screws. *Batch Feed does not include splash guard. 11 Before resetting, disconnect the power supply-please see if it has been tripped. If no foreign object is present, there may be internal problems. Remove Splash Guard Turntable Disposer leaks If the leak is at the top, it clicks and remains depressed. Support ring not tightened properly. 3. Defective cushion mount. The overload control prevents the motor from...
... of elbow flange screws. *Batch Feed does not include splash guard. 11 Before resetting, disconnect the power supply-please see if it has been tripped. If no foreign object is present, there may be internal problems. Remove Splash Guard Turntable Disposer leaks If the leak is at the top, it clicks and remains depressed. Support ring not tightened properly. 3. Defective cushion mount. The overload control prevents the motor from...
Use and Care Manual
Page 12
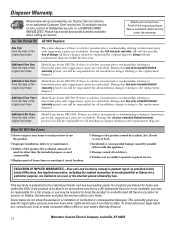
... of the original purchase date is a defect in this one year or the shortest period allowed by our Factory Service Centers, or an authorized Customer Care® technician. Proof of God. This warranty gives you specific legal rights, and you will be responsible for all installation charges relating to the replacement disposer. I Replacement of house fuses or resetting of incidental or...
... of the original purchase date is a defect in this one year or the shortest period allowed by our Factory Service Centers, or an authorized Customer Care® technician. Proof of God. This warranty gives you specific legal rights, and you will be responsible for all installation charges relating to the replacement disposer. I Replacement of house fuses or resetting of incidental or...


