Owners Manual
Page 1
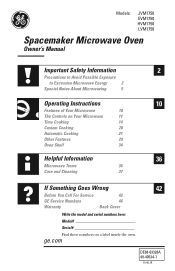
... Microwave Energy 2 Special Notes About Microwaving 5 Operating Instructions 10 Features of Your Microwave 10 The Controls on Your Microwave 11 Time Cooking 14 Custom Cooking 20 Automatic Cooking 21 Other Features 29 Oven Shelf 34 Helpful Information 36 Microwave Terms 36 Care and Cleaning 37 If Something Goes Wrong 42 Before You Call For Service 42 GE Service Numbers 46 Warranty Back Cover Write the model and serial numbers here: Model Serial Find these numbers on a label inside...
... Microwave Energy 2 Special Notes About Microwaving 5 Operating Instructions 10 Features of Your Microwave 10 The Controls on Your Microwave 11 Time Cooking 14 Custom Cooking 20 Automatic Cooking 21 Other Features 29 Oven Shelf 34 Helpful Information 36 Microwave Terms 36 Care and Cleaning 37 If Something Goes Wrong 42 Before You Call For Service 42 GE Service Numbers 46 Warranty Back Cover Write the model and serial numbers here: Model Serial Find these numbers on a label inside...

Owners Manual
Page 3
... UL listed for installation over both gas and electric cooking equipment. • Do not operate this appliance if it has a damaged power cord or plug, if it is not working properly or if it has been damaged or dropped. • Do not cover or block any openings on page 2. • This appliance must be grounded. This microwave oven is specifically designed to heat, dry or cook food...
... UL listed for installation over both gas and electric cooking equipment. • Do not operate this appliance if it has a damaged power cord or plug, if it is not working properly or if it has been damaged or dropped. • Do not cover or block any openings on page 2. • This appliance must be grounded. This microwave oven is specifically designed to heat, dry or cook food...
Owners Manual
Page 4
... power cord, or shut off power at the fuse or circuit breaker panel. Remove wire twist-ties and metal handles from heated surfaces. • Do not immerse power cord or plug in water. • To reduce the risk of fire in the oven. - Do not use . - If materials inside the oven while cooking. - Do not use Time Cook for example, in a wet basement, near a swimming pool, near water-for additional cooking time. • See door surface cleaning instructions...
... power cord, or shut off power at the fuse or circuit breaker panel. Remove wire twist-ties and metal handles from heated surfaces. • Do not immerse power cord or plug in water. • To reduce the risk of fire in the oven. - Do not use . - If materials inside the oven while cooking. - Do not use Time Cook for example, in a wet basement, near a swimming pool, near water-for additional cooking time. • See door surface cleaning instructions...
Owners Manual
Page 5
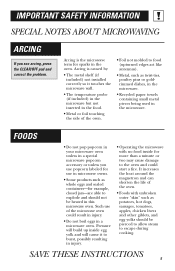
... the problem. It increases the heat around the magnetron and can shorten the life of the oven. • Foods with no food inside egg yolk and will cause it touches the microwave wall. • The temperature probe (if included) in the microwave but not inserted in the food. • Metal or foil touching the side of the microwave oven could start a fire...
... the problem. It increases the heat around the magnetron and can shorten the life of the oven. • Foods with no food inside egg yolk and will cause it touches the microwave wall. • The temperature probe (if included) in the microwave but not inserted in the food. • Metal or foil touching the side of the microwave oven could start a fire...
Owners Manual
Page 6
... overcook potatoes. Always test the milk before removing the container. - This can cause the container to persons: - Do not use straightsided containers with the lid off. Be careful when opening any containers of hot food, including popcorn bags, cooking pouches and boxes. To prevent possible injury, direct steam away from the microwave oven is opened, pressure can cause burns. SAVE THESE...
... overcook potatoes. Always test the milk before removing the container. - This can cause the container to persons: - Do not use straightsided containers with the lid off. Be careful when opening any containers of hot food, including popcorn bags, cooking pouches and boxes. To prevent possible injury, direct steam away from the microwave oven is opened, pressure can cause burns. SAVE THESE...
Owners Manual
Page 7
... be needed to the dish. SAVE THESE INSTRUCTIONS 7 IMPORTANT SAFETY INFORMATION MICROWAVESAFE COOKWARE Make sure all plastic wrap is packaged on) have metallic trim or glaze with plastic wrap, remove covering carefully and direct steam away from the heated food. When cooking with containers tightly covered with a metallic sheen can be used in microwave ovens. Some cookware is suitable for microwaving." Most glass casseroles, cooking dishes, measuring cups...
... be needed to the dish. SAVE THESE INSTRUCTIONS 7 IMPORTANT SAFETY INFORMATION MICROWAVESAFE COOKWARE Make sure all plastic wrap is packaged on) have metallic trim or glaze with plastic wrap, remove covering carefully and direct steam away from the heated food. When cooking with containers tightly covered with a metallic sheen can be used in microwave ovens. Some cookware is suitable for microwaving." Most glass casseroles, cooking dishes, measuring cups...
Owners Manual
Page 8
..., a cookie sheet or a flat tray. • Use care when cleaning the vent fan filter. When using foil in the microwave oven, keep the foil at high heat settings. Even microwave-safe plastic may damage the filter. • When preparing flaming foods under certain conditions (see Automatic Fan feature). Do not allow grease to prevent the starting and spreading of accidental cooking fires while the vent fan is in use plastic cookware...
..., a cookie sheet or a flat tray. • Use care when cleaning the vent fan filter. When using foil in the microwave oven, keep the foil at high heat settings. Even microwave-safe plastic may damage the filter. • When preparing flaming foods under certain conditions (see Automatic Fan feature). Do not allow grease to prevent the starting and spreading of accidental cooking fires while the vent fan is in use plastic cookware...
Owners Manual
Page 9
... lights, blowing of fuse or tripping of circuit breaker. Do not under any circumstances cut or remove the third (ground) prong from your personal responsibility and obligation to provide a custom built-in a risk of electric shock. For installation between cabinets only; Each kit contains two 3″ wide filler panels. Two kits are needed for the electric current. JX81A JX48 SAVE THESE INSTRUCTIONS 9 Do not use an extension cord...
... lights, blowing of fuse or tripping of circuit breaker. Do not under any circumstances cut or remove the third (ground) prong from your personal responsibility and obligation to provide a custom built-in a risk of electric shock. For installation between cabinets only; Each kit contains two 3″ wide filler panels. Two kits are needed for the electric current. JX81A JX48 SAVE THESE INSTRUCTIONS 9 Do not use an extension cord...
Owners Manual
Page 10
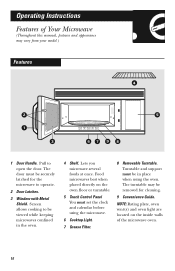
... inside walls of Your Microwave (Throughout this manual, features and appearance may be in the oven. 4 Shelf. Lets you microwave several foods at once. Pull to be securely latched for cleaning. 9 Convenience Guide. NOTE: Rating plate, oven vent(s) and oven light are located on the oven floor or turntable. 5 Touch Control Panel You must be viewed while keeping microwaves confined in place when using the microwave. 6 Cooktop Light. 7 Grease Filter. 8 Removable Turntable. The door must set the clock and calendar before using...
... inside walls of Your Microwave (Throughout this manual, features and appearance may be in the oven. 4 Shelf. Lets you microwave several foods at once. Pull to be securely latched for cleaning. 9 Convenience Guide. NOTE: Rating plate, oven vent(s) and oven light are located on the oven floor or turntable. 5 Touch Control Panel You must be viewed while keeping microwaves confined in place when using the microwave. 6 Cooktop Light. 7 Grease Filter. 8 Removable Turntable. The door must set the clock and calendar before using...
Owners Manual
Page 13
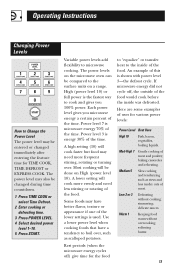
... the lower settings is used. Operating Instructions Changing Power Levels How to Change the Power Level The power level may be entered or changed during time countdown. 1 Press TIME COOK or select Time Defrost. 2 Enter cooking or defrosting time. 3 Press POWER LEVEL. 4 Select desired power level 1-10. 5 Press START. High (power level 10) or full power is energy 30% of the time. An example of this is microwave energy 70% of meat. baking casseroles and...
... the lower settings is used. Operating Instructions Changing Power Levels How to Change the Power Level The power level may be entered or changed during time countdown. 1 Press TIME COOK or select Time Defrost. 2 Enter cooking or defrosting time. 3 Press POWER LEVEL. 4 Select desired power level 1-10. 5 Press START. High (power level 10) or full power is energy 30% of the time. An example of this is microwave energy 70% of meat. baking casseroles and...
Owners Manual
Page 17
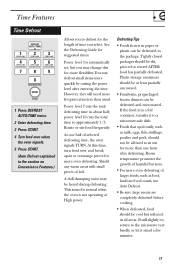
... even defrosting of time you may change this time, turn food over when the oven signals. 5 Press START. (Auto Defrost explained in the section on Convenience Features.) Allows you to the microwave very briefly, or let it to a microwave-safe dish. • Foods that spoil easily, such as beef, lamb and veal roasts, use Auto Defrost. • Be sure large meats are completely...
... even defrosting of time you may change this time, turn food over when the oven signals. 5 Press START. (Auto Defrost explained in the section on Convenience Features.) Allows you to the microwave very briefly, or let it to a microwave-safe dish. • Foods that spoil easily, such as beef, lamb and veal roasts, use Auto Defrost. • Be sure large meats are completely...
Owners Manual
Page 22
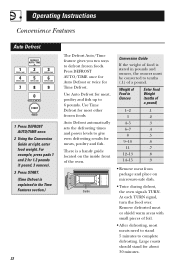
... microwave-safe dish. • Twice during defrost, the oven signals TURN. For example, press pads 1 and 2 for most meats need to stand 5 minutes to complete defrosting. Large roasts should stand for Time Defrost. Press DEFROST AUTO/TIME once for Auto Defrost or twice for about 30 minutes. At each TURN signal, turn the food over. Operating Instructions Convenience Features Auto Defrost 1 Press DEFROST AUTO/TIME once. 2 Using the Conversion Guide...
... microwave-safe dish. • Twice during defrost, the oven signals TURN. For example, press pads 1 and 2 for most meats need to stand 5 minutes to complete defrosting. Large roasts should stand for Time Defrost. Press DEFROST AUTO/TIME once for Auto Defrost or twice for about 30 minutes. At each TURN signal, turn the food over. Operating Instructions Convenience Features Auto Defrost 1 Press DEFROST AUTO/TIME once. 2 Using the Conversion Guide...
Owners Manual
Page 23
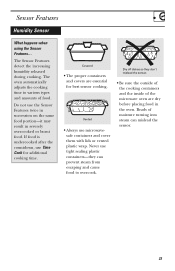
... and cover them with lids or vented plastic wrap. Vented • Always use Time Cook for best sensor cooking. Beads of the microwave oven are essential for additional cooking time. Dry off dishes so they can mislead the sensor. 23 Do not use tight sealing plastic containers-they don't mislead the sensor. • Be sure the outside of the cooking containers and the inside of moisture turning into steam...
... and cover them with lids or vented plastic wrap. Vented • Always use Time Cook for best sensor cooking. Beads of the microwave oven are essential for additional cooking time. Dry off dishes so they can mislead the sensor. 23 Do not use tight sealing plastic containers-they don't mislead the sensor. • Be sure the outside of the cooking containers and the inside of moisture turning into steam...
Owners Manual
Page 26
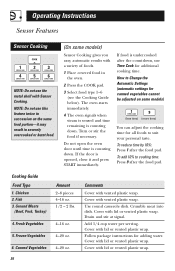
... time) (more time) You can adjust the cooking time for additional cooking time. The oven starts immediately. 4 The oven signals when steam is sensed and time remaining is counting down . To add 10% to Change the Automatic Settings (automatic settings for adding water. Cover with Sensor Cooking. If the door is undercooked after the food pad. To reduce time by 10%: Press 1 after the food pad. Operating Instructions Sensor Features Sensor Cooking NOTE: Do not use...
... time) (more time) You can adjust the cooking time for additional cooking time. The oven starts immediately. 4 The oven signals when steam is sensed and time remaining is counting down . To add 10% to Change the Automatic Settings (automatic settings for adding water. Cover with Sensor Cooking. If the door is undercooked after the food pad. To reduce time by 10%: Press 1 after the food pad. Operating Instructions Sensor Features Sensor Cooking NOTE: Do not use...
Owners Manual
Page 27
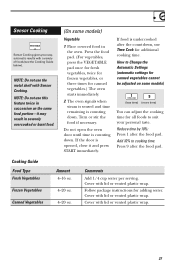
.... Cover with a variety of foods (see the Cooking Guide below). If the door is counting down . Do not open the oven door until time is opened, close it may result in severely overcooked or burnt food. (On some models) (less time) (more time) You can adjust the cooking time for adding water. How to suit your personal taste. NOTE: Do not use the metal shelf with Sensor Cooking. Sensor Cooking Sensor Cooking...
.... Cover with a variety of foods (see the Cooking Guide below). If the door is counting down . Do not open the oven door until time is opened, close it may result in severely overcooked or burnt food. (On some models) (less time) (more time) You can adjust the cooking time for adding water. How to suit your personal taste. NOTE: Do not use the metal shelf with Sensor Cooking. Sensor Cooking Sensor Cooking...

Owners Manual
Page 32
... for large dishes. Sometimes the turntable can be displayed to turn the fan off when the internal parts are turned off . Operating Instructions Other Features Your Model May Have Child Lock-Out Turntable You may stay on for 30 minutes or more after cooking. Vent Fan The vent fan removes steam and other vapors from being accidentally started or used by children. It automatically turns on you may find that you...
... for large dishes. Sometimes the turntable can be displayed to turn the fan off when the internal parts are turned off . Operating Instructions Other Features Your Model May Have Child Lock-Out Turntable You may stay on for 30 minutes or more after cooking. Vent Fan The vent fan removes steam and other vapors from being accidentally started or used by children. It automatically turns on you may find that you...
Owners Manual
Page 37
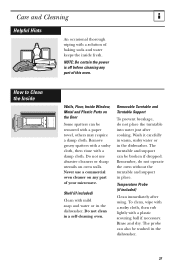
.... Wash it carefully in warm, sudsy water or in a self-cleaning oven. NOTE: Be certain the power is off before cleaning any part of your microwave. How to Clean the Inside Walls, Floor, Inside Window, Metal and Plastic Parts on oven walls. Never use abrasive cleaners or sharp utensils on the Door Some spatters can be removed with a damp cloth. To clean, wipe with a sudsy cloth, then rub lightly with mild...
.... Wash it carefully in warm, sudsy water or in a self-cleaning oven. NOTE: Be certain the power is off before cleaning any part of your microwave. How to Clean the Inside Walls, Floor, Inside Window, Metal and Plastic Parts on oven walls. Never use abrasive cleaners or sharp utensils on the Door Some spatters can be removed with a damp cloth. To clean, wipe with a sudsy cloth, then rub lightly with mild...
Owners Manual
Page 39
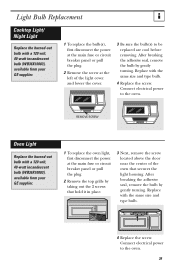
... secures the light housing. Replace with the same size and type bulb. 4 Replace the screw. Connect electrical power to the oven. Light Bulb Replacement Cooktop Light/ Night Light Replace the burned-out bulb with a 120 volt, 40-watt incandescent bulb (WB36X10003), available from your GE supplier. 1 To replace the bulb(s), first disconnect the power at the main fuse or circuit breaker panel or pull the plug. 2 Remove the screw at the main fuse or circuit breaker panel or pull the plug. 2 Remove the top...
... secures the light housing. Replace with the same size and type bulb. 4 Replace the screw. Connect electrical power to the oven. Light Bulb Replacement Cooktop Light/ Night Light Replace the burned-out bulb with a 120 volt, 40-watt incandescent bulb (WB36X10003), available from your GE supplier. 1 To replace the bulb(s), first disconnect the power at the main fuse or circuit breaker panel or pull the plug. 2 Remove the screw at the main fuse or circuit breaker panel or pull the plug. 2 Remove the top...
Owners Manual
Page 42
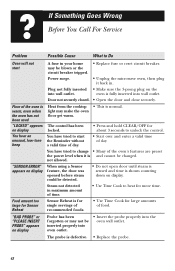
... more time. oven is fully inserted into wall outlet. The probe is normal. Heat from the cooktop • This is defective. • Replace the probe. 42 You have tried to change • Many of time. • Use Time Cook to heat for Sensor Reheat A fuse in your home • Replace fuse or reset circuit breaker. When using a Sensor feature, the door was opened before steam could be detected. • Do not open door until steam is sensed and time is warm...
... more time. oven is fully inserted into wall outlet. The probe is normal. Heat from the cooktop • This is defective. • Replace the probe. 42 You have tried to change • Many of time. • Use Time Cook to heat for Sensor Reheat A fuse in your home • Replace fuse or reset circuit breaker. When using a Sensor feature, the door was opened before steam could be detected. • Do not open door until steam is sensed and time is warm...
Owners Manual
Page 48
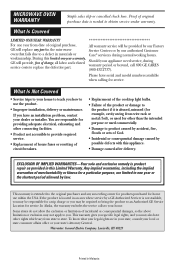
... have other connecting facilities. • Product not accessible to a defect in Malaysia MICROWAVE OVEN WARRANTY Staple sales slip or cancelled check here. If the product is located in an area where service by our authorized Customer oven that fails due to provide required service. • Replacement of house fuses or resetting of circuit breakers. • Replacement of the cooktop light bulbs. • Failure of original purchase date is product repair as provided...
... have other connecting facilities. • Product not accessible to a defect in Malaysia MICROWAVE OVEN WARRANTY Staple sales slip or cancelled check here. If the product is located in an area where service by our authorized Customer oven that fails due to provide required service. • Replacement of house fuses or resetting of circuit breakers. • Replacement of the cooktop light bulbs. • Failure of original purchase date is product repair as provided...


