
Owners Manual
Page 1
Back Cover Warranty 15 Owner's Manual Write the model and serial numbers here: Model Serial You can find them on a label on the front of the dryer behind the door. 175D1807P596 49-90328 04-07 JR Dryers ge.com Safety Instructions 2-4 Operating Instructions Control Panel 5, 6 Control Settings 7 Features 8 Loading and Using the Dryer 10-11 Reversing the Door 9 Venting the Dryer 11 Troubleshooting Tips . . . 12, 13 Consumer Support Consumer Support . . . . .
Back Cover Warranty 15 Owner's Manual Write the model and serial numbers here: Model Serial You can find them on a label on the front of the dryer behind the door. 175D1807P596 49-90328 04-07 JR Dryers ge.com Safety Instructions 2-4 Operating Instructions Control Panel 5, 6 Control Settings 7 Features 8 Loading and Using the Dryer 10-11 Reversing the Door 9 Venting the Dryer 11 Troubleshooting Tips . . . 12, 13 Consumer Support Consumer Support . . . . .

Owners Manual
Page 2
... gas supplier's instructions carefully. 2 Do not touch any gas or electrical appliance. 4 Immediately call the fire department. 3 Clear the room, building or area of all occupants. Exhaust/Ducting 1 Gas dryers MUST be properly installed and located in Installation Instructions. For your gas supplier from a neighbor's phone. I Connect to a properly rated, protected and sized power supply circuit to conform with the Installation Instructions before it will minimize incomplete combustion. IMPORTANT SAFETY INFORMATION. I Remove...
... gas supplier's instructions carefully. 2 Do not touch any gas or electrical appliance. 4 Immediately call the fire department. 3 Clear the room, building or area of all occupants. Exhaust/Ducting 1 Gas dryers MUST be properly installed and located in Installation Instructions. For your gas supplier from a neighbor's phone. I Connect to a properly rated, protected and sized power supply circuit to conform with the Installation Instructions before it will minimize incomplete combustion. IMPORTANT SAFETY INFORMATION. I Remove...

Owners Manual
Page 3
... NOT disconnect the appliance from the power supply or disconnect the dryer at the household distribution panel by or near the dryer until the drum has completely stopped. NOTE: Turning the Cycle Selector knob to catch fire. I Never reach into the dryer while the drum is used in a locked cabinet. DO NOT OPERATE THE DRYER WITHOUT THE LINT FILTER IN PLACE. that may be placed...
... NOT disconnect the appliance from the power supply or disconnect the dryer at the household distribution panel by or near the dryer until the drum has completely stopped. NOTE: Turning the Cycle Selector knob to catch fire. I Never reach into the dryer while the drum is used in a locked cabinet. DO NOT OPERATE THE DRYER WITHOUT THE LINT FILTER IN PLACE. that may be placed...

Owners Manual
Page 4
... to repair or replace any part of those products, or try a dryer-added product for those products and are not covered under the warranty to operate this Owner's Manual or in published user-repair instructions that their product can be stepped on the package that you use of these products are the responsibility of the manufacturers of this appliance or attempt any servicing unless specifically...
... to repair or replace any part of those products, or try a dryer-added product for those products and are not covered under the warranty to operate this Owner's Manual or in published user-repair instructions that their product can be stepped on the package that you use of these products are the responsibility of the manufacturers of this appliance or attempt any servicing unless specifically...

Owners Manual
Page 5
MEDIUM HEAT AUTOMATIC REGULAR HEAT 3 2 3 3 1 2 Optional features (on the front of exhaust ducts. 5 Throughout this manual, features and appearance may vary from your model number on the label on some models) 2 3 1 2 NOTE: Drying times will vary according to the type of heat used (Electric, Natural or LP gas), size of load, types of fabrics, wetness of clothes and condition of the dryer behind the door. About the dryer control panel. ge.com You can locate your model.
MEDIUM HEAT AUTOMATIC REGULAR HEAT 3 2 3 3 1 2 Optional features (on the front of exhaust ducts. 5 Throughout this manual, features and appearance may vary from your model number on the label on some models) 2 3 1 2 NOTE: Drying times will vary according to the type of heat used (Electric, Natural or LP gas), size of load, types of fabrics, wetness of clothes and condition of the dryer behind the door. About the dryer control panel. ge.com You can locate your model.

Owners Manual
Page 7
... Instructions Operating Instructions About the control settings. QUICK FLUFF For freshening or fluffing up already dry clothing, fabrics, linens and pillows. Example: Drying a load of no heat tumbling. 3 Start-Close the dryer door. HEAT, EASY CARE or PERMA PRESS MED. LOW HEAT FLUFF For fluffing items without heat. Timed cycles run for this load it would be the EASY CARE AUTOMATIC. Select START. TIMED DRY Set the Cycle Selector at the end of the drying cycle. DEWRINKLE For removing wrinkles from...
... Instructions Operating Instructions About the control settings. QUICK FLUFF For freshening or fluffing up already dry clothing, fabrics, linens and pillows. Example: Drying a load of no heat tumbling. 3 Start-Close the dryer door. HEAT, EASY CARE or PERMA PRESS MED. LOW HEAT FLUFF For fluffing items without heat. Timed cycles run for this load it would be the EASY CARE AUTOMATIC. Select START. TIMED DRY Set the Cycle Selector at the end of the drying cycle. DEWRINKLE For removing wrinkles from...

Owners Manual
Page 8
... the dryer drum should be used with the TIMED CYCLE. Cycle Signal Option (on some models) This signal will sound just before the end of the drying time and will sound at the end of the drying time and several times during the WRINKLE CARE cycle. I Remove garments promptly at the household distribution panel by removing the fuse or switching off the circuit breaker. These fabrics should be used to remove the clothes. Reach above dryer opening...
... the dryer drum should be used with the TIMED CYCLE. Cycle Signal Option (on some models) This signal will sound just before the end of the drying time and will sound at the end of the drying time and several times during the WRINKLE CARE cycle. I Remove garments promptly at the household distribution panel by removing the fuse or switching off the circuit breaker. These fabrics should be used to remove the clothes. Reach above dryer opening...

Owners Manual
Page 10
... not wildlife (birds, insects, etc.) nesting inside the duct or hood. Always follow the fabric manufacturer's care label when laundering. This wastes energy and causes wrinkling. The Lint Filter: Clean the lint filter before each use a damp cloth with the hose attachment and reconnect the duct. Remove the cleaner residue, and then dry with a clean cloth. A partially clogged exhaust can lengthen the drying time. Do not overload. Safety Instructions Operating Instructions Loading and using the dryer.
... not wildlife (birds, insects, etc.) nesting inside the duct or hood. Always follow the fabric manufacturer's care label when laundering. This wastes energy and causes wrinkling. The Lint Filter: Clean the lint filter before each use a damp cloth with the hose attachment and reconnect the duct. Remove the cleaner residue, and then dry with a clean cloth. A partially clogged exhaust can lengthen the drying time. Do not overload. Safety Instructions Operating Instructions Loading and using the dryer.

Owners Manual
Page 11
... Instructions Operating Instructions ge.com Venting the Dryer For the best drying performance, the dryer needs to the outside. I Use only rigid metal 4″ diameter ductwork inside the dryer cabinet. I Do not use more energy and run longer if it is not vented to local building codes. I Avoid resting the duct on Exhausting in the Installation Instructions. Correct Venting Incorrect Venting 11 Troubleshooting Tips Consumer Support I Use the shortest length possible. I Venting must conform to the below specifications. Use...
... Instructions Operating Instructions ge.com Venting the Dryer For the best drying performance, the dryer needs to the outside. I Use only rigid metal 4″ diameter ductwork inside the dryer cabinet. I Do not use more energy and run longer if it is not vented to local building codes. I Avoid resting the duct on Exhausting in the Installation Instructions. Correct Venting Incorrect Venting 11 Troubleshooting Tips Consumer Support I Use the shortest length possible. I Venting must conform to the below specifications. Use...

Owners Manual
Page 12
... all GE Dryers when used in accordance with the manufacturer's instructions. • Try a fabric softener. • Adjust setting to the type of heat used Overdrying Synthetics, permanent press and blends can cause static • Try a fabric softener. • Bounce® Fabric Conditioner Dryer Sheets have been approved for use 2 fuses/breakers. Problem Dryer doesn't start Dryer doesn't heat Dryer shakes or makes noise Greasy spots on clothes Lint on clothes Static occurs Inconsistent drying times...
... all GE Dryers when used in accordance with the manufacturer's instructions. • Try a fabric softener. • Adjust setting to the type of heat used Overdrying Synthetics, permanent press and blends can cause static • Try a fabric softener. • Bounce® Fabric Conditioner Dryer Sheets have been approved for use 2 fuses/breakers. Problem Dryer doesn't start Dryer doesn't heat Dryer shakes or makes noise Greasy spots on clothes Lint on clothes Static occurs Inconsistent drying times...

Owners Manual
Page 13
...) Controls improperly set Lint filter is full Improper or obstructed ducting Blown fuses or tripped circuit breaker Overloading/combining loads Underloading What To Do • Separate heavy items from lightweight items (generally, a well-sorted washer load is correct. • Replace fuses or reset circuit breakers. Select a LESS DRY or DAMP DRY setting. • Remove items when cycle ends and fold or hang immediately. • Separate large loads into smaller loads to speed drying time. • Match control settings...
...) Controls improperly set Lint filter is full Improper or obstructed ducting Blown fuses or tripped circuit breaker Overloading/combining loads Underloading What To Do • Separate heavy items from lightweight items (generally, a well-sorted washer load is correct. • Replace fuses or reset circuit breakers. Select a LESS DRY or DAMP DRY setting. • Remove items when cycle ends and fold or hang immediately. • Separate large loads into smaller loads to speed drying time. • Match control settings...

Owners Manual
Page 15
... warranty is abused, misused, or used for service. This warranty gives you specific legal rights, and you may be responsible for a particular purpose, are limited to one -year warranty, GE will also provide, free of circuit breakers. Safety Instructions Operating Instructions GE Dryer Warranty. For The Period Of: GE Will Replace: One Year From the date of the original purchase Any part of shipping or service calls to a defect in the Owner's Manual...
... warranty is abused, misused, or used for service. This warranty gives you specific legal rights, and you may be responsible for a particular purpose, are limited to one -year warranty, GE will also provide, free of circuit breakers. Safety Instructions Operating Instructions GE Dryer Warranty. For The Period Of: GE Will Replace: One Year From the date of the original purchase Any part of shipping or service calls to a defect in the Owner's Manual...
Owners Manual
Page 16
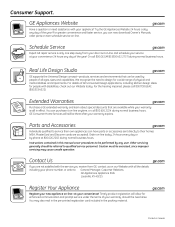
... business hours. Parts and Accessories ge.com Individuals qualified to service their own appliances can now download Owner's Manuals, order parts or even schedule service on -line and schedule your service at your warranty expires. Instructions contained in the packing material. Contact Us If you are not satisfied with disabilities, check out our Website today. Real Life Design Studio ge.com GE supports the Universal Design...
... business hours. Parts and Accessories ge.com Individuals qualified to service their own appliances can now download Owner's Manuals, order parts or even schedule service on -line and schedule your service at your warranty expires. Instructions contained in the packing material. Contact Us If you are not satisfied with disabilities, check out our Website today. Real Life Design Studio ge.com GE supports the Universal Design...
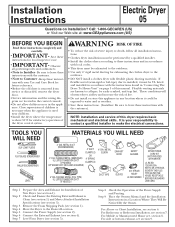
Installation Instructions
Page 1
... service or discarded, remove the dryer door. • Service information and the wiring diagram are known to Installer - It is your Use and Care Book for future reference. • Before the old dryer is above 50°F for Installation of the dryer control system. METAL ELBOW 4" DIA. Connect the External Exhaust (see section 9. IDENTIFY THE PLUG TYPE AS PER THE HOUSE RECEPTACLE BEFORE PURCHASING LINE CORD. Place the Owners Manual and the Installation Instructions...
... service or discarded, remove the dryer door. • Service information and the wiring diagram are known to Installer - It is your Use and Care Book for future reference. • Before the old dryer is above 50°F for Installation of the dryer control system. METAL ELBOW 4" DIA. Connect the External Exhaust (see section 9. IDENTIFY THE PLUG TYPE AS PER THE HOUSE RECEPTACLE BEFORE PURCHASING LINE CORD. Place the Owners Manual and the Installation Instructions...
Installation Instructions
Page 2
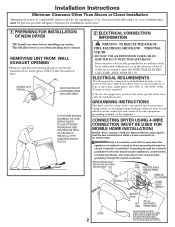
... LOOP OR SPADE TERMINALS WITH UPTURNED ENDS (NOT SUPPLIED). This will allow better access when installing dryer exhaust. If the electric supply does not meet the above specifications, then call a licensed electrician. REMOVING LINT FROM WALL EXHAUST OPENING • Remove and discard existing plastic or metal foil transition duct and replace with the circuit conductors and connected to a grounded metal, permanent wiring system, or...
... LOOP OR SPADE TERMINALS WITH UPTURNED ENDS (NOT SUPPLIED). This will allow better access when installing dryer exhaust. If the electric supply does not meet the above specifications, then call a licensed electrician. REMOVING LINT FROM WALL EXHAUST OPENING • Remove and discard existing plastic or metal foil transition duct and replace with the circuit conductors and connected to a grounded metal, permanent wiring system, or...
Installation Instructions
Page 3
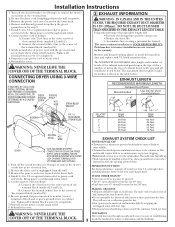
... THE TERMINAL BLOCK. Problems due to avoid leaks. Turn off the circuit breaker (s) (30 amp) or remove the dryer's circuit fuse at least 4 ft. Properly secure power cord to power cord entry hole. Reinstall the cover. of the terminal block (marked L1 and L2). TURNS OTHER THAN 90º • One turn and exhaust hood. B. The MAXIMUM ALLOWABLE duct length and number of bends of the exhaust system depends upon the type of duct, number of turns, the type...
... THE TERMINAL BLOCK. Problems due to avoid leaks. Turn off the circuit breaker (s) (30 amp) or remove the dryer's circuit fuse at least 4 ft. Properly secure power cord to power cord entry hole. Reinstall the cover. of the terminal block (marked L1 and L2). TURNS OTHER THAN 90º • One turn and exhaust hood. B. The MAXIMUM ALLOWABLE duct length and number of bends of the exhaust system depends upon the type of duct, number of turns, the type...

Installation Instructions
Page 4
... or exhausted air. • Provide an access for the home exhaust duct. • Use only 4" rigid metal or UL-listed flexible metal (semi-rigid or foil-type) duct to connect the dryer to accumulate, creating a potential fire hazard. • Do not assemble ductwork with the instructions found in "Connecting The Dryer To House Vent" on page 5 of this manual. • Do not terminate exhaust in a chimney, a wall, a ceiling, gas vent, crawl...
... or exhausted air. • Provide an access for the home exhaust duct. • Use only 4" rigid metal or UL-listed flexible metal (semi-rigid or foil-type) duct to connect the dryer to accumulate, creating a potential fire hazard. • Do not assemble ductwork with the instructions found in "Connecting The Dryer To House Vent" on page 5 of this manual. • Do not terminate exhaust in a chimney, a wall, a ceiling, gas vent, crawl...

Installation Instructions
Page 5
... exhaust pipe. A UL-listed flexible metal (foil-type)duct may be vented to the exhaust pipe with the other surfaces is: 0 in walls, ceilings, floors or other enclosed spaces. • Total length of crushing and kinking. Slide one end of open area equally distributed. Installation Instructions, Indoor Exhausting CONNECTING THE DRYER TO HOUSE VENT RIGID METAL TRANSITION DUCT • For best drying performance, a rigid metal transition duct...
... exhaust pipe. A UL-listed flexible metal (foil-type)duct may be vented to the exhaust pipe with the other surfaces is: 0 in walls, ceilings, floors or other enclosed spaces. • Total length of crushing and kinking. Slide one end of open area equally distributed. Installation Instructions, Indoor Exhausting CONNECTING THE DRYER TO HOUSE VENT RIGID METAL TRANSITION DUCT • For best drying performance, a rigid metal transition duct...

Installation Instructions
Page 6
... the tab to pull or damage the electrical wires inside the dryer exhaust duct and save. REMOVE DESIRED KNOCKOUT (ONE ONLY). Remove the screw inside the dryer when inserting the duct. BE SURE TO WEAR GLOVES ADDING NEW DUCT FIXING HOLE PORTION "A" REMOVE SCREW AND SAVE. TAB LOCATION RIGHT OR LEFT SIDE EXHAUST Reconnect the cut portion (A) of the dryer. Use the screw saved previously to the...
... the tab to pull or damage the electrical wires inside the dryer exhaust duct and save. REMOVE DESIRED KNOCKOUT (ONE ONLY). Remove the screw inside the dryer when inserting the duct. BE SURE TO WEAR GLOVES ADDING NEW DUCT FIXING HOLE PORTION "A" REMOVE SCREW AND SAVE. TAB LOCATION RIGHT OR LEFT SIDE EXHAUST Reconnect the cut portion (A) of the dryer. Use the screw saved previously to the...

Installation Instructions
Page 7
... numbers for each hinge. WIRING ERRORS CAN CAUSE IMPROPER AND DANGEROUS OPERATION AFTER SERVICING/INST ALLATION. Installation Instructions ADDING ELBOW FOR EXHAUST THROUGH BOTTOM OF CABINET • Insert the elbow through the rear opening and connect it UP and OUT. 3. ADDING COVER PLATE TO REAR OF CABINET (SIDES AND BOTTOM EXHAUST) 10 CHANGING DIRECTION OF DOOR OPENING 1. Open the door and remove the filler plugs opposite the hinges. Apply firm pressure to Owner's Manual...
... numbers for each hinge. WIRING ERRORS CAN CAUSE IMPROPER AND DANGEROUS OPERATION AFTER SERVICING/INST ALLATION. Installation Instructions ADDING ELBOW FOR EXHAUST THROUGH BOTTOM OF CABINET • Insert the elbow through the rear opening and connect it UP and OUT. 3. ADDING COVER PLATE TO REAR OF CABINET (SIDES AND BOTTOM EXHAUST) 10 CHANGING DIRECTION OF DOOR OPENING 1. Open the door and remove the filler plugs opposite the hinges. Apply firm pressure to Owner's Manual...


